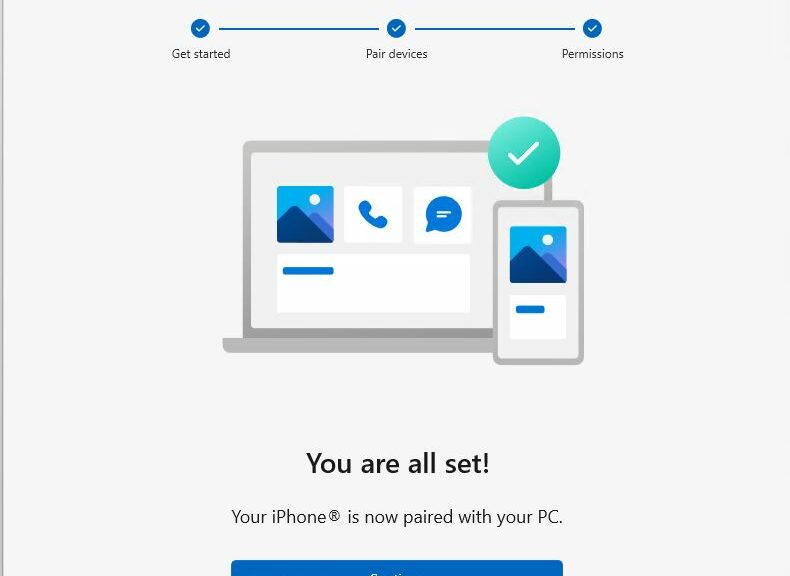
All posts by Ed Tittel

Full-time freelance writer, researcher and occasional expert witness, I specialize in Windows operating systems, information security, markup languages, and Web development tools and environments. I blog for numerous Websites, still write (or revise) the occasional book, and write lots of articles, white papers, tech briefs, and so forth.

New Device May Require Second Reboot

In installing the Kioxia (Toshiba) M.2 SSD late last week, I was reminded of something interesting. Hence this article title: new device may require second reboot. In my rush to set up and learn more about the drive, I was initially surprised to find it absent when I first ran Disk Management (diskmgmt.msc) to get that process going. Then it hit me: maybe it’s not showing up in UEFI.

But to access UEFI, another reboot was required. And by the time i did that, sure enough the device appeared in the list of drives present in the 7080. However, I had to reboot a second time to see the UEFi/BIOS settings and that produced the results I was after.

Why New Device May Require Second Reboot

Sure enough, when I rebooted a third time to get into Windows, the drive appeared in the Disk Management utility. I was able to choose GPT disk layout, and to format the drive as a single contiguous volume named Tosh1TB. It shows up as “Disk 1” in the lead-in graphic for this story, in fact.

What sometimes makes a second boot necessary is the way that UEFI/BIOS supports device enumeration. On many laptops, certain changes to the hardware — especially RAM changes — automatically trigger a trip into the BIOS interface upon the next reboot. This gives admins a chance to make and review config changes before booting back into the OS.

Adding the Kioxia (Toshiba) 1 TB SSD didn’t trigger the UEFI on its own. But when I rebooted and forced a trip into that environment, the Toshiba device (identified as such in BIOS, not as Kioxia) appeared along with the primary SSD. The second trip was enough to see the device recognized in BIOS/UEFI. In turn this made it accessible to Windows when I returned to that environment. That’s how I was able to choose GPT layout, format the drive, and give it the name that appears in the screenshot above. Case closed!

Don’t Panic: Boot Again

If you find yourself in similar straits sometime, try another reboot (or two, actually). That will probably get the device recognized and make it available to Windows. Only if this fails should further troubleshooting be needed.  In that case, I’d start looking into possible SATA lane conflicts next.

Facebooklinkedin
Facebooklinkedin

So Long Adobe Add-ons Shockwave & Air

At the end of last year, the Adobe Flash Player hit end of life (EOL). Yet today, when I ran the excellent free Patch My PC Updater on one of my test machines, I noted that Adobe Air was still present, plus Shockwave. too. My thought was; “Time to say so long Adobe add-ons Shockwave & Air!” Upon checking into both, my presumption proved valid. When I checked for Adobe elements on my 2012 Vintage X220 Tablet, I found serveral related elements, all of which I’m removing post-haste (see lead-in graphic).

Why say: “So long Adobe Add-ons Shockwave & Air?”

Both Shockwave and Air are at End-of-Life, at least as far as Adobe is concerned. HARMAN International has taken over Adobe Air support. But I hardly ever use this, so I’ve decided to uninstall on PCs where it’s still present. Not surprisingly it’s absent on all of my PCs acquired in 2018 or later, including 2xLenovo X1 Yoga 380, X1 Yoga 390, and X1 Extreme, among others. The free version of Revo Uninstaller is more than equal to this task. That’s why I used it to generate the lead-in screencap for this story, and to remove Air and Shockwave from machines where they’re still hanging ’round.

For the record, uninstalling Air left 2 registry keys and one value behind, as well as 3 files. Revo happily cleaned those up. Shockwave left 1 key with 13 values and no files behind, and took care of two entries (the one I selected, plus another) on its own.

More Info on Air & Shockwave

Read more about the future and status of these Adobe components online. Check out “The future of Adobe AIR” (5/30/2019) and “End of life/…Shockwave Player” (April 9, 2019). Going, going gone, and (hopefully) soon forgotten. Don’t need ’em or want ’em anymore. Sayonara!


Facebooklinkedin
Facebooklinkedin

Tiny 1TB SSD Toshiba Technology Triumph

Yeah, I know. They’re not called Toshiba anymore. it’s now Kioxia, but Toshiba’s the name on the stick-on label. It’s stuck on a teeny tiny 2230 M.2 SSD I just installed in my Dell Optiplex 7080 Micro SFF PC. And in this case 2230 means it’s a package that measures 22 mm wide and 30 mm tall. It’s not much bigger than an SD card. It’s also reasonably fast and amazingly compact. That’s why I call it a tiny 1TB SSD Toshiba technology triumph.

What Makes for a Tiny 1TB SSD Toshiba Technology Triumph?

It just blows my mind that one can buy a 1TB SSD that’s so darn small. It uses the PCIe Gen3 x4 NVMe 1.3b interface, so it also runs surprisingly fast. The specs page says it runs up to 2.3 GB/sec. I observed speeds of just over 2.0 GB/sec on CrystalDiskMark in the Dell 7080 Micro.

I confess I had to go to eBay to buy this device. In fact, they’re not currently for sale directly to end-users through conventional online outlets. That said, I paid under US$200 for the unit, which I consider an amazing deal given how much demand there is right now for such compact, capacious storage devices.

Seems Rock-Solid, But We’ll See

Having just received it in yesterday’s mail and installed it today, I can’t claim much experience with this unit just yet. Recalling issues with the Sabrent 2242 unit I tried out earlier, I’m reserving judgement. But I am stunned. It’s so small!

I’ve haven’t been this excited about miniaturization since I visited Madurodam in the Hague back in 1964 as a Boy Scout. There was a lot more to see there and then, but this little SSD definitely rocks the storage in today’s world. Stay tuned for more info, stats, and such as I get to know this little powerhouse better with time.

Interestingly, Dell doesn’t provide a hold-down screwport on the 7080 motherboard. I had to tape the drive down with some electrical tape to hold it in position. I have a nut I can superglue to the mobo at some future point instead. I’m still pondering that, as I get to know this device better. Stay tuned for more deets next week!

Facebooklinkedin
Facebooklinkedin

Using Microsoft Safety Scanner MSERT.exe

With each Patch Tuesday, MS releases a new version of the Malicious Software Removal Tool (MSRT). Just yesterday, I learned about a similar but different tool named Microsoft Safety Scanner (MSERT.exe). At first, I did a double-take to make sure it wasn’t a typo. It’s not, as the Safety Scanner Docs page attests. (Here are live links to the 32-bit and 64-bit downloads mentioned in the lead-in graphic.) Here, I’ll explore what’s involved in using Microsoft Safety Scanner, aka MSERT.exe.

Explanation Precedes Using Microsoft Safety Scanner

MS explains the tool thusly “a scan tool designed to find and remove malware from Windows computers.”  It goes on to says “Simply download it and run a scan to find malware and try to reverse changes made by identified threats.” Like the MSRT, the MS Safety Scanner gets updates and new signatures all the time, so MS recommends that you always download a fresh copy any time you’d like to use it. They also observe that it’s only worth using for 10 days, after which one MUST download a new version.

Here’s how MS describes the MSRT on its download page:

Windows Malicious Software Removal Tool (MSRT) helps keep Windows computers free from prevalent malware. MSRT finds and removes threats and reverses the changes made by these threats. MSRT is generally released monthly as part of Windows Update or as a standalone tool available here for download.

I’ll be darned if I can tell much difference between them. Nor do I see much distinction in third-party coverage. That said, Explorer sees big differences in size between the two, to wit:

Using Microsoft Safety Scanner.sizesNotice that MSERT.exe shows up as itself, while MSRT shows up as KB890830, version 5.87. Because MSRT is released monthly through WU, it apparently keeps the same KB number, but gets a new version number with each release. MSERT is not so readily obliging but does show that information on its Properties/Details page. That’s where I learned that MSERT stands for “Microsoft Support Emergency Response Tool.”

Using Microsoft Safety Scanner.details

Full name plus file version info readily available here.
[Click image for full-sized view.]

Let’s just say this is another tool from MS you can run at your own discretion to check a Windows PC for malware, and attempt cleanup. All this makes me curious to understand why we have access to not one, but two, such tools. Even the best of third-party explanations/explorations tend to be a bit shaky, like this Tom’s Hardware Forums item. Even my home forums community at TenForums is pretty much mum on differences, to my consternation and regret.

Using Microsoft Safety Scanner

The .exe file is portable and runs from anywhere (including the Downloads folder). The Docs don’t say one should run the program as administrator, but I did so anyway. It presents a EULA to which you must agree before it does its thing. Next you get a welcome/disclosure screen:

Click Next, and you get your choice of scan types (quick, full, or customized).

Then, it scans your “most likely compromised” files under quick scan.

On my production PC, the whole process took about 3:00 and produced the following results.

Nothing to see here folks, please move along. A clean bill of health, in other words.

Upon completion,  the log file (named msert.log) shows nothing informative about cleanup or actions taken (probably because it found nothing to clean up). Here’s a NotePad++ view of its contents (click to view full-sized, as it’s a little hard to read in native WordPress resolution):

I’m still not sure if you and I really need this tool or not, but it’s nice to know it’s available on demand should you wish to make a malware scan and clean-up pass over your Windows PC. The whole thing still has me wondering…


Facebooklinkedin
Facebooklinkedin

Further Windows Explorer Restart Follies

First: an admission. I occasionally have problems with losing access to the Start Menu, and getting Taskbar icons to respond to mouse clicks. I’m pretty sure my troubles are self-inflicted, and come from some interaction with Stardock Software’s Start10. I’ve used some variant of this software since Windows 8 Release Preview emerged in May 2012. Recently, I’ve experienced further Windows Explorer restart follies, as I’ve attempted repair and recovery. That said, the never-fail fix for these symptoms remains “restart Windows Explorer in Task Manager.” In attempting that fix recently, I came a across a new and amusing wrinkle this week. Let me explain…

What Do Further Windows Explorer Restart Follies Entail?

As I mentioned, the fix involves restarting Windows Explorer. When I went to attempt that fix earlier this week, Windows Explorer wasn’t showing under the Apps heading in Task Manager’s Processes view (see lead-in graphic for example). What to do?

You can’t right click something that’s absent to get to the Restart option in the menu shown above. So I did the obvious: I launched an instance of Explorer by clicking its folder icon in the Taskbar. This launched Explorer.exe, and caused the Windows Explorer item to appear where it was needed. Then, it was simple to right-click that entry, pick Restart and forcibly restart the explorer process.

Thankfully, as it always has before, this fixed whatever was wrong with my Taskbar icons and the built-in Start Menu. I’m not sure how long this has been going on. It’s been a while since I last had this problem. But my recollection is that because the Explorer process always runs in the background — it’s necessary to support the Start Menu, Taskbar, Notification Area and Action Center — it used to appear by default under Apps in Task Manager, too. Apparently, that’s no longer the case in 19042 and 19043 builds.

I proceeded from this principle: “If no Windows Explorer shows in Task Manager Apps, then put one there.” That makes it easy to restart. ‘Nuff said.

Facebooklinkedin
Facebooklinkedin

Three-Key Method Enables Instant Screen Snip

I collect and treasure cool keyboard shortcuts. I just learned a fantastic one, from long-time TenForums Guru @Berton. He rightfully describes himself as a “Win10 User/Fixer.” If you press these three keys together: WinKey+Shift+S you’ll launch the newfangled Snip&Sketch screen capture tool built into Windows 10, ready to capture whatever you like. I say this three-key method enables instant screen snip because there’s no need to launch the app to start the capture process in motion.

Which Three-Key Method Enables Instant Screen Snip?

I have to laugh at myself about picking up this tip from a third party. When you launch Snip & Sketch manually, the default screen that shows up is depicted in the lead-in graphic. There’s the tip, right there! (See above.)

You can launch Snip & Sketch in a variety of other ways, including:

  • from the Search box (typing “Snip &” usually suffices)
  • using the Screen Snip button in Action Center
  • entering explorer ms-screenclip: in the Search or Run boxes, or at any command line interface

What Makes the Three-Key Method Attractive/Useful?

It’s fast, easy, and happens immediately following key sequence entry. Because of my writing work, especiallly on Windows 10 topics, I’m capturing screens all the time. Anything that makes this faster and easier is a good thing for me. Others who labor in similar ways — tech writing or documentation, blogging, articles, and so forth — should find this equally useful.

I’m also giving myself the Homer Simpson “Doh!” award for not attending to the default app window’s poignant and informative message. It reads “Press Windows logo key + Shift + S to snip what’s on your screen without starting Snip & Sketch.” If only I’d thought about this (or tried it out sooner) I could’ve been doing this long ago.

That’s life for me these days in Windows World. I may not be first across the finish line, but I still (mostly) get to where I need to go. Tortoises rock!

Facebooklinkedin
Facebooklinkedin

Two Commands Boot Into WinRE

I had the good fortune to provide copy edit and feedback to an MS person who works with Windows 10 recovery tools recently. From the blog post involved in our back-and-forth, I learned that two commands boot into WinRE (that is, the Windows Recovery Environment). Of course, a restart is required to make this happen. It’s not like Advanced Startup in Settings → Update & Security → Recovery → Advanced Startup. That is, you won’t immediately restart your PC as you do when clicking its “Restart now” button. I almost fell over when I tried that out for the first time!

Which Two Commands Boot Into WinRE?

One I already knew about, the other is a welcome and interesting surprise. The surprising one uses a special switch for the Windows RE configuration tool — namely REAgentC. Turns out there’s a special option named “boottore” that does the trick. If you parse the string properly, it’s self-advertising: “boottore” = “Boot to R(ecovery )Environment.” Thus, that complete command is:

reagentc /boottore

The second one is a special version of the good old, familiar shutdown command. It takes two parameters–namely:

  • /r Restarts the computer after shutdown
  • /o Goes to Advanced boot options menu and restarts device, then boots into WinRE

Thus, the complete command is:

shutdown /r /o

What’re These Commands Good For?

Good question. In this modern era, transfer of control to the Windows loader often occurs extremely fast. This means that it can be difficult to impossible to interrupt the initial bootstrap process to divert over to an alternate boot menu — such as WinRE, BIOS/UEFI, boot device menus, and so forth. These commands put you in control over what happens after your next boot in advance. This has become my preferred method, because of the degree of control and guaranteed results that occur.

Shoot! Give one or both of them a try. You might come to like one or the other of them, too! For best results, run them in an administrative command prompt window or PowerShell session.

Facebooklinkedin
Facebooklinkedin

MediaCreationTool.bat Gets 21H1 Update

There’s an interesting spin on Microsoft’s Media Creation Tool available on GitHub. It’s known as MediaCreationTool.bat, and basically it allows users to build an ISO (or a bootable USB device) for any version of Windows 10 from 1507 all the way up to 21H1. By saying “MediaCreationTool.bat Gets 21H1 Update” I’m informing readers an updated version now includes 19043 Builds (21H1).

If MediaCreationTool.bat Gets 21H1 Update, Then What?

I wrote about this tool last year for Win10.Guru where you’ll find background and info about the developer. This GitHub project throws up a menu (see center of Command Prompt window above) that lets users pick the version of Windows 10 for which they want to grab an image. As MCT has always done, it lets them apply an update to the current PC. More commonly, it also lets them create an ISO or build bootable USB media with the chosen image aboard.

A couple of steps are needed to make the batch file usable, however. First, it won’t run unless it gets a .bat extension. You can right-click the GitHub page, select “Save-as” and then make sure to pick “All files” from the File type option. Otherwise, it saves with a .txt extension which must be removed through a file rename operation. Either way, you’ll want to open the properties for this file in Explorer, then click the Unblock button to make sure the OS doesn’t prevent its execution.

Using the Batch File Is a Snap

Then, open an Administrator: Command Prompt window, navigate to the directory where the batch file resides, and run it. I right-click the file name in explorer and grab the name from the Properties window. Then I can simply paste the string into Command Prompt to avoid re-typing. It’s what produced the lead-in graphic for this story.

Because the batch file changes each time a new Windows version comes out, you should get in the habit of visiting the developer’s home page for the script to grab the latest version. From there, click the “Raw” button to open a Web page with the latest version inside.

MediaCreationTool.bat Gets 21H1 Update.homepage

Click the Raw button at upper right and web page with the script text inside will open. Then you can follow the preceding “Save” instructions for your very own copy.
[Click image for full-sized view.]

I’ve gotten in the habit of naming the file to include the version number for the most current one it supports. Thus, I named the most recent such file MediaCreationTool21H1.bat. Hope that makes sense. Enjoy! Good stuff.

Facebooklinkedin
Facebooklinkedin

When WU Repairs Fail Try UUPDump

I’ve got two test machines on the Beta Channel release right now. The older of the pair — a 2014 vintage Surface Pro 3 — is stuck on KB5000842 and keeps throwing install errors. Others reporting into the TenForums thread on this update have had success using the terrific UUPdump tool to build a customized image to install 19043.906. So that’s what I’m trying, too. In general, my strategy is “When WU repairs fail try UUPDump” next anyway. Glad to see others use that strategy, too.

When WU Repairs Fail Try UUPDump.WUerror

A couple of failures, including a complete WU reset, means it’s time to change update strategies.
[Click image for full-sized view.]

Why Say: When WU Repairs Fail Try UUPDump?

The update installs fail each time with an error code of 0x800F081F. This is interesting, and a bit strange, because the error is often associated with the Windows Update Assistant nowhere present in this situation. It can also pop up when items are missing from the download packages that WU delivers to the desktop.

That latter reason explains why a switchover to UUPDump makes sense. It grabs the ISO-based image for the base OS version from MS servers  (19043 aka 21H1 in this case). Then, it uses DISM to apply all newer updates packages up to and including the problematic KB5000842 item that’s throwing the error here. It’s perfectly safe because it uses only Microsoft Servers as the source for its OS and update files.

Building the 19043.906 ISO File

Running UUPDump to build an ISO for a patched OS takes some time because of the many and various steps involved. For the SP3 PC, it took over an hour before it got stuck mounting the image for Build 19041.1. That’s when I realized it makes sense to run UUPdump batch files on the fastest PC around.

Thus, I ran the same job on my Lenovo X1 Extreme, with its 6-core i7-8850H CPU. Given more threads and a faster CPU and much faster Samsung OEM PCIe x3 SSDs, it ran noticeably faster, though the KB5000842 cab file update still took 5 minutes to complete (click “view image” inside the lead-in graphic for this story). The whole thing still took 35 minutes from start to finish.

And it went that fast only because we have fast (nominal GbE, actual 900 Mbps or so) Internet service here at Chez Tittel. What takes the real time, however, is bringing the windows image (.wim) file up from base level Build 19043.844 to the current/highest level Build 19043.906. This takes several steps, each one involving mounting the image, adding packages, the dismounting the image, and continuing forward. There’s some mucking around with a WinRE.wim file along the way, too.

Performing the In-Place Repair Install

This is the easy part: mount the image, run setup.exe and let the installer do its thing. This takes a while, too — considerably longer than applying the update would (checking the PC, agreeing to the EULA, checking for updates,  and so forth; then finally into OS installation). This entire process took another hour or so to complete. But here’s the end result, straight from winver.exe:

When WU Repairs Fail Try UUPDump.final

All’s well that ends well: here’s Build info from the upgraded SP3, right where I want it to be

More About UUPDump

I’ve written about UUPDump for numerous other sites, including TechTarget and Win10.Guru, both for my Windows Enterprise Desktop blog. Here are some links, if you’d like to learn more:

  1. UUPDump Invaluable Resource (TechTarget)
  2. A Peek Inside UUPDump (Win10.Guru) includes a brief interview with its developer who goes by the handle “Whatever”
  3. UUPDump Outdoes Windows Update (Win10.Guru)

Cheers!

Facebooklinkedin
Facebooklinkedin

Build 21343 File Explorer Makeover

On March 24, MS released Build 21343 to Dev Channel Insiders. I immediately heard and saw that File Explorer shows a new look, with modern iconography and a clean, spare layout. But I really didn’t appreciate how attractive things were until I produced the screencap for the lead-in graphic.  While there’s no disputing Build 21343 File Explorer Makeover sounds nice, it’s amazing to experience first hand.

Indeed, Build 21343 File Explorer Makeover Is Real

The top-line toolbar gets a new set of icons that include new UI elements seen elsewhere. For example, the Settings icon at middle top is spiffed up. It now matches the one used in the Start Menu and elsewhere in Dev Channel and other Windows 10 versions. The default folders (formerly known as Libraries) get compelling new icons. Compare them to the folder icons from Build 19042.868 on my production PC. Note that the seldom-used 3D Objects folder — I’ve never used it once myself — also disappears from view.

Build 21343 File Explorer Makeover.oldfoldericons

The old Folder icons (shown preceding) seem flat, monochromatic, and boring compared to the new ones up top.
[Click item for full-sized view.]

Bigger, Bolder Icons Offer More Visual Impact

Even the Network view in File Explorer gets a more interesting and appealing look and feel, as the next screenshot shows quite nicely. Up until now I’d been inclined to take breathless hype surrounding the upcoming “Sun Valley” Windows 10 redesign with a grain or two of salt. Now, seeing the way that File Explorer pops with just a bit of that fairy dust applied, I’m rethinking my enthusiasm.

There may indeed be something interesting and — as Panos Panay put it for upcoming Windows 10 changes at the recent Ignite conference — “exciting” going on here. We still have no choice but to wait and see how future Dev Channel releases play this out. But I am now inclined to be more curious and to look forward more positively for what may be coming next. We’ll see!

Build 21343 File Explorer Makeover.networkicons

The New Network icons also offer more pop and pizazz.
[Click item for full-sized view.]

Facebooklinkedin
Facebooklinkedin