Category Archives: Windows 11

WU Offers Win11 26H2

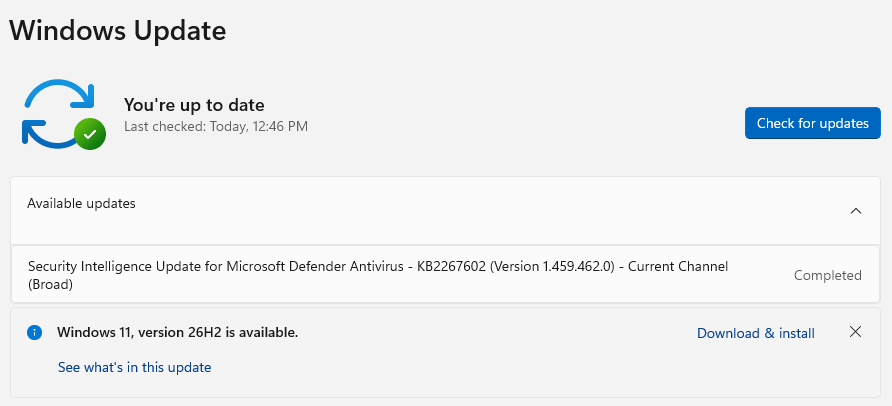
OK, then. After reading numerous Windows rumors that the latest Windows version might drop today, I just ran the update check on WU. As you can see in the lead-in graphic, it’s offering qualified systems (including Flo6, P16, RyzenOfc and D7080) this item as the “Windows 11 2026 Update .” As WU offers Win11 26H2, that info provides the lead-in graphic for this very blog post.

When WU Offers Win11 26H2, Then What?

If you’re like me and love living on the edge, you’ll install it right away. If you’re in a corporate or other gated environment, you’ll bring up in a testbed first to see if it breaks anything. Given that this is another “enablement package” most of what’s coming is already here. And if last year’s 25H2 eKB (enablement package KB update) is any indicator, the whole experience should be pretty fast and painless.

Today’s Windows Experience blog post, from MS Product Mgmt VP John Cable, is entitled “How to get the Windows 11 2026 Update.” Appearances to the contrary in the title aside, it basically says “Comes to eligible devices via WU.” No download links, or anything like that. Fortunately, Shawn Brink’s covering post at ElevenForums provides x64 and ARM64 links to the eKB. Good enough for me!

The eKB Experience on AsusSnap

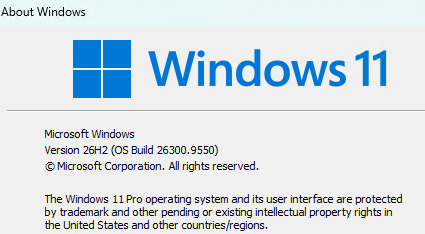
Because WU didn’t offer the eKB to my Snapdragon X Asus Zenbook A14 (aka AsusSnap), I grabbed the ARM64 download to try it out. It’s zipped and tiny (172KB compressed; 175K for .msu file). It completed in under 30 seconds on the target PC, and the reboot was pretty speedy, too. Shows up as Build 26300.9550 after the update:

Seems like mostly a no-brainer. Thus, I’m bidding adieu to 25H2 and saying hello to 26H2. Check it out: you may decide to do likewise!


Facebooklinkedin
Facebooklinkedin

Bye-Bye Copilot+ PCs

Looks like MS is retiring the Copilot+ PC branding and nomenclature. Why? As Trusted Reviews puts it “Microsoft dropping Copilot+ PC branding makes sense when every machine is AI-capable.” Or as more cynical observers might put it, If few people care, why bother? Even in September 2026, only 2-5% of PC sales fit the label anyway. With such a small market slice in play, no wonder MS isn’t shy about saying “Bye-bye Copilot+ PCs!”

A New Generation Also Says
“Bye-Bye Copilot+ PCs”

As I observed in last week’s Googlebook post, that company is entering a crowded field for AI-ready platforms, along with NVIDIA’s more formidable RTX Spark platform (both due week after next, Google’s on 10/4 and NVIDIA’s on 10/7). With all the hoopla for newer, different AI PCs could it be that Copilot+ PCs simply lost their shine? Methinks that is at leastly partly the case.

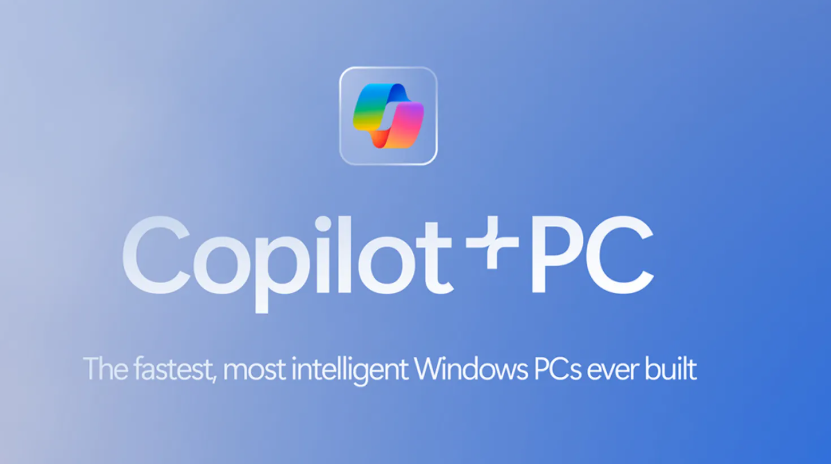
Looking at the proud branding from a May, 2024 article (appears as the lead-in graphic here), it now seems somewhat behind the times. Given the RTX Spark and Googlebook offerings, not to mention a new generation of AMD, Intel and Qualcomm 64-bit machines (laptops mostly, with a desktop or mini-PC here and there) the language seems over the top.

Indeed, I’ve got an ASUS Zenbook A14 here at Chez Tittel. While it is a real, honest-to-gosh Copilot+ PC, nobody would characterize it as one of “The fastest, most intelligent Windows PCs ever built.”

Usefulness Outlived: Time to Move On

With only a small sliver of the PC market covered, and a whole new set of AI-ready (and more capable) PCs in the offing, I guess Copilot+ PCs are simply passe. Time for the next big thing. MS has a Surface event coming up on the day of the RTX Spark on October 7. Perhaps the company will share a new vision for PC computing then?

Here in Windows-World, the more things change the more they stay the same. AI is still a happening thing for PCs in general (and laptops in particular). But it’s happening under a different umbrella (or set of umbrellas) soon. Should be interesting to see what happens next, and what MS has to say about it. Stay tuned…


Facebooklinkedin
Facebooklinkedin

Bitten: Sandbox Network Access Bug

Windows Sandbox is supposed to be a clean, disposable environment that “just works.” But every so often, it bites back. In the past few days I’ve hit a recurring issue where Sandbox loses network access, stalls, or refuses to start after a failed session. The symptoms vary, but the root cause keeps pointing to the same culprit: corrupted HNS state. This post walks through what happens, why it happens, and how to fix it without drama. Alas, it means I’ve been bitten by the Sandbox network access bug widely reported these days (see Windows-Sandbox and Windows-Containers issues in GitHub; 131 and 128 for the former, and 631 for the latter).

Sandbox Network Access Bug — TLDR Summary

When Windows Sandbox suddenly loses network access or fails to relaunch, the underlying HNS (Host Networking Service) stack gets stuck in a half‑deleted state. Resetting the HNS networks and rebooting sometimes restores normal behavior. But it keeps coming back with each use, and the fix doesn’t always work.

How the Bug Shows Up

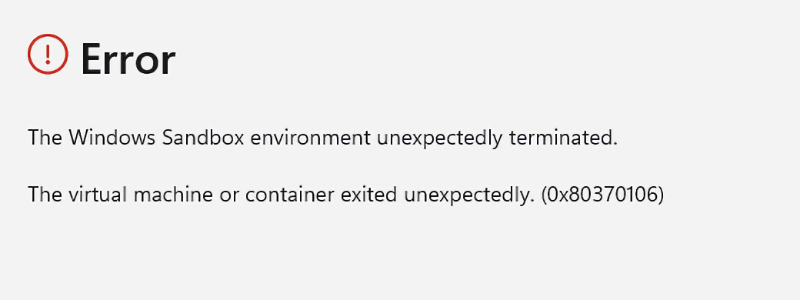
The first sign is usually a sudden loss of connectivity inside Sandbox. A browser tab stops loading, a site hangs, or a download stalls. Closing Sandbox seems harmless enough, but reopening it often triggers a second symptom: the app refuses to start. Sometimes it crashes, after which Windows throws error 0x80370106. Other times it simply flashes “connection lost” and drops you back to the desktop.

On my Flo6 machine, the failure pattern became predictable. Sandbox would run normally for a while, then lose network access. After closing it, the next launch attempt failed. Meanwhile, my P3 Ultra Gen 2 workstation ran Sandbox without complaint. That contrast made the diagnosis easier: the problem wasn’t the workload, the site, or the browser. It was the host’s virtualization networking stack.

Why HNS Gets Stuck

Windows Sandbox relies on a lightweight virtual switch managed by HNS. When Sandbox closes cleanly, HNS tears down the temporary network and resets its internal tables. But when Sandbox crashes or loses connectivity mid‑session, the teardown doesn’t complete. HNS keeps references to a dead network, and the next launch attempt hits a corrupted state.

Stopping HNS with net stop hns rarely works in this scenario. The service stays in a running state even while trying to unwind stale entries. The fix requires removing the broken networks directly.

The Reliable Fix

The repair workflow is simple and safe:

1. Remove the stale HNS networks using PowerShell:
Get-HNSNetwork | Remove-HNSNetwork

2. Reboot the system. This step matters because HNS rebuilds its network tables only after a restart.

3. Launch Windows Sandbox again. In most cases, network access returns immediately and the environment behaves normally.

This reset does not affect standard networking. Windows automatically recreates the default switch, NAT configuration, and Sandbox virtual network during startup.

Why This Keeps Happening

Sandbox is lightweight by design, but its networking stack depends on the same components used by Hyper‑V, WSL, and container workloads. Any hiccup in those layers can leave HNS in a confused state. Heavy browser workloads, WASM execution, or aggressive site behavior can push Sandbox into a crash that leaves the network half‑torn‑down.

Because the bug lives in the host’s virtualization plumbing, toggling Sandbox on and off in optional features doesn’t fix it. Only a full HNS reset clears the corrupted entries.

Final Thoughts

Windows Sandbox remains one of my favorite tools for quick testing, but the network access bug is an annoyance. The good news is that the fix is consistent and non‑destructive. If Sandbox bites you with a sudden loss of connectivity or a refusal to start, resetting HNS is the fastest way to get back to work.

Good thing it works just fine on the ThinkStation P3 Ultra Gen 2. When I hit issues with Sandbox on Flo6, I just remote into the P3 and keep going. Here in Windows-World, it’s always good to have an alternative workaround.

Facebooklinkedin
Facebooklinkedin

Jabra 75 Headset Goes On Strike

Strange! I updated the driver for my Jabra 75 headset recently. But I hadn’t tried to use it since. Today, when I went off to listen to some tunes, the headset was MIA. All the Windows-side audio device settings looked good. Given the circumstances and the recent driver update, I knew it had to be that final stage in the audio chain. And alas, when my Jabra 75 headset goes on strike, the silence is deafening. Sigh.

If Jabra 75 Headset Goes On Strike, Check Usual Subjects

Ultimately, I ended up crawling the Jabra 75 UI, once I determined that the driver and firmware were indeed current. There I discovered the device was locked into Softphone-only mode, with MS Teams as the default app. Guess what? That means Spotify couldn’t talk to the device any more.

The fix turned out to be absurdly easy. Since I don’t use the headset as a softphone anyway, I just turned that functionality off. Immediately, Spotify chimed in and was able to listen to Mark Knopfler and the gang wailing away on the original “Dire Straits” album.

Dire Straits, indeed. Funny how a drive reset can turn a finely tuned device into a whole lotta nothing. Here in Windows-World, one must sometimes roll up one’s sleeves and start flipping toggles to see what’s getting in the way. But hey! I’m not back in the groove, listening to “The Sultans of Swing.” Good enough for me!

Facebooklinkedin
Facebooklinkedin

Fixing Macrium Rescue Disk

Microsoft updated its Secure Boot revocation database (DBX) in mid-2026. That update requires Boot Manager binaries to carry a minimum Security Version Number (SVN) of 11.0. It also bans the older “Production PCA 2011” signing certificate. Rescue media that Macrium Reflect X builds fails both tests out of the box. That means with Secure Boot enabled, the Reflect’s boot media won’t work. That’s why I’m writing today about what’s involved in fixing Macrium Rescue Disk.

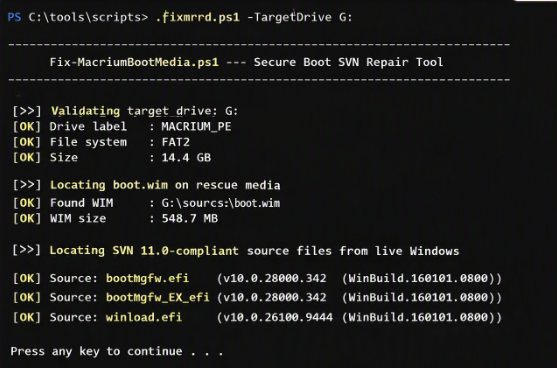
Most important, this post walks you through a PowerShell script named fixmrrd.ps1 that fixes all three BANNED files in a single pass. Buckle up! There’s LOTS of ground to cover…

Why Fixing Macrium Rescue Disk Is Necessary

Macrium Reflect X builds its WinPE rescue environment from the Windows ADK (Assessment and Deployment Kit). The ADK ships once per Windows release and never gets Patch Tuesday updates. Its boot files stay frozen at the SVN level they carried on release day.

For Windows 11 24H2, the WADK 11 ADK shipped with boot files at SVN 2.0. The current DBX floor is SVN 11.0. That nine-version gap is the core problem that requires fixing.

The standard boot manager file, aka bootmgfw.efi that lives under C:\Windows\Boot\EFI\ also carries the banned Production PCA 2011 certificate. Even when the SVN is correct, that certificate triggers a hard BANNED result. Garlin’s check_bootMedia.ps1 diagnostic tool makes both problems visible immediately.

Introducing fixmrrdv2.ps1

fixmrrdv2.ps1 bridges the gap Macrium leaves open. It pulls every replacement file from your live, fully patched Windows 11 installation. Those files already meet the SVN 11.0 requirement and carry the correct Windows UEFI CA 2023 certificate. It’s a v2 version because @Monica1491 over at ElevenForums pointed out an error that I fixed.

Here is what the script does at each step:

  1. Validates the target USB drive and confirms it carries a MACRIUM label.
  2. Locates boot.wim on the rescue media, typically at sources\boot.wim.
  3. Identifies three source files from your live Windows installation: bootmgfw.efi, bootmgfw_EX.efi, and winload.efi. It reports the version number of each file.
  4. Replaces the external bootmgfw.efi on the USB EFI partition. It uses the EX variant (bootmgfw_EX.efi) as the source — not the standard bootmgfw.efi. The standard file carries the banned Production PCA 2011 certificate. The EX variant carries the required Windows UEFI CA 2023 certificate.
  5. Mounts boot.wim using DISM. Then it adjusts ACLs on the internal target files. WIM images lock their contents with restrictive ACLs. Even Administrator hits an access-denied error without a takeown and icacls step first.
  6. Replaces bootmgfw_EX.efi and winload.efi inside the mounted WIM.
  7. Commits the changes and unmounts the WIM. If any step fails, DISM discards the mount and leaves the original WIM intact.

The script backs up every replaced file with a timestamped .bak_ suffix before touching it. Color-coded [OK], [!!], and [FAIL] status lines show progress at each step.

Before You Run the Script…

There are four prerequisites apply before you run fixmrrdv2.ps1.

  • Run as Administrator. DISM mount operations require elevation.
  • Use Windows PowerShell 5.1 (powershell.exe). Do NOT use PowerShell 7.x (pwsh.exe). The DISM /Mount-Image command does not work correctly under PowerShell Core. The script detects PS 7.x automatically and exits with a clear message if you start it from the wrong shell.
  • Your Macrium rescue USB must be plugged in and assigned a drive letter. Note that letter before you start.
  • Your execution policy must allow local scripts. Run this in an elevated PS 5.1 window if needed:

Set-ExecutionPolicy -ExecutionPolicy RemoteSigned -Scope CurrentUser

Download fixmrrdv2.txt from its OneDrive link (read only). Rename it to fixmrrd.ps1. Place it in a convenient location, such as C:\tools\scripts\.

Running the Script…

Open an elevated Windows PowerShell 5.1 window. Navigate to the folder holding fixmrrd.ps1. Then run:

.\fixmrrd.ps1 -TargetDrive G:

Substitute your actual rescue drive letter for G:. If you omit -TargetDrive, the script prompts you for it.

The script runs without further interaction. The DISM commit step takes the longest — typically 30 to 60 seconds. Do not interrupt that step.

Each replaced file gets a timestamped .bak_ backup before the script writes anything new. You can restore any original file by renaming the matching backup.

One timing note: the script reports source file versions from C:\Windows\Boot\EFI\ and C:\Windows\Boot\EFI_EX\. You may notice the version number on the USB after copy differs slightly from what the script reported. This is a FAT32 metadata quirk. The SVN level is what really matters, and transfers correctly.

Verifying Results

Run Garlin’s check_bootMedia.ps1 against the drive when the script finishes:

.\check_bootMedia.ps1 G: -audit -verbose

A correctly fixed drive shows all three boot files as ALLOWED:

USB Drive g: "MACRIUM_PE"
    Windows Boot Manager [Windows UEFI CA 2023] is ALLOWED.
        g:\EFI\Microsoft\Boot\bootmgfw.efi
        File Version: 28000.367, SVN 11.0

    boot.wim:1 (WinPE 26100.1)
        Boot Manager [Windows UEFI CA 2023] is ALLOWED.
            \Windows\Boot\EFI_EX\bootmgfw_EX.efi
            File version: 28000.367, SVN 11.0

    \Windows\System32\winload.efi is ALLOWED.
        File version: 26100.9444

If any file still shows BANNED, check that you ran the script in PowerShell 5.1 with elevation. Re-run if needed — the backup files let you roll back safely.

The Net-Net: Working Rescue Disk

This is a product gap in Macrium Reflect X, not a user error. Macrium builds from ADK components that Microsoft does not update through Patch Tuesday. The recoverydrive.exe tool that ships with Windows sources its boot files directly from the live OS. Macrium does not. Until Macrium ships a fix that closes that gap, fixmrrd.ps1 fills it. It ticks me off, and that’s why I decided to script my way around it.

Keep this script on hand. The next time you rebuild a Macrium rescue drive, perhaps after a major Windows update or a new ADK release, you will need it again. The whole process takes under two minutes once you know the steps. Here in Windows-World, when vendors don’t fix their stuff, we users must sometimes step in to help out. Cheers!


Facebooklinkedin
Facebooklinkedin

Doing the Recovery Drive Rebuild

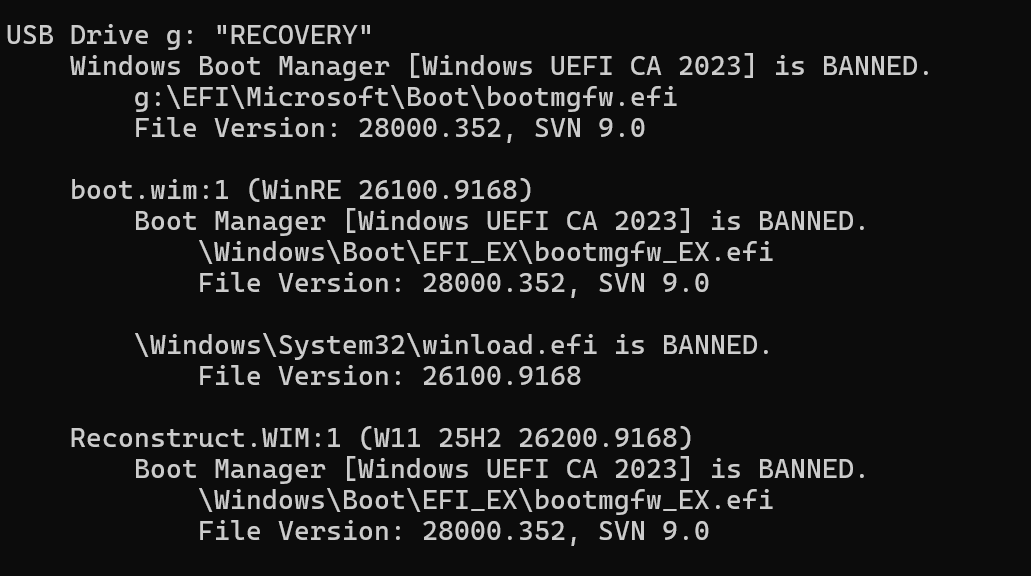
If you’ve been following Microsoft’s ongoing Secure Boot shenanigans, you already know the company has been rolling out a series of Secure Boot certificate revocations. This is a deliberate effort to invalidate boot signatures tied to older, potentially vulnerable boot components. The practical consequence is both important and easy to overlook. Boot media you created even last month may now carry BANNED boot files. That’s what had me doing the Recovery Drive rebuild this morning, in fact. Let me explain…but first look at the lead-in graphic from Garlin’s check_bootmedia script to see why I’m doing it.

Why I’m Doing the Recovery Drive Rebuild

The lead-in screencap shows the results of the Garlin script against the Recovery (G:) disk I built after last month’s Patch Tuesday (August 11). As you can see, it’s sadly out of date, BANNED across the board.

Alas, after this month’s Patch Tuesday (September 8) the G: drive features a boot manager or Windows Recovery Environment image signed with certificates that  on Microsoft’s revocation list. On a fully-patched system with current DBX (Forbidden Signatures Database) entries loaded into firmware, that old recovery drive simply will not boot.

It fails Secure Boot validation with a “Secure Boot Violation” error from UEFI, leaving you with nothing but a blinking cursor when you need help most. Fortunately, a community member named Garlin created a PowerShell script called check_bootmedia.ps1 that diagnoses your boot media in seconds and tells you exactly which files are ALLOWED and which are BANNED. I’ve been running it across machines in my lab, and the results on my production desktop (named) Flo6 tell a very clear story.

Before the Rebuild: BANNED Rules!

Working from last month’s Recovery (G:) UFD, I ran Garlin’s check_bootmedia.ps1 against it. The output was unambiguous,but not in a good way. It appears as the lead-in graphic above. Indeed, this script reports that Flo6’s existing recovery drive is running WinRE.wim at build 26100.9168, with a File Version of 28000.352 and a SVN (Security Version Number) of 9.0. Every boot file examined — the boot manager and the WinRE image alike, comes back flagged as BANNED.

That designation is not positive: it means those files carry Secure Boot signatures that Microsoft has since explicitly revoked. Any PC with current DBX entries loaded into its UEFI firmware would refuse to execute those files at boot time. In other words, if Flo6 hit a serious failure tomorrow and I reached for that recovery drive, it simply wouldn’t boot on a fully-patched machine. Not acceptable!

After the Rebuild: ALLOWED Everywhere

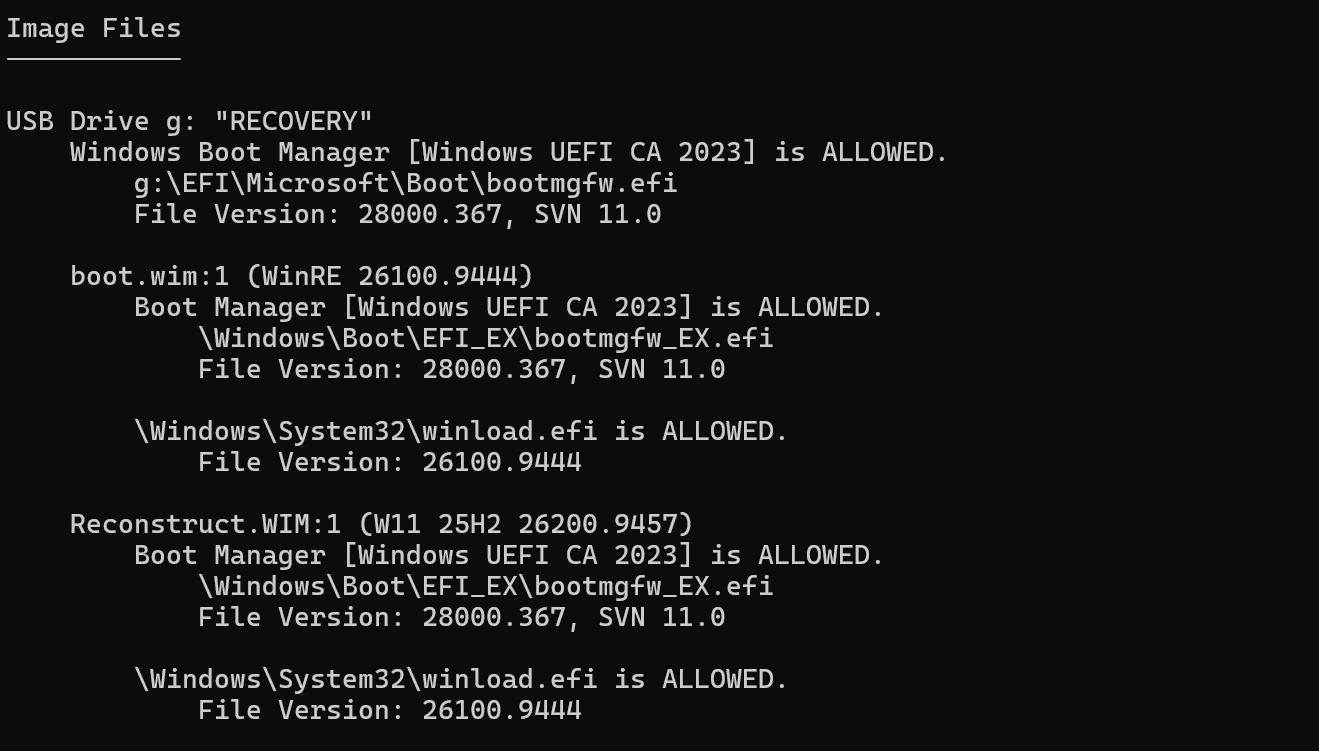
I rebuilt Flo6’s recovery drive using the built-in Windows “Create a recovery drive” wizard. This requires no third-party tools, nor manual WIM manipulation, just theRecoveryDrive.exeutility. Once that process finished, I ran check_bootmedia.ps1 again. Take a look:

Everything that was BANNED before, is now ALLOWED. Good!

The transformation was total. The new drive reports WinRE.wim build 26100.9444, File Version 28000.367, and SVN 11.0. Every boot file now shows ALLOWED. The drive is clean, current, and will boot cleanly on any fully-patched Secure Boot system. The SVN jump from 9.0 to 11.0 is especially noteworthy: that’s two full security version increments, reflecting two distinct rounds of certificate revocations that have rolled through since the original image was created. Each SVN increment represents a deliberate decision by Microsoft to bar an entire generation of signed boot binaries from executing. Flo6’s old drive had missed both of them.

Why Did This Take SOOOOOOOOOO Long?

The recovery drive rebuild on Flo6 took well over an hour. If you’ve ever watched the progress bar crawl through a drive creation and wondered whether something was wrong, the answer is almost certainly: no, this is normal. Sigh. Here’s why.

These three main contributors to that long interval are worth understanding:

  1. USB write speed. Flo6’s target drive is a SanDisk SDC2340 UFD. Even though it’s a USB 3.x device, flash writes, especially the large, sequential writes that a WinRE.wim deployment demands  are constrained by the drive’s NAND controller throughput and its write-endurance headroom. Consumer-grade flash storage routinely delivers sustained write speeds at a fraction of the peak specifications. Those rated speeds represent brief burst perfor-mance under ideal conditions, not multi-gigabyte sequential writes the wizard performs.
  2. WinRE.wim compression and decompression. The Windows Recovery Environment image is stored in compressed WIM format. The wizard decompresses it, processes its contents, and then recompresses it to the target drive. That’s a full double-pass operation.Thus, it’s CPU-intensive on the decompression side, and I/O-intensive on both sides. This step alone accounts for the majority of the elapsed time on most systems.
  3. Verification. The wizard doesn’t just write and walk away. It verifies written blocks after the write completes. That adds another full sequential read pass across the whole drive. On a slow UFD, that additional pass adds 15 to 25 minutes by itself.

On a faster USB 3.2 Gen 2 drive with a quality controller (something like a Samsung Flash Drive or a Kingston DataTraveler Max)  the same operation takes 15 to 20 minutes. On Flo6’s SanDisk SDC2340, over an hour is entirely too normal. Slow, but not broken.

Check Your Boot Media!

Here’s my recommendation. After any Windows Update CU, run Garlin’s check_bootmedia.ps1 against every bootable UFD you have.  A recovery drive that passed muster six months ago may now carry BANNED files. That’s because the DBX doesn’t stop growing, and Microsoft shows no sign of slowing its revocation cadence.

The fix, as Flo6 demonstrates, is simply to rebuild. It costs you a USB drive, an hour of clock time, and nothing else. Flo6 is my production desktop, but the same process and the same stakes apply to every Windows 10 and Windows 11 PC you manage.

Maintaining a current, bootable recovery drive is table-stakes Windows hygiene. Also, it’s the kind of thing that feels unnecessary right until it’s the only thing that matters. Now, thanks to Garlin’s script, you have a fast, reliable way to prove yours is good. There’s no excuse not to check. Here in Windows-World, I call those “marching orders.” Start walking…

Facebooklinkedin
Facebooklinkedin

Removing Stubborn Acrobat Pin

I keep learning more and more about hidden wrinkles in WinGet. I guess that’s because I use it every day, and notice when things get hinky. Today, I noticed my pin on Adobe Acrobat got stuck like Schrodinger’s cat: it was there and not-there at the same time. Ultimately, this had me removing stubborn Acrobat pin, as normal methods couldn’t do their job. Let me explain…

What’s Involved When Removing Stubborn Acrobat Pin?

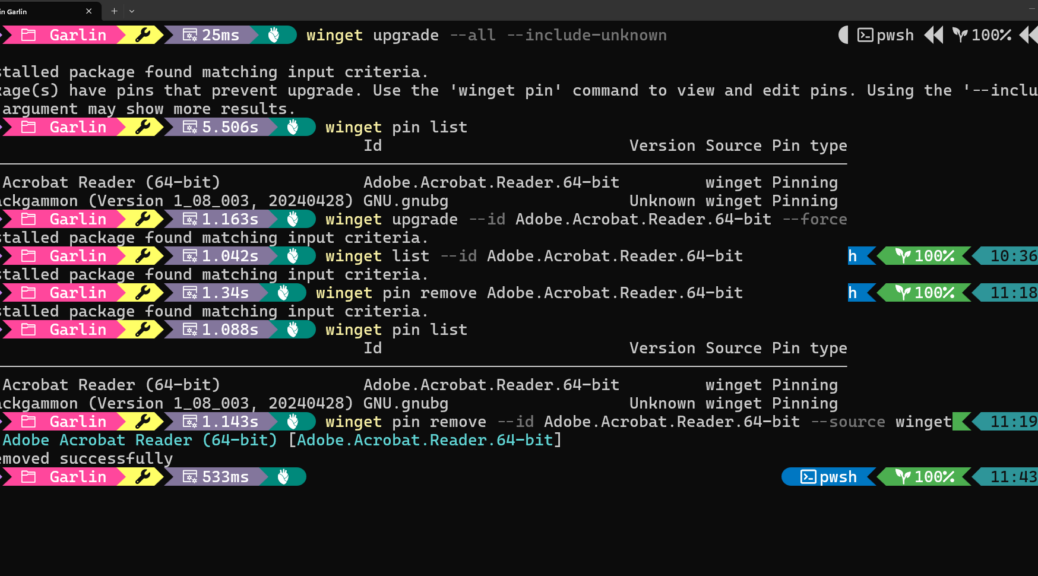
Take a look at the WinTerm screen capture that starts off this blog post. After running winget upgrade ... I got a message “1 package(s) have pins that prevent upgrade.” Flo6 has 2 pins right now and one of them has no internal version number (GNU Backgammon) so I knew the affected package must be Adobe Acrobat. You can see both packages as output to the winget pin list, in fact.

But as you can see in the next two lines, neither winget list --id... nor winget pin remove recognized Adobe.Acrobat.Reader.64-bit as a valid package name. That’s decidedly odd, because that’s the name that shows up in winget pin listoutput shown earlier.

Turns out that’s a thing. It’s a short form versus long, explicit form discrepancy.

Why the Short Form Fails

When you run winget pin remove without explicit flags, winget uses positional argument matching. It tries to match the string Adobe.Acrobat.Reader.64-bit against its installed packages database first. It does not go straight to the pin store.

If WinGet cannot find a recognized installed package entry for that string, it stops. It bails out before it ever reaches the pin database. The pin record sits untouched.

This mismatch happens for a specific reason. Adobe Acrobat was likely removed through Windows Settings or Add/Remove Programs, not through winget uninstall. Winget never got the chance to clean up its own records. So the installed-package record disappeared, but the pin record survived in winget’s separate pinning.db database file.

That gap between the two databases is the root cause of the error. The fix is to route Winget around that gap entirely.

The Fix: Explicit Flags

The solution is to be explicit with WinGet. To do that, add two flags to the command: –id and –source. Together, they change how winget searches. Use this exact command:

winget pin remove --id Adobe.Acrobat.Reader.64-bit --source winget

Here’s how this works: The --id flag forces WinGet to look up the package by its exact manifest identifier. The --source flag tells WinGet to look specifically in the winget source. Together, they bypass the installed-package correlation step and go straight to the pin store.

The output confirms it works. You see “Found Adobe Acrobat Reader (64-bit) [Adobe.Acrobat.Reader.64-bit]” followed immediately by “Pin removed successfully.” Run winget pin list one more time to confirm the pin is gone. It will be.

This is the cleanest way to use winget pin remove whenever a package no longer has a matching installed record. Keep those flags in your back pocket.

Take the Long Way Home

When winget pin remove fails with “No installed package found,” the short form is matching against the wrong database. Adding
--id and --source redirects it straight to the pin store, where it needs to go. Always uninstall packages through WinGet when you can. That keeps its databases in sync and prevents this mismatch from happening in the first place. A little discipline now saves a lot of troubleshooting later, and now you know exactly what to do when things go sideways despite your best efforts. A not unfamiliar sensation to those who, like me, run in the halls of Windows-World.

Facebooklinkedin
Facebooklinkedin

WinGet Mistakenly Reports Discord as Pinned

Here’s a scenario many Windows users will recognize. You open a terminal and run winget upgrade to freshen up your apps. Everything looks normal — until you spot Discord sitting there labeled “pinned.” You never pinned it. You have no idea why it shows up that way. Sound familiar? Turns out that WinGet mistakenly reports Discord as Pinned for its own, somewhat murky reasons.

This WinGet Discord pinned situation surprises a lot of people. It looks wrong, or like WinGet won’t update a much-used app. Neither is true.

Take a breath. Discord is fine. WinGet is fine. There’s a perfectly logical explanation — and once you see it, the whole thing makes complete sense. Let me fill  you in…

Why WinGet Mistakenly Reports Discord as Pinned

WinGet uses the “pinned” label for two very different situations, and it doesn’t distinguish between them visually. The first situation is one you control: you run winget pin on a package, and WinGet holds that app at its current version. That’s an intentional, user-driven pin.

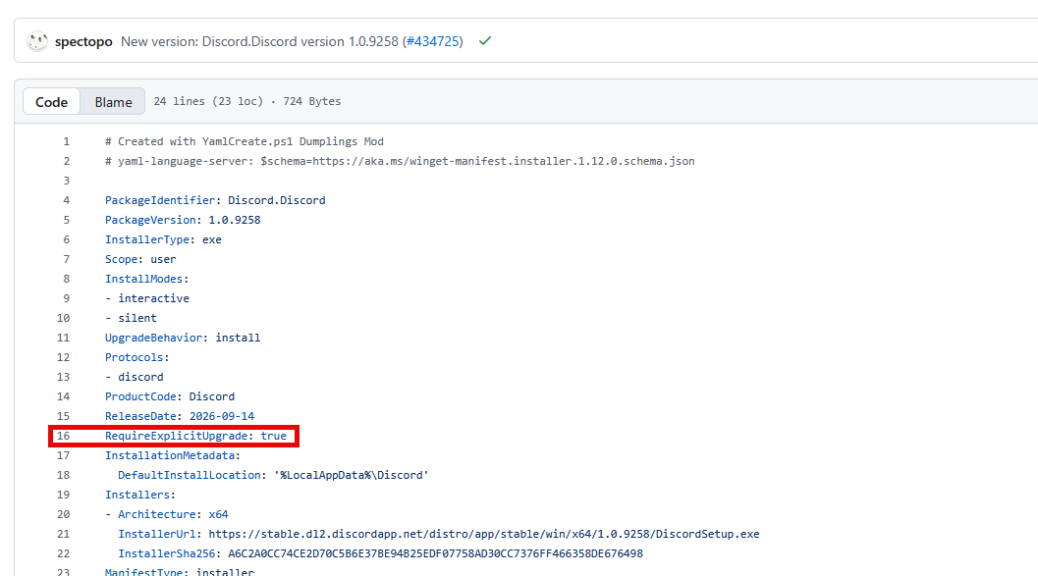
The second situation involves the app’s own manifest. Package maintainers can set a field called RequireExplicitUpgrade to true inside their installer’s YAML file. When WinGet sees that flag, it skips the package during bulk upgrade runs. Then, it labels it as “pinned” in the output.

Discord’s manifest resides in the winget-pkgs repository. ICYDK, that’s the Microsoft community Windows Package Manager manifest repository on GitHub. There, its manifest carries RequireExplicitUpgrade: true across many versions, including 1.0.9005, 1.0.9166, and 1.0.9188. WinGet groups both user-set pins and manifest-driven flags under the same display label. That shared label is the root of all this kerfluffle.

Why Discord Sets RequireExplicitUpgrade

Discord ships with its own built-in auto-updater. Most of the time, Discord updates itself quietly in the background without you lifting a finger. It doesn’t need WinGet’s help to stay current. It runs by default each time you open the app (or restart your PC).

Setting RequireExplicitUpgrade: true in the manifest tells WinGet to stand down during bulk winget upgrade runs. This prevents WinGet from downloading and launching a full installer that could interfere with Discord’s own update mechanism. Two updaters competing for the same app can be a recipe for trouble.

This is actually a smart, deliberate design choice. Thus, it’s not a bug, nor an oversight. The Discord team and the winget-pkgs maintainers made a deliberate call to keep things tidy. WinGet and Discord each do their own job, without stepping on each other.

How to Check the Discord Manifest

Want to see Discord’s package details for yourself? Start with this command:

winget show --id Discord.Discord

This output gives you useful metadata — the current version, publisher, installer URL, SHA256 hash, and release date. What it does not show is the RequireExplicitUpgrade field. winget show surfaces display metadata, not every field in its YAML manifest.

The file Discord.Discord.installer.yaml does not exist on your local PC. It lives only on GitHub. To find it, go directly to this URL in your browser. (Swap in whatever the current version number is for 1.0.9258 if needed.) Once there, look for RequireExplicitUpgrade: true in the YAML. That single line is what tells WinGet to treat Discord as a skip-by-default package during bulk upgrades. You can see it highlighted in the lead-in graphic at line 16 of that YAML file, in fact.

Upgrading Discord Through WinGet Anyway

Maybe you want WinGet to handle the Discord update on your terms. No problem. You can override the RequireExplicitUpgrade flag with a single targeted command:

winget upgrade --id Discord.Discord --force

This tells WinGet to update Discord explicitly, bypassing the manifest flag just for this one run. It’s a clean, safe way to push a WinGet-managed update when you want one.

That said, most of the time you won’t need to bother. Discord’s own updater does its job reliably and quietly. The WinGet Discord pinned label looks alarming, but your Discord client is almost certainly already up to date. Check the app’s version in its settings if you want confirmation.

WinGet Category Conflation Explains All

The “pinned” label WinGet shows for Discord is not a real user-set pin. Again, you did nothing wrong, and nothing is broken. It reflects the RequireExplicitUpgrade: true field baked into Discord’s own manifest That tells WinGet to step aside and let Discord’s built-in updater do its thing. Once you understand the distinction, WinGet’s behavior makes perfect sense. This behavior is simply misreported as “pinned” not “RequireExplicitUpgrade.”

Now that you know what’s going on, you can look at that “pinned” label and nod knowingly instead of scratching your head. That’s what understanding tools is all about. That makes you a sharper and better-informed inhabitant, here in Windows-World.

Facebooklinkedin
Facebooklinkedin

OOB KB5129195 Impacts LAN

Imagine my surprise this morning when I sat down at Flo6, my trusty B550-based homebrew desktop. Instead of taking me to the desktop, I faced a login prompt. “Hmmm,” I thought to myself, “Looks like an update came through.” Sure enough, when I checked I found MS pushed one yesterday to fix issues following last week’s Patch Tuesday. And indeed, OOB KB5129195 impacts LAN access via RDP to at least one of my machines. Let me explain, and provide more details.

How OOB KB5129195 Impacts LAN

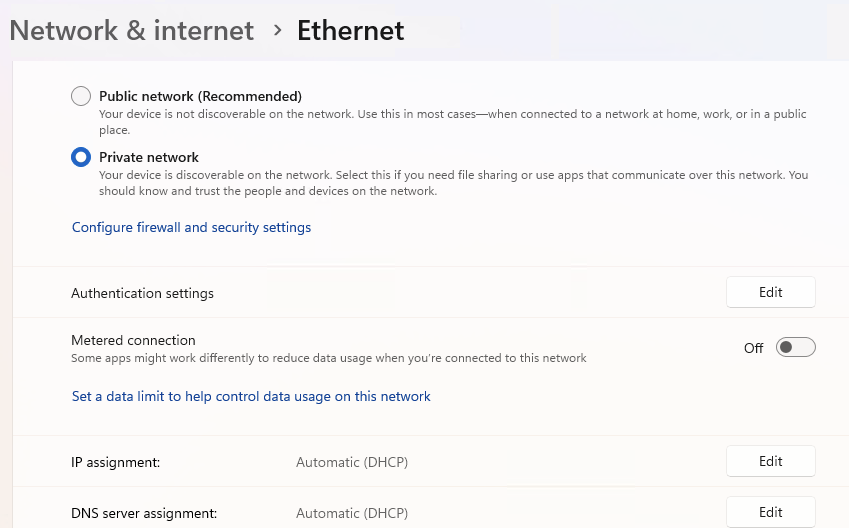
When I tried to RDP into the ThinkStation P3 Ultra Gen 2 (aka TSP3Ultra2), the machine name wouldn’t resolve. Using Advanced IP Scanner, however, I was able to get in through its IP address. I quickly determined that the update had toggled the Network type from “Private” to “Public” (in that latter situation, Machine Names don’t work). Resetting the toggle to “Private” put things back in the pink.

TLDR: OOB KB5129195 in Brief Bullets

  • OOB KB5129195 shipped September 14, 2026, outside the normal Patch Tuesday schedule, to hit my PCs last night.
  • It fixes RDP instability, Hyper-V folder sharing, USB audio failures, and a partially unpatched privilege escalation flaw.
  • Five of my eight home PCs received and installed the update.
  • Two machines required manual restarts; only one flipped its LAN profile from Private to Public afterward.
  • Fixing the profile flip takes about two minutes in Settings;be sure to check for it.

The OOB Release Trigger

September’s Patch Tuesday update, KB5122880, introduced several nasty regressions. Remote Desktop Services became unstable, causing RDP failures and server hangs. That alone would justify an emergency fix. Hyper-V Plan9 folder sharing also broke for Linux VMs, a real headache for developers. USB Audio Class 1.0 multichannel playback went sideways on some affected systems too.

On top of all that, a privilege escalation flaw, CVE-2026-62721, was only partially patched in the original release. That flaw lives in the Windows User-Mode Power Service. KB5129195 addresses all  these regressions. After installation, Windows 11 24H2 machines move to build 26100.9457. Windows 11 25H2 machines land on build 26200.9457. Eventually.

The Upgrade Hit 5 of 8 PCs Here at Chez Tittel

I run eight PCs in my home lab here in Round Rock. Five of them flagged KB5129195 as applicable and pulled it down. The other three were unaffected, likely due to differing configurations. The five affected machines automatically downloaded the update. Microsoft’s documentation puts installation time at roughly ten minutes. That tracked closely with what I observed across my fleet.

Auto-restart systems finished cleanly: Three of my five affected PCs are set to auto-download, install, and reboot via Windows Update. All three finished the update with zero drama. No errors, no failed installs, no post-reboot surprises. That is the experience Windows Update is supposed to deliver. I wish every update went so smoothly.

Manual Restarts on P16 and TSP3Ultra2: Two machines required manual restarts: my Lenovo ThinkPad P16, which I call the P16, and the TSP3Ultra2. Both showed KB5129195 as pending restart in Windows Update. I manually triggered the restart on each machine and waited. Both came back up fine after the reboot.

Then I noticed something off. On the TSP3Ultra2, the LAN network profile had flipped from Private to Public. This is a known side effect that occasionally follows cumulative updates. It matters more than you might think. I fixed it by going to Settings, then Network and Internet, then Ethernet properties, and switching the profile back from Public to Private.

Why the LAN Profile Flip Matters

Windows treats Public and Private network profiles differently. The Public profile blocks most incoming connections and disables network discovery. That can silently break file sharing, remote access, and other local network features. The Private profile enables discovery and sharing, which is what you want on a trusted home or office network. After any significant Windows update, I now make a habit of checking the network profile. Go to Settings, then Network and Internet, then click on Properties. Confirm the profile reads Private. If it says Public, flip it. It takes about thirty seconds.

KB5129195 is a necessary update, and I am glad Microsoft moved quickly to ship it. Most machines handled the install without any fuss. The LAN profile flip on the TSP3Ultra2 was an annoyance, but nothing a quick settings change couldn’t handle. If you apply OOB KB5129195, do yourself a favor: check your network profile afterward. A few seconds of verification can save head-scratching later. That’s a good thing, here in Windows-World where reasons for such behavior pop up all the time!

Facebooklinkedin
Facebooklinkedin

Strange DirectX Pin on Flo6

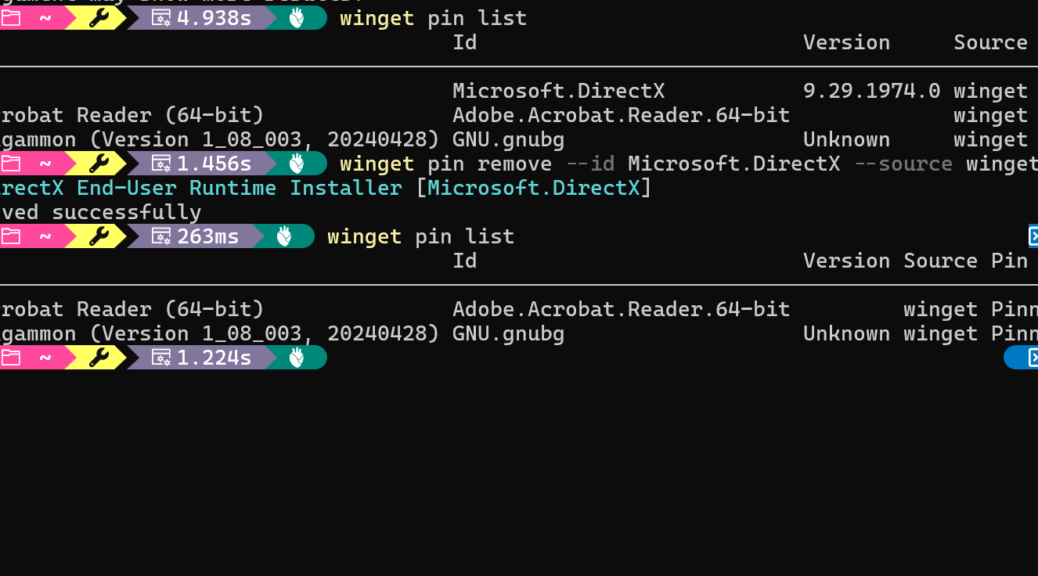
I was doing a routine check of my WinGet pin list on Flo6 just now (ICYMI, Flo6 is my production desktop). After running winget pin list I spotted three pinned packages. Two of them I recognized immediately. Adobe Acrobat Reader (64-bit) and GNU Backgammon  I pinned myself, on purpose. But the third one stopped me cold. It showed Microsoft.DirectX at version 9.29.1974.0. I had never pinned that. Why did I see this strange DirectX pin?

How I Got a Strange DirectX Pin on Flo6…

First, let me share some background. Modern DirectX, meaning DirectX 11 and DirectX 12, is baked directly into Windows. Windows Update manages it entirely. Winget does not install, update, or remove it. How, then, did it make its appearance?

The Microsoft.DirectX package from the WinGet community catalog is something else entirely. It refers to the DirectX End-User Runtime redistributable, specifically its June 2010 release. That’s the last one MS ever shipped.

Indeed, Version 9.29.1974.0 is the final, frozen-forever build. It’s unchanged since 2010. Back in the day, games and apps from that era bundled this runtime to pull in legacy components. Think D3DX9, XAudio2, and XInput. On most modern Windows systems, this redistributable is obsolete and irrelevant.

The Source of This Strange Pin May Be…

Here’s where things get weird. The Microsoft.DirectX manifest in the WinGet community catalog had a long-running typo. For a while, it listed the package version as 9.29.1974.1 instead of the correct 9.29.1974.0. A community contributor eventually caught the error and submitted a pull request to fix it.

Once that fix merged into the catalog, WinGet suddenly saw a mismatch on affected machines. The catalog now declared 9.29.1974.0 as current. The installed runtime also reported 9.29.1974.0. So far so good. But the metadata around the install technology did not reconcile cleanly. Windows owns and controls the DirectX runtime. WinGet does not.

Winget could neither upgrade the package nor cleanly resolve the discrepancy. So it did the next best thing. It quietly added a Pinning-type pin to suppress its spurious upgrade prompt. That kept its noise out of winget upgrade --all output. In short, winget added the pin to stop nagging itself about a package it cannot actually manage. I have to laugh about that, give me a moment…

Removing the DirectX Winget Pin Is Safe

The good news here is straightforward. This pin is purely administrative. WinGet created it as a workaround for its own catalog inconsistency. It was never protecting anything vital.

Removing the pin leaves the DirectX runtime alone. The actual runtime stays right where it is. Windows Update continues to manage it, same as always. Better yet, the phantom upgrade version, 9.29.1974.1, is already gone from the WinGet catalog. Removing the pin won’t spur any bogus upgrade attempts. Nothing bad is waiting to happen.

The command to remove it is simple:

winget pin remove --id Microsoft.DirectX --source winget

As you can see in the screenshot above, the operation returns “Pin removed successfully” in under two seconds. A quick follow-up winget pin list confirms the DirectX entry is gone. No drama, no side effects.

Separating Signal from Noise

This episode is a good illustration that WinGet isn’t infallible. Sometimes its catalog or tooling leaves artifacts behind that look alarming but turn out to be harmless. The DirectX pin on Flo6 was exactly that: a breadcrumb left by WinGet’s own error-handling logic, not by anything I did. A single one-liner clears it up in seconds. Now, winget pin list shows only packages I actually chose to pin. That is exactly how it should be, and I am glad to have one less mystery on my machine. That counts as a win, here in Windows-World. Cheers!

Facebooklinkedin
Facebooklinkedin