


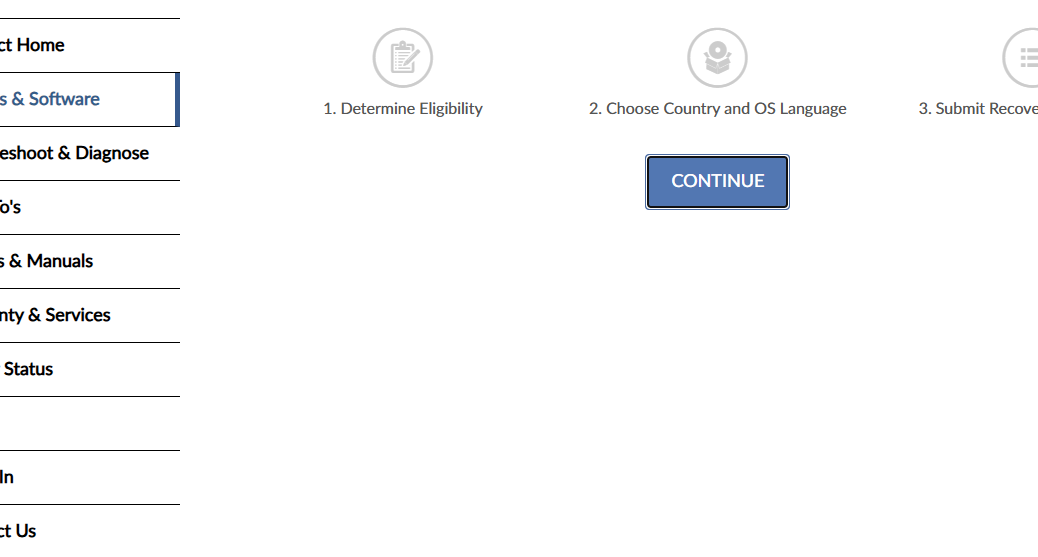
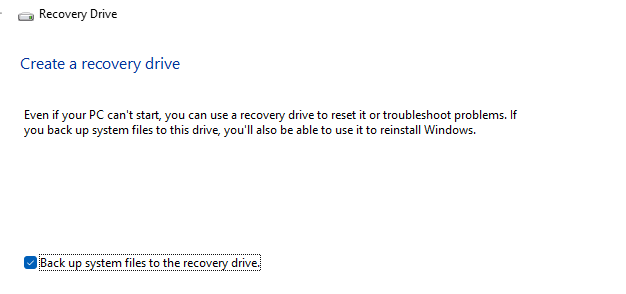
Every so often, Windows administrators run into a problem that looks like one thing but turns out to be something else. My recent adventure with Lenovo’s USB Recovery Creator is a good example. What started as a simple attempt to build a recovery USB stick for a ThinkStation P3 Ultra Gen 3 turned into a deep dive into how Windows, UEFI firmware, and USB controllers decide what counts as “removable media.” Spoiler alert: it’s the layout, not the UFD. To access this tool visit Lenovo Support, plug in your Lenovo PC serial number, go to the Drivers & Software page, then click the Submit Recovery Media Order button.
Why I’m Sayin’: It’s the Layout Not the UFD
If you’ve ever plugged in a perfectly good USB flash drive only to have Lenovo’s recovery tool refuse to see it, you’re not alone. I tried half a dozen drives. They included 32+GB models from SanDisk, Kingston, Mushkin, Transcend, ADATA, even a brand‑new 256GB USB‑C DataTraveler. Every single one failed Lenovo’s removable‑media test. Windows saw them. Explorer saw them. Disk Management saw them. But Lenovo’s tool? Nada. The dropdown menu stayed stubbornly empty.
That’s when the real troubleshooting began.
Why the Tool Rejects “Unspecified” Devices
Lenovo’s USB Recovery Creator is picky. Indeed, it’s far pickier than most users expect. It doesn’t simply look for a USB drive. It looks for a USB drive that reports itself as MediaType = Removable through Windows’ storage stack. Anything else—SSD, HDD, or the dreaded Unspecified—gets ignored.
Here’s the catch: many modern USB flash drives, especially high‑performance ones, identify themselves as fixed disks rather than removable media. This is intentional. Manufacturers optimize for speed, wear leveling, and controller behavior to mimic SSDs. Windows is fine with this. UEFI is fine with this. Most tools , ditto. Lenovo’s USB Recovery Creator tool is not.
When I ran:
Get-PhysicalDisk | Select FriendlyName, BusType, MediaType
every single UFD I owned showed up as:
- BusType = USB
- MediaType = Unspecified
That’s the kiss of death for Lenovo’s recovery tool. It will never list a device that reports “Unspecified,” no matter how new, fast, or reliable it is.
Proper Cleaning, Formatting and Partitioning Works
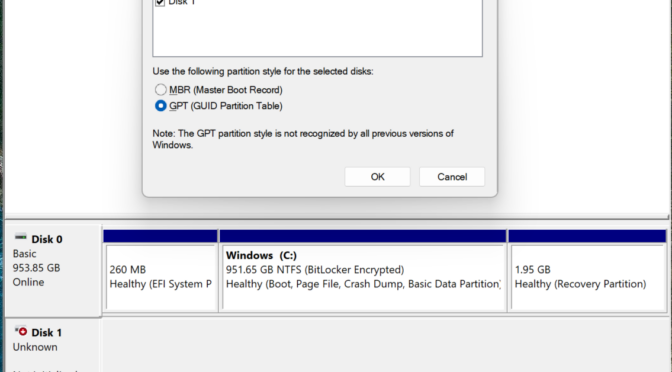
Here’s where the story takes a turn. Conventional wisdom says formatting or repartitioning won’t change how a USB device identifies itself. And that’s true — MediaType doesn’t change. But Lenovo’s tool isn’t only checking MediaType. It’s also checking the partition layout, and that’s where things finally broke open.
After trying multiple drives and ports, I decided to go nuclear and rebuild the USB stick’s layout from scratch using DiskPart. The magic sequence turned out to be:
diskpart

list disk

select disk X

clean

convert gpt

create partition primary size=32000

format fs=fat32 quick

assign

exit
The moment I did this — and I mean immediately — the Lenovo USB Recovery Creator dropdown lit up and showed the UFD. No hesitation. Nothing ambiguous. No more empty menu.
This was the breakthrough: Lenovo’s tool requires a very specific starting layout before it will accept a USB device, even if the device reports MediaType = Unspecified.
In other words, the tool doesn’t just care about whether the drive is removable. It cares about:
- GPT vs MBR
- Partition count
- Partition size
- Partition type
- File system
- Whether the drive is “clean”
- Whether Windows has mounted it consistently
Once the drive was wiped, converted to GPT, given a single 32GB FAT32 primary partition, and mounted cleanly, Lenovo’s tool recognized it instantly. That’s when the lightbulb lit up: it’s the layout, not the UFD.
Why Lenovo’s Tool Needs a Clean GPT/FAT32 Layout
Lenovo’s recovery creator expects to take full control of the USB device. It wants to:
- wipe the drive
- repartition it
- write a bootloader
- copy the recovery image
- verify checksums
If the drive has:
- multiple partitions
- leftover boot sectors
- exFAT or NTFS formatting
- odd alignment
- remnants of previous boot media
- a corrupted MBR
- a GPT with unexpected metadata
the tool simply refuses to show it in the list of acceptable targets. This explains why even brand‑new drives failed: they shipped with factory formatting that didn’t match Lenovo’s expectations. That said, once the layout was corrected, the tool behaved exactly as designed.
The Real Lesson: Modern USB Behavior Requires Modern Troubleshooting
This experience taught me something important: modern USB flash drives aren’t the simple “plug‑and‑play removable media” devices they used to be. They behave more like miniature SSDs, and their factory formatting often reflects that.
Lenovo’s USB Recovery Creator, however, still expects a classic removable‑media layout. When the layout doesn’t match, the tool silently ignores the device. Fortunately, the fix is straightforward once you know what the tool wants to see.
Lesson Learning
If you’re struggling with Lenovo’s USB Recovery Creator, don’t assume your USB flash drive is bad. Don’t assume the ports are faulty. Don’t assume the controller is misbehaving. The real issue is usually the partition layout on the UFD. Clean it. Convert it. Create a simple FAT32 primary partition. Then watch the Lenovo tool recognize it instantly.
In other words: it’s the layout, not the UFD. Here in Windows-World these little details matter. They sucked up my morning and tossed it away. This afternoon, I’m back on the hunt. Whew!
 Accessed via on-disk WinRE, there it is!