Category Archives: Security

Evolving Windows Device Security Hardware

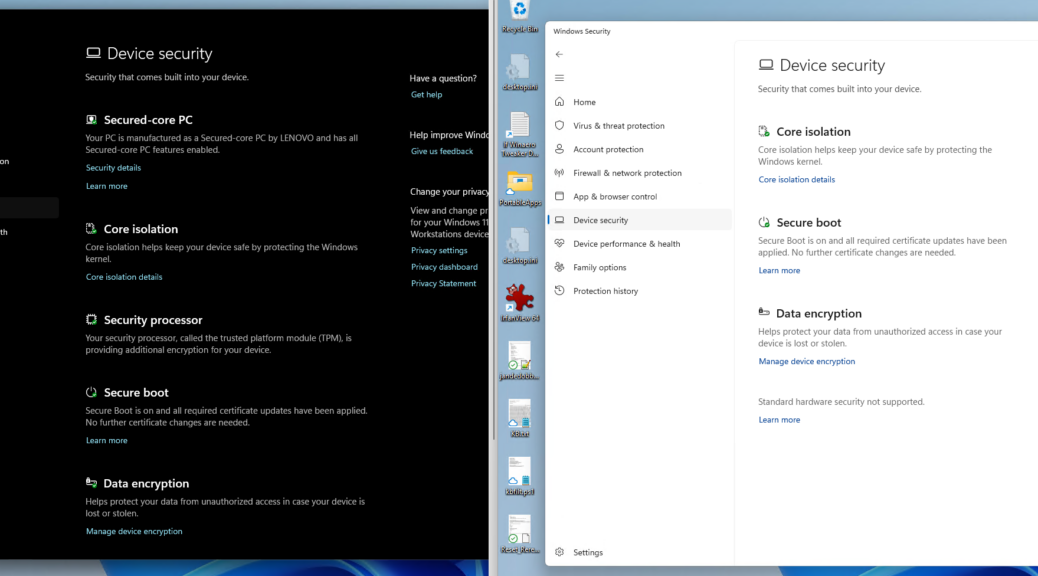
This weekend, I pulled up the Windows Security Device security panel on my ThinkPad P16 Gen 3 (2025 build) and my ThinkPad X380 (2018 build; made a 2017 debut), and put them side by side. The difference showed me something interesting — namely,  evolving Windows Device Security hardware.

Both machines run Windows 11. Both are solid, business-class Lenovo laptops. However, the P16 Gen 3 panel is full: every tile is lit, every checkmark is present. The X380 panel, OTOH, shows obvious gaps. It closes out with a blunt verdict: “Standard hardware security not supported.” The lead-in screenshot tells a story of Windows device security hardware evolution over 7 years.

The X380 isn’t a bad machine. It was just built before the security landscape it now lives in actually existed. That distinction matters, so it’s worth unpacking what’s missing and why.

What Evolving Windows Device Security Hardware Means

The most visible absence on the X380 is the Secured-core PC badge. Not surprising when you check the timing: MS launched the Secured-core PC initiative on October 21, 2019. That’s over a year after the X380 shipped. The X380’s 8th-generation Intel Core (Kaby Lake Refresh) silicon predates the Dynamic Root of Trust for Measurement (DRTM) and System Guard Secure Launch capabilities that Secured-core status requires.

In sharp contrast, the P16 Gen 3 runs Intel Core Ultra 9 silicon that fully implements Intel Hardware Shield. That’s what underpins DRTM and Kernel DMA Protection at the hardware level. In addition, Secured-core mandates HVCI (Hypervisor-Protected Code Integrity) enforced at the silicon level. Older CPUs can enable this in software. Alas, they cannot deliver the hardware-based capability that Microsoft’s Secured-core PC requirements demand.

The second gap is the Security processor tile. The P16 Gen 3 surfaces an explicit tile confirming that TPM is visible, active, and reports correctly to the Windows Security layer. The X380 does have a TPM  (Lenovo shipped TPM chips on all commercial machines by 2017). However, Windows Security on the X380 doesn’t surface that tile. Its firmware TPM integration doesn’t offer stricter attestation-visibility that newer UEFI and firmware stacks expose to the operating system. The chip is there, but the trust handshake simply isn’t good enough for Windows to show it as an attestable asset.

The X380 Bottom Line Is…Not Quite There

That brings us to the X380 bottom-line verdict: “Standard hardware security not supported.” Windows delivers this message when a device cannot simultaneously confirm TPM 2.0 attestation, Kernel DMA Protection, and VBS readiness at the hardware level. The X380 can satisfy some of those requirements individually, but not in hardware. As a result, it falls short of the full baseline. That is not a misconfiguration, but falls out because the required silicon-to-firmware-to-OS trust chain simply wasn’t designed into the X380.

What Both Machines Get Right

Let’s be fair to the X380, because calling it obsolete would be wrong. Core isolation runs. And indeed, Virtualization Based Security operates in software mode. Secure Boot is fully active, with all certificates up to date. BitLocker encrypts the drive. These are the foundational Windows security capabilities that survive on older hardware, and they aren’t trivial. The X380 still protects data at rest and guards boot integrity against tampering. It simply cannot make the firmware-to-OS trust chain guarantees that silicon-rooted security delivers. There’s a meaningful difference between those two tiers, but the lower tier is not nugatory.

A Seven-Year Gap in Numbers

Between 2017 and 2025, Intel moved from 8th-generation Kaby Lake Refresh to Core Ultra (Meteor Lake and Arrow Lake). AMD traveled from Ryzen 1000-series to Ryzen AI 300. Along the way, Microsoft introduced Secured-core PC certification (2019), Windows 11’s hard TPM 2.0 requirement (2021), the Pluton security processor co-design with AMD and Intel (2022 ), plus evolving memory encryption standards. Thus, the Device Security panel on a 2025 machine doesn’t just reflect software updates . It also reflects seven years of deliberate co-design among Microsoft, Intel, AMD, and various OEMs, baked directly into the silicon and firmware before the OS even loads.

Wondering About Continued Viability?

If you’re running a 2017/8-era machine and wondering why your Device Security panel looks thin, it’s not your fault and it’s not your settings. It’s the silicon that falls short. The hardware security stack that Windows 11 fully expects is built into CPU microarchitecture and firmware design from 2019 onward. No amount of registry tweaking can close that gap. That said, your older machine isn’t broken. Instead it’s working at a lower tier of the trust hierarchy, but it still does real security work. When it is finally time to refresh, pull up the Device Security panel on your new, Secured-core PC. It  fills those gaps, and offers more and  better security capability. Worth it!

Facebooklinkedin
Facebooklinkedin

Explainer: Secure Boot Chain of Trust

Here’s an uncomfortable, seldom considered truth: your operating system isn’t the first thing that runs when you power on your PC. The firmware goes first. Then the bootloader. Then the OS kernel. Malware creators figured this out a long time ago. Get in early enough — before the OS loads — and you can own a machine invisibly, surviving reboots, reinstalls, and even antivirus scans. All this explains why the secure boot chain of trust is vital to modern Windows security.

The threat is real and it’s present right now. BlackLotus, a UEFI bootkit sold on criminal forums, made headlines in 2023 for bypassing Secure Boot on fully patched Windows 11 systems. BootHole exposed a critical flaw in GRUB2’s boot process that affected both Linux and Windows. PKFail (2024) revealed that dozens of device vendors had shipped products using a leaked “do not ship” test Platform Key — meaning the root of the entire trust hierarchy was compromised straight out of the box. Then, in January 2025, ESET researchers disclosed CVE-2024-7344: a Microsoft-signed UEFI recovery application that could silently load unsigned bootkit code — on any UEFI system, regardless of whether Secure Boot was enabled. Microsoft pulled the vulnerable binaries in the January 14, 2025 Patch Tuesday update.

Boot-time attacks aren’t theoretical. They’re happening. Under-standing Secure Boot’s chain of trust is the first step toward knowing whether your defenses are actually holding.

Understanding the Secure Boot Chain of Trust

Think of the chain of trust as a series of checkpoints at the border. Each checkpoint must vouch for the next before anything is allowed through. No vouching, no entry, and the boot process stops dead.

In technical terms: every component in the boot sequence verifies the digital signature of the next component cryptographically before handing off execution. The firmware checks the bootloader. The bootloader checks the OS kernel. The kernel checks drivers. If any link in that chain can’t be verified — wrong signature, no signature, a signature that’s been revoked — the process stops. Your PC refuses to proceed rather than run untrusted code. That’s the whole point. Always safe means never sorry, even if it also means a PC that won’t fire up and run.

The chain only works, of course, if the first link is trustworthy. That’s where the UEFI key hierarchy comes in.

The Key Players: PK, KEK, db, and dbx

UEFI Secure Boot manages trust through four interlocking databases baked into your firmware. Get familiar with them — they come up constantly whenever something goes wrong at boot time.

Key / Database Full Name Role
PK Platform Key Root of trust. Set by the hardware manufacturer. Controls who can update KEK.
KEK Key Exchange Key Authorized to update the signature databases (db and dbx).
db Signature Database Hashes and certificates of trusted bootloaders allowed to execute.
dbx Forbidden Signatures Database Revoked signatures and hashes. Anything here is blocked unconditionally.

The PK sits at the top. Your motherboard manufacturer owns it. Below the PK, the KEK authorizes who gets to update the lists of trusted and forbidden signatures. In practice, Microsoft functions as the de facto Secure Boot Certificate Authority for the consumer PC ecosystem. Nearly every machine you buy ships with Microsoft’s certificates pre-loaded in db — exactly why CVE-2024-7344 was so broadly dangerous. A legitimately Microsoft-signed binary became a usable attack vector!

Worth Knowing: PKFail and the Test Key Problem

In 2024, the PKFail vulnerability revealed that over 200 device models from multiple vendors shipped with a Platform Key originally marked “DO NOT TRUST” — a sample key from AMI’s reference firmware that was never meant to leave the lab. When your PK is public knowledge, the entire root of trust collapses.

How the Chain Is Created at Boot Time

Power on your PC, and here’s what actually happens — fast, invisible, and mostly taken for granted.

  1. The UEFI firmware initializes hardware and activates Secure Boot mode.
  2. The firmware reads the bootloader from the EFI System Partition and checks its signature against db. It also checks against dbx — if it’s there, execution stops immediately.
  3. The signed bootloader (Windows Boot Manager, for example) takes over and verifies the OS kernel’s signature using its own embedded certificates.
  4. The kernel loads and verifies signed drivers. On Windows, this is enforced through Driver Signature Enforcement — unsigned kernel-mode code is blocked by default.

Every handoff is cryptographically verified before it happens. Compromise any link — plant an unsigned binary, exploit a signed-but-vulnerable loader, sneak past a misconfigured dbx — and an attacker owns your machine below the OS waterline. That’s precisely the attack surface that BlackLotus, BootHole, and CVE-2024-7344 each exploited in different ways.

Maintaining a Strong Chain of Trust

Secure Boot isn’t a “set it and forget it” control. Maintaining a healthy chain of trust requires ongoing attention from both Microsoft and from you.

The most important maintenance lever is the dbx — the blocklist. When a bootloader is found vulnerable (as happened with a batch of 2011-era Microsoft-signed binaries in 2023, and again with the CVE-2024-7344 binaries in January 2025), Microsoft issues dbx updates through Patch Tuesday. Your firmware then refuses to execute those specific binaries even if they’re somehow placed on the system. Keeping Windows Update current is how those revocations reach your PC.

Firmware updates matter just as much. Vulnerabilities in the UEFI firmware itself require OEM-supplied updates delivered via Windows Update or manufacturer tools. The NSA and CISA have both issued guidance recommending that organizations periodically audit their Secure Boot configuration — confirming the correct keys are enrolled, the dbx is current, and no rogue Platform Keys are in place (a lesson PKFail drove home hard).

Complementing Secure Boot is the TPM’s Measured Boot capability. While Secure Boot enforces what can execute, Measured Boot records cryptographic measurements of everything that did execute into TPM Platform Configuration Registers (PCRs). Remote attestation tools can then verify those measurements after the fact. Think of Secure Boot as the bouncer at the door; Measured Boot is the security camera logging who actually got in.

Why the Chain of Trust REALLY Matters

Secure Boot isn’t perfect — BlackLotus, BootHole, PKFail, and CVE-2024-7344 all proved that. But “not perfect” is a long way from “useless.” It raises the cost and complexity of boot-level attacks significantly, and when the ecosystem keeps the revocation databases current, it closes known attack paths quickly.

Do yourself a favor: open System Information (msinfo32), find BIOS Mode (should read UEFI) and Secure Boot State (should read On). If either is wrong, fix it. Keep your firmware updated. Keep Windows updated. The chain of trust is only as strong as its weakest, most-neglected link — and that link is usually sitting right between the keyboard and the chair. Here in Windows-World keeping track of key security concerns is darned important. The Secure Boot chain of trust should be at the top of everyone’s list.

Facebooklinkedin
Facebooklinkedin

Windows Security Checks Secure Boot

I just read at WindowsLatest that the Windows Security app now includes a Secure Boot check beneath its Device Security left-column head. I checked all of the PCs in my office to make sure (7 of them). Sure enough. each now lists Secure boot amidst its elements. As the aforelinked story shows, when Windows Secure checks Secure Boot status it uses one of three visual symbols as quick indicators:

  • Green checkmark indicates Secure Boot is basically OK. There’s more going on here than meets the eye, as I’ll explain later.
  • Yellow exclamation (warning) indicates Secure Boot is running but the latest certificate (CA-2023) is not yet in place or use.
  • Red X (stop sign, error/problem) indicates the device cannot receive required updates to keep the Windows boot process secure.

Why Windows Security Checks Secure Boot Now

Microsoft added this new entry because Secure Boot certificates from 2011 are expiring in 2026. Thus, Windows needs a user‑visible way to show if a device has received the updated 2023 certificates. Up to now, Secure Boot status was invisible unless users dug into UEFI or used PowerShell.

But with certificates — CA-2011, specifically –expiring, Microsoft now needs some way to:

  • Tell users whether their system is still protected
  • Indicate whether the new certificates have been applied
  • Warn users if action is required (firmware update, OEM tool, etc.)
  • Provide a simple green/yellow/red indicator instead of forcing people to inspect UEFI variables

That makes the new Secure Boot section in Windows Security  essentially an approachable, easy-to-grasp health dashboard for the certificate update.

It’s Not as Easy as It Looks?

The WindowsLatest story shows the same green checkmark text as the lead-in graphic for this story. But when I checked a couple of my other machines, I saw something different. Here ’tis:

Note the difference in the text output here. Even though both forms proffer the green checkmark to denote Status=OK, the first one reads “Secure Boot is on and all required certificate updates have been applied. No further certificate changes are needed (bold emphasis mine).” However, the second one simply says “Secure boot is on, preventing malicious software from loading when your device starts up.”

The second doesn’t say “No further certificate changes are needed.” At first, I thought the difference might be that on some PCs the CA-2011 certificate had already been revoked (all OK PCs must have the CA-2023 cert installed, in use, and recognized in the boot loader to qualify for that status). But on one PC with the simpler message, the CA-2011 certificate shows revoked (it’s in the UEFI DBX Certs database, which means it’s blocked). And on the other PCs with the “no further” language the CA-2011 certs are still enrolled (they’re in the UEFI KEK and UEFI DB databases, and NOT in the UEFI DBX database).

So I’m still wondering exactly what’s going on here, and what MS is trying to tell us with these two different OK messages. I’ll keep digging and write more when I find or figure out what’s going on. A sense of mystery, and a willingness to suspend resolution pending necessary information, are familiar sensations in Windows-World. The plot thickens…but I hope, not too much!

Added 1 Hr Later: Word from the Top

I corresponded with Garlin himself on ElevenForum, and at his suggestion, ran his update_UEFI-CA2023. script on the P16G3. That brought all the DB certs into the UEFI DB (including Option ROM and Windows UEFI). It still shows VBS policy as missing. But it turns out that by running .\Update_UEFI-CA2023 -SkuSiPolicy and rebooting, I can take care of that. Here goes … another reboot. Now the Garlin check script gives the P16G3 a completely clean bill of health, but I still get the short message. Very interesting!


Facebooklinkedin
Facebooklinkedin

Chez Tittel Secure Boot Report Card

Here in my house — Chez Tittel, that is — I have 11 computers running. Of that number, 10 have Secure Boot enabled and running. 8 have updated to the 2023 Secure Boot certificate authorities (aka 2023 CA) to replace the soon-to-be-obsolete 2011 CAs. Let’s call this status the Chez Tittel Secure Boot Report Card. Next, I will provide more details.

Presenting Chez Tittel Secure Boot Report Card

You can see that the report card takes the form of a table in three columns. (Open the lead-in graphic in its own browser tab to see the whole shebang.)  Col1 shows the machine name for each PC. Col2 indicates whether or not Secure Boot is enabled. Col3 covers whether or not the new 2023 CA is present or missing.

Here’s a breakdown, with percentages:

  • 10 of 11 machines have Secure Boot enables and running (~91%)
  • 8 of 11 machines have the new 2023 CA in their secure stores
  • 2 of 11 machines are waiting on WU to send them an update. It will add CA 2023 to their secure credentials. (2018 vintage X380 Yoga and the 2020 vintage X12 Hybrid Tablet.)
  • The only holdout is RyzenOfc, whose Asrock B550 motherboard won’t go into UEFI with the ancient NVIDIA GeForce 1070Ti currently installed. I’ve ordered a newer 4070 board and expect to complete the install process to enable Secure Boot and bring CA 2023 on board once it gets here.

Assessing a Mini-Fleet Experience

I was pretty surprised that the OEM PCs made working with Secure Boot and the 2023 CA update more or less routine. I only had to enable Secure Boot on a couple of machines, and the all of their update processes went smoothly. This involved machines from Lenovo (7) and one each from Dell and Asus.

The Asrock B550 PCs were a whole ‘nother story. I now know it’s at least partly because the old Pascal firmware on the 1070 GPUs doesn’t mesh well with UEFI in general. But I also now know that the B550 UEFI itself is a finicky and sometimes cantankerous beast.

Getting the first instance (Flo6, my production desktop) working with SB and 2023 CA  was close to the adventure of a lifetime. I sincerely hope that when the new GPU appears here at Chez Tittel, the second iteration will be easier, less vexing, and nowhere near as drawn-out as the first one was. We’ll see: here in Windows-World anything can happen — and often does!

Facebooklinkedin
Facebooklinkedin

KB5074105 Brings On Secure Boot

Just when I’d more or less given up, along comes KB5074105 on January 29. In its “Normal rollout” fork, the first item to appear is entitled [Secure Boot]. That item (partly depicted above) also explicitly mentions boot manager updates for UEFI CA 2023. And indeed, after I installed and rebooted from that update, I was finally, finally able to get Secure Boot working on the Flo6 desktop. It ain’t necessarily easy or quick, but KB5074105 brings on Secure Boot capability to at least some machines that need it.

With Some Effort, KB5074105 Brings On Secure Boot

You’d think it would be as easy as falling off a log to get Secure Boot (SB) working after the update. You’d be wrong. I had to go through eight (8!) steps after that to set things to rights:

1. Reboot into UEFI and enable Secure Boot
After KB5074105 updated the boot binaries, I could finally toggle Secure Boot ON without triggering a pre‑GOP (graphics output protocol) stall. This was the first sign the trust chain was now compatible with the 2023 CA.

2. Switch Secure Boot Mode to Custom
This exposed the key‑management interface, allowing me to directly manipulate PK, KEK, db, and dbx. Standard mode hides these controls.

3. Install the factory default Secure Boot keys
Reloaded the OEM/Microsoft default PK, KEK, db, and dbx. This rebuilt the entire Secure Boot hierarchy from a known‑good, signed set.

4. Save and reboot to exit Setup Mode
Once the keys were installed, the firmware left Setup Mode and re‑entered User Mode, meaning Secure Boot enforcement was now active.

5. Boot Windows with Secure Boot enabled
Windows successfully validated its updated boot chain (thanks to KB5074105) and completed a full boot under Secure Boot for the first time on Flo6.

And That’s Still NOT the End of the Ride…

6. Rebuild the TPM trust state
Because Secure Boot changed the PCR profile, Windows had to re‑establish TPM‑sealed secrets. This required signing in with my password and letting Windows reseal keys.

7. Reprovision Windows Hello for each MSA
Both my primary and secondary MSAs needed fresh Hello containers because the TPM and Secure Boot trust anchors had changed. Each account required a password login followed by PIN setup.

8. Rebuild WAM tokens for Store/Xbox/MSA services
Once Hello was re‑established, the MS Web Account Manager (WAM) regenerated its token sets. This cleared the Xbox PIN loop and restored cloud‑service authentication. Indeed WAM allows apps to silently authenticate using Hello-based credentials.

A lot of this is new to me, because I’ve never had to set up SB on a PC before. My other PCs from Lenovo and Dell have done a fine job of doing it for me. This is the first time I’ve done it for myself… and it’s been much more of an adventure than I expected. Wow!


Facebooklinkedin
Facebooklinkedin

SAC Gains Gradual Rollout Toggle

SAC stands for Smart App Control. It appears in Windows Security under the App & browser control heading. Over on WindowsLatest this morning, I read about a new change with mounting excitement. Starting with Build 26220.7070, SAC may now be turned on and off at will. Before this new change, once turned off, reinstalling Windows (clean install) was the only way to turn SAC back on. But alas, it seems that SAC gains gradual rollout toggle, because that feature is not available to me. Look at the lead-in graphic the text under the “Off” toggle on my ThinkPad T14s. It still reads “If SAC is off it can’t be turned on without reinstalling Windows.” Drat!

Not Yet Included, As SAC Gains Gradual Rollout Toggle

As it turns out the same thing is true for my Lenovo X380 Yoga, running Build 26220.7344. Apparently, neither of my qualified test PCs meets the initial gating criteria for the new version of SAC. Sigh.

The clean install requirement (and the one my machines must meet) for turning SAC back on, once it’s turned off, is a kind of deal-breaker for me. I do understand that Windows wants SAC to start with a clean slate. Indeed, that’s why this requirement is exacted. But it seems MS can now get past this immense previous hurdle.

Thus, my question is: When will my eligible test PCs get their turn? Here in Windows-World, answering such questions inevitably means waiting … and waiting … and waiting … until that turn rolls around. If history is any guide, it will take a while. I’ll keep you posted, but don’t hold your breath.


Facebooklinkedin
Facebooklinkedin

Windows 11 Smart App Control

I’m always learning something new or surprising about Windows. In this case, I’m talking about Windows 11 since 22H2 came along in September 2022. That’s nearly 3 years ago, so to discover something mostly missing in new-ish (and brand-new) eval PCs from OEMs such as Lenovo, dynabook, and Panasonic is my surprise of the day. I’m talking about a feature in Windows Security — namely Windows 11 Smart App Control — about which I’ve been mostly oblivious until today.

This morning, I re-read a piece from Paul Thurrot from last Thursday (June 26) entitled  You Use Windows. Be Resilient (it’s Premium content, so you’ll need to sign up for a membership to read this: sorry). Under the heading of app protection, it off-handedly mentioned Smart App Control as follows:

Windows 11 has a feature called Smart App Control that’s in a weird state of flux and may or may not be configurable on your PC. Open Windows Security and navigate to App & browser control > Smart App Control, and see whether you can enable it. If you can, do so.

“Hmmm” I thought to myself, I don’t recognize this. “I’ll go look.” On the vast majority of new machines (all issued in 2023 or later) I found that — as you can see in the lead-in graphic– Smart App Control was turned off. And right below that status: a can of interesting worms. Gotcha!

A Gotcha in Windows 11 Smart App Control

That can of worms is, of course, the explanation beneath the “Off” toggle that reads “If Smart App Control is off it can’t be turned on without reinstalling Windows.” Really?!?!

That’s right. Apparently, enough people have noticed this distressing detail that MS has put together a FAQ around this very topic. It’s the one that’s accessible from the link at the bottom of the lead graphic that says Learn more about why Smart App Control is off.

TLDR: Smart App Control hooks into the OS at a deep enough level that if it’s not there when the OS gets laid down, a new, clean install is necessary to put it there from inception to make sure it works like it should. In other words, if your install of Windows 11 predates 22H2 — as so many of mine do — or the OEM doesn’t enable this feature as part of their initial Windows 11 image install — you can’t have it without an OS do-over.

What’s in My Field of (New/ish) View?

With this item in mind I examined all of my newest PCs, only to find that just one of them supports Smart App Control (SAC), albeit in “Eval mode.” Here’s what that looks like:

Of all my relatively new PCs only the dynabook X40M2 supports SAC (in evaluation mode).

Here’s a list of those PCs, for the record:

  • The preceding graphic shows I’ve got it in “Evaluation” mode on the dynabook X40M2 laptop I received earlier this month.
  • It’s turned off on the Lenovo ThinkPad T14s (original Windows 11 install date November 2024)
  • It’s turned off on the Lenovo ThinkStation P3 Ultra (original Windows 11 install date November 2023)

I just got an eval from Lenovo for its new Copilot+ capable AIO (Model Lenovo Yoga AIO 9i last Friday. I haven’t unboxed it yet, so I can’ t yet say if it has it turned off or not. I’ll report back later.

Small Sample Size Warning & Wondering

The sample size is ludicrously small (3 machines so far, with a fourth on the way later this week). But it’s now a bit clearer to me why I haven’t run into Smart App Control before. It’s just not that widely dispersed in the field yet. And I bet a lot of other long-time Windows Pros like me don’t know they can’t have it on older PCs unless they bring it in via a clean Windows 11 install.

Very interesting! Let’s just hope the dynabook survives Evaluation mode with Smart App Control intact, so I can learn more about how it works, and what it really does. And isn’t that just the way things often work, here in Windows-World? You betcha!

Facebooklinkedin
Facebooklinkedin

E-mail Link Cynicism Is Well-Considered

I’ll admit it: I’m a cynic when it comes to emails that ask me to follow a link to verify something. If somebody asks for verification unsolicited, I believe by default that request is malign. So when an email showed up asking me to verify my account to keep my email server going, my first instinct was “Heck NO!” And, as the NordVPN link-checker immediately confirmed , my instincts are good. It pops up instantly as a phishing site. Skepticism is spot on, and e-mail link cynicism is well-considered — at least IMO.

Check to See if E-mail Link Cynicism Is Well-Considered

If in doubt, check the link at a third-party site. NEVER click a link from an unknown sender. If you’re incurably curious, do it from a sandbox or VM you can blow away if something bad happens. The important thing is to think about what’s in your inbox, how it got there, and how it might bite you.

Here’s what the NordVPN site says. It’s great advice so I’ll repeat it verbatim:

Got a suspicious email or text? Check the link before clicking — it will significantly reduce the chances of you falling for a phishing attack.

When in doubt, check. If you can’t check, don’t click: wait until you can (or delete the email). If it’s really important and legit, the sender will resend and you’ll get another opportunity to recheck what’s going on.

Reverse Lookup Mojo

Indeed, if you are concerned about a reported issue or account problem, it’s much safer for YOU to visit a known, good, working vendor site to check on status. Amazon is a good example: I can’t tell you how many bogus SMS text messages I’ve gotten on my cell that ask for Amazon account details to confirm things, because I delete them as soon as they appear. As a matter of policy Amazon does not request sensitive info (passwords, credit card data, etc.) via SMS, though they do report  order and delivery status that way.

Be smart when you respond to emails. If there’s any doubt, open your own link to a trusted vendor and check things from your end. If you don’t recognize a sender asking for sensitive info, don’t respond. This is a case where doing nothing is exactly what’s right — and safest.

Facebooklinkedin
Facebooklinkedin

Leave Post KB5055523 Inetpub Folder Alone

I’d seen reporting on this yesterday, along with blithe assumptions about related cleanup (deletion). Today, MS has published a CVE-2025-21204 security note that explains what’s going on, and specifically advises users to leave post KB5055523 Inetpub folder alone — and intact.

Here’s a direct quote from the afore-linked source:

After installing the updates listed in the Security Updates table for your operating system, a new %systemdrive%\inetpub folder will be created on your device. This folder should not be deleted regardless of whether Internet Information Services (IIS) is active on the target device. This behavior is part of changes that increase protection and does not require any action from IT admins and end users.

Note: KB5055523 is a security update for Build 26100.3775 (production level Windows 11 24H2) released as part of the Patch Tuesday collection on April 8, 2025.

Why Leave Post KB5055523 Inetpub Folder Alone?

It’s part of the infrastructure upon which MS relies to fend off the named vulnerability. In other words, if the folder is present, MS can use it to protect against potential attacks. MS is sometimes fond of leaving folders behind in the wake of various installs (especially feature upgrades). Anything not needed is usually fair game for Disk Cleanup or the Windows Store PC Manager app.

That said, some OCD-friendly Windows users (you know who you are) relentlessly clean up things just because they must. This is apparently a case that flies against that impetus. MS, in this particular case, says “Leave it alone.” I guess I shall, and you probably should, too.

Though the Inetpub folder is empty after the update runs (see next screencap) it is meant to be and stay there. You’ve been warned! Indeed, as you can see, it’s properties are also set to “Read-only.”

The ‘Read-only’ status signals weakly that this item should stay put.

Final Warning: Don’t!

I’ve seen various online sources assert that it’s OK to delete this folder because it caused no observable ill effects on their test PCs. If what MS says about Inetpub’s presence or absence on a PC is true, you don’t want to sight what could happen if it were to be deleted. Let this particular sleeping critter keep snoozing, please.

Facebooklinkedin
Facebooklinkedin

PowerShell-Based Defender Commands

The other day, my Canary Channel X380 Yoga hung up on Windows Update. In other words, after  some kind of WU download difficulty, it wouldn’t download from those servers. There are lots of ways to unstick WU, but one of the easiest is to get Windows Defender to update. Personally, I prefer to use a single PowerShell command with no arguments or parameters, rather than navigating into Windows Security to see if that might help. Indeed, there is a plethora of Defender controls in PowerShell. The one I used is just a single instance in a collection of over a dozen items.

Finding PowerShell-Based Defender Commands

You can see the command I used to ask PowerShell to update Defender in the lead-in graphic. It’s named Update-MpSignature, and it takes no mandatory arguments or parameters. What you’re looking at there, in fact, is the general PowerShell Module Browser at MS Learn. It’s dialed into Defender commands, shown in the breadcrumbs up top: Learn/Windows/PowerShell/Defender. As you will soon find out, there is a baker’s dozen of such things there under this heading.

Other Defender Commands get their own listings, but also appear in a handy-dandy table (simplified contents reproduced verbatim below). Indeed, each one also has its individual command reference, for which you find links in said table.

As you can see there are lots of interesting and sometimes useful ways to interact with Defender in PowerShell. They’re worth exploring and getting to know. I used a simple one to unstick WU this week, but there are lots of other tools here, ready to help you manipulate Defender in Windows Terminal or via automation scripts. Have at it!

Facebooklinkedin
Facebooklinkedin