Category Archives: Device drivers

Fixing False Vantage Update

If you’ve ever dealt with a Lenovo Vantage false update, you know how maddening it gets. That goes double, when every install attempt fails silently and the same ghost package reappears on every subsequent scan. Sigh.

But that’s precisely what happened to me on a Lenovo ThinkStation P3 Ultra Gen 2 (Arrow Lake-S desktop). There, Lenovo Vantage’s System Update panel stubbornly flagged Intel Dynamic Tuning Technology (DTT) Driver version 9.1.10001.173 as a required update, even after reporting a successful install on the previous try. Sigh again.

Why I’m Fixing False Vantage Update

Here’s the wrinkle: DTT is a laptop-exclusive power-management feature. It’s tightly coupled to Intel’s thermal sensor bus. Specifically, it applies to SWC\VID8086_DTT_* ACPI devices. Alas desktop platforms don’t sport them. My ThinkStation doesn’t have one. It never will. Yet Vantage keeps insisting otherwise.

Furthermore, every install attempt failed without so much as an error dialog. Vantage just re-offered the driver on the very next scan, politely pretending nothing had gone wrong. Time to dig in, and get this thing outtah heah!

Ruling Out the Obvious

First, I tried some obvious remedies. Logging into Vantage directly as Administrator changed nothing. There’s no ellipsis menu, no right-click context option. That means no “suppress this update” checkbox anywhere in the System Update panel. Lenovo simply hasn’t built that in.

Next, I turned to the standalone Lenovo System Update app. After installing the optional Lenovo SoftwareComponent Driver 26.9.0.20 from Windows Update, System Update scanned the machine and correctly reported “No packages applicable.” Clean bill of health. Meanwhile, Vantage still flagged the DTT driver for update. Sigh one more time.

However, that discrepancy was actually useful. It proved the issue lived entirely inside Vantage itself. It’s an artifact of its System Update addin, not  Lenovo’s underlying package catalog. The two tools evaluate the same catalog through completely different pipelines. Importantly, only one of them is wrong.

Tracing That False Positive…

With the obvious paths ruled out, I dug into Vantage’s session data folder:
C:\ProgramData\Lenovo\Vantage\AddinData\
LenovoSystemUpdateAddin\session\
.

Inside, I found two SQLite databases: update_history.db (Vantage’s live working store, rewritten on every scan) and editable_update_history.db (which appears designed to accept external edits). I tried setting the DTT entry status to NotApplicable in the editable_update_history.db. Alas, nothing changed on screen. Vantage reads update_history.db for all rendering decisions and overwrites it with Applicable again after each rescan. The “editable” database, it turns out, is a red herring.

I also found available_updates.json.It’s a 5 KB file that’s rewritten upon each update scan. It gave me a fully parsed package definition, including a Dependencies block that pointed me toward the real culprit.

A (Bogus) WildCard in the XML

Vantage caches each package’s raw XML in its own repository subfolder. For this machine, the DTT package XML lives at:

session\Repository\m1dpf015d_p3ultrag2_25h2\m1dpf015d_p3ultrag2_25h2_2_.xml

Inside that XML, the Dependencies/_Bios/Level section contained two machine-type entries: “*” and “S0NKT*”. The S0NKT* pattern correctly targets specific Lenovo laptop lines that carry DTT-capable thermal silicon. That entry belongs there. The “*” wildcard, however, matches every machine type on the planet — including the ThinkStation’s 30J5 machine type. That entry almost certainly doesn’t belong there, and it looks like a straightforward Lenovo catalog error.

Consequently, without the wildcard, Vantage evaluates the ThinkStation’s machine type against S0NKT*, finds no match, and writes NotApplicable to update_history.db automatically on every future scan. No database patching, no registry hacks — just the correct answer from a corrected applicability list.

PowerShell to the Rescue!

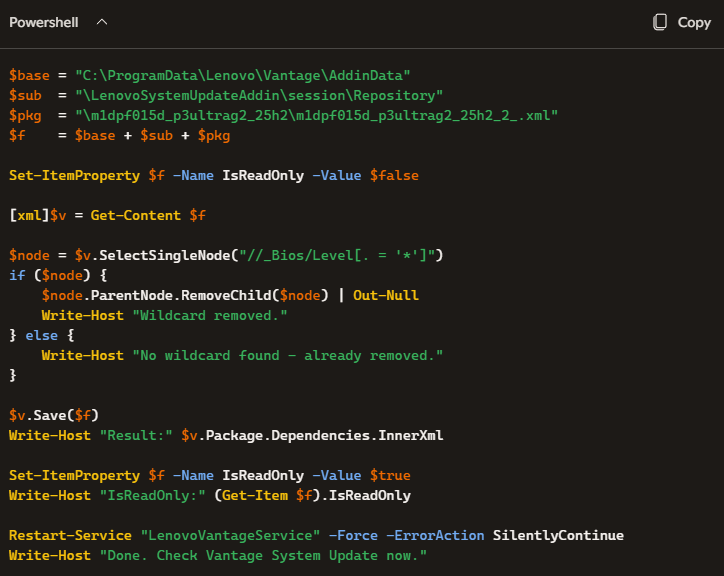
I wrapped the repair into a short PowerShell script called fix_dt.ps1. The logic is straightforward: clear the file’s read-only attribute, load the XML into an XmlDocument object, locate the offending node using an XPath query, remove it, save the file, restore read-only protection, then restart the LenovoVantageService so Vantage picks up the change cleanly.

The lines that do the heavy lifting are (edit to remove line breaks):

$node = $v.SelectSingleNode("//_Bios/Level[. = '*']")
if ($node)
{ $node.ParentNode.RemoveChild($node) | Out-Null }

Setting the file back to read-only afterward is an important step. It prevents Vantage from silently re-downloading a fresh copy of the XML on its next catalog sync and re-introducing the wildcard. Sadly, that would undo the fix entirely.

To run the script, open an elevated PowerShell prompt and execute:

powershell -ExecutionPolicy Bypass -File
"C:\Temp\fix_dt.ps1"

Note: Run this from an elevated (Run as Administrator) PowerShell session. The script must stop and restart the LenovoVantageService, which requires administrator rights. Edit so it runs on one line.

Lessons Learned

This exercise surfaced a few things worth minfing for anyone who’s doing deep Vantage troubleshooting:

  • Vantage and the standalone System Update utility maintain completely separate state databases and catalog evaluation pipelines. Agreement between them is not guaranteed. Disagreement is a useful diagnostic clue, not a dead end.
  • The “editable” SQLite database is a red herring for display suppression. Vantage ignores it when rendering the System Update panel. Don’t waste time on this.
  • A single bogus wildcard in a machine-type applicability list causes a laptop-only driver to haunt a desktop indefinitely. The fix is in the XML, not in the database.
  • When the official UI offers no suppress or hide option for a persistently wrong update, the XML repository is the right lever to pull. Appearances aside, it’s not the SQLite layer above it at fault.

Ultimately, this is a reminder that catalog quality control matters. One stray “*” in a dependency block can send thousands of ThinkStation owners chasing a ghost driver that will never install. If you’ve hit the same Lenovo Vantage false update on a different ThinkStation model, or if you’ve spotted a similar wildcard problem in another Vantage package XML, please drop a comment here. I’d love to know how broadly this catalog bug extends beyond the P3 Ultra Gen 2.

Here in Windows-World, updates sometimes get weird. This time, for once in a blue moon, it’s not WU that’s the culprit. It’s Lenovo. That makes me oddly glad. Go figure!

Facebooklinkedin
Facebooklinkedin

Bitlocker Makes Transplanted NVMe Inaccessible

Here’s a scenario that trips up even seasoned Windows power users. You yank a perfectly healthy NVMe drive from your desktop or laptop, slide it into a USB or Thunderbolt enclosure, and Windows either refuses to unlock it or asks for a BitLocker recovery key that doesn’t unlock anything. A BitLocker NVMe enclosure combination produces what looks like data loss — but isn’t. Not yet, anyway. Understanding why this happens requires a quick tour of how BitLocker actually seals your data to your hardware. The point, however, is worth noting: using Bitlocker makes transplanted NVMe inaccessible. You can’t read it unless you put it back whence it came.

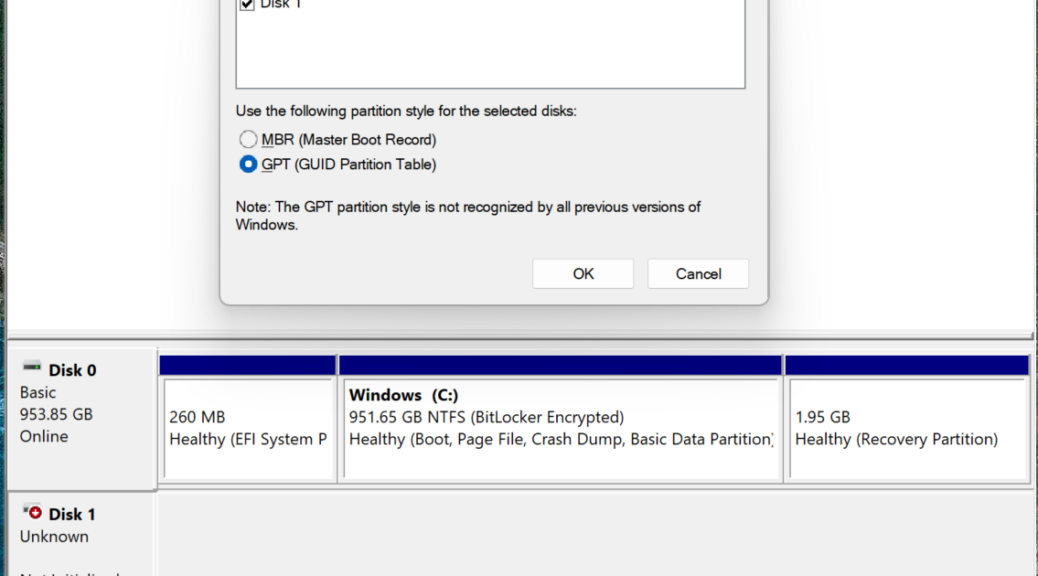
After an initial warning asking for a Bitlocker key that WILL be rejected, the affected drive shows up as “Unknown” in Disk Management. That’s what you see as the lead-in graphic for this blog post.

Why Bitlocker Makes Transplanted NVMe Inaccessible

BitLocker doesn’t just encrypt your drive and hand you a recover key. By default, it uses the TPM (Trusted Platform Module) — the dedicated security chip on your motherboard — to seal the VMK (Volume Master Key) against a specific hardware fingerprint. That fingerprint is a set of PCR (Platform Configuration Register) measurements recorded at the moment BitLocker was first enabled. Think of it like a wax seal on an envelope: the seal was made using your exact hardware setup, and it can only be broken by that same setup.

The most important register in modern configurations is PCR7. It tracks the Secure Boot policy state — specifically, the UEFI firmware’s Secure Boot signature databases (db and dbx), the boot manager, and the OS loader’s cryptographic signatures. When your PC boots normally, the TPM recalculates PCR7 from scratch. If that fresh measurement matches what was recorded at sealing time, the TPM automatically releases the VMK, BitLocker decrypts the drive in the background, and you never see a prompt. The entire process is silent and seamless. That’s the design goal.

When the PCR7 measurement doesn’t match — because something in the Secure Boot chain has changed — the TPM refuses to release the VMK. BitLocker then falls back to prompting for a recovery key. That’s expected behavior. A drive enclosure, however, is a different problem entirely.

Why the Enclosure Breaks Everything

When you move the NVMe to an external enclosure, the TPM doesn’t come along for the ride. It’s soldered to your original motherboard. The enclosure presents the drive to a completely different environment — or no TPM at all, if you’re plugging into a machine without one, or directly into another system as a USB mass storage device. There is no trust anchor. No Secure Boot validation chain. No PCR match is even possible.

To appreciate the full picture, it helps to know the other key registers. PCR0 captures the UEFI firmware code itself. PCR2 captures option ROM measurements — the firmware on expansion cards and storage controllers. PCR4 records the boot manager. PCR11 is BitLocker-specific, covering its own policy settings. Normally, all of these must match the original sealed profile for the TPM to cooperate. In an enclosure, none of them can be reproduced. This is not a bug. It is precisely the theft-prevention feature Microsoft designed BitLocker to deliver.

The VMD/RST Complication

There is a subtler wrinkle that catches power users off guard: VMD (Intel Volume Management Device) and RST (Rapid Storage Technology). Many modern Intel-platform systems configure their NVMe storage through the VMD controller, which routes NVMe drives through Intel’s RST driver stack during the boot process. That RST driver participates in the boot chain and alters the PCR measurements — particularly PCR2 and PCR0, which capture option ROM and firmware behavior.

When you pull that NVMe and attach it to a plain USB or Thunderbolt enclosure, the RST and VMD stack is completely absent. Even if you moved the drive to another Intel machine with a TPM, the PCR profile would not match because the storage controller mode is different. The sealed measurements were taken with VMD/RST in the picture; your new environment has neither. Many users never realize their BIOS storage controller mode is part of the BitLocker trust equation. Now you know.

Why The Recovery Key Doesn’t Work

Here’s the misconception that causes the most panic. Your recovery key isn’t being rejected because it’s the wrong key. The deeper problem is that BitLocker in TPM-only mode never even reaches the stage where it checks the recovery key in a normal boot flow. The TPM unsealing fails first — and in an external enclosure, there’s no TPM at all. BitLocker can fall back to recovery-key mode, but only if the drive’s key protectors actually include a recovery password protector. If BitLocker was configured in TPM-only mode with no recovery password added, you are looking at an encrypted brick. The data is mathematically inaccessible.

This is why Microsoft’s guidance is emphatic: always back up your recovery key. Store it in your Microsoft Account, print it, or escrow it to Active Directory or Azure AD. Every one of those options beats learning this lesson the hard way at 2 a.m.

Pro Tip

Before pulling an NVMe from an encrypted system, run manage-bde -protectors -get D: to review the drive’s protector configuration and PCR profile. Confirm a recovery password protector exists. Then decrypt fully with manage-bde -off D: before removal. Re-encrypt after reinstallation in the new system. That sequence keeps your data safe and accessible every time.

BitLocker’s hardware binding is a feature, not a flaw — and a pretty powerful one. A TPM-sealed VMK means a stolen drive is worthless without the original motherboard’s trust environment. But that same strength makes casual NVMe swaps treacherous if you aren’t prepared. Decrypt before you disconnect. Check your protectors before you assume. And for everything else, learn more about BitLocker recovery options directly from MS before you need ’em.

Facebooklinkedin
Facebooklinkedin

USB Ports Need More Storage Bandwidth

In reading over Computex coverage I’m impressed by an array of newer, faster computing platforms and storage technologies. At the same time I’m depressed that USB-attached storage is not swimming in this rising tide of increased performance and capability. Simply put: USB ports need more storage bandwidth so they can hold up their end while ushering in a brave new world of performance computing. Let me explain…

Why USB Ports Need More Storage Bandwidth

Thunderbolt 4 tops out at 40 Gbps — that’s a theoretical ceiling of roughly 5 GB/s, and real-world storage transfers run well below that. It was impressive when it arrived. It isn’t anymore. Thunderbolt 5 moved the needle, pushing up to 120 Gbps on the read side and 40 Gbps on writes. Indeed, its asymmetric bandwidth design delivers somewhere in the neighborhood of 6–7 GB/s of actual storage throughput under optimal conditions.

That’s a real boost, and to give credit where it’s due: Intel’s Thunderbolt 5 is the current high-water mark for USB-attached external storage performance. But here’s the problem — “high-water mark for external” and “keeping pace with internal” are two very different things. Alas, the gap between them is widening fast.

Phison’s PCIe 5 Controllers: Lapping the Field

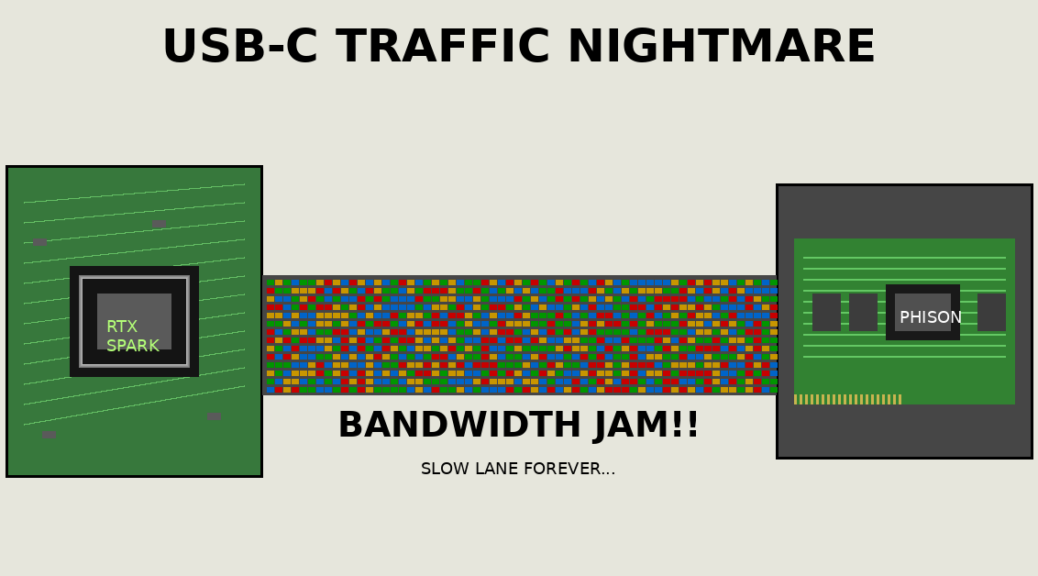
Let’s talk about what’s happening inside the box right now. Phison’s E26 controller — the flagship PCIe 5.0 x4 part — pushes sequential reads up to roughly 14 GB/s and writes near 12 GB/s. That’s not a roadmap promise. That’s shipping silicon, today, in drives like the Crucial T705 and Seagate FireCuda 540. And the reason those numbers are possible is that PCIe 5.0 x4 delivers approximately 32 GB/s of raw bus bandwidth — a figure Thunderbolt 5’s best-case scenario can’t remotely approach.

I’ll be blunt: Thunderbolt 5 running at its theoretical maximum is still less than a quarter of PCIe 5’s available bus bandwidth. External storage users are working with a narrow pipe while internal NVMe users are drinking from a fire hose. And here’s what makes it even more galling — PCIe 5 SSDs themselves are already hitting their ceiling and looking nervously at what comes next. The interface they’re starved for is PCIe 6, which is already coming down the pipe.

Phison PCIe 6 Controllers: Next Tier Is Here

Computex 2025 was where Phison first made the PCIe 6.0 future feel real, and the momentum has only built from there. The next-generation Phison controller roadmap targets PCIe 6.0 x4 — an interface that theoretically delivers around 64 GB/s of raw bandwidth per slot, thanks to PAM4 signaling running at 64 GT/s per lane. Real-world sequential read targets are north of 20 GB/s.

Think about what that means for Thunderbolt 5’s ceiling. A single PCIe 6 SSD — one drive, one M.2 slot — could in principle saturate nearly five simultaneous Thunderbolt 5 connections running flat out. The Thunderbolt bandwidth ceiling doesn’t just look inadequate at that point; it looks comical. External storage users are so far behind that “catching up” is a massive understatement. Instead, designs must condider a completely different approach.

What Needs to Change?

USB4 Gen 3×2 sits at 40 Gbps — identical to Thunderbolt 4, still not enough. USB4 v2 bumps that to 80 Gbps, which helps at the margins but still lands less than a third of PCIe 5’s bus bandwidth, let alone PCIe 6’s. These are incremental improvements on an interface that needs a fundamental rethink, not a spec bump.

The industry needs a paradigm shift. Either Thunderbolt 6 or USB5 — whatever we end up calling it — must arrive with dramatically higher bandwidth, we’re talking 200+ Gbps as a floor, not a ceiling. Alternatively, PCIe tunneling over external cables needs to mature to the point where it can fully exploit NVMe speeds without  overhead that kills performance today. One or the other. Probably both, eventually.

Until one of those paths becomes real and shipping, external storage users are locked in a performance ghetto. Internal SSD buyers are sprinting ahead with every product generation. The storage industry owes external storage users a credible, substantive answer. I’m not talking about another incremental spec revision, not another narrowly defined workaround. Computex 2026 is the right venue and this is the right moment. USB silicon designers need to envision, then deliver something worth getting excited about. So far, I can’t see it. Let’s hope for something amazing, shall we?

Facebooklinkedin
Facebooklinkedin

Intel DSA Remains Driver Install Clickmeister

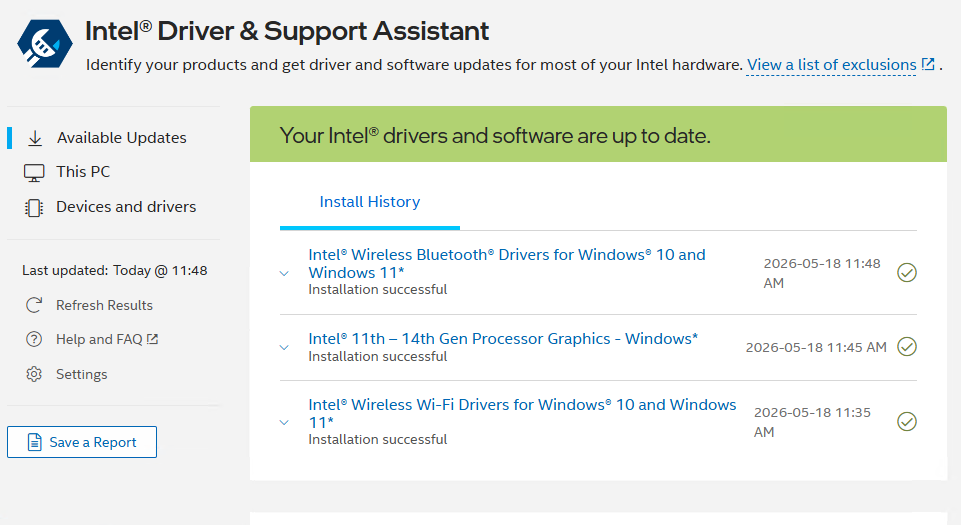
I just realized that DSA was MIA on my ThinkPad X12 Gen 1 Detachable Tablet. So I installed it, then ran it. It found 3 drivers in need of updates on that device: Wi-Fi, Bluetooth, and (Xe) Graphics. In updating them, I observed that the  Intel Driver and Support Assistant (Intel DSA) remains driver install clickmeister supreme. Let me explain…

Why say: Intel DSA Remains Driver Install Clickmeister?

It’s long been my observation that using DSA requires lots of mouse clicks. This time around, installing the three drivers shown in the lead-in screencap required at least 24 mouse clicks. For the record, those drivers were (numbers at right count clicks for each one):

  • Wireless Bluetooth Drivers (9)
  • 11th-14th Gen Processor Graphics (10)
  • Wi-Fi Drivers (5)

This time around it actually took me 4 additional mouse clicks to get from item 2 to item 3, because I was installing the GPU driver for the first time. Thus, I had to reboot my system, because DSA got “stuck” on “installing” for item 2, and wouldn’t advance to item 3. Sigh. I didn’t count those “extra” clicks in my reported total.

Achieving Intel Driver Update Silence

Believe it or not, that’s the title of a blog I posted on April 27, 2023. That was another time when the sheer number of clicks involved in running DSA hit me hard. It remains noticeable. Today, it struck me as excessive. So I’m formulating this plea to the Intel DSA developers:

Please add a silent mode switch to DSA. Let users tell the tool to run the installs without requiring minutes of babysitting to get through routine maintenance.

I wonder if anybody is listening. Then, I wonder if they’ll respond. Here in Windows-World the silence can sometimes be deafening. Let’s see what happens, shall we?


Facebooklinkedin
Facebooklinkedin

Firefox Update Fixes Weird Cursor Ripple

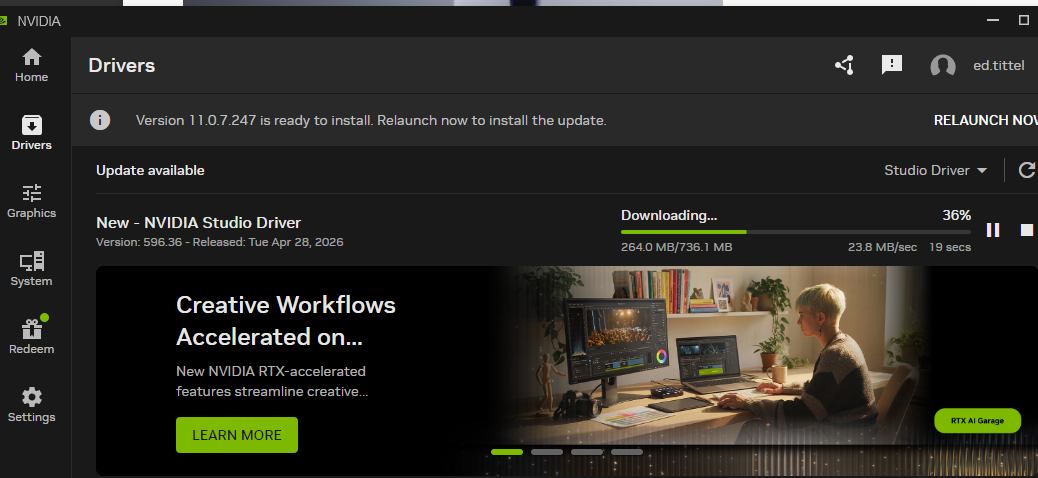
I’ve got to admit, I was misled this morning. After updating my NVIDIA Studio driver for the 3070Ti GPU, I noticed a strange “ripple” behavior around the on-screen cursor in Firefox. This occurred as I was scrolling inside today’s new posts and threads at ElevenForum.com. After reloading the graphics driver (WinKey+Shift+Ctrl+B), no change. So I asked Copilot: “Do I need to reboot?” “Nope,” it responded, “a Firefox update fixes weird cursor ripple” thanks to a fix for a DirectComposition code path error when using NVIDIA cards. It worked!

How Firefox Update Fixes Weird Cursor Ripple

A well-advised principle in troubleshooting relies on answering the question “What changed?” That’s what had me ready to blame the new NVIDIA driver as soon as Firefox got wonky. After taking advice from Copilot, I noticed further that the cursor ripple was indeed limited only to Firefox. It didn’t show up in Chrome or Edge, nor in other Windows apps. If it had been the GPU driver, all would have been affected.

Thus, I’m glad I thought to ask Copilot rather than start rebooting or rolling back the driver. Turns out the cause was obvious, indeed, but related to the specific program I was running as it interacted with the NVIDIA driver. Here in Windows-World, it’s wise not to overlook the obvious. But it’s also wise to cast a wider net, so as not to blame the obvious when something else could be — and in this particular case, was — at fault.

All’s well that ends well. I’m happily using my updated system. And Firefox — where I usually work to create this WordPress content — is working correctly now, too. Bonus: updating the browser is much faster than a driver rollback, and faster than a reboot. Good-oh!

Facebooklinkedin
Facebooklinkedin

Flo6 Gets Unghosted, Loses 183 Drivers

When I switched my production PC, Flo6, from the ASRock to the MSI motherboard on March 21, I left a large crew of ghosts behind. In this case, a ghost is a no-longer-used driver that remains in the driver store even though it’s out of service and irrelevant to the new installation. Thankfully, Copilot helped me remember and find Uwe Sieber’s outstanding Device Cleanup Tool. It specializes in identifying and removing such ghosts. After using the tool, Flo6 gets unghosted, loses 183 drivers (!), and gets considerably slimmed down.

How Flo6 Gets Unghosted, Loses 183 Drivers

At first I tried a tool named GhostBuster. It showed me I had 399 drivers installed on Flo6, of which up to 193 could be removed. But I couldn’t actually make it remove anything. So I asked Copilot for a different option, among which I recognized Uwe Sieber’s aforementioned tool. It worked, too!

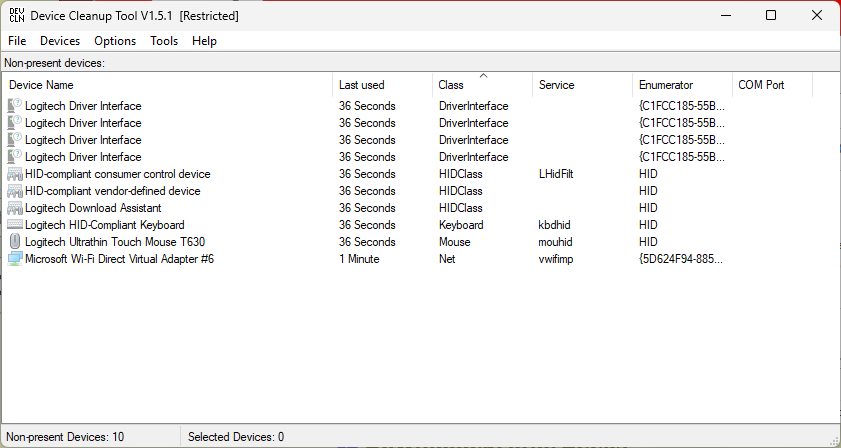
Sieber’s Device Cleanup Tool shows ONLY drivers that may be removed. So I removed all of them. Of the 194 in that collection, 11 came back after a reboot (you can see them in the lead-in screencap). That’s how I got to the 183 number for the count of drivers removed from Flo6 overall. I used PowerShell to calculate before and after sizes for the DriverStore. It started out at 10.63 GB, and dropped to 7.87 GB after cleanup. I like that!

One of the consequences of moving from one mobo to another without a clean install is that this kind of cleanup is needed. One of the advantages of that swap is that I didn’t have to clean install the OS. What can I say? I was in a hurry! Here in Windows-World, these are the trade-offs and the consequences we must learn to accept.

Facebooklinkedin
Facebooklinkedin

Two Checkboxes Means 12X Faster

I plugged a Samsung 990 Pro 1TB NVMe into the Thunderbolt 5 port on my Lenovo ThinkPad P16 Gen 3 mobile workstation. ICYDK, TB5 promises up to 80 Gbps bandwidth. The 990 Pro is one of the fastest consumer NVMe drives money can buy. I expected fireworks. I got a firefly. Fortunately, I determined that clicking two checkboxes means 12 faster results. This comes from foregoing quick disconnect and enabling write caching. Let me explain…

Exploring: Two Checkboxes Means 12X Faster

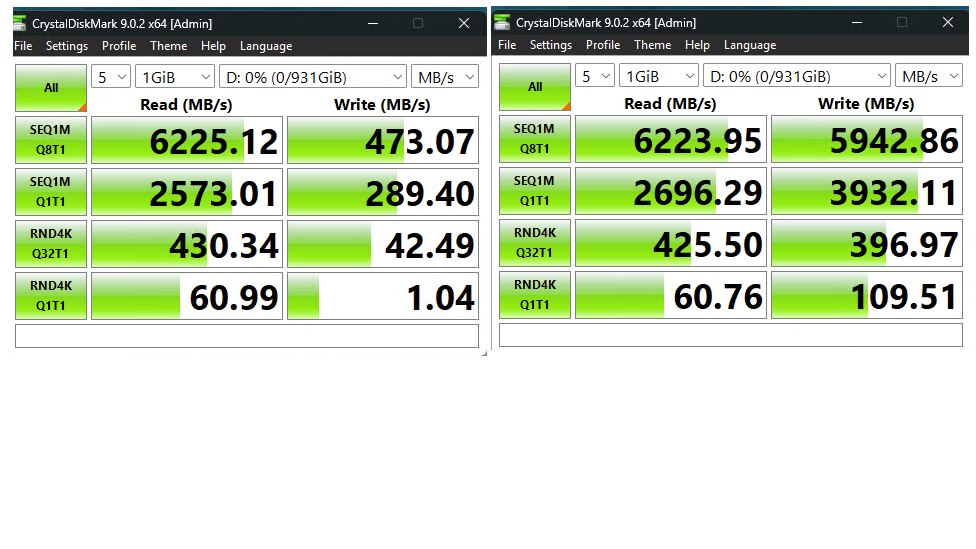
As shown in the lead-in graphic, CrystalDiskMakr tells the ugly truth. As you can see on the left hand side, read speeds looked good. But writes are stuck in what I’d charitably call “USB 2.0 territory.” Something was very, very wrong — and it wasn’t the hardware. Results come from CrystalDiskMark 9.0.2 x64 software.

Now, look to the right, you can see that write speeds jumped significantly, while read speeds stay more or less the same. Indeed, the Thunderbolt 5 (TB5) link and Acasis TB501Pro enclosure weren’t the whole bottleneck. Sequential writes jumped from 473 to 5,943 MB/sec for a 12.6X speed boost.. Even more amazing: 4K Q1T1 writes leapt from 1.04 to 110 MB/sec, for a 105X gain.

All this came from two little checkboxes, on the Policies tab from the Properties window for the Acasis TB501Pro enclosure. Deets follow…

Two Related Settings in DevMgr Do the Trick

Here’s the 30-second procedure:

  1. Open Device Manager → expand Disk drives → right-click your external NVMe → select Properties → click the Policies tab.
  2. Switch from “Quick removal” (the default) to “Better performance.” This unlocks the write caching option that’s otherwise grayed out.
  3. Check the box for “Enable write caching on the device.” This is the setting that actually turns on write caching.
  4. Click OK, then rerun your benchmarks and enjoy the results.

Both settings are required. Selecting “Better performance” alone without the write caching checkbox won’t deliver these numbers. You need both.

Here’s the Tradeoff

Windows defaults to Quick Removal for a good reason: it protects against data loss if you yank a drive without ejecting it first. With Better Performance and write caching enabled, you must use “Safely Remove Hardware” before unplugging, or you risk losing data still sitting in the write cache.

That’s the tradeoff. For a stationary workstation drive that stays plugged in during work sessions, it’s a no-brainer. For a drive you hot-swap constantly throughout the day, think twice. I’m going for maximum speed on backups and restores, so I’ll make myself remember this tradeoff if I need to unlplug the NVMe enclosure.

The Results Could Still Be Better

I’m still of the opinion that — as I opined in my Feb 20 blog on this topic — that buying a TB5 NVMe enclosure isn’t worth the added expense. TB4 enclosures cost about US$100 less, and deliver nearly the same performance as TB5 (it’s a 10-15% difference at best). Doubling the price for a modest gain just doesn’t make sense. TB5 shines for video and networking. For storage links, not so much, because controllers basically limit links to PCIe x3/x4 levels.

That’ still true today. But I was pleased to get much more out of my rig once I made the enclosure behave more like a USB drive and less like a USB stick! Here in Windows-World you sometimes have to take your wins where you can find them…

Facebooklinkedin
Facebooklinkedin

Rolling Back Fingerprint Reader Driver

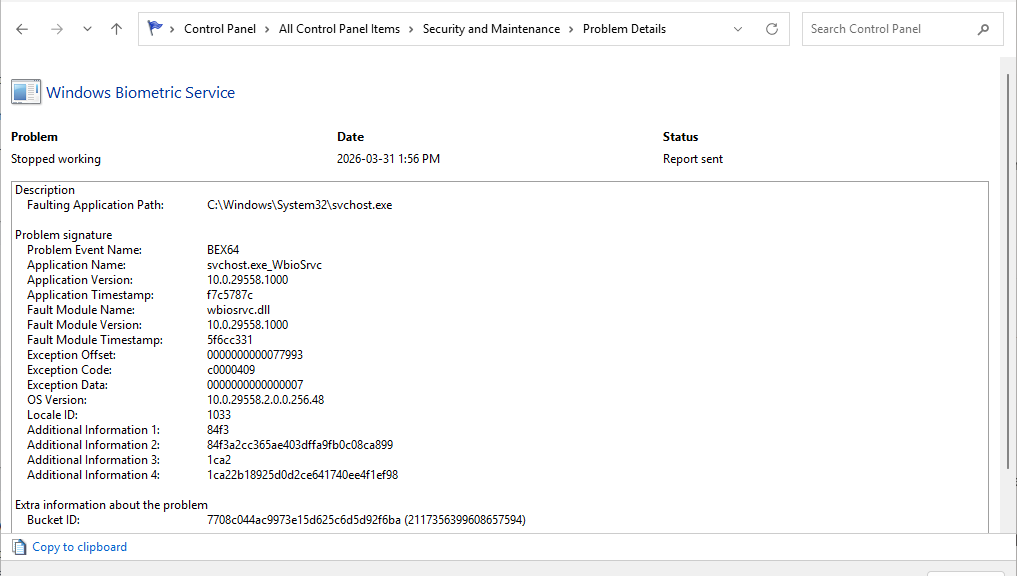
I have to laugh at myself a little ruefully. In checking over my Canary test platform just now — the snazzy little ThinkPad X12 Detachable Gen 1 hybrid tablet — I found the too-familiar BEX64 error in the mix. To those not already aware, this flags an out-of-bounds memory access, often from a driver or an associated dll. In this case it was the notoriously picky Synaptics Fingerprint reader. After looking over driver dates and versions, I realized my driver was newer than the official Lenovo offering. Thus, rolling back fingerprint reader driver was exactly the right thing to do. But there was a problem, also of my own making…

The Problem with Rolling Back Fingerprint Reader Driver

I’m relentless about using Driver Store Explorer (RAPR.exe) to clean up old drivers. Needless to say, that means the Rollback driver button in the fingerprint reader’s properties sheet was greyed out. Of course, that’s because the older driver had been removed from the Store. So I had to visit Lenovo support and grab the driver from there. Easily done, armed with the unit’s Serial Number thanks to Lenovo Vantage.

Another complication then presented. Because I was replacing a newer driver with an older one, I had to uninstall the new before attempting to install the old. Why? Because Device Manager doesn’t allow older drivers to over-write newer ones as a matter of policy. That is, Windows enforces this to prevent accidental regressions or security downgrades, so it refuses to overwrite a newer driver with an older one unless the newer one is removed first. An uninstall gets the previous driver out of the way, so the new install can proceed successfully.

All’s Well That Ends Well

I’m 100% confident that the driver swap worked. I’m expecting the fingerprint reader to behave well going forward. What makes me so confident? After installing the driver, I logged out and then used the selfsame fingerprint reader to log back in. It worked, and read my right index fingerprint from the already-defined biometric data at its disposal.

If there had been any issues with compatibility or workability, Windows Hello would have forced me to start afresh. That would mean proving my identity with a PIN, password, or other acceptable data. Then, I’d have had to re-scan my fingerprints to give the reader something to work with to establish my identity.

None of this happened. The fingerprint reader worked on the first try. I’m hopeful this will do away with the error documented in this post’s lead-in graphic. But as with so many other things in Windows-World, we’ll just have to wait and see what happens. Stay tuned!

Facebooklinkedin
Facebooklinkedin

Clearing X-Rite Error Proves Interesting

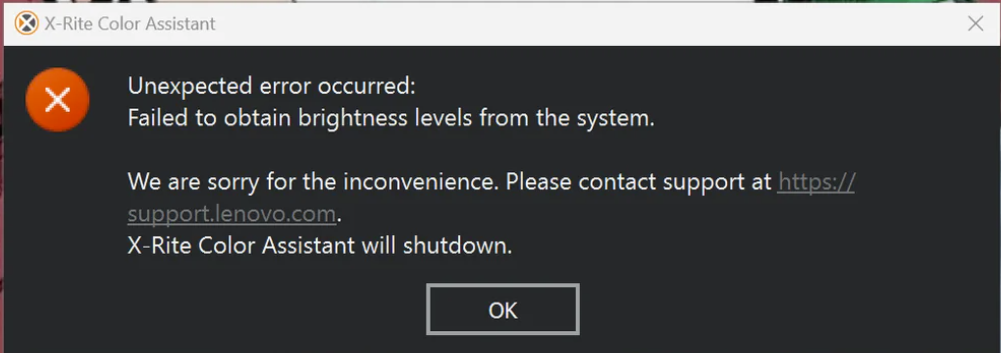
I’ve got a terrific new loaner unit from Lenovo, a P16 Gen 3 Mobile Workstation. I’m still learning my way around this powerful beast of a laptop, as I discovered this morning. After login, I couldn’t help but notice that the built-in X-Rite Color Assistant failed — namely it opened a dialog box that told me the app couldn’t run because of an “unexpected error.” Mildly disturbing, and not terribly informative. Indeed clearing X-rite error proves interesting, as I first try–and fail–to fix the app through a basic uninstall/reinstall maneuver. Then I notice something…

Why Clearing X-Rite Error Proves Interesting

While I was checking over the P16 Gen 3 for clues, I noticed that Lenovo Vantage had a new firmware update pending. “Hmmm,” I wondered: “Maybe a firmware update (and reset) will also make X-Rite happy?” I quickly installed same (and then waited for the usual update process to grind to completion, and the post-install reboot to finish).

Guess what? The firmware update did the trick! After the reboot, I was able to launch the X-Rite Color Assistant. And it turns out it’s a “background app” on that Lenovo model (which uses a software or virtual color control, because the unit lacks a built-in color sensor). So I had to go through the Notification area, and right-click on the app to get it to open.

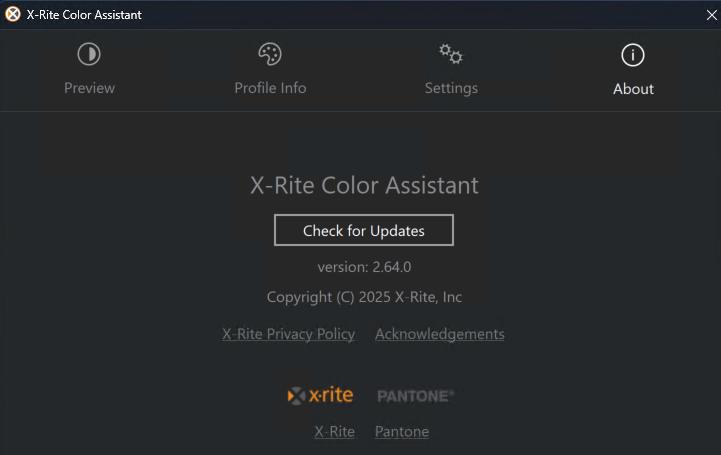
Below, you can see the About info from the app itself. According to Copilot, the UEFI/firmware refresh helped to bring X-Rite back to life because it resets the basic runtime environment, including the GPU to system connection. Good to know!

After a quick UEFI reset, X-Rite Color Assistant ran without error.

Here in Windows-World, the right ingredients for a happy and working laptop include the underlying firmware and drivers, as well as the OS and its software. Luckily for me, by fixing the lowest level stuff, the higher-level app came back to life. I’ll count this one as a win.

Facebooklinkedin
Facebooklinkedin

DDU Fixes GPU Driver Disasters

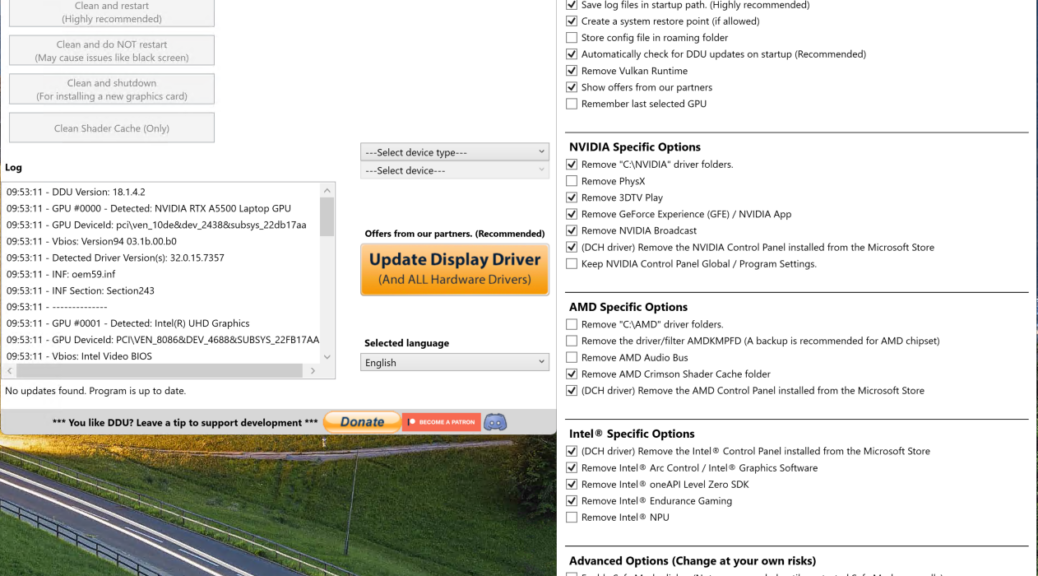
Today’s blog post is a paean to a tool named Display Driver Uninstaller, popularly known as DDU. It’s long been part of most Windows admin and power user toolboxes. DDU comes from Wagnardsoft, but well-known 3rd-party mirrors also include Guru3D and TechPowerUp. DDU remains a useful tool at completely replacing GPU drivers and their Windows infrastructure when graphics go wrong. It’s also a great way to switch from one GPU type to another. Say, from NVIDIA to AMD, or vice-versa, or even from one of them to Intel ARC. TL;DR version: DDU fixes GPU driver disasters and lets you switch types with little muss or fuss.

Why Say: DDU Fixes GPU Driver Disasters?

Over the past 9 days, we’ve seen an unusually fast series of NVIDIA Game-Ready GPU drivers (with one evanescent Studio driver on February 26). That Thursday saw both versions make an appearance that provoked immediate issues and outcry; version 595.59 was withdrawn less than two hours after its release.

Then on Monday, March 2, NVIDIA fired off Game-Ready version 595.71. Users soon began reporting diminished performance from this driver (especially for certain, GPU-intensive games). Further inspection (using tools like GPU-Z) observed that it imposed voltage caps on RTX 50-series GPUs to limit damage potential. At the time, I wondered if this wasn’t like putting “chewing gum on top of baling wire” to fix things.

On March 4, 2026 (Wednesday), NVIDIA dropped a hotfix to address these issues, in the form of 595.76. It addressed the voltage capping, and a variety of other game-specific glitches and gotchas. Since then, things on the NVIDIA Game-Ready driver front are steady, if somewhat uneasy. This is the first time in YEARS that the company has had two unstable Windows Hardware Quality Labs (WHQL) designated drivers follow in quick succcession.

Rollback Versus Deep Cleanup

So far, users have been able to recover from these updates without lingering issues. In the past, GPU driver glitches have resulted in black or stuttering screens, serious and ongoing display disturbances (aka “screen artifacts”), driver store damage, or bothersome system or GPU installer instability or crashing. When those things happen, that’s when DDU comes into its own. It cleans up all of the old GPU driver stuff and gets rid of whatever’s causing problems, then lays down a brand-new, clean and (hopefully) reliable replacement runtime to get your GPU(s) working properly once again. Hopefully, it’s obvious this capability also makes DDU excel at “out with the old, in with the new” actions when switching from one GPU type to another.

Did the recent NVIDIA debacle call for DDU? No it did not. I personally observed that the rollback facility in Device Manager took my system back from 595.59 to 591.74 (Studio). Other users have consistently reported that Game-Ready drivers also rolled back successfully as well (591.86 in most cases).

Even though this latest spate of Game-Ready drivers has caused some commotion, it hasn’t seemed to cause much need for DDU. Not this time around, anyway. But it’s good to know that DDU is out there should you need it. Or should you be switching from one GPU type to another. Here in Windows-World it’s better to have such tools and not need them, than to need them and not have them!

Facebooklinkedin
Facebooklinkedin