Having returned a couple of loaner units to Lenovo, I recently decided to enroll the Lenovo ThinkStation P3 Ultra — a beast of a workstation — in the Windows Insider Program to start testing preview builds. The machine was running Windows 11 Pro, TPM 2.0 was enabled, Secure Boot was on, and I had a personal Microsoft account linked. By every measure, this machine should have sailed right through that process. But alas, P3 Ultra Insider enrollment falters, and thereby hangs this tale.
Why P3 Ultra Insider Enrollment Falters
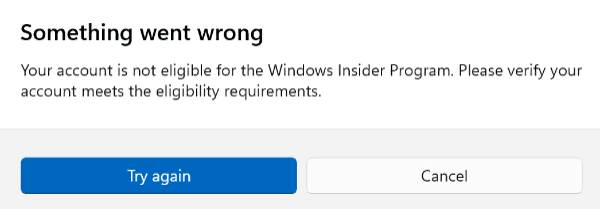
Enrollment hung. Indeed, I hit a brick wall: an eligibility error that blocked enrollment dead in its tracks. I got no clear explanation, no obvious next steps. Just a vague message and a dead end. If you’re in the same boat, you’re not alone, and there’s an easy fix. Here’s exactly what I did to get it working.
What This Error REALLY Means
The error Windows surfaces during Insider enrollment is frustratingly generic. Depending on your exact configuration, you might see language about the device not being “eligible,” a “policy restriction” preventing enrollment, or a note about account requirements — sometimes all three in the same dialog. There’s rarely a useful error code attached.
What makes this especially maddening on a machine like the P3 Ultra is that the hardware is fully compliant. TPM 2.0? Check. Secure Boot? Check. Windows 11 Pro? Absolutely check. The error fires anyway, leaving you staring at a dialog that tells you almost nothing useful about where the actual blocker is hiding.
There’s Something About the (Original) MSA
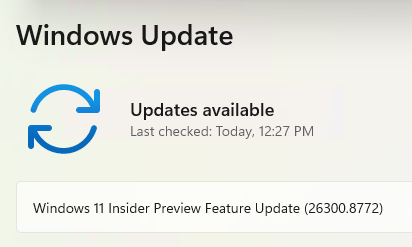
I can’t figure out what it is, but there’s something about my primary MSA that stymied the enrollment. As soon as I switched to a backup MSA and authenticated (using the MS Authenticator app on my iPhone), the process went through correctly. After a reboot, the Insider update showed up and downloaded (as you can see, it’s installing right now):
 Troubleshooting Tips for Insider Enrollment
If a change of MSA doesn’t fix your issues, try looking for Group Policy that blocks preview build enrollment, or check to see if diagnostic data level is too low. Additional deets follow.
Fix the Diagnostic Data level
Navigate to and make sure “Diagnostic data” is set to Optional — or at minimum confirm it isn’t being suppressed or overridden by a policy. Without this, enrollment may silently fail even if everything else is correct. If the toggle is greyed out, a Group Policy or MDM policy is controlling it, and you’ll need to address that first via or your MDM console.
Reset the “Manage preview builds” Group Policy
Open (run as Administrator), then navigate to . Find the policy named “Manage preview builds” and set it to Not Configured or, if you prefer explicit control, set it to Enabled with the sub-option that allows preview builds. Once done, open an elevated Command Prompt and run gpupdate /force to apply the change immediately without waiting for the next Group Policy refresh cycle.
Try a Personal MSA
MSAs can be of type “Work or School” or “personal.” The Insider program wants one that’s strictly personal. If all else fails, you can use a gmail, yahoo or icloud email address. MS free options include Outlook.com (though existing hotmail and live.com addresses still work, no new signups for those domains are allowed).
Insider Enrollment Issue Takeaways
Insider Program enrollment errors on modern workstation-class hardware almost always come down to one of three things: the diagnostic data level is too low, Group Policy is actively blocking preview build enrollment, or there’s an account type mismatch — a work or school identity where a personal MSA is needed. It is almost never the hardware itself.
The ThinkStation P3 Ultra is a fully Insider-capable machine. It meets every technical requirement Microsoft publishes. The blocker, in my experience and in most reported cases, is configuration — either something an IT department put in place, or a default that Windows didn’t surface clearly during setup.
Work through the three steps above in order, and there’s a very good chance you’ll be selecting your Insider channel within a few minutes. And if you hit a variant of this error that the steps above didn’t resolve, drop the details in the comments below — include the exact error message text, whether the machine is domain- or Entra-joined, and what your output shows for the Windows Update for Business policies. The more detail you share, the faster we can help narrow it down.