I’ve got to admit it: I’m of two minds about restore points in modern Windows versions — especially Windows 11. I found myself chewing over Windows 11 restore point pros&cons this morning, as I used WizTree to check my boot/system drive on some test PCs. Let me explain…
Exploring Windows 11 Restore Point Pros&Cons
Let’s start with a basic definition courtesy of Gavin Wright/TechTarget:
A system restore point is a backup copy of important Windows operating system (OS) files and settings that can be used to recover the system to an earlier point of time in the event of system failure or instability. It is a part of Windows XP, Vista, 7, 8, 10, 11 and Windows Server. They are created automatically or manually. System restore points only affect OS and application files, but not user data.
I confess: up through and including versions of Windows 8, I used to use Restore Points a LOT. But since the introduction of Windows 10 in 2014/2015 — quite some time now — I’ve been using daily or weekly image backups on my production and test PCs almost exclusively. These protect user preferences, settings, and data as well as the “important OS files” mentioned in the preceding definition. For me, it’s also faster and easier to restore an image backup than it is to do likewise with a restore point (and with less certain results). FWIW, I still use Macrium Reflect Free as my primary backup and restore tool. (I use the paid-for version on production PCs.)
Restore Point Pros
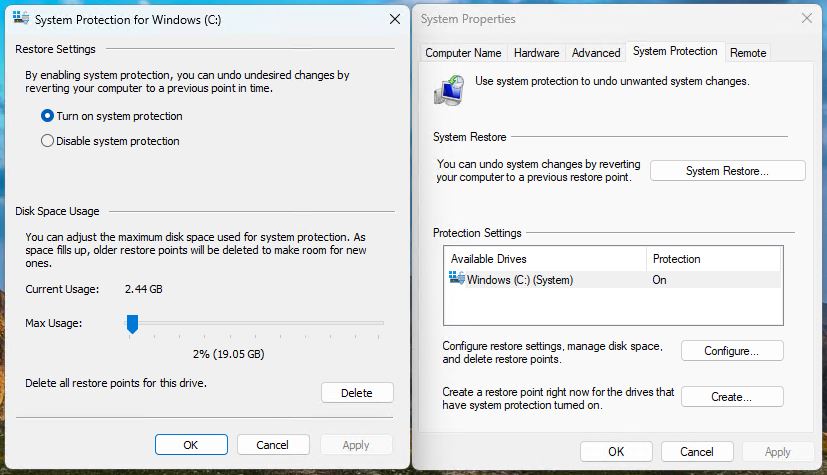
If, as shown in the lead-in graphic, you have restore points turned on, Windows will make them for you automatically or manually. They’re created automatically when you apply Windows updates. Likewise, many application installers are built to make a restore point early on in their operation, so they can roll back to a point in time prior to their actions in case something goes wrong. Also, you can create a manual store point by clicking the “Create” button shown at the lower right in the lead-in graphic. If you do choose to use restore points, I also recommend grabbing and trying out Nic Bedford’s System Restore Explorer as well. IMO, it’s easier to use and more comprehensive than the built-in Windows facility.
Restore points are easy, somewhat automated and cover many OS or runtime issues. This makes them easy and convenient to use, especially for less savvy and sophisticated Windows users. In a nutshell, those are the pros for restore points.
Restore Point Cons
In using WizTree to explore a couple of my test machines this morning, I was reminded of one of the cons for restore points — namely, they can soak up a fair amount of disk space. When I use the “Delete all restore points…” option on one of my Lenovo ThinkPad X380 Yoga PCs this morning, here’s what WizTree showed as deleted immediately afterward:

All in all I recovered almost 6 GB of disk space by deleting all restore points.
[Click image for full-sized view.]
The impact of restore points can be up to the size limit you set aside for such use. As shown in the lead-in graphic, that’s 19.05 GB for my “other” X380 Yoga test PC. If you’re making image backups and restore points, it’s a good idea to allocate no more than 1% or 10GB (whichever is less) for such use.
Besides space issues, I’ve observed that restore points don’t protect you from unwanted registry changes (including preferences, settings, use of tweak tools and so forth). Nor do they restore user or application data files and such, either. In general, I favor image files because they include absolutely everything that might get changed — or go wrong.
That said, if you use an image restore, you will lose any new files or changes you’ve made since the time at which that image was captured. Thus, it may be necessary for you to run a “mini-backup” to save that stuff to a flash drive or other external media before restoring the most recent image so you lose less (or nothing). Because Reflect lets me mount an image as a virtual drive, I often make another image of my broken system just in case I need something from that set-up after I revert to my most recent saved image.
What’s Your Preference?
On your Windows PCs, you can do as you like with backups and restores (including restore points). I don’t use them anymore because they don’t bail me out of all the trouble I often get myself into. If your usage patterns are less experimental or extreme, restore points may indeed meet all your needs. Even so, I’d still recommend periodic image backups just in case they don’t work to get you of some of the jams you may occasionally get into. But again: that’s up to you!