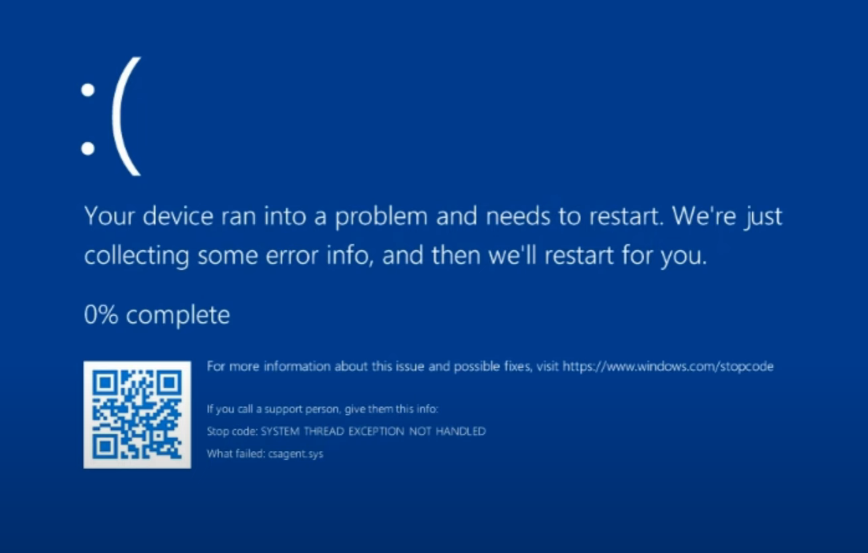
All posts by Ed Tittel

Full-time freelance writer, researcher and occasional expert witness, I specialize in Windows operating systems, information security, markup languages, and Web development tools and environments. I blog for numerous Websites, still write (or revise) the occasional book, and write lots of articles, white papers, tech briefs, and so forth.

Sold-out CalDigit TS4 Offers Amazing Power

I’m a big fan of Thunderbolt docks, especially for high end laptops. These days, Thunderbolt 4 stuff can be especially hard to buy. I was “wildly excited” to learn about CalDigit’s new 18-port 98W charge capable TS4 dock. I was also unsurprized to learn it was out of stock. Indeed, the sold-out CalDigit TS4 offers amazing power and capability (view next graphic full-size for complete front and back view of ports). That said, its most outstanding attribute at present is to frustrate my ability to say “Shut up, and take my money!”

Sold-out CalDigit TS4 Offers Amazing Power
Sold-out CalDigit TS4 Offers Amazing Ports and Power (click image for full-sized view; use Back button to return to story)

If Sold-out CalDigit TS4 Offers Amazing Power, When Can I Get One?

According to CalDigit’s latest “Update on availability,” more TS4s will come off the line in mid-May. Assuming the second batch is as popular as the first, it’ll sell out in days, if not hours. I may still try to buy one anyway. But I’m not expecting to score on the upcoming round either.

Why not? Because there aren’t that many good Thunderbolt 4 docks on the market right now. And because the TS4 is sufficiently compelling to elicit the famous “Shut up and…” response I uttered earlier.

Sigh. On the plus side, it’s fun to get excited about computing gear for good reason. On the minus side, it’s sad to understand that demand will continue to outstrip supply for some time to come.

Waiting for the Perfect, or Buying What’s for Sale?

OTOH, I could always succumb to the almost as nice, but less capacious and powerful Caldigit Thunderbolt 4 Element hub. There are other alternatives available, too. See this WindowsCentral story for a nice survey of what’s on the market in this space right now.

I’m torn, but will probably keep trying to score a TS4 through the next round. After that, I’ll either post a review, or reconsider a change of plan. Stay tuned!

Facebooklinkedin
Facebooklinkedin

Resuscitated Windows Welcomes Require Notification Reset

OK, then. I did some “weekend admin” work around the house yesterday. That included installing recent CUs on a couple of holdout Windows 10 PCs. Soon thereafter, I found myself facing the “Let’s finish up…” item shown in the lead-in graphic above. “Hmmm” I found myself thinking. “I vaguely recall there’s an easy way to turn this off.” And indeed, some CUs means that these resuscitated Windows welcomes require Notification reset. Let me explain…

Why Do Resuscitated Windows Welcomes Require Notification Reset?

Apparently, when certain CUs (or an upgrade) gets installed, it resets related notifications in Start → Settings → System → Notifications & actions: see checkboxes under notifications in the following screencap.

Resuscitated Windows Welcomes Require Notification Reset.settings.system

By default all boxes are checked; I routinely uncheck the lower three as shown here.

How Often Does This Happen?

It can happen after some Cumulative Updates. You won’t know until it pops up (literally). It DOES happen after every upgrade, though you’ll see a different screen instead. This one is labeled “Welcome to Windows” as shown next.

This item is turned off when the first of the three unchecked boxes above is unchecked. It’s another one of those things that repeat experience with Windows teaches. But in my case, it happens infrequently enough that I have to refresh my memory with an online search about half the time when it shows up. Sigh.

What About Windows 11?

As far as I can tell, Windows 11 appears exempt from both kinds of “nag screen” — as certain, disgruntled Windows 10 users sometimes label these displays. I guess that’s a good thing, eh?

[Note: thanks to Mayank Pamar at WindowsLatest. His April 25 story Windows 10’s full screen setup nag returns – here’s how to disable it showed up this morning, just after I’d looked this info up yesterday. He’d obviously run into the same thing I did. That’s how things go sometimes, here in Windows-World. Thanks!]

Facebooklinkedin
Facebooklinkedin

Three Windows Update Repair Tips

Recent reporting on the latest Patch Tuesday (April 13) includes mention of issues with completing Cumulative Updates (CUs). Thus, for example, check out this WindowsLatest item dated April 22. Entitled Watch out for these issues in Windows 11 KB5012592 & Windows 10 KB5012599 it mentions various errors would-be updaters could encounter. It also mentions two tried-and-true recovery/repair techniques, to which I’ll add a suggestion of my own. Thus, I provide three Windows Update repair tips for your consideration and use.

Here Are Three Windows Update Repair Tips

Note: all these tips work equally well for both Windows 10 and Windows 11. Use ’em with my blessing in the order provided. In my personal experience they’ll cover most update issues people are likely to encounter.

Tip1: Simple Reboot

That’s right. If a CU update fails to complete, the first strategy is to reboot the PC, and try again. Believe it or not, that is sometimes all that’s needed to get things working.

Tip2: Shift-Shutdown

If you hold down the Shift key while you select the Shutdown option in Windows 10 or 11, it forces what’s sometimes called a “full shutdown.” This forces Windows to close all opened apps and applications. It also logs out any logged-in accounts. At the same time, a full shutdown performs neither a hybrid shutdown nor will it hibernate your PC.

Hibernation saves open documents and running applications to the %systemdrive% and copies them back into RAM upon restart, to speed that process along and let you pick up where you left off. That’s NOT desirable when fixing WU issues.

A hybrid shutdown hibernates the kernel session (what the OS is doing) and shuts down everything else. This supports Fast Boot capabilities on the subsequent reboot process to speed it up. It’s enough like hibernation that it too, is NOT desirable when fixing WU issues.

Tip3: Reset WU

Although the tutorial “Reset Windows Update…” appears on TenForums, it works equally well for Windows 11. Basically, it involves running a batch file that stops all update related services, resets all the update related registry keys, then restarts all the update related services it stopped. Surprisingly, it works like a charm. I routinely keep this batch file on many of my Windows 10 and 11 desktops. As it has worked for me both long and well, so it can also do for you.

If None of the Above Works, Then What?

Alas, in some cases, none of the aforementioned fixes will work. Next thing I’d consider would be an in-place repair install (covered in this equally handy tutorial). After that, more dire measures including a clean install and/or a trip to the shop might be warranted. In my 30-plus years of “messing with Windows” that has happened to me exactly twice. One of these occurrences happened less than two weeks ago (see this post for details). Odds are, therefore, it shouldn’t happen to you. Fingers crossed!  One of them was pretty recent, after all…

Facebooklinkedin
Facebooklinkedin

Printer IPv4 Address Produces Reports

Here’s something I just learned that I should’ve known years ago. Turns out that if you type in a specially formatted version of any printer’s IP address into a web browser, you’ll go straight into a report interface. To be more specific, the Printer IPv4 address produces reports on the resulting web page. Let me explain…

How Printer IPv4 Address Produces Reports

Of course, three things are essential for this technique to work. They don’t pose a big hurdle, though, as you can see here:

Thing1: The printer must be network-attached and have an assigned IP address (that’s how most printers work nowadays, though many home users still use USB-attached devices).
Thing2: You must know the printer’s IP address (I explain two handy ways to get that info in a following section).
Thing3: You must format the URL for the printer as follows:
http://xx.xx.xx.xx, e.g. http://192.168.1.44
Secure HTTP (which puts https:// at the head of the URL string) does NOT work, as I confirmed by experiment.

When I tried this technique for both printers on the LAN here at Chez Tittel, it worked in Edge, Chrome and Firefox. One is a Dell color laser 2155cn MFP; the other is a Samsung monochrome laser ML-2850. I can’t say from sure knowledge that it works in ALL browsers and all printers, but I can assert it works in all the browsers and printers I use.

Under the hood, there’s a reporting API for network-attached printers. It produces report data as HTML formatted output when this kind of connection gets made. Works nicely, so it’s good enough for me!

Finding Printer IP Addresses

I can describe two ways to get this info, though those with their own IP scanning tools can use them instead. The first way is to open Devices and Printers, right click the printer of interest, then select the Printer Properties item from the pop-up menu. Select the Ports tab, then find the currently selected port in use (hint: it’s the only one whose left-hand checkbox is checked). Highlight that port, then click the “Configure Port…” button. You’ll see something like this:

Note that the IP address appears in the second field from the top (Printer name or IP address). Works every time!

I am also fond of Nirsoft’s NetBScanner utility. If you scan your local LAN segment it will report and describe all IP addresses it finds in use. For me, it’s a little faster and easier than the foregoing tactic, so it’s the one I use most often myself. Other scanners will do the same for you, so if you’re already familiar with another one, use it with my blessing.

Always nice to learn something new. Even better is to learn something new and useful. Here ’tis!

[Note added early afternoon: Thanks to ElevenForum member and fellow WIMVP @stormy13 whose off-hand remark in this thread pointed me into this topic.]

Facebooklinkedin
Facebooklinkedin

MS Explains Windows 11 Taskbar Clock Missing Seconds

OK, now we know. Windows tinkerers and tweakers have often wondered why the Taskbar clock in Windows 11 shows no seconds. Nor does it provide a registry tweak to display same. Raymond Chen lays things out in an Old New Thing blog post. Entitled “Now that computers have more than 4MB of memory, can we get seconds on the taskbar?” it provides the answer: “No.” Along the way, MS explains Windows 11 Taskbar clock missing seconds. In a word: “Performance.”

How MS Explains Windows 11 Taskbar Clock Missing Seconds

As you can see in the lead-in graphic — Windows 10 on the left, 11 on the right — the 10 clock happily displays a seconds count. 11 does not, nor does  it offer controls to display same. Why that difference?

Chen’s explanation is interesting and hinges on performance issues when many clocks are involved, all in need of ongoing updates. Here’s a lengthy, but informative, quote from the afore-linked blog post:

On multi-users systems, like Terminal Server servers, it’s not one taskbar clock that would update once a second. Rather, each user that signs in has their own taskbar clock, that would need to update every second. So once a second, a hundred stacks would get paged in so that a hundred taskbar clocks can repaint. This is generally not a great thing, since it basically means that the system is spending all of its CPU updating clocks.

This is the same reason why, on Terminal Server systems, caret blinking is typically disabled. Blinking a caret at 500ms across a hundred users turns into a lot of wasted CPU. Even updating a hundred clocks once a minute is too much for many systems, and most Terminal Server administrators just disable the taskbar clock entirely.

He goes onto say that even PCs that lack a Terminal Server role are still subject to performance constraints. Indeed, “periodic activity prevents the CPU from entering a low-power state.” He also adds “Updating the seconds in the taskbar clock is not essential to the user interface. . .”

Now we know. For those still inclined to stay on top of time at the second level (performance concerns aside) check out this ElevenForum thread: Taskbar Clock Replacement. ‘Nuff said!

Facebooklinkedin
Facebooklinkedin

Possible A/B Icon Test in Dev Build 22598

OK then, I’ve got different behaviors in the clean install version of Build 22598 (one PC) and upgraded versions (two PCs). The lead graphic shows my post at ElevenForum about this phenomenon, and includes the different icon styles I’m seeing. One version, I’ve learned is called “combined icons” (I refer to them as “expanded” in my post) and the other “uncombined icons” (ditto for “compact”). The guru consensus at ElevenForum is that there’s a possible A/B icon test in Dev Build 22598. Makes sense to me!

What Possible A/B Icon Test in Dev Build 22598 Means

Simply put, it would mean that some machines would manifest “combined icons” while others would show “uncombined icons.” That is what appears to be up. But the announcement post, and its subsequent revisions for .100 and .200 CUs make no mention of such. I’m puzzled.

What is clear, however,  is that I can’t find any Taskbar personalization control that lets me turn this feature off (or on). So I’m hoping I’ll find a registry hack to let me take control. We’ll see.

The Mystery Continues . . .

If you take a look at the ElevenForum post on this topic, you’ll see nobody in the community knows what’s up for sure. The A/B test scenario, however likely, is sheer speculation. That said, I have no better explanation.

Stay tuned. I’m casting my inquiries broader afield. If I learn something worth adding, it’ll show up here. If not, we can all keep wondering what’s up. It’s good exercise!

[Added Late Afternoon April 19]

Turns out it was Start11 working behind the scenes that caused this issue. I also had the combined terminology completely backwards: combined means no accompanying text, never combined means always accompanying text. Here’s the setting I changed in Start11 to fix my issue:

Once I selected “Always” for combined, I got the streamlined compact icons I was looking for. My profound thanks to Shawn Keene, fellow WIMVP, who pointed me in exactly the right direction. Fixed!

Facebooklinkedin
Facebooklinkedin

Blinking Monitor Requires Nvidia Studio Driver

Yesterday, my production PC (Windows 10, i7-6700, 32GB RAM, 3070 Ti GPU) started the “blinking thing” again. As soon as I logged in, the right-hand monitor would go black then come back at irregular intervals. Previous episodes have responded to a driver update. But this time, no such update was handy. But my 3070 Ti runs either a gaming (for game play and high frame rates) or studio (for creative and production work) version. This time, fixing the blinking monitor required Nvidia Studio Driver to do its thing.

Why Is It That Blinking Monitor Requires Nvidia Studio Driver?

This issue has been popping up on my production PC since I switched out the 1070 Ti for the oversized 3070 Ti in January. I’m starting to wonder if my power supply may be having issues with the load on this system.

Reliability monitor doesn’t show any errors. But a dive into Event Viewer shows a Service Control Error 7031 that points to the Nvidia Local System Container at around the times I was getting the blink behavior. Since I’ve switched from the Gaming version of the driver to its Studio counterpart, the error has not resurfaced. Looks like it may be some kind of software glitch after all.

GeForce Experience lets you switch between the two driver flavors pretty easily. Simply click the vertical ellipsis to the right of the Check for Updates item and it gives you a radio button to pick one or the other, like so:

Fortunately for me, switching from”Game Ready” to “Studio” restored my system to proper operation. Good thing I’m not a serious gamer, eh?

Facebooklinkedin
Facebooklinkedin

Working Through Writer’s Block

Today is Easter Sunday here in Central Texas. I took my constitutional a bit later than usual, leaving the house just before 11 AM local time. While walking, I had the pleasure of listening to the “Arts Hour” on the BBC World Service on my iPhone. Unexpectedly, I listened through a brief interview with Aaron Sorkin (creator of The West Wing, and lots of other TV shows and movies). When asked about his issues with writing he responded something like this: “The problem is not with writing; it’s with NOT writing.” I found myself laughing out loud, because in the past couple of weeks I found myself working through writer’s block to finish what turned out to be an interesting project.

Working Through Writer’s Block Pays Off

Like many other writers, I do sometimes get stuck. My biggest problem is getting started on a project. When I don’t feel 100% prepared, when I’m not completely comfortable with the subject matter, or when I know a project includes lots of “hard labor” I tend to put such projects off. And then, sometimes, I put them off some more.

This last time around, I had to postpone a delivery because of a severe allergy attack that laid me up over the weekend. When Monday rolled around, I put it off until Tuesday. That turned into Wednesday, and so forth until Friday was staring me in the face.

Getting Unstuck May Require a Push

Confession, it is said, is good for the soul. Thus, upon finding myself profoundly stuck I called my senior editor. I’ve worked with the same team for 3-4 years now, so we know each other well. I simply fessed up and said: “I’ve got writer’s block. How can I get started?”

The advice turned out to be just what I needed to break my logjam. The editor said two things:

1. Start in the middle
2. The outline is 3,500 words and the piece is 4,500-5,500 words. How can this be a problem?

He was right. As soon as I read the outline and re-read some source material, I knew what I needed to do. I skipped the intro (which had been stopping me) and started with Part 1. It did take me two full days to write the piece after that, but I did get it finished. Thank goodness.

Other Sources of Help

Turns out there are lots of places to turn for good advice on beating writer’s block. A quick Google search turns up some real gems including:

Jeff Goins: How to Overcome Writer’s Block: 14 Tricks That Work
Penguin Random House: 10 Ways to Beat Writer’s Block
ReedsyBlog: Writer’s Block: 10 Ways to Defect a Writer’s Worst Enemy
R.L. Stine: 6 Tips for Overcoming Writer’s Block

And believe me, there’s plenty more where that came from. Turns out that asking for help (and talking to a friend) is pretty close to the top of  most of the preceding (and other) lists. Fundamentally, you need to break out of whatever has you stuck. If one thing doesn’t work, try another — and keep trying until you get writing again.

Works for me, anyway…

Facebooklinkedin
Facebooklinkedin

Windows 11 Clean Install Overlooks Certain Drivers

OK, then: here’s a “new-ish” behavior in Windows 11 that I don’t love. Once upon a time, you could use the update function in Device Manager to search the Internet for device drivers. No longer: if a driver is absent, the “Update driver” function can’t find anything to use. That explains why Windows 11 clean install overlooks certain drivers. If they’re not in the driver store built into the ISO image, they’re simply unavailable.

If Windows 11 Clean Install Overlooks Certain Drivers, Then What?

Take my recently clean installed Lenovo ThinkPad X380 Yoga. I happened to notice a half-dozen items under “Other Devices” in Device Manager yesterday. “Hmmm” I thought to myself. “Looks like the installer didn’t find some drivers while bringing the machine up.” Too true, as it turns out!

Fortunately, none of what was missing was essential to the laptop’s operation. Thus, that meant identifying the missing drivers, then finding and installing them. At first look, I saw 7 such devices. A quick hop to the Lenovo Vantage app (the company’s maintenance-update platform, which generally works OK or better) took care of three of them.

On a whim, I looked up LifeWire‘s story on the best free driver updaters (Tim Fisher updated it on April 4, 2022). It gives Driver Booster 9 Free the best rating (but the free version only updates 15 drivers, then requires users to pay ~US$23 to get a paid-up, for-a-fee version). It found 24 (!) drivers in need of update, so I concentrated on updating those that showed up with a “Driver Missing” label in that program’s output. Once identified, I knew I could handle the others on my own.

Back in  the High Life Again . . .

Indeed, the free version of the program did the trick for me. You can see in the lead-in graphic from Driver Store Explorer (aka RAPR.exe) that I was able to update 7 drivers (they show outdated versions). Add in another 7 new drivers added to go from “missing” to “found” and my system is now fully up-to-date, with no remaining “Other” device entries. No Device Manager items with the yellow exclamation point, either.

The gurus at TenForums and ElevenForum generally recommend against driver scan/update tools. I generally concur. But this was a big enough kerfluffle that I was grateful for some automated search-and-update help.

I guess that means I’m willing to make an exception when the “don’t check the Internet for available drives” behavior in Windows 11 prevents the installer from providing a full slate of items. I understand why MS did this (to prevent driver changes from adversely affecting naive users). But as I said in my lead ‘graph: I’m not in love with this design decision and its impact on clean install completeness.

That’s life, here in Windows-World. I can live with it, and fix it myself, when I must. So that’s what I did. And now the clean install machine is nearly production-ready. Just a few more apps and applications to go!

Facebooklinkedin
Facebooklinkedin

22598 Insider ISO Download Available

That didn’t take long. Build 22598 in the Dev Channel made its debut on April 13 (yesterday). Today (April 14) it’s already available for download on the Windows Insider Preview Downloads page.  {Note: eagle-eyed reader and fellow WIMVP David H Johnson tells me the ISO and the WU version appeared at the same time.] The lead-in graphic above, shows 22598 Insider ISO download available. Of course, users must sign in with a valid Insider MSA (Microsoft Account) to gain access.

22598 Insider ISO Download Available: Grab It!

This was the source I used last weekend for the clean install on my “troubled” X380 Yoga. I ended up with an earlier version because of the timing. Nevertheless it worked like a charm. I’m in the habit of keeping ISOs together on my Ventoy drive, so I have going on 30 (mostly Windows OS) images all together on one easy-to-search external drive.

And because that drive is a USB-C/Thunderbolt 3 enclosure with a nominal 256 GB NVMe SSD inside, it does a reasonably good job of providing ready and quick access to its contents. The whole thing cost me about US$100 in late 2020 (you can buy the same thing for under US$75 now). It’s definitely proved its worth to me many,  many times since I put all the pieces together (read more about its innards in this December 2020 post: Interesting Single-Builder SSD Benefits.

Doing the Download Thing

After specifying my version and language in the download GUI, I grabbed a copy of the 22598 ISO from the web page. It took about 7 minutes to arrive in toto —  longer than most such transfers take me. Watching it make its way onto my C: drive, I can only speculate that traffic levels are higher than normal. Indeed a quick hop to Fast.com showed Internet speeds all over the place on my local cable loop, ranging from a low of 250 Mbps to a high of 650 on my 940 Mbps (max speed) connection.

But once you have the ISO you can use it for DISM repairs, an in-place repair install, or even — as I did recently — a clean reinstall. Handy!

Facebooklinkedin
Facebooklinkedin