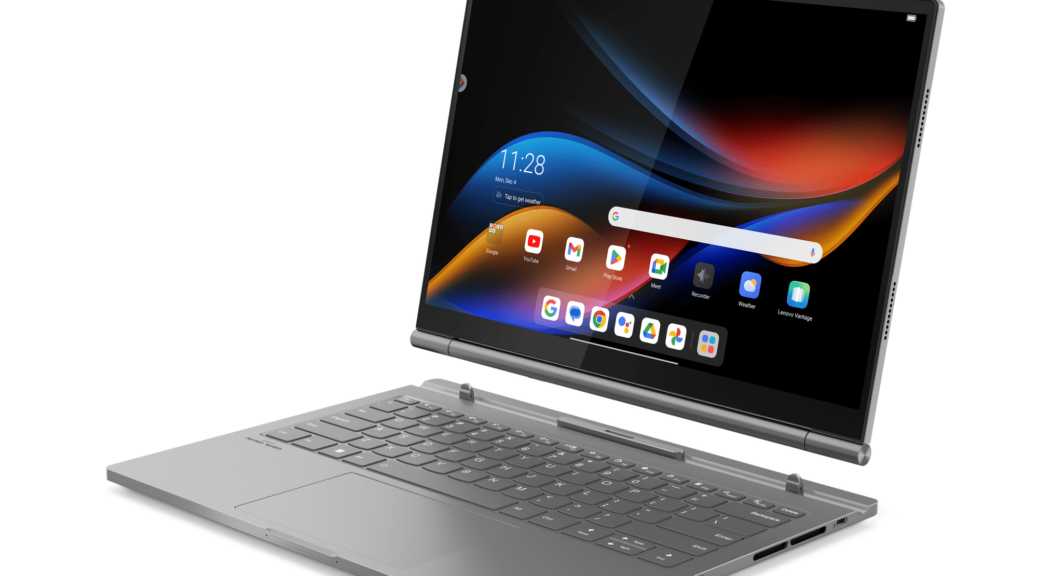
Category Archives: WED Blog

Working with WinFetch

WinFetch is a windows-focused knock-off of another well-known shell tool named NeoFetch. Each is written to show useful and informative data about systems from within a command-line shell environment. NeoFetch is built atop bash; WinFetch atop PowerShell. IMO, that makes WinFetch more suited for use with Powershell. I’ve been working with WinFetch a lot lately, learning how to use it to help me see what I’m doing with Windows Terminal and PowerShell customizations. Indeed, it’s pretty helpful. But I’ve also been learning some lessons the hard way as I go. Let me explain…

Why Working with WinFetch Takes Some Effort

The documentation on WinFetch is kind of sparse. In fact, I’m starting to think I should spend my time reading the NeoFetch stuff, because it may shed more light on the inner workings of WinFetch. Straight from its GitHub home, there’s precious little info available about its details and settings. Sigh.

So far, the lessons I’ve learned the hard way include:
1. You must save the config.ps1 file that governs WinFetch behavior for its changes to take effect.
2. Sometimes, a reboot is required, above and beyond a simple save. I can’t tell why, but I found myself stuck a couple of times on this hump. If you make a change, save the config file and it has no impact on the WinFetch output, try a reboot. It may do the trick.
3. Customizing the WinFetch config is totally a trial-and-error exercise. Be prepared to spend lots of time tweaking and checking, then repeating ad infinitum. Sigh again.

Customizing for Winget Package Mgr

It took me a while — including plenty of the aforementioned trial and error, but I got WinFetch to look at and report on Winget packages. Here’s the syntax, straight from the config.ps1 file that makes WinFetch work:

$CustomPkgs = @(“winget”)
function info_pkg_winget {
return ((winget list | measure-object).count)
}

What you’re doing is telling winget to list all the packages it knows about, then piping that input into the measure-object cmdlet. Using its count attribute you simply show the overall package count. Sublime!

Facebooklinkedin
Facebooklinkedin

WU Reset Fixes Weird Windows 11 Upgrade Freeze

With Dev and Beta Channel releases, it’s always “just a matter of time” before something gets wonky. Yesterday, in fact, I ran into difficulties upgrading one of my X380 Yoga laptops to Build 25227. In November 2021, I wrote a blog post here entitled WU Reset Tool Works on Windows 11. Good thing, because WU reset fixes weird Windows 11 upgrade freeze, too. Let me explain…

I’m Glad WU Reset Fixes Weird Windows 11 Upgrade Freeze

Here’s what’s weird about this failure. The laptop hung during the post-GUI update phase, after the old OS hands over control to the installer’s WindowsPE-based runtime environment. Indeed, it got all the way to 98% complete before it hung interminably.

Yet, as you can see, the hex code speaks to a “download error.” I have to guess there was some essential bit of data that the installer needed to read right at the end of the post-GUI installation process. When that failed, the whole shooting match went south. Stuck forever!

The Charm Came on the 2nd Try

I probably got lucky. I ran the invaluable reset/reregister batch file cited in the WU Reset Tutorial at ElevenForum, Then I tried the 25227 upgrade again: it worked this time! That said, this one took 30-40 minutes to complete (a fair while longer than previous but recent Dev Channel upgrades). But it sailed through to completion and is now working properly on the X380 laptop.

On the plus side, the login issues I’d been having with RDP on the same laptop also disappeared with the upgrade. That’s a relief. But on the minus side, my other Dev Channel test machine acted a bit wonky during the upgrade, too. It shut down after the reboot from the GUI phase into the post-GUI phase of the install. I had to manually power back on to finish the job. That hasn’t happened for a while with Dev Channel releases, either.

But hey! The purpose of Insider participation is to help catch — and hopefully kill — bugs and weirdnesses before they get into general release. We’re all just doing our jobs by finding and reporting this kind of stuff.

And that’s how it goes sometimes, here in Windows World. Good thing I enjoy it, and relish my appetite for problem solving and troubleshooting.

Facebooklinkedin
Facebooklinkedin

Zoom Updates and Payment

Here’s an interesting set of observations. In the past weeks, I’ve noticed that the free version of Zoom no longer offers the “Check for Updates” option in its menus. I’ve also noticed that Zoom has been asking free users to “upgrade” to the for-a-fee pay version. That got me to thinking about Zoom updates and payment. So I conducted an experiment…

What About Zoom Updates and Payment?

I went ahead and signed up for an individual Zoom license. It’s assessed annually, and costs about US$185 per year. Right now, the first year is discounted, so my actual out-of-pocket was “only” US$95.88. But it renews automatically at full price one year from today. Ouch!

That said, as I suspected — and as you can see in the lead-in graphic above — if you do pay for Zoom, you also get the Check for Updates option back. That raises the interesting question: is automatic updating worth US$95 (this year) or US$185 yearly? I’m not convinced.

There IS Another (Free) Way

If you don’t mind running a few Winget commands, you can keep the free version and update as you need to. FYI, I use SUMo to tell me when it’s time to update, but because I don’t pay for a license to that software on all my PCs, I’ve figured out how to use Winget to handle that instead.

The basic concept is to uninstall the version that’s running. Then, if you install Zoom again it will grab the latest version. That results in an up-to-date version on your PC. Two simple one-liner commands are involved:

  1. Winget uninstall Zoom.Zoom
  2. Winget install Zoom.Zoom

That’s it. Works like a champ. Be sure to keep your sign-in account and password info handy, because you’ll need to sign into the newly installed version after going through this remove/replace operation.

But you can keep using the free version, and stay current, if you follow this simple two-step operation. That’s probably what I’ll revert to next year, when my renewal comes due. To be continued…

It’s Irksome, and Potentially Insecure

C’mon Zoom: this approach is potentially unsafe for lots of users who SHOULD be free (e.g. students, seniors, nonprofit workers, and so on). Sure, it may be an inducement for some people (me, for example) to purchase a commercial license so as to regain auto-update ability. But the vast majority of free users who have no choice but to stay put should not be exposed to potential security vulnerabilities in the name of (modest) incremental revenues.

My plea/request: return the automatic updates to the free version! Find a different way to increment your income, please, in the name of better overall application security.

Facebooklinkedin
Facebooklinkedin

First Windows 11 22H2 Moment Arrives

OK, then. We knew it was coming. And with yesterday’s release of  KB5019509 it’s here. That’s right: with this out-of-band  update, the first Windows 11 22H2 moment arrives. This time, it includes the tabbed version of File Explorer, which wasn’t quite ready for release when 22H2 made its debut on September 20.  This new, snazzed-up File Explorer version provides the lead-in graphic for this story, shot from my just-updated P16 laptop.

What First Windows 11 22H2 Moment Arrives Means

I guess it helps to understand that a moment is shorthand for what ComputerWorld (CW) describes as “small, quarterly feature updates” in a September 14 story. (This story in turn relies on a July Windows Central hearsay report about the terminology.) And indeed, support for tabs in File Explorer makes a perfect illustration of what such a “moment” could bring to users.

But there’s more to KB5019509 than File Explorer tabs. Here are  descriptions of two other new features, straight from that update announcement (blue text emphasis mine for ease of identification):

  • New!It adds a feature called Suggested Actions for items that you copy. This is available for customers in the United States, Canada, and Mexico. For example, when you copy phone numbers or future dates, we provide suggestions, such as make a call with Teams or Skype or add an event in the Calendar app.
  • New! It adds a taskbar overflow menu. The taskbar will offer an entry point to a menu that shows you all your overflowed apps in one space.

We’ll Have These Moments to Remember…

If the CW description is correct, this is just the first of a series of such moments that will pop up from time to time. I can’t tell if MS will itself use the “moment” terminology or not. In fact, KB5109509 calls the aforementioned introductions “quality improvements” instead. A search on the word “moment” turns it up nowhere in this text.

Other new quality improvements in the update include using nearby sharing to “discover and share more devices, including desktops,” a switchover to Windows Settings from Control Panel to “uninstall, repair and modify all apps,” and improved “performance of federated authentication.” All told, KB5109509 appears to offer some interesting stuff.

But if a quality improvement isn’t explicitly called out as a “moment,” why bother with this terminology? Good question! I wish I had an equally good answer. We’ll have to see how this all unrolls. In the meantime, I’m just going to savor this particular moment…


Facebooklinkedin
Facebooklinkedin

Get-Hotfix Shows What WU Sometimes Cannot

When MS lifted the safeguard hold on  my Lenovo P16 Mobile Workstation, I upgraded it to Windows 11 22H2. Naturally, my first thought thereafter was to check on status of recent updates and fixes. That’s when I figured out that KB5018427 was included in the 22H2 version installed. Seems that Get-Hotfix shows what WU sometimes cannot — at least as far as Update History goes.

It’s all apparent in the lead-in graphic for this story. In case it’s not legible enough, right-click on that image and select “Open image in new tab” (Chrome, Firefox, Edge, etc.). That should show it at original resolution. If necessary, you can use the browser’s Zoom controls to magnify the text.

How Get-Hotfix Shows What WU Sometimes Cannot

Update history shows only user-alllied updates. It does not show updates that — like KB5018427–get rolled up into the windows image file (WIM) used to install a version upgrade. That’s what makes the PowerShell Get-Hotfix command so useful. Its image analysis tool tells it what’s there, whether the user applied it directly, or whether it’s already “in there” as is the case here.

An important clue appears in the “Installed on” date shown in the output of Get-Hotfix. Although the KB item itself is dated 10/11/2022, it didn’t get rolled into the WIM until 10/14/2022.

What Led Me Down This Trail?

I read the Windows Latest story about KB5018427. Naturally, I wanted to check on its status in the upgraded 22H2 version. When I didn’t see it in Update History, I visited the Microsoft Catalog and downloaded the 64-bit MSU file. Upon attempting its installation, it searched the updates already installed on the PC. That produced the following status message:

That made me understand the KB had been included in the WIM file I’d already installed. A search on “use PowerShell to show updates installed” led me to the Get-Hotfix command.

As the afore-cited PowerShell docs states:

The Get-Hotfix cmdlet gets hotfixes, or updates, that are installed on the local computer or specified remote computers. The updates can be installed by Windows Update, Microsoft Update, Windows Server Update Services, or manually installed.

Thus Get-Hotfix can catch patches and fixes no matter how they get included in the image it checks and reports upon. The rest, as they say (drum roll, please)… is history!


Facebooklinkedin
Facebooklinkedin

P16 Safeguard Hold Lifted

OK, then. I performed my daily ritual WU check on the P16 Mobile Workstation on Friday (Oct 14) . This time, the P16 safeguard hold lifted, and I was able to update to Windows 11 22H2. As you can see in the lead-in screencap, the 22H2 download was available during capture. Neat-o!

And indeed a quick visit to the 22H2 Known Issues page shows that my hold-up — the Intel SST drivers — appears as “mitigated.” Here’s what that looks like:

P16 Safeguard Hold Lifted.SST-info

The P16 blocking issue is now resolved, thanks to Intel driver updates. These appear in DevMgr under the “Software Components” heading.

With P16 Safeguard Hold Lifted, Upgrade Proceeds

I got a little concerned right after the first reboot (from the GUI-based portion of the install, into the post-GUI phase). The P16 sat at 0% complete on processing updates for what seemed like an eternity (about 4 minutes). But then, it started to chunk through the process and finished in about 20 minutes during that install phase.

I noticed that the update included a raft of driver updates –14 in all — by checking Reliability Monitor later on. The two items of greatest import show up in the software components category where various sound -related items reside.

Whatever the issue might have been, I’m glad to see it resolved. And so far, the P16 is running without apparent issues. I’m connected to it remotely via RDP right now, so that recent bugaboo is not present here, either. Good-oh!

Facebooklinkedin
Facebooklinkedin

USB NVMe HW Tweak Delivers Big

I’m still noodling about, trying to figure how to get the best performance out of high end USB NVMe drive enclosures. To that end, I was reminded of something I already knew but hadn’t considered. That is: deep down in the hardware policies for Windows removable devices — including NVMe drives — is something called “Removal policy.” As a quick and easy item, this USB NVMe HW tweak delivers big results.

Those results appear in the lead-in graphic for this story. Both sets of CrystalDiskMark results come from the same system, same USB-C port, and the same NVMe hardware. The only difference is that one is tweaked (selected “Better Performance”) and one is not. As you can see, this tweak makes a big difference. (Hint: the left-hand item shows tweaked results.)

How-To: Set Up NVMe HW Tweak Delivers Big

This takes a bit of digging to get into. This properties page is several levels deep in the storage device properties hierarchy. There are multiple ways to get to this page. I’ll illustrate one with step-by-step instructions using Disk Management:

1. Use Winkey+X to open the quick access menu.
2. Select Disk Management.
3. Right-click the drive letter for the NVMe device, then select Properties.
4. On the General tab, click the Properties button at lower right.
5. On that General tab, click the “Change Settings” button at lower left.
6. Click the Policies tab on the resulting Properties page, and click the radio button next to “Better Performance.” Also, click “Enable write caching on the device.”

Here’s what that final page looks like, with the described selections made:

USB NVMe HW Tweak Delivers Big.removal-policy

This page is four levels deep into the device properties hierarchy. It offers a useful “Better Performance” option.

What About Those Results?

I built a spreadsheet using both sets of results. Note that for every cell in each set of results, the tweaked drive was faster than the untweaked one. Some of the differences are negligible (under 10%). Some are minor, but noticeable (under 35%). The entire write column, however, offers at least doubled speed (top two columns). The random writes are 30 times faster when one thread works against a queue depth of 32. That drops to “merely” 11 times faster for a single thread and a single write request. Amazing!

Tweak(R) Tw(W) Notweak (R) Notw(W) Delta (R) Delta (W)
3049.53  2898.59  3004.07  1326.67  101.51% 218.49%
1760.91 2020.40 1620.99 857.20 108.63% 235.70%
499.74 361.83 411.16 12.00  121.54%  3015.25%
50.92 110.77  38,74 9.52 131.44% 1163.55%

This represents a significant boost in performance for a quick settings tweak. It does mean, though, that you must use the “Safe Eject” tool in the notification bar to eject the drive before you can disconnect it. Or, if you’re like me, you’ll simply do it the next time the host PC is rebooting (best done right when the restart gets underway, after shutdown is complete).

But gosh! Consider the money for a fast-ish NVMe drive (about US$120 – 150 for the 1 TB Sabrent Rocket 4 Plus). Then, factor in US$150-170 for a fast, USB4 NVMe enclosure. The tweak takes under a minute and really helps with drive performance. If you spend the money, you need to spend the time and effort to apply the tweak. You’ll get the most from your investment that way.

Realworld Results Change

Untweaked, it takes Macrium Reflect 5:30 to image the system drive on the P16 Mobile Workstation where the USB4 NVMe drive is attached. Tweaked, that same drive finished the job in 2:25. That’s over twice as fast. To me, that’s much more meaningful than synthetic benchmark results like those from CystalDiskMark. It also shows those benchmark results have some truth to them as well. Good-oh!

Facebooklinkedin
Facebooklinkedin

Windows 365 App Now Available

Too cool!  The Windows 365 app — now available in the MS Store — is out. Search on either “Windows 365” or “Windows 365 Preview” and it should come right up. The app’s Store page appears as the lead-in graphic for this story, in fact.

With Windows 365 App Now Available, What Else Is Needed?

Good question! I immediately downloaded and installed the app. Upon running same, I learned that a valid Windows 365 subscription is required so that the app can connect and interact with a Cloud PC instance. Because I lack such a subscription, here’s what I got from the cloud when I logged into my AD tenant account:

Windows 365 App Now Available.noacct

Drat! I was afraid that Preview didn’t confer temporary or evaluation access. I was right, alas…

Looking at Windows 365 Business Plans for SMBs, I see they cost from US$31 to 61 per month. Ouch! That’s costish, for something I don’t really need, but would love to play with.

Visiting the MS Evaluation Center, nowhere do I see Cloud PC among its various offerings. I guess that makes sense: it doesn’t cost MS anything more than storage space to provide ISOs for download. Hosting (extra) cloud PCs for evaluation means they bear more or less the same costs that the real thing imposes, with none of the revenue generating benefits.

Ifs and Buts for Cloud PC, Windows 365 App

Too bad! I’ve wanted to give the Cloud PC thing a try since it was first announced in 2018-2019. Right now, it seems like there’s no way to try it out without buying it. And with costs at US$372 per year and up, that means tangible costs. I’ll have to think about this, to see if I want to “pay to play.”

But those who already have Windows 365 subscriptions can simply download the app. When they log into an AD tenant with associated Cloud PC instances, the app should take it from there…

Facebooklinkedin
Facebooklinkedin

Fixing Windows 10 WinKey-X

I don’t remember anymore how I shot myself in the foot this particular time. All I know is that I somehow removed all traces of PowerShell from the WinKey+X menu on my Windows10 production PC. The lead-in graphic shows that menu from my ancient Surface Pro 3, also still running Windows 10. Recently, I’ve found myself fixing Windows 10 Winkey-X because I want it to show Windows Terminal.

After Some Fumbles, I’m Fixing Windows 10 WinKey-X

If you search on “customizing WinKey+X menu” you’ll find lots of information and advice available. Initially, I was beguiled by Sergey Tkachenko’s WinX Editor. I should’ve known better: it hasn’t been updated since 2017.

A key ingredient in modifying the WinKey+X menu, as it turns out, turns on using the latest version of Rafael Rivera’s hashlnk.exe program. Basically, it creates hash values and associated them with menu shortcuts, so the OS treats the entries in the following path correctly:

%LocalAppdata%\Microsoft\Windows\WinX

The sub-folder “Group3” is where my specific shortcut had to go. But it didn’t work without using the latest (2.0) version of hashlnk. And because WinX Editor doesn’t use that version, it doesn’t work, either.

TenForums to the Rescue

As with many other topics in the Windows world, I found my fix in the TenForums Tutorials. This particular one is called Add Custom Shortcuts to Win+X Quick Link Menu in Windows 10. I followed its guidance, step-by-step, and got an admin version of Windows Terminal installed in my WinKey+X menu without undue difficulty.

As is often the case in fixing Windows issues, it took much longer to find the right solution than it did to implement it. I think we’re talking about an hour-plus of fumbling around and failed attempts before I turned to my unusually reliable and intelligible TenForums resource. Sigh. That’s the way things go around here sometimes….

Here’s what my Winkey+X menu looks like now, with my desired entry up top.

Fixing Windows 10 Winkey+X.i7skyfixed

After going through the motions I get a Windows Terminal entry with admin privileges (reads “Term (Admin)”).

I have long been a proponent of Ten Forums and ElevenForum tutorials. This doesn’t change that stance at all. In fact, it strengthens it!

Facebooklinkedin
Facebooklinkedin

HDDs Still Have Their Uses

Hmmmm. Just saw a fascinating story at Neowin.net. It provides links to some low-cost deals for hard disk drives (HDDs) that range in size from 3 to 14 TB, with prices from US$60 (3TB) to US$210 (14 TB). I’m not endorsing the brand (WD) or the deals (listed from Amazon and — in some instances — Newegg). But I am amazed at just how cheap conventional hard disks can be today. And because HDDs still have their uses — particularly for archiving and spare backups — buying may make sense.

Economics Also Verify That HDDs Still Have Their Uses

I’m struck by the contrast between HDD and NVMe prices, especially for 4 and 8 TB devices. Looking at Amazon, I see that 4TB NVMe drives go for US$460 and up, with most top-end devices just below or over US$600. When you can find them (not easy), 8TB devices cost from just under US$1,200 to around US$1,500 or so.

The comparison to HDD is pretty stark. The Neowin story cites prices of US$70 for 4, and US$130 for 8 TB. Do the math to figure out the ratios. The 4TB NVMes cost between 6.57 and 8.57 times as much as their HDD counterparts. 8TB models run between 9.23 and 11.53 times as much.

Of course, denser solid-state devices are much more expensive to make. Though higher-capacity HDDs have more platters, achieving denser storage doesn’t magnify costs anywhere near as much. In fact, the HDD cost increment for going from 8TB to 10TB is US$30, and from 8TB to 14TB US$80. That clearly shows the incremental cost of storage is much, much cheaper for HDDs than SSDs.

But given the mind-blowing costs for higher capacity NVMe devices, they’re not going to replace HDDs completely any time soon. They simply cost too much to justify wholesale switchovers. Nobody’s going to use HDDs for serious, real-time workloads any more. They have no place as system drives, either. But for other applications where high capacity trumps I/O performance, they still have a vital role to play. And that explains why I still have over 40TB of spinning storage myself, much of it idle as “backups for my backups.”

Facebooklinkedin
Facebooklinkedin