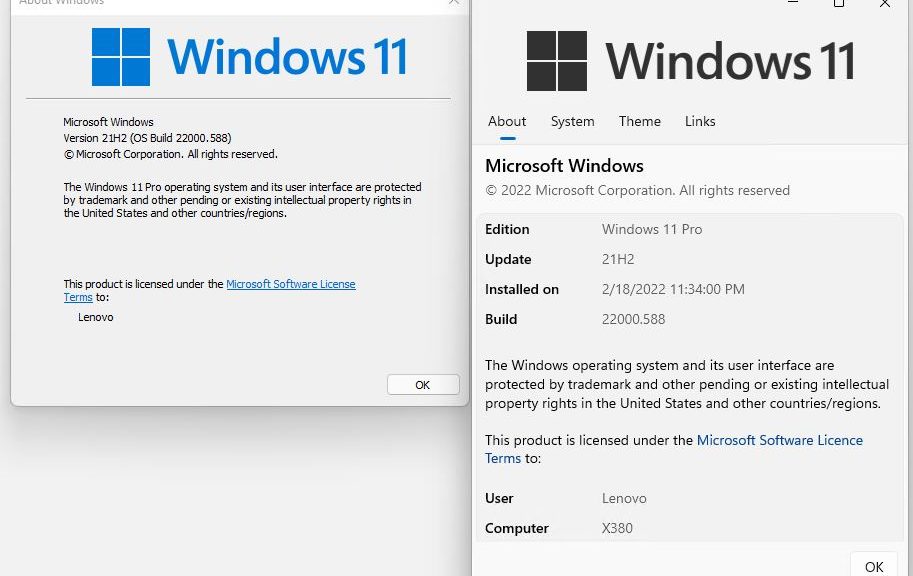
Machine Clean-up Makes For Rocky Computing

Last week, I swapped notebook PCs with a co-worker, who essentially traded me a smaller, lighter MSI PR200 notebook for a larger, heavier Acer model. Essentially I took over a machine that had been somebody else’s for over a year and had to go through the clean-ups and contortions necessary to make it mine (or ours, actually, as this machine is destined to become my son’s first full-time PC). Boy, was I ever in for it, though I wouldn’t realize it for a few days.

First, I went through the hard disk, cleaning up all the files and applications I didn’t need anymore. For some reason or another the putative 160 GB (actual binary 146 GB) hard disk on this MSI notebook came to me with three partitions installed:

  • The C: (boot/system) drive measured ~47 GB, over 75% of which was occupied. Two days (not full time, mostly watching TV or sitting after dinner) later, I had it down to 51% or thereabouts. I also defragged the drive about four times, using the excellent Raxco Perfect Disk 10 product to consolidate free space as well as defragment files.
  • The D: (data) drive measured 97 GB, and was virtually empty with less than 400 MB of material present, most of it downloads I installed while adding some utilities, and updating the BIOS and drivers for the system.
  • There’s also a hidden E: partition named WinRE (which is shorthand for Windows Recovery Environment), probably a Windows PE based factory reinstall utility. I have to use Disk Management or a third-party partition manager to see it, and to determine that it’s almost 6 GB (5.86 to be more precise) in size.

After I cleaned up the disk drive,I installed my usual grab-bag of favorite tools and utilities to help me get on top of and manage this machine. I’m running lightweight security with Windows Firewall, AVG AntiVirus 8.0 Free, and Windows Defender. I figure a 5-year-old won’t be doing much Web surfing just yet. Later on, I’ll probably upgrade him to NIS or perhaps an all-PCTools environment (Spyware Doctor, PC Tools AntiVirus, and PCTools Firewall). I always use the excellent CPUID tools, HWMonitor and CPU-Z, so on they go, along with CCleaner and Revo Uninstaller. Then, of course, Raxco’s Perfect Disk to get going on good defragmentation. Of the many apps left on the machine, I kept WinRAR (which I’m learning to appreciate as a WinZip alternative), Daemon Tools (for mounting ISOs), plus Google Chrome and the latest Opera (both of which I’ve been enjoying playing with).

Next, I started attacking the system drivers using my tried-and-trusted sidekick DriverAgent. Of the 93 drivers on the PC, I needed to update an even dozen. No big problems there, except for the time and a constant repetition of the download-install-reboot cycle. I ended up updating various system device drivers, the integrated Intel graphics, all the networking drivers, including wireless (Intel), wired (Realtek), and Bluetooth (IVT Firmware), the modem (which I’ll probably never use), the Webcam (Bison), and RealTek HD Audio. This probably took me about 5 or 6 hours to complete, all told. Though it took some time everything went smoothly.

Then came the rock upon which this poor little notebook PC almost foundered. Upon checking the MSI Website, I noticed the machine was running a 2006-vintage BIOS about 5 revs back from the current version, released in mid-January 2009. I grabbed an AMI BIOS flashing tool and the most current BIOS download and then set to work. Having just done some reasonably serious Award BIOS hacking without difficulty, I asked myself “How hard can this be?” Alas, I was about to find out…

Any time you mess with the BIOS you always start by making a backup of the current, installed version. If you’re smart, you’ll stick on a USB key where you can get to it from just about anywhere. I was later to thank my lucky stars for having done just that. After a bit of blithe research through Google, I began my efforts with a Windows-based BIOS flashing utility called AFUWIN.exe (AFU stands for AMI Firmware Update, WIN for Windows). “Heck,” I said to myself,”It’s from AMI, so how bad can it be?” I would shortly be finding out, because when I ran the program and performed the BIOS update, it informed me I didn’t need to update two of the 8 or so defined regions in the BIOS map, so I allowed it to proceed as it wanted to. Bad move!

When I restarted the machine, I discovered signs of serious issues. Bluetooth wouldn’t work, and Vista started complaining about all kinds of device related issues; numerous services wouldn’t start, and other odd behaviors soon manifested. “No problem,” says I, “I’ll just roll back to the old BIOS and everything will be OK.” If I hadn’t used the same tool to try to roll back that I had used to roll forward it all might have ended there. But alas, I did, and once again permitted the reflash to skip the same two BIOS regions it had skipped on the first flash. The result was a somewhat more stable, but still noticeably flaky system.

Only then did I begin to suspect my problem came from the tools, and not the BIOS files or the PC itself. I quickly became acquainted with the excellent Wim’s BIOS page and soon learned that many of the better third-party (non-AMI) tools available there wouldn’t touch my BIOS because it was corrupted and they didn’t want to make a bad thing worse by messing with it. After noodling around and trying (and failing) with about half-a-dozen more third party tools did my research lead me to learn that wholesale BIOS rewrites are easier to force from a DOS boot, using ruder, cruder, and more powerful flashing tools at the command line in that environment.

Next, I learned how to build a DOS-bootable UFD, copy the DOS BIOS flasher and BIOS files onto that device, and have my way with the MSI PR200′s BIOS. I got fed up enough with the lack of clear, cogent information on exactly how to do this that I wound up going to instructables.com yesterday, where I crafted a profusely illustrated, step-by-step tutorial on how to pull all the tools and ingredients together, and how to implement this process on your own PC. It’s called “Build a Bootable UFD for flashing AMI BIOS,” and I urge you to check it out.

Once I force-rewrote the entire BIOS using my original version and got back to where I had started, I bit the bullet, and repeated the process with the 1/13/2009 BIOS build A1221IMS v1.48 I had downloaded from the MSI site. Bingo! I was back in business with the updated functionality the BIOS version description had promised working as advertised. But wow, did that take a long time and give me a big scare… At one point, I was researching vendors who could send me a replacement BIOS chip, having read enough horror stories about the issues that a corrupted BIOS chip can cause to think an outright replacement might be called for. Thank goodness, that turned out to be unnecessary.

Image of MSI Performance Reliability Monitor
When the BIOS gets weird, the OS does too!

In the meantime, I’ve gotten to know this little notebook PC very well, and have learned more about its performance and behavior. I’ve ordered 2 2GB SO-DIMMs to replace the 1 GB modules currently installed in the machine, believing it will benefit from the effective 1 MB increase in RAM that will result from this maneuver ($40). I’ve also ordered a 7,200 RPM hard disk to replace the 160 GB Fujitsu 5,400 RPM model it currently contains ($50). I’ve got an HD caddy into which I can pop the new drive and then copy an image of the old drive onto to make the upgrade reasonably swift and painless. I’m also considering installing Paragon Partition Manager on this machine and merging the C: and D: partitions since I can’t see any compelling reason why I should continue to keep them separate.

In the meantime, what with all the hangs, crashes, and app problems the balky BIOS caused while I was troubleshooting and experimenting have caused the System Reliability Index on this machine to fall from an acceptable 8.88 to a pretty dismal 4.14. I’m hoping this will climb steadily over the coming weeks and stay up above 9.0 where it belongs!


Facebooklinkedin
Facebooklinkedin

Here Goes…Something: Win7 Upgrade

Although my recent recitation of Vista system problems has not been altered (and I’ve also lost my ability to interact with my HP MediaSmart Server via the Windows Home Server Connector in the interim), I’m still going to try an upgrade install from Windows Vista Ultimate to Windows 7 Ultimate on my primary production machine. Everything I know about Windows says that if your registry has problems in the predecessor OS, those problems will be inherited in the successor OS after an upgrade. But I’m going to go ahead and do it anyway, in the expectation that I’ll have to wipe the system drive and do a clean install shortly thereafter. I’m not sure if simple curiosity, sheer cussedness, or outright perversity is driving this action, but I really want to try this and see what happens.

Image of MSDN Windows 7 Download file transfer progress
One down, one underway, and two left to go

In the four or five months I’ve been working daily with Windows 7, I’ve been impressed by its great stability overall and its improved resilience in the face of problems, issues, and failures as compared to Windows Vista. That’s why I’m going to jump in and try the upgrade install — probably some time later today, in fact. I started downloading the Windows 7 .iso images for Professional and Ultimate x86 and x64 versions yesterday, and am nearing the half-way point on my download of the 32-bit Professional version as I write this, with both versions of Ultimate still ahead as I write this blog. Here’s a screencap from the Microsoft File Transfer Manager that reports on my progress so far:

At my present rate of download progress — which remains much slower than the 1 MBps rates I normally get from MSDN for downloads, even though MS has enlisted Akamai to help handle the severe spike in demand that posting Windows 7 RTM has caused — I will probably be able to conduct this experiment either this evening or some time tomorrow. Count on me to post my results, and share my observations as to issues and problems, as soon as I can. While you’re at it: wish me luck, too! I have a strong feeling I’m going to need it…

[important][Update at 3:22 PM: Finally got to the last item in the download list, and the one I need to update my production machine and transfer rates are an abysmal 20-26 KBps, with estimated transfer times between 27 and 31 hours. Looks like I won’t get to do this one until tomorrow, after all…][/important]

Facebooklinkedin
Facebooklinkedin

Mapping Out USB Ports

In attempting to fix erratic mouse behavior on my production desktop, I discovered the need to visualize what USB devices were connected to which ports on my PC. I also wanted to make sure I had USB 2.0 devices connected to USB 2.0-capable ports and hubs, while I was looking into these matters.

To those ends, I tried to run down a reasonably capable but free USB inspection or reporting tool that could tell me what was what on my PC. Ultimately, I wound up with USBView, a simple but effective Microsoft-made utility.

One interesting thing about this task was how to search for what I wanted. “USB scanner” didn’t do it, nor did “USB mapper,” “USB diagnostics,” or “USB ports.” After flailing about for a while, I went to visit a familiar USB Website I turn to from time to time, EveryThingUSB. They recommended a tool called USBinfo, but all the links I could find to the program (especially the latest version, 2.0) were defunct (though I did find a working link to a Version 1.2 download). I also discovered a USB sniffing tool from HHD Software called USB Monitor Lite, for which a free trial download is available (it’s only good for 14 days, after which the buy-in is $40). I also found a nice-looking utility from Nirsoft called USBDeview but it wouldn’t work properly on my PC, and appeared to cause the very kind of erratic mouse behavior that had prompted me to search for such a tool in the first place!

But once I had some program names and looked at what they called themselves, and how they described themselves, my search terms became more relevant to the actual tools and utilities out there in cyberspace. In fact, a search on “USB utilities” proved most useful, and led me to the site where I discovered Microsoft USBView.

USBView lists the hierarchy of USB devices present on your PC. If you haven’t added a bus-attached USB controller to your system, it lists all of the USB Universal Host Controllers (UHCs) on your motherboard at the top of the hierarchy, followed by the USB root hubs attached to the host controllers. If you do have one or more additional USB controllers, you’ll see extra entires at the top two levels of the hierarchy. At the next level down, you’ll see either Port numbers or any secondary hubs that you may have attached to USB ports on your PC or notebook computer. At each level in the hierarchy, any device you highlight in USBView’s left pane displays its properties in the right pane for inspection. Clicking on any Port to which a “Device connected” notification attaches will usually permit you to identify that device by looking at its associated property values.

USBViewImage of USBView
The usual hierarchy is UHC => Root Hub => (Optional) Hub => Port => Device

For my SuperTalent Pico 8GB Flash drive, however, I had to identify it by process of elimination because USBView failed to resolve its vendor ID. All of the other devices were identifiable by type and by vendor in the properties information pane. As it happens, the Pico’s vendor ID resolves to the chip maker’s name for the Flash RAM it contains, rather than the device builder’s name anyway, as I discovered thanks to a handy unofficial list of USB vendor IDs. When in doubt, I also discovered, you can always remove or insert a device to change your configuration, or do both, to conclusively identify any particular USB device anyway.

For others who are incurably curious about what’s on and in their PC’s, or those who must deal with USB problems, some or all of the utilities mentioned here may come in handy. For me, USBView was just what I wanted, so it was the only one to remain resident on my machine.

[notice]Note: USBInfo 1.2  and 2.0 Incompatible with Vista[/notice]

Just for grins, I decided to install USBInfo version 1.2 on my Vista machine to see how it compared to Microsoft’s USBView. I’ll never know, because the program is incompatible with Vista. It uses several obsolete and deprecated DLLs, some of which are no longer available in Vista, and some of which provoke a “contact Microsoft for more information” warning when the program goes looking for them (most notably msvbm50.dll, which dates all the way back to the Visual Basic 5.0 era).Though there are sources for such things online, I decided to forgo this dubious privilege and immediately used Revo Uninstall to get the program back off my machine, with no apparent ill effects. I also found a download for version 2.0 at www.onlinedown.com through mirror 6 or 7, but it too suffered from exactly the same problems. My advice: don’t bother with this software on a Vista system!

Facebooklinkedin
Facebooklinkedin

Certified Information Systems Security Professional

Totally updated for 2011, here’s the ultimate study guide for the CISSP exam!

Considered the most desired certification for IT security professionals, the Certified Information Systems Security Professional designation is also a career-booster. This comprehensive study guide covers every aspect of the 2011 exam and the latest revision of the CISSP body of knowledge. It offers advice on how to pass each section of the exam and features expanded coverage of biometrics, auditing and accountability, software security testing, and other key topics. Included is a CD with two full-length, 250-question sample exams to test your progress.

Facebooklinkedin
Facebooklinkedin

Computer Forensics JumpStart

Essential reading for launching a career in computer forensics!

Internet crime is on the rise, catapulting the need for computer forensics specialists. This new edition presents you with a completely updated overview of the basic skills that are required as a computer forensics professional. The author team of technology security veterans introduces the latest software and tools that exist and they review the available certifications in this growing segment of IT that can help take your career to a new level. A variety of real-world practices take you behind the scenes to look at the root causes of security attacks and provides you with a unique perspective as you launch a career in this fast-growing field.

Facebooklinkedin
Facebooklinkedin

Cyberheist

Not since the markets melted down, and the recession sank its icy hooks into the business climate in 2008, has American business faced a threat as serious as the current cybercrime scene. Small to medium enterprises have been hard-hit in particular, amounting to tens of millions of dollars being stolen out of their bank accounts.

This book is meant to educate you about the dangers of conducting business online. In particular, it covers phishing, a particular type of social engineering attack delivered by email or over the Internet.

Facebooklinkedin
Facebooklinkedin

HTML, XHTML & CSS for Dummies

The indispensable introductory reference guide to HTML, XHTML and CSS

Even though new technologies enable people to do much more with the Web, in the end HTML, XHTML and CSS are still at the root of any Web site. The newest edition of this bestselling guide is fully updated and revised for the latest technology changes to the field, including HTML5 and CSS3. Illustrated in full color, this book provides beginner and advanced coders the tools they need to be proficient at these programming languages.

Facebooklinkedin
Facebooklinkedin

SuperTalent Pico Drives: Tiny, Compact Form Factor, Great Big Value and Capacity

A couple of months ago, my friends at memory maker SuperTalent Technology sent me several of their super-compact Pico USB Flash drives for review. After finishing a couple of books, and dispatching diverse dragons, I’m finally ready to report on my findings. The quick’n’dirty take on these 8 GB flash drives is: excellent value, nice engineering, ultra-compact form factor, very usable, though a tad slow (but OK) for ReadyBoost.

Let’s start with a list of what SuperTalent sent me:

  • 8GB Pico-D Swivel Flash Drive (STU8GPDS): Pick one up at SuperBiiz.com for $14.99 right now and get free shipping. This design features a center post swivel so that the business end (USB connector) for the device rotates inside a sleeve when not in use. Weighs 8.2 g (0.2892 oz) without the chain, 9.2g 0.3245 oz) with chain. Lack of a standard USB connector means you have to pay attention to where the contacts are, and insert the Flash drive correctly.

    SuperTalent Pico Drive image
    The Pico-D features a swivel-mounted Flash module: swivel it in to cover it up; swivel it out to plug it in.
  • 8GB Pico-C Nickel Plated Flash Drive (STU4GPCN): You can buy this puppy at SuperBiiz.com right now for a measley $19.04 (plus S&H). Both versions includes a jewelry grade chain: weights are 4.6 g (0.1623 oz) without, and 6.3 g (0.1975) with. The Pico-C models feature a more obvious USB business end, but provide no cover for the contacts. Some attention to plug-in orientation is still required, but you really can’t put one in upside-down as you can with the Pico-D.

    SuperTalent Pico Drive image
    Both nickel and gold models look the same, except for the color of their outside plating.
  • 8GB Pico-C Gold Plated Flash Drive (STU8GPCG): So the gold plate obviously costs a little more, as does the longer, more attractive gold-plated chain that comes with it. The device weighs the same as the nickel-plated model (4.6 g/0.1623 oz), and again, the chain weighs little (1.7g/0.0960 oz). Except for the bling, however, this unit is identical in size, shape, and performance to the nickel-plated model. You’ll pay an extra $8.58 for the gold on this model ($27.62 total) at SuperBiiz.

    image of SuperTalent Pico Drive next to a quarter
    When you put the Pico-C next to a US Quarter, you can really appreciate its tiny size.

No matter which model you choose, you get a lot of capacity at a very low price–for the preceding units $/GB falls in a range from $1.87 to $3.45. Even at the high end, this is cheaper than 4 GB units cost less than six months ago.

Pros and Cons of the 8GB SuperTalent Models

On the plus side, you get decent read speeds (just under 30 MBps seems like a safe average figure), a low price per GB of storage, compact sizes, light weight, and pretty good looks. All these Flash drives worked well for us in the office and on the road, and were more than tough enough to shrug off the hazards of travel and life on the road, as well as the hazards of a home office with an inquisitive 4-year-old VERY interested in these compact powerhouses.

For a 32 KB file, write (orange) and read (blue) speeds in MBPS (y-axis) versus block sizes in KB (x-axis).
graph image of 4mb hard drive tuning results
Same axes as above, for 4 MB file.
image of graph for 512 MB hard drive tuning results: Same axes again, for 512 MB file.
Same axes again, for 512 MB file.

On the minus side, you get fairly slow write speeds. Our HDTune screencaps consistently read under 10 MBps–we measured 9.22 MBps for a 2.6 GB .PST file just to confirm these numbers–in fact, write speeds appear to average in a range from 6 to 9 MBps. By contrast, my trusty old 2 GB Memina Rocket measures out 18-23 MBps on these same tests; newer SATA hard drives routinely measure between 60 and 70 MBps write speeds. Though I used the Pico-D for ReadyBoost on two different Vista systems for a week apiece, and noticed no slowdowns, Overclockers.com currently gives the OCZ Rally the nod for “fastest ReadyBoost Flash Drive” where an 8 GB model will set you back $23 at Newegg. I only observe a 4-5% difference in the PC Doctor memory benchmarks when using faster versus slower ReadyBoost drives, however, so I’m not sure it really makes a big difference.

With Flash drives as small as the Pico units, you also have to be careful when working with them. They’re so small they can disappear far too easily, so it’s best to keep them plugged into a USB port, or clipped onto a key fob (that’s how I manage to hang onto mine, anyway).

[important]Bottom Line: Great Bang for the Buck

If you want stylish, capacious, and affordable USB Flash drives, you could do a lot worse than to pick up one or more of these SuperTalent Pico drives. If you want mine, you’ll have to fight me for it![/important]


Facebooklinkedin
Facebooklinkedin

Hallelujah! Production Vista System Finally Behaves Like One

All I can say when it comes to finally getting my production Vista desktop working as I think it should be is “It”s about (expletive deleted) time!” After building this system over the summer and dealing with the usual shakedown issues involved in getting all the software and settings installed, I found myself fighting a series of mysterious and frustrating hardware problems that lasted from the end of August through the first week of November, 2008.

Continue reading Hallelujah! Production Vista System Finally Behaves Like One

Facebooklinkedin
Facebooklinkedin

Author, Editor, Expert Witness