Category Archives: Tips, Tricks and Tweaks

Want to know how to make the most out of your Windows 7 system?
Here we share the things we have learned for what to do (and what not to do) to make Windows 7 perform at its best.

Copilot Assisted RAPR Analysis

Yesterday, I found myself revising a story for ComputerWorld. The topic: cleaning up Windows driver bloat using DriverStore Explorer, aka RAPR.exe. Along the way I found myself wanting to count the drivers in that store, and to identify duplicates for possible removal. Performing what I’m calling Copilot assisted RAPR analysis, I had it craft some Powershell for me. Came in really handy, so I’ll explain and illustrate what I used…

Enumerating Copilot Assisted RAPR Analysis Items

I used two one-liner PowerShell commands, plus one script, to do the following:

  • Provide a count for the number of drivers in the store (found in C:\Windows\System32\DriverStore\FileRepository)
  • Display the total file size of the store’s contents (same place)
  • Enumerate and identify the duplicates in the store (script)

These items are helpful because running the first two one-liners let me quickly count items and obtain their overall file size. Handy for before and after comparisons. The script was useful because it let me identify duplicates in the store, which RAPR does not always remove when you use the “Select (Old Drivers)” and “Delete Driver(s)” buttons for clean-up purposes.

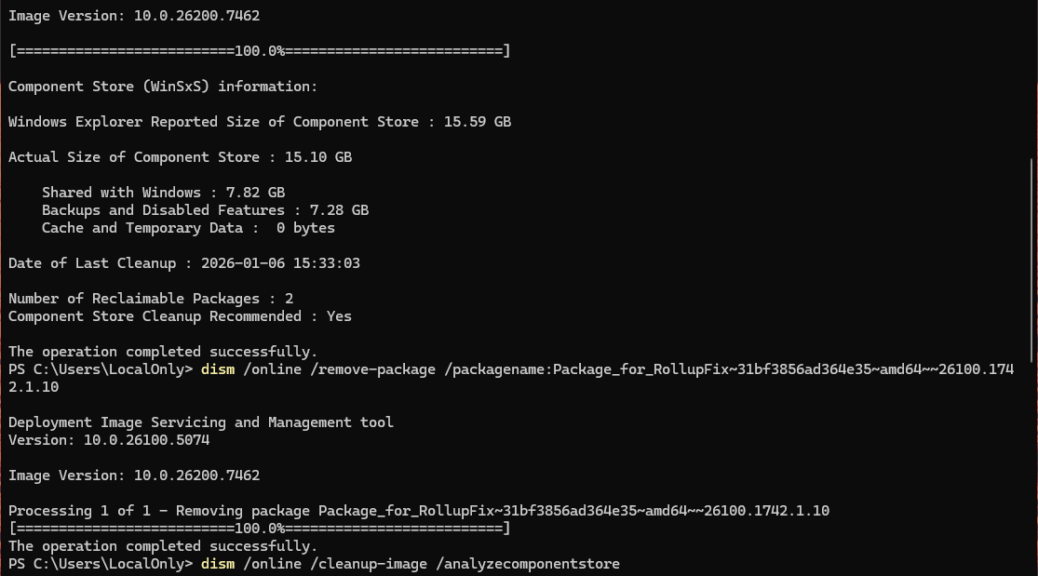
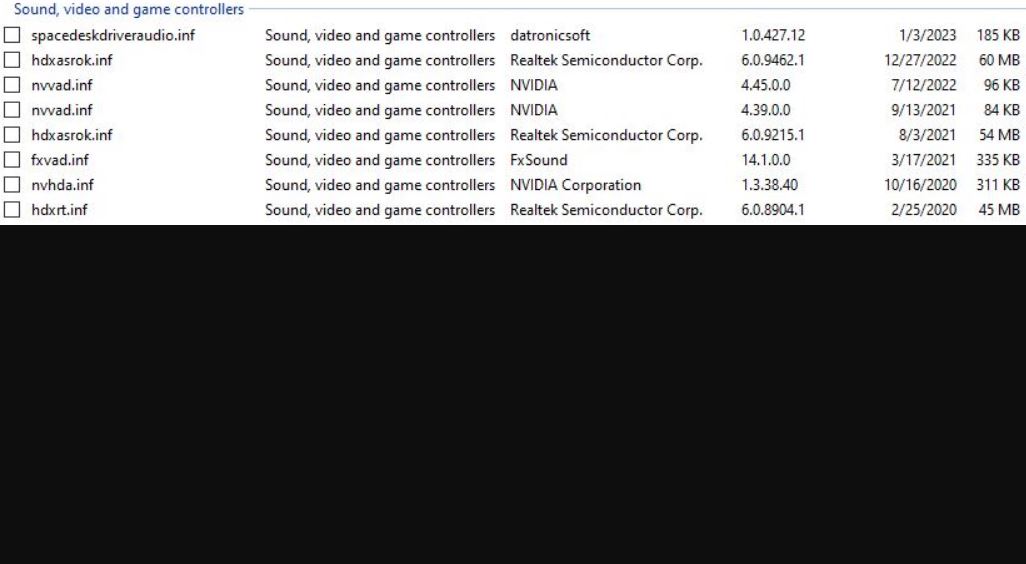
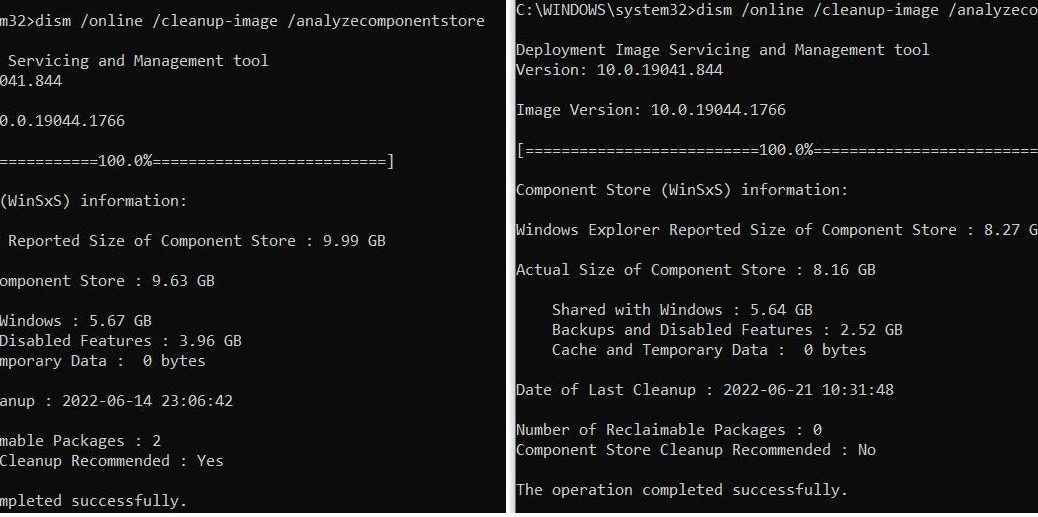
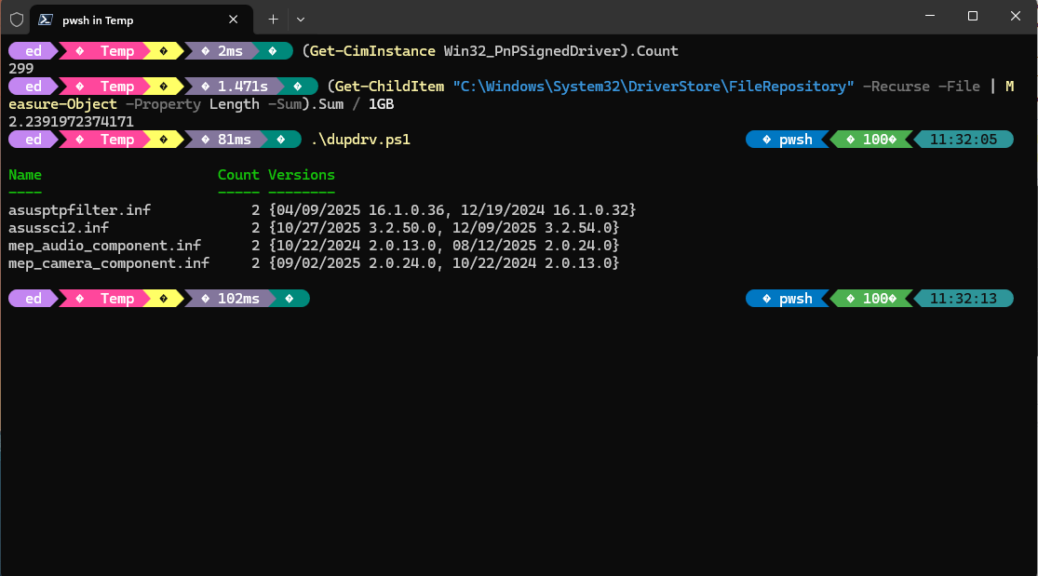
If you look at the lead-in screenshot it shows the one-liners for making a count and getting size verbatim, and calls a script named dupdrv.ps1. The results also appear as well. These all represent post-cleanup results, FWIW.

PowerShell Details: One-Liners and Script

To obtain the count, PowerShell runs through all instances of signed PnP drivers in the store, and tots them up:

(Get-CimInstance Win32_PnPSignedDriver).Count

To get the size of the overall DriverStore, PowerShell examines each file, gets its size, adds it to a growing sum, then shows it in GB units:

(Get-ChildItem "C:\Windows\System32\DriverStore\FileRepository" -Recurse -File | Measure-Object -Property Length -Sum).Sum / 1GB

The script is longer and a little more complicated. Basically, it iterates through all files in the DriverStore, builds a table of unique entries by name, and counts all instances it finds. It reports only on instances that have counts of 2 or more (indicating duplicates).


pnputil /enum-drivers |
Select-String "Published Name","Original Name","Provider Name","Driver Version" |
ForEach-Object {
if ($_.ToString() -match "Published Name\s*:\s*(.*)") { $pub = $matches[1] }
if ($_.ToString() -match "Original Name\s*:\s*(.*)") { $inf = $matches[1] }
if ($_.ToString() -match "Driver Version\s*:\s*(.*)") { $ver = $matches[1] }
if ($pub -and $inf -and $ver) {
[PSCustomObject]@{
PublishedName = $pub
InfName = $inf
Version = $ver
}
$pub = $inf = $ver = $null
}
} |
Group-Object InfName |
Where-Object { $_.Count -gt 1 } |
Select-Object Name, Count, @{n="Versions";e={$_.Group.Version}}

These tools come in nice and handy when using RAPR to clean up a driver store. Indeed, they even extend its capabilities beyond finding old and obsolete drivers. They also identify duplicates as well. Sometimes, those too can be cleaned up. Good thing that trying to delete a driver in actual use in RAPR won’t succeed unless the “Force Deletion” option is checked. I don’t recommend using that unless you know you must for some good reason. I certainly didn’t need that here.

Benefiting from Copilot Assist

For updating this story, Copilot made it faster, easier and more convenient for me to do what I needed to anyway. That’s good. But it also let me step beyond what I’d been able to do by way of driver debloating in the past, and tackle duplicate elements as well. That’s about as good as things ever get, here in Windows-World. I’m jazzed!

Facebooklinkedin
Facebooklinkedin

More Spurious Win 11 Reclaimables

Don’t ask me why. But every now and then, MS drops a couple of old, outmoded, and obsolete packages into its Windows 11 updates. They also show up should you perform an in-place upgrade repair (“Reinstall now” via Settings > System > Recovery). Ditto for a clean install. I call them spurious reclaimables because they shows up in DISM … /cleanup-image if you run /analyzecomponentstore. Well, they showed back up on my Lenovo ThinkStation P3 Ultra yesterday. With more spurious Win 11 reclaimables to clean up, that’s just what I did. Here’s how…

Handling More Spurious Win 11 Reclaimables

Through repeated exposure to this phenomenon, and repeated prior cleanups, I’ve learned the names of the packages involved. I’ll also note they come in both AMD64 and ARM64 flavors. If you look at the lead-in graphic you can suss those names out. I repeat them here for readability:


Package_for_RollupFix~31bf3856ad364e35~amd64~~26100.1742.1.10
Microsoft-Windows-FodMetadataServicing-Desktop-Metadata-Package~31bf3856ad364e35~amd64~~10.0.26100.1742

These go into the following DISM command for easy removal (if they’re not present, the command will fail gracefully with no damage to a Windows image):

dism /online /remove-package /packagename:

Paste the package name right after the colon at the end of the string (no spaces). For ARM64 installations change the “amd” in “amd64” in the preceding package names to “arm” (e.g. “arm64”). That’ll do it.

Note: upon double-checking this info on another PC just now, I observed that removing the rollupfix package also removes the FodMetadataServicing package. Thus, a manual attempt to remove the latter fails. Never fear: a quick check of reclaimable packages in DISM shows the count at zero (0). Good-oh! On ARM64 PCs, however, both items (with the stipulated replacement above) MUST be done separately.

Why Do These Spurious Reclaimables Occasionally Come Back from Oblivion?

Copilot explains this as something that’s a “known defect baked directly into the original Windows 11 24H2 installation media.” Apparently this means they will come back in 24H2 and 25H2 images from time to time. When updates that include them are applied, it’s like the movie Poltergeist: “They’re heeeeeere!”

When that happens you can leave them alone. Or, if you tend toward OCD in seeking clean Windows images, you can use DISM to return them to the oblivion they so richly deserve. That’s the way things go occasionally, here in Windows-World. I enjoy such things, in case you can’t tell…

Note: I’ve written on this topic repeatedly. Run this Google search if you’d care to scan some of my other musings on these little zombies.

Facebooklinkedin
Facebooklinkedin

NirSoft BatteryInfoView Works Well

I admire the heck out of Israeli software developer Nir Sofer. He’s the person behind the powerhouse utility provider NirSoft.net, where you’ll find nearly 200 (177 at last count) great Windows utilities ready for download and use. I just got reminded about his nifty BatteryViewInfo took in a recent AskWoody newsletter. Indeed the free NirSoft BatteryInfoView works well, and provides lots of useful battery status and health information. See a typical display from my 2018 vintage Lenovo ThinkPad X380 Yoga in the lead-in graphic.

Why say: NirSoft BatteryInfoView Works Well?

As you can see from the screencap above, BatteryInfoView (BIV) tells you pretty much everything you need to know about any given PC (laptop, tablet, etc.) battery. The current capacity and battery health values tend to be of greatest interest.

And indeed, Lenovo offers a battery settings control, for which it claims that setting maximum capacity to around 80% will result in longer battery life. I believe that translates into better battery health over time. Here’s what the X380 shows under battery charging threshold in the Battery section for Lenovo Vantage:

NirSoft BatteryInfoView Works Well.batset

Note: Charge threshold is turned on. Charging starts at 75% and stops at 80%. [Click image for full-size view]

Notice further that in the lead-in graphic, battery health is 92.8%. On my Lenovo ThinkPad X1 Extreme, which I obtained in 2021, I did not reset the battery threshold on that PC. Thus, even though it’s two years newer than the X380, its current battery health number is 89.3%. That’s about 4% less. To me, it shows that Lenovo’s recommendations to lower the stop and start values for charge levels really do have an impact on battery life. It’s not huge, but it’s not nothing, neither.

It also shows how a good tool can help admins and power users get the most from their technology investments.

Copilot Weighs in on Battery Health

Just for grins I asked Copilot “Working from NirSoft’s BatteryInfoView utility, at what level of “Battery Health” should one consider replacing the battery?” Copilot hemmed and hawed but ultimately said this:

In general, if the “Battery health” value is consistently below 80%, it may be a sign that the battery is deteriorating and may need to be replaced soon. However, this is not a hard and fast rule, and other factors such as the age of the battery, the usage patterns, and the operating conditions can also affect the battery life and performance. If you notice that your laptop’s battery is not holding a charge as long as it used to, or if you are experiencing other issues such as overheating, slow performance, or unexpected shutdowns, it may be a good idea to have the battery checked by a professional or replaced if necessary.

My original impression comes from translating a story from German into English for Tom’s Hardware back in the early 2000s. Even then, their research showed that a regime of reducing charge level was the best way to keep a laptop battery healthy in the long run. I wish I could find a link to that story (but I can’t) but they recommended dropping battery charge levels to 40% for long term storage, and recommended not charging batteries to over 80% if a PC remains plugged into AC power. Regular deep discharge cycles were also recommended. A 2023 Tom’s Hardware forum thread still cites the 80/40 rule, in fact. Sounds like the old rule is still cool.

Facebooklinkedin
Facebooklinkedin

Cloud File Service Update Secrets

If you read my Windows musings with any frequency, you know that I’m constantly patrolling my PCs to check for updates, patches and fixes. One thing I’ve been noticing lately is that updates for cloud based file services can be tricky. In response, I’ve been cataloging cloud file service update secrets. Let me explain…

What Makes Cloud File Service Update Secrets Useful?

In working with numerous law firms, publishers, and software companies, I find myself using various file services to exchange large chunks of digital stuff. These are usually ZIP files bigger than 25MB (the top end on email attachment size in many SMTP servers). Simply put, they provide a way to move lots of project files around. Most also offer enhanced authentication and security capabilities.

The following table addresses the various cloud file services I use, with some additional information. I’ll walk through things below.

Provider Name Trick
Google Google Drive No
Box Box Drive Yes
Dropbox Dropbox Yes
Microsoft  OneDrive Yes

Column 1 identifies the maker, 2 names the cloud file service, and 3 indicates if an update trick is required (Yes) or not (No). Notice that 3 of my 4 all require “tricks” for update. That mostly has to do with how often they update their software, and how often they push those updates to users.

Updating Box

Box itself describes the whole drill in detail at its support article entitled “Installing and Updating Box Drive.” The Windows TLDR version is: Right-click the Box icon in the TaskBar notification area; if an Update entry appears in that menu, click same. The following notification appears:

Click Update Box Drive and you’re done. If this doesn’t work, you must uninstall Box, visit the Box Download page, click the download button, then reinstall. Then you’ll be caught up. Easey-peasey, pretty much. But I’ve had to intervene with remove-replace manuevers several times over the past couple of years.

Updating Dropbox

The support article here is entitled “Update to the latest version…” As with Box, right-click the Dropbox icon in the Taskbar notification area. Check notifications. If an update is pending that hasn’t yet been applied, you’ll find an update button there. If you don’t see such a button, this is where things get interesting. You may not find the latest version at the download page. Here’s the trick: you need to visit the Dropbox Client Releases page instead, where you’ll want to grab the one near the top labeled “Stable Build” with the highest release number. You can simply install this without having to uninstall beforehand (this installer is smart enough to update an existing install if it recognizes one).

Updating OneDrive

Most of the time, OneDrive updates itself automatically as part of a Windows OS install and/or Office install/365 subscription. Some-times, you may have to intervene to get it working. This Business Insider article takes you through those steps in detail. Right-click the OneDrive icon in the Taskbar notification area, click Settings, then About. The OneDrive version entry comes up as a link. Click that link and you’ll open the MS OneDrive release notes page. Download and install the link at the intersection of Latest release build (left) and Production ring (above) and you’ll be good to go. As with Dropbox, the OneDrive installer is smart enough to update an existing installation if it finds one.

No More Secrets?

I have no more update secrets to share for cloud file services. That’s because these are the only ones I’m using. I’m sure, were I using more, I would have more secrets to share. But looking for the maker’s “how to update” support page is a good place to start, after which third party sources may shed additional light. Good luck with your own update secrets in that regard. Cheers!


Facebooklinkedin
Facebooklinkedin

Why Give PowerToys Admin Access?

I found myself looking at a suggestion from PowerToys on a test PC yesterday. It popped up when I opened Windows Terminal as Administrator, as per usual practice. It warned me that Fancy Zones and other PowerToys tools might not work properly unless I gave PowerToys admin access, too. Hence the question: Why Give PowerToys Admin Access?

Why Give PowerToys Admin Access?
Because other apps use it…

I turned to MS Learn. There I found an item entitled PowerToys running with administrator access. It pretty much explained everything. Here are the salient points from its second heading:

PowerToys only needs elevated administrator permission when interacting with other applications that are running in administrator mode. If those applications are in focus, PowerToys may not function unless it is elevated as well.

These are the two scenarios PowerToys will not work in:

  • Intercepting certain types of keyboard strokes
  • Resizing / moving windows

Seems pretty straightforward to me, and makes perfect sense. Here’s how to get to admin mode in PowerToys from its default “Running as user” mode.

Making the Switch: User to Admin

You must open PowerToys in admin mode to switch to admin mode. If PowerToys is running, right-click its taskbar icon and select exit to terminate its runtime instance. Next, right-click the PowerToys icon in the start menu, and select “Run as administrator.” In Settings, Administrator mode, move the “Always run as administrator” slider from off (as shown in the lead-in graphic) to On. That’s it!

Now, you can run some of your tools and programs in admin mode without warning messages from PowerToys (or concerns that its tools might not work as they’re supposed to). I like it, and I like ready access to simple, intelligible explanations as to why things must change to work properly.

One More Thing: v0.67.1 Is Out

As I write this item, MS has just released PowerToys update to v0.67.1. While you’re poking around inside Settings/General click the “Check for updates” button. If your PC isn’t yet caught up to this latest version, it’ll take care of it for you. Or, try this command

Winget upgrade Microsoft.PowerToys

if you prefer. Cheers!


Facebooklinkedin
Facebooklinkedin

16 Month Pause Between Audio Updates

Whoa! I finally hit paydirt yesterday. I’ve been checking for updated drivers for my Realtek® Audio (UAD) device for some time now. As I’ve just calculated, there’s been a 16 month pause between audio updates on my production PC. Undoubtedly that’s because it’s an i7 Skylake (Intel Gen 6) CPU that made its debut in 2016. Could this be another sign that it’s time to retire this PC? Probably!

Why a 16 Month Pause Between Audio Updates?

Please look at the intro graphic. Because I just updated the ASRock Realktek audio driver yesterday, you can see two versions of the corresponding setup information (INF) file, hdxasrok.inf. Note the dates: the newer one reads 12/27/2022 while the older reads 8/3/2021. Do the math, and that’s 16 months plus over 3 weeks. Wow!

I’d been visiting the ASRock Support website and my favorite alternate driver source — namely station-drivers.com— for a long, long time before I finally struck gold. Before I dug into this ZIP file and realized it covered my audio chipset, the vast majority of recent updates were for Nahimic audio chips, not the plain-vanilla Realtek chips in my now-aging motherboard.

Frankly, I don’t know why it took so long to find a newer version. My best guess is that older motherboards (and chipsets) don’t get the same love and attention that newer ones do. I have to guess that’s because driver updates require time and effort to create, and older stuff is less likely to be in demand than newer stuff. The just the way of Windows-World: older hardware eventually gets no love at all. Mine is pushing that envelope, clearly.

Thanks Again, RAPR!

The Driver Store Explorer (aka RAPR.exe) once again comes in handy for inspecting driver status on my Windows 10 production PC. It’s the source of the screencap at the head of this story. It does a stellar job of showing Windows drivers, including their number and status on targeted PCs. This search proved an excellent stimulus for me to update RAPR itself, too. Thus, I’m now running v0.11.92 (uploaded to GitHub on 1/6/2023). Previously, I’d been running v0.10.58 (internal file date: 4/10/2020).

Thus, the need to upgrade one thing (the Realtek driver) also reminded me to upgrade another (RAPR). Now, I’ll need to distribute this around my entire PC fleet. Good stuff!


Facebooklinkedin
Facebooklinkedin

Turning Off Corel PSP Ads

I’d had enough, enough, enough. After seeing an advertisement from Corel for extensions to its PaintShop Pro (PSP) product yesterday, I searched online for “Turn off ads in Corel PaintShop Pro 2023.” Thankfully turning off Corel PSP ads is not only easy, there’s even an official vendor-sponsored knowledge base (KB) how-to article. Hooray!

The intro graphic shows the program’s default settings for what shows up as “Message Preferences” in the program’s Help menu. Notice that users get opted into “Keep me informed with the latest product related messages.” Notice further that update frequency for such notification is — I kid you not — daily (“Once a day”).

Unticking Boxes For Turning Off Corel PSP Ads

By no coincidence whatsoever, changing those two settings turns ads off completely. What a relief. Here’s what the same dialog box looks like when properly altered:

Turning Off Corel PSP Ads.ads-off

Ads turned off. Wish all such apps (and browsers) were this easy to manage!

Just to recap those changes, they require unchecking the “Keep me informed…” box. They also require changing the “Receive updates/offers…” setting to “Do not show…” Presto! No more advertisements or notifications from PaintShop Pro. What a relief!

The Politics of Dancing…

In its own small way, this little tweak shows the importance of understanding how the programs you install on your Windows PCs work. If you don’t like something about them, you will often be able to change their behavior to make irritants or unwanted communications mute or disappear. This small example from PSP serves as a pretty good and nearly self-explanatory example.

I upgrade my copy of the software every 12-18 months, so I don’t need to be reminded to buy into the latest version. I’m not doing more serious photo or image editing so I don’t really care about the many tools and add-ons for PSP that Corel and third parties offer.

I just wanted the ads to go away. So that’s what I made them do. I imagine (but will find out when installing the 2024 update next year) that this default will reappear thereafter. But now, I know how to subdue that beast should it rear its unwanted head once again. Cheers!

Facebooklinkedin
Facebooklinkedin

P16 Posts Mysterious Memory Training Message

OK: here’s a new one on me. This weekend, I updated the UEFI on the Lenovo P16 Mobile Workstation. Along that update path, the P16 posts mysterious memory training message. Something along the lines of “the screen will go dark for 2 minutes while the system performs memory training.” I’d not enountered this terminology before so I was taken aback. Turns out it’s a well-known thing, tho…

Learning Ensues When P16 Posts Mysterious Memory Training Message

Apparently memory training — or as Lenovo calls it in the P16 Maintenance manual: “memory retraining” — can happen after hardware changes or following UEFI updates. Online research eventually led me to a document that explained what’s going on. It’s called DDR4 SRAM: Initialization, Training and Calibration, and it’s darned informative. In fact, it’s worth a read-through for those interested in going beyond the basics I’ll present here.

For my purposes, it was enough to know the following:

1. Device or firmware changes can affect memory timing and performance
2. Training uses an iterative approach to altering timing values
3. It converges on settings that provide a workable trade-off between speed (faster performance) and stability (fault-free memory access)
4. If your motherboard uses JEDEC timings, training/retraining is not usually required (or performed)

In fact, it’s a lot like what I used to read at Tom’s Hardware about over-clocking PC memory back in the late 1990s. Start from a safe setting, increment and try. If it works, increment again. Repeat until a failure occurs. Back off to the preceding increment. Done!

Changes Sometime Cause (Re)Training

The bottom line is that what I was entirely normal. I’d either never seen or never noticed such warnings before, but they’re typical following hardware (usually RAM module swap-outs) or firmware (including UEFI) changes. Now I know. And it gave me a good excuse to download and read around the maintenance manual for the P16. That’s always fun, too.

Facebooklinkedin
Facebooklinkedin

DISM Component Store Cleanup

This morning, I recalled the value of occasional “check-and-clean” operations on the Windows Component Store (aka WinSxS). Check the “Before and After” screencap at the top of this story. It shows that applying updates can leave old components behind. Checking the component store tells you what’s up. Performing a DISM component store cleanup recovers wasted space. To wit: 1.72 GB in reported size, and 1.47 GB in actual size.

How to run DISM Component Store Cleanup

What you see in the before (left) and after (right) image is syntax to check the Windows Component Store. Run it in an admin cmd or PowerShell session, like so:

DISM /online /cleanup-image /analyzecomponentstore

Two notes. One, the output from the before (left) tells you how many reclaimable packages are found (2, in this instance). Two, it tells you whether or not component store cleanup is recommended (yes, this time around). Running the check and report syntax shown above takes 1-2 minutes on most Windows 10 and 11 PCs.

Performing the Actual Cleanup

As with the check and report DISM command, the cleanup command must also run in an administrative cmd or PowerShell session. That syntax is slightly different:
DISM /online /cleanup-image /startcomponentcleanup
Depending on how many reclaimable packages are found, and how big they are, cleanup can take upwards of 5 minutes on most Windows 10 or 11 PCs. That wait goes up, as the number (and total) size of packages increases. Be patient! I’ve only had this fail a handful of times over the years I’ve been using this tool (and many of those failures were self-inflicted because of prior use of /resetbase, which locks existing packages into place in the Component Store).

Nevertheless, this is an excellent and recommended Windows cleanup technique, which I try to run after each month’s Cumulative Update (CU) is installed. The check and report command doesn’t always find something to cleanup, but when it does, I follow up with the /startcomponentcleanup to trim down the Component Store footprint. It’s a great technique for regular Windows image management, in fact.

Facebooklinkedin
Facebooklinkedin

Resuscitated Windows Welcomes Require Notification Reset

OK, then. I did some “weekend admin” work around the house yesterday. That included installing recent CUs on a couple of holdout Windows 10 PCs. Soon thereafter, I found myself facing the “Let’s finish up…” item shown in the lead-in graphic above. “Hmmm” I found myself thinking. “I vaguely recall there’s an easy way to turn this off.” And indeed, some CUs means that these resuscitated Windows welcomes require Notification reset. Let me explain…

Why Do Resuscitated Windows Welcomes Require Notification Reset?

Apparently, when certain CUs (or an upgrade) gets installed, it resets related notifications in Start → Settings → System → Notifications & actions: see checkboxes under notifications in the following screencap.

Resuscitated Windows Welcomes Require Notification Reset.settings.system

By default all boxes are checked; I routinely uncheck the lower three as shown here.

How Often Does This Happen?

It can happen after some Cumulative Updates. You won’t know until it pops up (literally). It DOES happen after every upgrade, though you’ll see a different screen instead. This one is labeled “Welcome to Windows” as shown next.

This item is turned off when the first of the three unchecked boxes above is unchecked. It’s another one of those things that repeat experience with Windows teaches. But in my case, it happens infrequently enough that I have to refresh my memory with an online search about half the time when it shows up. Sigh.

What About Windows 11?

As far as I can tell, Windows 11 appears exempt from both kinds of “nag screen” — as certain, disgruntled Windows 10 users sometimes label these displays. I guess that’s a good thing, eh?

[Note: thanks to Mayank Pamar at WindowsLatest. His April 25 story Windows 10’s full screen setup nag returns – here’s how to disable it showed up this morning, just after I’d looked this info up yesterday. He’d obviously run into the same thing I did. That’s how things go sometimes, here in Windows-World. Thanks!]

Facebooklinkedin
Facebooklinkedin