If you read this blog, you already know I finally got my Lenovo X380 Yoga upgraded to 21313 earlier this week. I’d been fighting a bugcheck error for the two prior Dev Channel upgrades before that. Along the way, I found myself looking for diagnositic info about the failed upgrade. A Microsoft tool SetupDiag.exe unveils upgrade gotchas, so I started using it. With this post, I want to shed more light on this nice little tool, based on recent experience.
How SetupDiag.exe Unveils Upgrade Gotchas
The program is a log analysis tool that focuses on Windows Setup log files. As the MS Docs page for SetupDiag says:
It attempts to parse these log files to determine the root cause of a failure to update or upgrade the computer to Windows 10. SetupDiag can be run on the computer that failed to update, or you can export logs from the computer to another location and run SetupDiag in offline mode.
That latter offline capability is nice, because it means you can boot an otherwise unbootable machine using rescue media. Once booted, you can then suck the files you need from the problem PC and analyze them on a working machine instead.
Note 1: consider bookmarking the already-quoted MS Docs page. It includes an always-current download link to the latest SetupDiag.exe version. (V160 is current as of Feb 17, 2021 only.)
Note 2: SetupDiag.exe requires .NET Framework 4.6 (or newer). See this WindowsCentral story for multiple .NETversion check methods in PowerShell (3) or Cmd.exe (1).
Working with SetupDiag.exe
Starting with Windows 10 2004, SetupDiag.exe is included with Windows Setup on Windows 10 ISOs and other install images. Paraphrasing the MS Docs item, it says:
During the upgrade process, Windows Setup extracts its sources files to a directory named %SystemDrive%$Windows.~bt\Sources . With Windows 10, version 2004 and later, setupdiag.exe is also installed to this directory. If there is an issue with the upgrade, SetupDiag will automatically run to determine the cause of the failure.
Thus, so long as you don’t clean up after an attempted upgrade, you’ll find SetupDiag.exe in the afore-cited directory. Grab a copy and put it somewhere else, if you’d like.
Simply search your PC for SetupDiag.exe. Once found, you can run the program from Explorer, in PowerShell, at the Command Prompt, or via the run command.
Reading the Results
SetupDiag.exe writes its results in a file named SetupDiagResults.log. By default, it appeared in my download folder
(C:\Users\<uname>\Downloads).
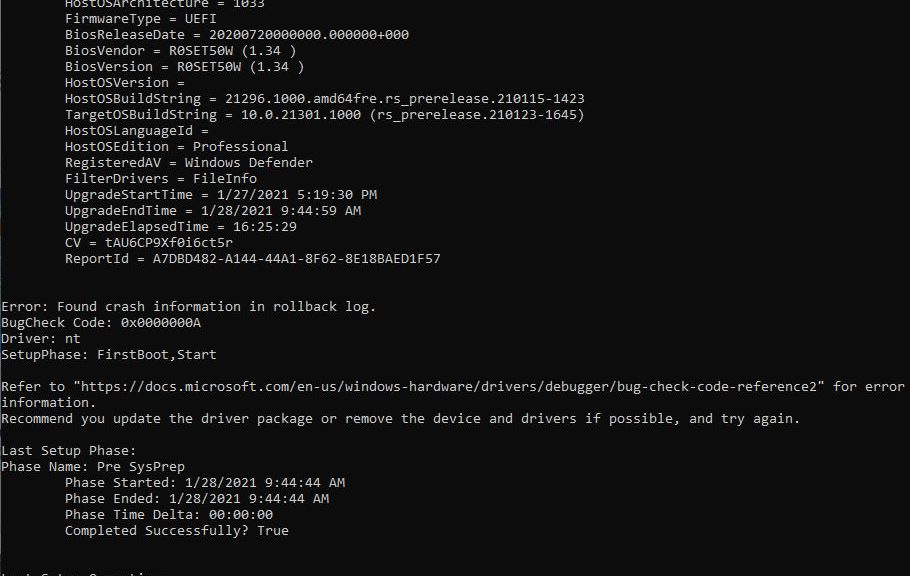
I found it easily, because I use Voidtools Everything to locate files on my behalf. It’s how I got the details on my bugcheck error code. It reads 0X0000000A therein, but may appear as 0XA in discussions online. When I got the GSOD the error identified itself in the report window as IRQ_NOT_LESS_OR_EQUAL…
The lead-in graphic for this story shows the log file. The area of interest starts mid-way down in a line that reads: “Found crash information in rollback log.” That’s where the bugcheck code appears. Also, “nt” appears as the responsible driver. This, alas, is a built-in OS driver. Mere users cannot uninstall or update it. (That’s a Microsoft internal thing dontcha know?) It’s what convinced me that waiting for an upgrade from MS was the ultimate (and only) fix avaialble.
One thought on “SetupDiag.exe Unveils Upgrade Gotchas”