Category Archives: Recent Activity

When WU Repairs Fail Try UUPDump

I’ve got two test machines on the Beta Channel release right now. The older of the pair — a 2014 vintage Surface Pro 3 — is stuck on KB5000842 and keeps throwing install errors. Others reporting into the TenForums thread on this update have had success using the terrific UUPdump tool to build a customized image to install 19043.906. So that’s what I’m trying, too. In general, my strategy is “When WU repairs fail try UUPDump” next anyway. Glad to see others use that strategy, too.

When WU Repairs Fail Try UUPDump.WUerror

A couple of failures, including a complete WU reset, means it’s time to change update strategies.
[Click image for full-sized view.]

Why Say: When WU Repairs Fail Try UUPDump?

The update installs fail each time with an error code of 0x800F081F. This is interesting, and a bit strange, because the error is often associated with the Windows Update Assistant nowhere present in this situation. It can also pop up when items are missing from the download packages that WU delivers to the desktop.

That latter reason explains why a switchover to UUPDump makes sense. It grabs the ISO-based image for the base OS version from MS servers  (19043 aka 21H1 in this case). Then, it uses DISM to apply all newer updates packages up to and including the problematic KB5000842 item that’s throwing the error here. It’s perfectly safe because it uses only Microsoft Servers as the source for its OS and update files.

Building the 19043.906 ISO File

Running UUPDump to build an ISO for a patched OS takes some time because of the many and various steps involved. For the SP3 PC, it took over an hour before it got stuck mounting the image for Build 19041.1. That’s when I realized it makes sense to run UUPdump batch files on the fastest PC around.

Thus, I ran the same job on my Lenovo X1 Extreme, with its 6-core i7-8850H CPU. Given more threads and a faster CPU and much faster Samsung OEM PCIe x3 SSDs, it ran noticeably faster, though the KB5000842 cab file update still took 5 minutes to complete (click “view image” inside the lead-in graphic for this story). The whole thing still took 35 minutes from start to finish.

And it went that fast only because we have fast (nominal GbE, actual 900 Mbps or so) Internet service here at Chez Tittel. What takes the real time, however, is bringing the windows image (.wim) file up from base level Build 19043.844 to the current/highest level Build 19043.906. This takes several steps, each one involving mounting the image, adding packages, the dismounting the image, and continuing forward. There’s some mucking around with a WinRE.wim file along the way, too.

Performing the In-Place Repair Install

This is the easy part: mount the image, run setup.exe and let the installer do its thing. This takes a while, too — considerably longer than applying the update would (checking the PC, agreeing to the EULA, checking for updates,  and so forth; then finally into OS installation). This entire process took another hour or so to complete. But here’s the end result, straight from winver.exe:

When WU Repairs Fail Try UUPDump.final

All’s well that ends well: here’s Build info from the upgraded SP3, right where I want it to be

More About UUPDump

I’ve written about UUPDump for numerous other sites, including TechTarget and Win10.Guru, both for my Windows Enterprise Desktop blog. Here are some links, if you’d like to learn more:

  1. UUPDump Invaluable Resource (TechTarget)
  2. A Peek Inside UUPDump (Win10.Guru) includes a brief interview with its developer who goes by the handle “Whatever”
  3. UUPDump Outdoes Windows Update (Win10.Guru)

Cheers!

Facebooklinkedin
Facebooklinkedin

Lenovo Vantage Updates Take Patience

Here’s a sticky situation I’ve found myself in more than once. I’m reasonably fond of the Lenovo Vantage update tool, which handles BIOS, firmware, driver and ancillary software updates pretty well. Occasionally, two or more updates requiring a reboot appear together therein. That’s what happened today, as an Intel Manage-ment Engine (IME) firmware update and a BIOS update appeared in tandem. It’s also what reminded me that Lenovo Vantage updates take patience.

Why Say: Lenovo Vantage Updates Take Patience?

This doesn’t happen with Windows Update, but when you’re applying low-level updates to a system, items that require a reboot must be applied one at a time. I’ve learned this working with Vantage over the past few years. If a firmware update and a BIOS update show up on the same day, it’s best to download and install one by itself. Then, repeat for the second item.

What happens if you try to do more than one? When you attempt to install the second item with a reboot pending, installation fails because it is smart enough to recognize that two separate and distinct reboots are needed.

I don’t always remember this, so I got bitten today when Vantage finished the pre-reboot phase of the BIOS update and transitioned into the IME update. As soon as the IME update got going, it stopped itself and reported an error. Part of the text read “An installation failed to complete properly. Please reboot and try again.”

The Reboot’s the Thing

Of course, as soon as the reboot got through shutdown and into restart, the BIOS update ran to completion and the system rebooted again. After that reboot, I returned to Vantage to generate the lead-in graphic for this story that shows the IME firmware update still pending. As soon as I clicked install, I got an explicit reboot warning, to wit:

If I’d run the sequence IME first, BIOS second, I’d have seen this warning right away, and not been caught in an error. Sigh.

In general, it’s a good idea to make firmware and BIOS changes piecemeal anyway. You don’t want more than one thing at a time to blow up. That could complicate troubleshooting beyond belief. That’s NOT what anyone wants when making deep-level system changes.

Live and learn — or in my case, keep living and get an occasional reminder. Cheers!

Facebooklinkedin
Facebooklinkedin

Windows 10 Driver Go-To Tool DriverStore Explorer

I’ll confess. I’ve been a fan of lostindark’s DriverStore Explorer tool for a decade or more now. Aka RAPR.exe, this tool lays bare the complete contents of the Windows DriverStore for versions 7 and newer. It also makes it pretty easy to clean up old drivers, thanks to its “Select Old Driver(s)” (SOD) button. That what makes my main Windows 10 driver go-to tool DriverStore Explorer. Accept no substitutes!

Windows 10 Driver Go-To Tool DriverStore Explorer Shows ALL Drivers

If you look at the lead-in graphic for this story, you’ll see 8 copies of the same Intel Bluetooth driver installed on my Lenovo X1 Extreme (Gen 8) laptop.  Three older versions of the same driver are also present. When I click the SOD button, 6 copies of the 1/22/2021 driver get marked, along with all 3 2020 versions. When I then click the “Delete Driver(s)” button, and confirm that instruction, exactly 2 copies remain behind. Because they’re different sizes  — one is 2 MB, the other 6 MB — I conclude they’re different even though they share a common filename. All the rest of them (31 MB total) are gone.

Some Drivers Are Special Cases

Sometimes, when you use the SOD button, a selected driver won’t be deleted. Typically, that means the still-present item is in use, despite being older than something else also present in the DriverStore. You can force deletion on such items, but are risking system instability by doing so. I recommend against this unless you’re dead sure the newer driver will work correctly.

Even so, I typically recover anywhere from 50MB to several GB of disk space when I use RAPR to clean out my Windows 10 DriverStores. Nvidia graphics drivers are particularly big space consumers (and generally run from 900 MB to 1.1 or 1.2 GB in size). Cleaning up a half-dozen of these can recover some real space.

Try it for yourself. You can’t help but like it. Visit the GitHub page for more information and the most current download. As I write this story, that version is numbered v0.11.64.


Facebooklinkedin
Facebooklinkedin

21H1 Attains Commercial Pre-Release Validation

A recent Windows IT Pro Blog post title reads “Windows 10, version 21H1 for commercial pre-release validation.” That means that users can update selected PCs to 21H1 using the enablement package to see what it’s like. The post raises interesting questions. “Do you want to see how quickly devices update from version 2004 or 20H2 to 21H1, and how little downtime is involved? Now you can!” And that dear readers is what 21H1 attains commercial pre-release validation means. Simply put: Check it out!

What If 21H1 Attains Commercial Pre-Release Validation?

The fine print reveals it’s still necessary that “select PCs” enroll in the Insider Preview program to partake of 21H1. Indeed, MS announced on February 17 the enablement package would go to Beta Channel Insiders. I’ve been running it on my Surface Pro 3 since then, to very good effect. The whole thing took under 5 minutes on that 2014-vintage PC (i7-4650U CPU, 8 GB RAM, Samsung 256 GB OEM mSATA SSD) from initial download, through installation, and back to the desktop. It ought to go faster on newer, more capable hardware.

Another Harbinger of GA

Of course, GA stands for “General Availability.” That’s when MS starts public release of a new Windows 10 version through official channels. If “commercial pre-release” is happening now, GA won’t be too far behind. This hasn’t always been part of the MS release sequence, but it is a definite signal that 21H1 is coming soon. In fact, I think it’s bound to appear within the next 30 days. I’m guessing Patch Tuesday, April 13 or somewhere thereabouts, is quite likely.

Typically, business users tend to follow one or two versions behind the leading edge. So perhaps this is really a signal they should be planning upgrades to 2004 (on the trailing edge) or 20H2 (on the leading one)? As with so much else on the Internet, things vary wildly from one organization to the next. I still keep seeing the screens at my optometrist’s office, with the Windows 7 lock screen on cheerful display…

Facebooklinkedin
Facebooklinkedin

A Tale of Two USB Ports

I’ve been troubleshooting a vexing M.2 2242 NVMe drive this week. If you look back over my recent writings here at edtittel.com, you’ll see this adventure has led me to some interesting places. Yesterday, it led me to recognize that not all USB-C ports are the same. I found myself confronting the profound difference that current-gen Thunderbolt support can make. Thus indeed, a tale of two USB ports follows.

Telling the Tale of Two USB Ports

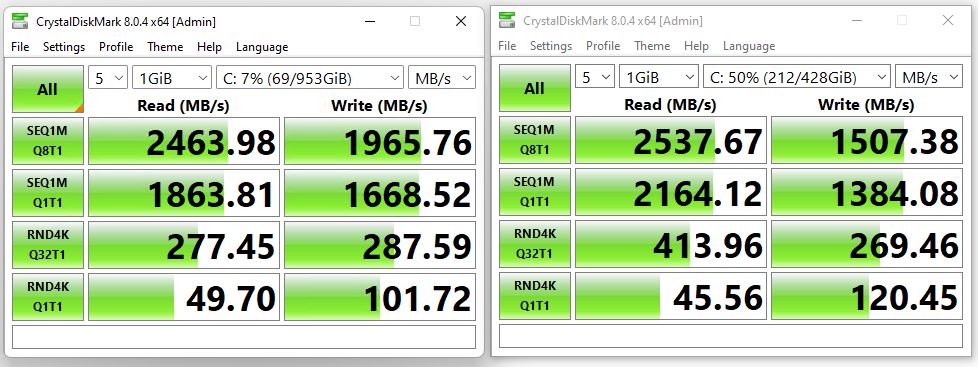
On the one hand: a 2019-vintage Lenovo X390 Yoga. Its fastest USB port is described in its tech specs as “USB 3.1 Gen 2 Type-C / Intel Thunderbolt 3.” On the other hand: a 2021-vintage Lenovo X1 Nano. Its fastest USB port is described in its tech specs as “USB 4 Thunderbolt 4.” I must confess, I was curious about what differences might manifest between these two technology generations.

It made a significant difference. Thus the story’s lead-in graphic shows. CrystalDiskMark output from the Nano is on the left, the X390 on the right. It shows the speed-up varies somewhat. It is better than 2:1 on the big-transfer items (upper 2). But the more important random 4K reads/writes fill the bottom two rows. There,  we see 17-18% (read-write) for random with queue depth=1. That jumps to 42-50% with queue depth=32.

In practice, I believe it’s what allows the X1 Nano with an i5 processor to work much like my older i7-6700 on my desktop PC. It also makes the X1 Nano faster than the X390, despite an i7 on that older machine. I/O is indeed a  powerful performance factor.

Is USB 4 Thunderbolt 4 Worth Buying?

If you’re in the market for a new PC or laptop, you will get a performance boost from using the newer USB technology. If the ability to complete backups (and other big file transfers) twice as fast is worth something to you, factor that into the price differential. If better overall I/O performance of at least 18% in accessing peripheral storage has value, ditto.

Only you can decide if it’s worth the price differential. For me, the answer is “Heck yeah!” I’m not sure that means I’ll buy an X1 Nano. But I am sure it means my next laptop will have USB 4 Thunderbolt 4 ports.

Facebooklinkedin
Facebooklinkedin

Strange Sabrent Rocket Adventures

Last Friday, I blogged about swapping out my review unit Lenovo Thinkpad X1 Nano SSD. I purchased a US$150 Sabrent Rocket Nano (Model SB-1342 1 TB). It replaced a Samsung OEM 512 GB SSD (NVMe PCIe 3.0 x4). Check the Friday post for details on performance, installation and so forth. Today, I’m writing about the strange Sabrent Rocket adventures I’ve had since taking that device out of the laptop. Frankly, it’s a continuing and wild ride.

Strange Sabrent Rocket Adventures: Drive MIA

First, I used Macrium Reflect to clone the original Samsung drive. Then, I made the swap, ran some tests and replaced the Sabrent with the original SSD. Things got intersting after I plugged the drive back into the Sabrent NVMe drive enclosure (EC-NVME). The drive was MIA: it showed up as 0 bytes in size and generated a “fatal device error” if I tried to access it. Ouch! I immediately reached out to vendor tech support.

Sabrent Tech Support quickly coughed up a link to a terrific tool, though. The name of the tool is lowvel.exe, and it performs a complete low-level format of the drive, zero-filling all locations as it goes. That turned out to be just what I needed and put the Rocket Nano back into shape where DiskMgmt.msc could manipulate it once again.

Then, I initialized the drive as GPT, and set it up as one large NTFS volume. For the next 12-14 hours, I was convinced this was a final fix. But my troubles are not yet over, it seems.

More Strange Rocket Adventures

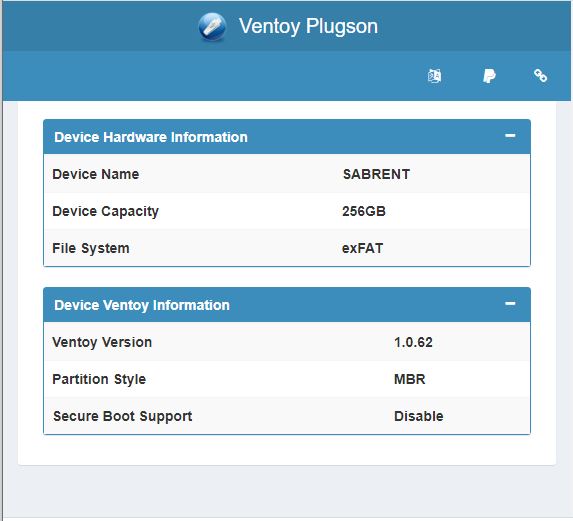
The next morning, having left the device plugged in overnight, I sat down at my desk to see it blinking continuously. When I tried to access the device, it was inaccessible. It’s not throwing hardware errors to Reliability Monitor, but I have to unplug the device and plug it back in, to restore it to working order. Something is still weird. Temps seem normal and the Sabrent Rocket Control Panel utility (shown in this story’s lead-in graphic) gives the device a clean bill of health.

I’ve got an intermittent failure of some kind. I need more data to figure this one out. I’m leaving the Control Panel running on the test laptop where the Rocket Nano is plugged in. We’ll see if I can suss this one out further. It’s not inconceivable I’ll be going back to Sabrent Tech Support and asking for a replacement — but only if I can prove and show something definite and tangible. Sigh.

Info Added March 25: All Is Quiet

Who’d have thought a Sabrent NVMe enclosure and a Sabrent NVMe drive might be ill-fitted together? Apparently, that’s what ended up causing my intermittent failures. On a whim, I bought the cheapest NVMe enclosure I could find — a US$26 FIDECO USB 3.1 Gen 2 device — into which I inserted the Sabrent Nano SSD. It’s now run without issue, pause, hitch, or glitch for a week. I did not insert the device pad that normally sits between the case and the device (already present in the Sabrent enclosure). I’m inclined to blame some kind of heat buildup or connectivity issue resulting from an overly tight fit in the Sabrent enclosure, which I may have avoided in its FIDECO replacement. At any rate, it’s working fine right now. Case closed, I hope!

Facebooklinkedin
Facebooklinkedin

Swapping X1 Nano NVMe Drives

OK, then. I went and sprung US$150 for a Sabrent 1TB M.2 2242 NVMe drive at Amazon. It is depicted in the lead-in graphic above. The high-level sequence of events is as follows. Ordered on Wednesday, received and experimented on Thursday, reported on Friday (today). Alas, I seem to have hosed the drive and have started RMA negotiations with Sabrent. Along the way, I learned most of what’s involved in swapping X1 Nano NVMe drives.

Be Careful When Swapping X1 Nano NVMe Drives

As is almost always the case, there’s a YouTube video for that. It showed me everything I needed to do. Disassembly/reassembly were easy and straightforward. I had no mechanical difficulties. But once again, my US$7 investment in a laptop screws collection saved my butt. I mislaid one of the two NVMe holder screws (found it later during  cleanup). I lost one of the 6 battery restraint screws (fell on the floor into neutral brown carpet). Both were easily replaced from the collection.

Cloning Works, But Proves Mistaken

For whatever odd reason, the Sabrent drive shows up pre-formatted. The disk layout is MBR and the primary partition is ExFAT. Both of those got in my way as I cloned the original drive to the replacement. First, I had to clean the drive, convert to GPT, then format it as a single NTFS volume. Then, I used Macrium Reflect to clone the contents of the Samsung OEM drive to the Sabrent. Along the way Reflect told me it had turned off BitLocker and that I would need to re-enable it after boot.

Replacing the Samsung with the Sabrent, I went into BIOS and turned secure boot off instead. This let the X1 Nano boot from the cloned drive just fine. I was able to run CrystalDiskMark to compare their performance. Here’s what that looks like:

Swapping X1 Nano NVMe Drives.side-by-side

Samsung OEM results left; Sabrent results right. Best improvement where it counts most!
[Click image for full-sized view.]

What do these results show? Indeed, the Sabrent is faster on all measurements, and more so on the most important random 4K reads and writes (lower two rows). It’s not a night-and-day difference, but IMO the added capacity and increased speed justify the expense involved. It’s a good upgrade for the X1 Nano at a far lower price than Lenovo charges. Also, performance is somewhat better than what their OEM stock delivers.

Here’s a summary of performance row-by-row (count 1-4 from top to bottom):
1. Read speeds increase by <1%; write speeds by >28%
2. Read speeds increase by >7%; write speeds by >36%
3. Read speeds increase by  >52%; write speeds by >21%
4. Read speeds increase by >14%; write speeds by >51%

Where Did I Go Wrong?

Cloning was a mistake. I saw it in the disk layout, which showed over 400 GB of unallocated space. Better to have done a bare-metal backup using Reflect with their Rescue Media. Next time I’m in this situation, that’s what I’ll do.

Something untoward also happened when uninstalling the Sabrent drive. When I stuck it back in my M.2 Sabrent caddy (which fortunately handles 2242 as well as other common M.2 form factors), it came up with a fatal hardware error. None of my tools, including diskpart, diskmgmt.msc, MiniTool Partition Wizard, or the Sabrent utilities could restore it to working order. I suspect that removing the battery, even though the power was off on the laptop, spiked the drive with a power surge. It’s currently non-functional, so I hope my warranty covers this and I’ll get a replacement. If not, it will prove a more expensive lesson than I’d planned, but still a valuable one.

Facebooklinkedin
Facebooklinkedin

Multiple Methods Clear Defender Threat History

First, an admission. I do occasionally use the CCleaner and the MiniTool Partition Wizard (MTPW) installers. Yes, I know they include “bundleware” elements that Defender flags as “potentially unwanted programs” (PUPs). In fact, until you clear the threat history and exclude that history from future scans, Defender keeps reporting them ad infinitum. Sigh. As I worked my way through a UGetFix.com article yesterday on my Lenovo X390 Yoga I learned multiple methods clear Defender threat history. In fact, when none of the article’s methods worked for me, a spin on one of them did the trick.

[Note] The lead-in graphic for this story shows a Defender warning for a “potentially unwanted application” (PUA) from another bundleware instance. That one comes from the Unlocker program (it’s always been a little dicey, which is why I provide a MajorGeeks download link). Use at your own risk.

Enumerating Multiple Methods Clear Defender Threat History

The UGetFix.com article is entitled “Windows Defender identifies the same threat repeatedly — how to fix?” It works readers through three separate methods:

  1. Delete the Service folder within the following Windows folder:
    C:\ProgramData\Microsoft\Windows Defender\Scans\History. This is where Defender keeps its logs and threat history info. There’s an alternate method based on Event Viewer described in the article as well to clear the history log.
  2. Prevent Defender from scanning the history file. This occurs in Manage Settings inside Virus & Threat Protection in Defender, under the Exclusions heading. By excluding the preceding folder specification, you stop Defender from repeating warnings based on its own history files.
  3. Clear Browser Caches: YMMV on this one, depending on the browsers you use. I’ll let you puzzle these efforts out for yourselves, from the help systems built into each browser.

As I said, none of the methods worked for me. What did work, was a variation on Item number 1 above. I was unable to delete the Service folder. It came back as “locked by Windows Defender.” What I was able to do, however, was to navigate within the Service folder and edit the history.log file using NotePad++ to delete its contents. I also found a series of two-digit-numbered folders with various history files inside (named 01, 02 and so forth) that I was able to delete (and did so).

After that maneuver, the annoying multiple repetitions of PUP warnings for the CCleaner (version 5.77) and MTPW (version 12.03) installers disappeared. I used Everything to check my systems and make sure the offending files were no longer present, too. It’s only the installers that include bundleware. Once deleted and flushed, they no longer pose any threat.

Concluding Unscientific Rantlet

It’s weird that Defender triggers PUA/PUP warnings from the contents of its own history file. Even when the files that legitimately trigger an alert on a Windows 10 PC are no longer present, the same alerts still trigger — repeatedly! My plea to the Defender development team is that they automatically exclude the history file from scans by default so as to further insulate users from this small but vexing gotcha.

Facebooklinkedin
Facebooklinkedin

Key Terms EKB 21h1 Reveal Next Win10 Release Coming Closer

I have to hand it to the team at Bleeping Computer, especially Lawrence Abrams. He’s done a neat and convincing bit of filesystem forensics. It shows that recent Beta Channel updates set the stage for the upcoming 21H1 Windows 10 release. In fact, he shows that key terms EKB 21h1 reveal next Win10 release coming closer to fruition. That inspired the File Explorer screencap for this story’s lead-in graphic.

Finding Key Terms EKB 21h1 Reveal Next Win10 Release Coming Closer

The string “21H1” (or “21h1” as it mostly appears in filenames) stands for the next upcoming Windows 10 release. EKB, as I learned, is the MS abbreviation for enablement package. This is a pre-staging technique for minor Windows 10 upgrades. It actually relies on updates installed prior to the official enablement of the “next upgrade” (21H1 in this case) that simply get turned on. And indeed, it’s the enablement package (EKB) that does the turning on bit.

The names of the files shown in the lead-in graphic reside in the
C:\Windows\System32\CatRoot\{F750E6C3-38EE-11D1-85E5-00C04FC295EE}
folder on Windows PCs running the Insider Preview Beta Channel release. To find these files, the Beta Channel image must be at Build 1904*.789 or higher. As it happens, I took the lead-in screencap on a PC running Build 19042.844

Terms of interest in the list involve:

  • Windows UpdateTargeting
  • Windows Product Data
  • EKB Package
  • EKB Wrapper Package

All of these terms identify current and upcoming versions of Windows 10, including the current version and build and its status, and the contents and handling of any current or upcoming enablement package (EKB). Most discussion I read about dates for 21H1 still suggest “May or June” as the GA date for this upcoming and minor Windows 10 feature upgrade. I see no reason to disagree with those assessments. And indeed Microsoft’s own 21H1 announcement post  doesn’t say much more than only minor changes to Windows 10 will show up when the release goes public.

We’ll just have to wait and see when 21H1 gets the nod from the Insider Team, and makes a public debut through Windows Update. Whenever that happens, though, it’s pretty clear that 21H2 is when the big changes for this year will hit Windows 10. Stay tuned!


Facebooklinkedin
Facebooklinkedin

Pondering Lenovo ThinkPad X1 Nano

It’s not often I get to step back from day-to-day work items and pause to think about something. I’ve had a Lenovo X1 ThinkPad Nano since Tuesday, February 23 (I wrote a First Look piece the next day). Since then, I’ve worked with that machine daily. I’ve even used it in place of my iPad Air for evening reading in bed. All this has me pondering Lenovo ThinkPad X1 Nano further. I want to position and present it properly to readers so they can decide if what it offers is what they want.  .  . and if they want to pay for it, too.

When Pondering Lenovo ThinkPad X1 Nano, Use Cases Rule

To justify the cost, one really needs strong use cases for a thin-and-light laptop. It weighs 381g more than my iPad (906 vs 525g). But it’s still comfortable on my lap. As a pretty serious touch typist, I actually prefer constant access to a keyboard. I do now wish, though, that Lenovo offered a touchscreen option for the X1 Nano for simple tablet-friendly activities like web surfing and reading e-books.

Over time, I’ve grown even more impressed with the X1 Nano’s performance and capability. It really does run on par with my older (2016) desktop PC. That’s true despite 32GB RAM and an i7-6700 on that PC vs. 16GB RAM and an i5-1130G7 on the X1 Nano. To me, it’s a telling illustration of how fast technology marches ahead. I didn’t expect an i5 to be able to go head-to-head with an i7 (even a 5-year-old model).

Blast from the Past…

The lead-in graphic for this story comes from Sergey Tkachenko’s WEI clone. He calls it the Winaero WEI Tool. For those who don’t remember — or who never knew — WEI stands for Windows Experience Index. It’s been around Windows since Vista came out in 2007. You can still run the equivalent functionality in Windows 10, in fact, with this command winsat formal. I like the Winaero tool because it presents the same look’n’feel as in Vista and 7.

What you see in that graphic is a rough-and-ready assessment of hardware components on the PC it’s run on. Those numbers show values from 8.9 (CPU, RAM) to  9.2 for the SSD and 9.9 for 3D business and gaming graphics. The only outlier is the desktop graphics — Iris Xe in this case — which come in at a relatively low 8.0 value (the primary reported value as well, because WEI uses the lowest number to desigate overall capability).

FWIW, the only area in which my older desktop beats the X1 Nano is on the desktop graphics category (it’s got an NVIDIA GTX 1070 card). All the other metrics are within 0.1 of one another, so neither machine obviously beats the other by any kind of margin.

Desktop graphics performance notwithstanding, I’ve come to appreciate the X1 Nano quite a bit in the 10 days I’ve had it in hand. It runs acceptably when surfing the Web, using Outlook or Word (my two most frequently used and important desktop apps). To be honest, I am seriously considering buying one of these with my own money. I can’t give a laptop a better endorsement than that.

What’s the Ideal Package?

If you, like me, decide to buy the ThinkPad X1 Nano, I recommend buying the i7 model with the 16 GB RAM configuration. Because the SSD is the only user serviceable part (RAM is soldered), get the 256 GB SSD, which you’ll want to replace when something like the Sabrent 1TB Rocket 4 becomes available in a 2242 form factor.

If you absolutely have to buy something now, the Sabrent 1 TB Rocket is available in a 2242 package. While it’s a bit slower than the Rocket 4, it’s faster than the Samsung OEM parts Lenovo uses in the Nano. You’ll also want to buy a Thunderbolt/USB-C dock, because the Nano is pretty short on ports (2xThunderbolt + 1xheadphone is all you get). As a backup fiend, I’ve already got a 5TB 2.5″ drive enclosure hooked up for extra storage and Macrium Reflect’s use.

Facebooklinkedin
Facebooklinkedin