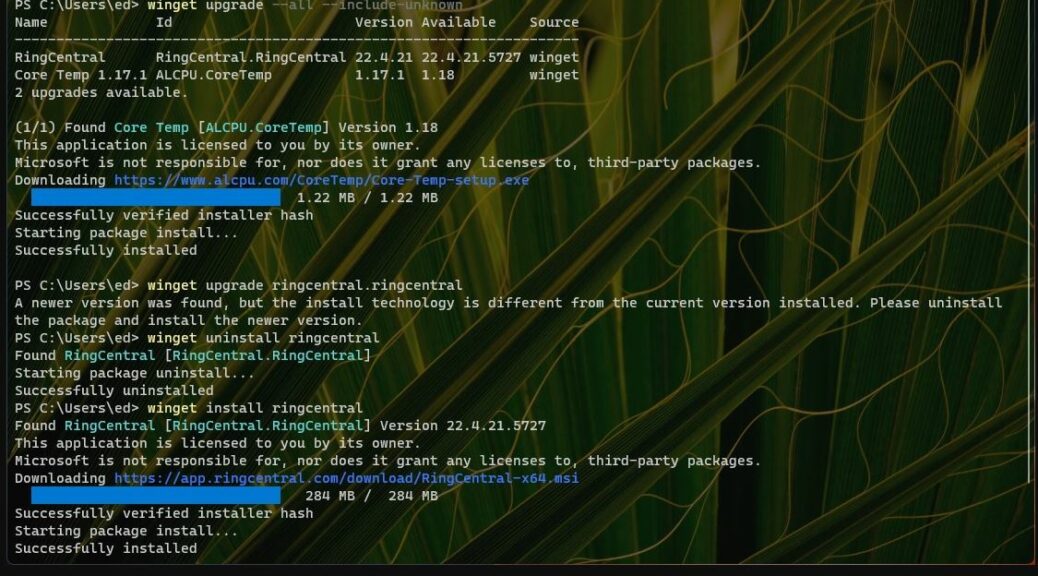
Category Archives: Windows 10

Updating Dolby Audio X2

On some of my Lenovo systems, one specific file often shows up in the Software Update Monitor (SUMo) in need of a newer version. It’s named dolbydax2desktopui.exe . According to Lenovo, it’s part of the Dolby Audio X2 system (DAX2) and comes preloaded on some of its PCs. Updating this Dolby Audio X2 file has been problematic, because a file source and update method have been unclear. No longer!

Updating Dolby Audio X2 Is Easy, If You Know How…

Most software updates require … well … an update of some kind to be applied. Not so for this particular file. One simply needs to overwrite the older version with a newer one in its default path:

C:\Program Files\Dolby\Dolby DAX2\DAX2_APP\

Of course, this raises an interesting question — namely, where might one find current versions of this file? I finally found them at a website named pconlife.com, which describes itself as “aimed at recovering the .dll or .exe file lost by Windows OS for computer users.” In general it seeks to help users replace lost, missing or damaged Windows files. For me, it’s shown itself to be a safe and reliable source of current versions of the afore-named DAX2 file. (Note: VirusTotal gives this file a 0/68 finding on its comparative checks).

Now, when SUMo tells me I need to update this file, I know where to go to get its specified version. I also know how to “update” that file. Choosing “Copy and Replace” in Explorer when seeking to over-write its predecessor does the trick nicely, thanks very much!

Yet Again, Persistence Pays Off

Learning how to keep Windows apps and components current is mostly a matter of routine. But for some things — this DAX2 item is a good example — one has to figure out how to do that, and where to get new versions as they appear. It’s easier when the vendor or maker provides an update package (and easier still when applying that package can be automated). But with enough investigation and elbow grease, these problems can be cracked over time. I’m glad to have this one finally made routine as well.

Facebooklinkedin
Facebooklinkedin

Store Reinstall Solves Stuck Terminal

Interesting! As is my usual practice, I just installed KB5015882, the upcoming CU preview. It targets production Windows 11, and takes it to Build 22000.832. After that update and restart, I noticed two things. First, this PC was still running the old Windows Terminal version. Second, Windows Store offered me an upgrade for same, but it got stuck during the process. After forcibly closing Store, and returning to the same page, a Store reinstall solves stuck Terminal once and for all. Deets follow, and a general approach to app repair.

Praise Be! Store Reinstall Solves Stuck Terminal

To begin with, when I ran Windows Terminal, I noticed it was still running an old version (no access to Settings, nor various supported command line environments). When I visited the Store, and searched on “Windows Terminal” its app page hung while trying to upgrade that very tool. So I terminated the whole shebang by clicking the close button at upper right.

Just for grins, I ran winget upgrade --all. It did not upgrade my Windows Terminal install, though it found and updated numerous other items successfully. Go figure!

Then, I opened the Microsoft Store again. I repeated my search on “Windows Terminal.” Lo and behold, it offered an Install button this time. When I clicked that option, it downloaded and installed the latest version. As you can see from the lead-in graphic above, the result was a current version of Windows Terminal, which runs PowerShell version 7.2.5 by default. Fixed!

When Windows Apps Get Wonky…

When apps start going sideways, I go through a drill to clean them up. This drill consists of the following steps:

    1. Visit the Store, look up the app and see what it offers. Apply any resulting upgrades or installs. If this doesn’t work, go on to
    2. Use PowerShell and Winget to find the name of the package for the app in question. Here,  winget list terminal reports that name is Microsoft.WindowsTerminal.
    3. You can use winget to uninstall, then reinstall the package as follows:
      winget uninstall Microsoft.WindowsTerminal. Then,
      winget install Microsoft.WindowsTerminal
      will install the current version.

Most of the time — as in this instance — if the Store offers options, they will usually suffice to fix app issues. Steps 2 and 3 are only needed when the app itself is somehow damaged or corrupt.

Put this in your bag of Windows 10 and 11 tricks. It could come in handy someday!

Facebooklinkedin
Facebooklinkedin

KB5015684 Provides Quick Windows 10 22H2 Upgrade

Here’s an interesting item. Turns out that MS has made KB5015684 available through its update servers. Thanks to the team at DeskModder.de you can find x86, x64 and ARM64 versions of either .CAB or .MSU files. All have links of the form https://catalog.s.download.windowsupdate.com/c/upgr/2022/07/windows10.0-kb5015684-xxx.cab or .msu. They must be legit, right? Hence my claim that KB501864 provides quick Windows 10 22H2 upgrade.

I just ran it on my production Windows 10 PC, and it went through without hitch or glitch. Completed in under 2 minutes, including download, install and reboot time, too. May be worth a try for those with Windows 10 PCs not expected to elevate to Windows 11 soon (or ever). So far, I see no discernable changes in look, feel, or behavior — just a new Build number 19045 (vs. 19044). Same minor extension as before, in fact: 1826.

What KB501864 Provides Quick Windows 10 22H2 Upgrade Really Means

Two things:
1. MS is getting close enough to a 22H2 public release for a preview to go out.
2. The code for the 22H2 release is stable enough to start it through the Windows Insider program.
Note: I didn’t have to join the Insider program to install this update, which appears as a “Quality Update” in Update History. The Windows Insider Program page on this PC, post-update, does NOT show itself as “joined-up” either. So one need not be concerned that applying the update automagically changes the PC’s status to that of an Insider machine. That’s a relief!

I ran the .MSU x64 version of the upgrade, simply because a self-installing update file is a little easier to apply than CAB files can sometimes be. You can find all links in the original Deskmodder.de article (6 files in all). It might be a good idea to apply this upgrade to test machines with some caution, if you’re concerned about possible unwanted side effects. That didn’t stop (or hurt) me on this PC, though…

If you’re interested, have at it. Cheers!

Facebooklinkedin
Facebooklinkedin

Choose Reflect Backup Drives Carefully

I’m a HUGE fan of Macrium Reflect. Available in both free and for-a-fee forms, I’m convinced it’s the best Windows image backup tool available today. Disclosure: I run both free and fee-based versions, and own a Home 4-Pack license that I upgrade as new versions are released. I was reminded to choose Reflect backup drives carefully yesterday, when I targeted an older USB 3 drive with mSATA SSD devices under its hood. Let me explain…

Why Say: Choose Reflect Backup Drives Carefully?

Because the read and write speeds of the underlying device and the speed of the channel (USB 3.1 in my case here) matter. In fact, they strongly affect the time it takes to complete a whole-image backup. In targeting an mSATA device that backup took nearly 40 minutes to complete.

I’m making the same backup right now, and targeting a PCIe x3 NVMe SSD in a Sabrent USB-C enclosure right now. As you can see from the lead-in graphic, Macrium Reflect currently guesstimates it will take 19 minutes to complete. That’s just over 50% faster than the mSATA number, or about 20 minutes overall.

If such a task is running in the background, and can complete whenever it’s done, that doesn’t matter much. But if, as in my case, I was waiting on completion to do something else, it matters a lot.

And There’s More…

While watching the NVMe and mSATA image backups proceed, I noticed another difference. The transfer rate for the two backups not only differed but so did their variability. The NVMe device kept getting faster as it proceeded. It ranged from a low of 1.1 Gbps to a high of 1.8 Gbps. The mSATA device started out at around 600 Mbps, It dropped as low as 220 Mbps, and as high as 1.0 Gbps during the course of the backup process.

Upon completion, Reflect also shared other stats worth noting. The overall read rate for the mSATA device was reported at 1.6 Gbps, while its write rate came in at a less stellar 550 Mbps. On the NVMe device, the overall read rate was 6.6 Gbps, and the write rate 1.9 Gbps. That’s a BIG difference, and explains the title for this story. Yes, these numbers appear inflated because they take compression into account. But those are the numbers that Reflect reports, and they do underscore the importance of device read/write speeds.

Note: Actual time for the NVMe backup was 19:31, while actual time for the mSATA backup was 39:52.

Facebooklinkedin
Facebooklinkedin

Windows Terminal PowerShell Selection

I have to laugh. Yesterday, I noticed version 5 of PowerShell  running inside Windows Terminal. So I naturally wondered: “How do I upgrade this?” Turns out, in fact, that no upgrade is needed. It all comes down to the current Windows Terminal PowerShell selection. I’ll explain shortly, but first: look at the window in the lead-in graphic.

Managing Windows Terminal PowerShell Selection

By default, version 5.1.xxx… appears when you open Windows Terminal. But it’s easy to get to a newer PowerShell version. No upgrading is necessary: you need only know how to do this. If you click on the down-caret at the far right of the title bar, a menu appears, like this:

Windows Terminal PowerShell Selection.choose shell

The down-caret menu lets you choose among shells you can run in a Windows Terminal tab. [Click image for full-sized view.]

The trick — if you can call it that — is to choose the right version of PowerShell (and corresponding default) to run. The top item in the menu corresponds to version 5.1.xxx. The fourth item down brings up the latest 7.x PowerShell version (specifically, 7.2.5). If you click Settings, you can also choose this version as the “Default Profile” which makes the new version (rather than the 5.1.xxx version) appear whenever you open Windows Terminal, or click the “Plus” sign to open a new default Terminal tab.

As with many other things in Windows World, foreknowledge and understanding are key to doing things right. In my case, I had no need to update PowerShell. I only needed to pick the right version to run inside Windows Terminal. Now I know how. If you didn’t know how already, this should make things equally simple for you. Cheers!

Facebooklinkedin
Facebooklinkedin

Change Dev Channel Task Manager Default View

Here’s a nice little addition that’s popped up in the Dev Channel version of Task Manager. If you visit its Settings page, you will see a “Default Start Page” pull-down menu there. This makes it easy to change Dev Channel Task Manager default view. My preference is Details, as shown here:

Change Dev Channel Task Manager Default View.details

Because it’s my go-to view, I set “Details” as the default in Task Manager.

Why Change Dev Channel Task Manager Default View?

For convenience, mostly. It’s not a huge deal in terms of added functionality. But anything that saves a mouse click is helpful, when it comes to getting down to work, eh? In general, MS seems to be moving to a move open, less cluttered layout for Task Manager in the Dev Channel version. It takes a little getting used to, but I like it.

My eyeballs are still better trained to make sense of the old-fashioned Task Manager that’s still visible in Windows 10 and other Windows 11 versions (for me that mostly means production version, Build 22000.778). The contrasting yellow shades for data cells are still more recognizable to me.

But, as with all things Windows, changes spur us on to learn and appreciate new things. That’s how I’m going to play the evolution of Task Manager. We’ll probably have side-by-side versions for Windows 10 and 11 for some time anyway, what with Windows 10 EOL not until October 2025.

But Wait, There’s More…

Turns out you can change the default tab for older Task Manager versions, too. The menu fiddling is a bit different though, as shown in the next screencap:

A different sequence of menu picks changes the default view in old Task Manager iterations.

As you can see in the preceding screenshot, click Options → Set default tab → and then any of the items shown (Processes, Performance, App history, Startup, Users, Details, Services) to make your selection. Good stuff!

[Note] Here’s a shout-out to Mauro Huculak at Windows Central, whose July 8 story clued me into this new wrinkle on an old favorite Windows tool. Thanks, Mauro!

Facebooklinkedin
Facebooklinkedin

More WingetUI Interactions

OK, then. I’m using WingetUI as an element of my Windows PC update toolbox. Along the way, I’m finding some areas where it shines, and others where it doesn’t. But as I gain familiarity with this tool, more WingetUI interactions convince me it’s worth using. That said, it’s no silver bullet for Windows updates, either. Let me explain…

After More WingetUI Interactions, Another Status Report

If you look at the lead-in graphic, I can point to elements where WingetUI shines, and those where it doesn’t. It handles most third-party apps perfectly (e.g. 7-Zip, Kindle, SUMo, Python 2, and Spacedesk). Not so for MS components, except for C++ runtime elements. It failed (or I didn’t try based on prior failures) with Edge WebView2, Teams, and the WADK. This is not a huge problem for me.

SUMo also catches the follow items that did not show up on the WingetUI radar: Chrome, Firefox, CrystalDiskInfo, Intel PROSet utility, MyLANViewer, Nitro Pro, Notepad++ (a false positive, IMHO), Snagit and Winaero Tweaker. Thus I must continue to use a collection of tools to get through my entire update roster. But I knew that already.

All’s Well That Ends Well

I was able to use PatchMyPC to handle the routine updates that WingetUI didn’t see. SUMo led me to fix everything except Intel PROSet, Nitro Pro, and Snagit. I got the first and last myself, and skipped Nitro Pro for the moment (though I did find install syntax for the latest version using winget itself, which I’ll try again later…).

[Note added 1 Day later…] Eventually, I jumped to the Nitro Pro download page (Product Updates) to grab and install the latest version (13.67.0.45). That got me completely caught up. What I now can’t understand is why winget will sometimes update Nitro Pro for me, but why I must do it manually at other times. I’m guessing it depends on package prep and info…


Facebooklinkedin
Facebooklinkedin

NetBScanner Blind Spot

I’ve been trying to understand what’s going on with local machine name handling on my LAN this week. Along the way, I’ve found a NetBScanner blind spot in that otherwise excellent NirSoft tool. Here’s the thing: as you can see in the lead-in graphic, NetBScanner does not include the name/address info for the scanning PC in its results. Those appear in the nslookup results in the cmd prompt window below.

What NetBScanner Blind Spot Means

I was quickly able to find another Nirsoft tool that does a complete scan, including the scanning PC — namely FastResolver. But alas, some tinkering with that tool is required to make it show only occupied IP addresses in a target range. That’s shown in the next screencap, which includes the scanning machine in its results:

NetBScanner Blind Spot.FR

Note that the i7Skylake item, IP 192.168.1.63, appears in the list along with all other items that NetBScanner shows above.

One of the most interesting things about using tools properly requires understanding their limitations. I just learned an important limitation for NetBScanner (ditto for FastResolver) in figuring this out.

Other Lessons Learned

I’ve now observed also that it takes the Spectrum router 24 hours to update its LAN entries in its DNS database. That’s entirely consistent with the default timeout of 24 hours for “positive DNS cache” entries. So now I understand that when a machine name won’t resolve to the correct IP address, it’s because DHCP has leased a different IP address to that host sometime in the past day. If I give it time, it will catch up. Good to know!

Facebooklinkedin
Facebooklinkedin

Phone Only App Manages Spectrum Networks

Man! I am NOT a happy camper right now. I just figured out that my DHCP leases have changed, but DNS isn’t tracking same. Thus, my “fixed” correlation between machine name X12Hybrid and 192.168.1.20 is no longer valid. The last digits of the IPv4 have changed. But NSlookup still sees the aforementioned address. And in attempting to troubleshoot the issue, I’ve just learned I can’t login to my router from a PC on my LAN. Because a phone only app manages spectrum networks, I must go through my iPhone.

Why Phone Only App Manages Spectrum Networks Is a Drag

I’m used to getting up close and personal with the Spectrum router through a web-based login. I know that interface, and can use it well. Now I not only have to learn a new interface instead, I must also:

  • run it through a smartphone with a ~3″x6″ display
  • try to figure out how (or perhaps even if) what I already know how to do inside one utility still works in another

It’s frustrating to be FORCED to use a cellphone when I have large screens at my disposal. I’ve shared my sentiments with the Spectrum tech support crew — a nice and genuinely helpful bunch of folks — but it seems to make little difference.

That’s progress, I guess. I can’t say I see this as a step forward. I can approve of using the phone app as an alternative to the old way. I can’t approve of using it as an out-and-out replacement. Sigh.

Facebooklinkedin
Facebooklinkedin

Use NSlookup for Machine Name Checks

Certain recent Dev Channel builds have played intermittent hob with RDP. Thus, for example, I had to switch from using the machine name to its IP address to RDP into one particular PC. In troubleshooting that issue, I quickly realize it makes sense to use NSlookup for machine name checks. Indeed as you can see in the lead-in graphic, when NSlookup resolves that name correctly, RDP will also accept that name to establish a connection.

Why Use NSlookup for Machine Name Checks?

Because it will tell you if RDP can recognize the machine name. Under the hood, both RDP and NSlookup rely on access to local DNS records to resolve the name into an IP address (see lead-in graphic). When the command line works, RDP should also be able to rely on the same underlying service — namely, DNS — to do its thing as well.

Of course, this raises the question as to why my local DNS server — which runs on the boundary device from Spectrum that sits between my LAN and the cable Internet connection — sometimes fails to resolve valid machine names. Feature upgrades can cancel existing IP address leases, and require the DNS cache to be rebuilt. And apparently, recent lightning storms can also mess with that device’s DNS cache when the power fails. So, I’m learning to flush and rebuild that cache as part of local device hygiene.

At least I now know what’s going on and why I must sometimes switch from machine names to IP addresses to access certain devices. Good thing it’s easy to log into and handle the reset over the LAN. It’s always something, right?

Facebooklinkedin
Facebooklinkedin