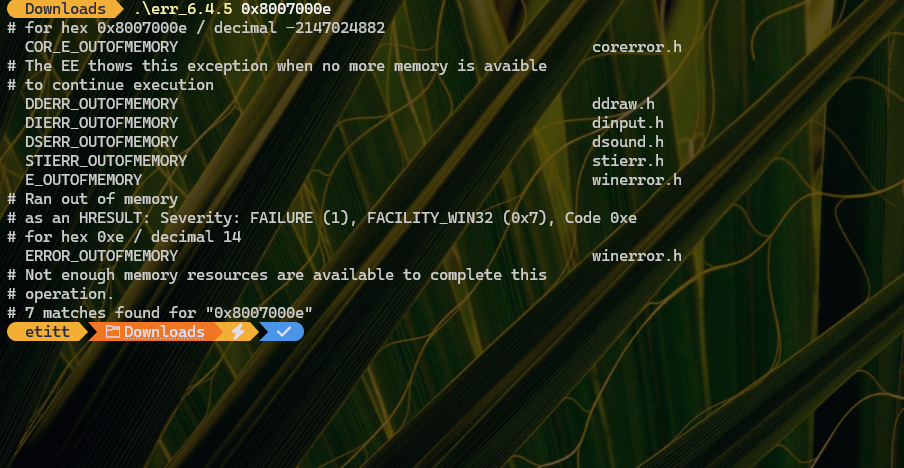
Category Archives: Windows 11

P16 Safeguard Hold Lifted

OK, then. I performed my daily ritual WU check on the P16 Mobile Workstation on Friday (Oct 14) . This time, the P16 safeguard hold lifted, and I was able to update to Windows 11 22H2. As you can see in the lead-in screencap, the 22H2 download was available during capture. Neat-o!

And indeed a quick visit to the 22H2 Known Issues page shows that my hold-up — the Intel SST drivers — appears as “mitigated.” Here’s what that looks like:

P16 Safeguard Hold Lifted.SST-info

The P16 blocking issue is now resolved, thanks to Intel driver updates. These appear in DevMgr under the “Software Components” heading.

With P16 Safeguard Hold Lifted, Upgrade Proceeds

I got a little concerned right after the first reboot (from the GUI-based portion of the install, into the post-GUI phase). The P16 sat at 0% complete on processing updates for what seemed like an eternity (about 4 minutes). But then, it started to chunk through the process and finished in about 20 minutes during that install phase.

I noticed that the update included a raft of driver updates –14 in all — by checking Reliability Monitor later on. The two items of greatest import show up in the software components category where various sound -related items reside.

Whatever the issue might have been, I’m glad to see it resolved. And so far, the P16 is running without apparent issues. I’m connected to it remotely via RDP right now, so that recent bugaboo is not present here, either. Good-oh!

Facebooklinkedin
Facebooklinkedin

USB NVMe HW Tweak Delivers Big

I’m still noodling about, trying to figure how to get the best performance out of high end USB NVMe drive enclosures. To that end, I was reminded of something I already knew but hadn’t considered. That is: deep down in the hardware policies for Windows removable devices — including NVMe drives — is something called “Removal policy.” As a quick and easy item, this USB NVMe HW tweak delivers big results.

Those results appear in the lead-in graphic for this story. Both sets of CrystalDiskMark results come from the same system, same USB-C port, and the same NVMe hardware. The only difference is that one is tweaked (selected “Better Performance”) and one is not. As you can see, this tweak makes a big difference. (Hint: the left-hand item shows tweaked results.)

How-To: Set Up NVMe HW Tweak Delivers Big

This takes a bit of digging to get into. This properties page is several levels deep in the storage device properties hierarchy. There are multiple ways to get to this page. I’ll illustrate one with step-by-step instructions using Disk Management:

1. Use Winkey+X to open the quick access menu.
2. Select Disk Management.
3. Right-click the drive letter for the NVMe device, then select Properties.
4. On the General tab, click the Properties button at lower right.
5. On that General tab, click the “Change Settings” button at lower left.
6. Click the Policies tab on the resulting Properties page, and click the radio button next to “Better Performance.” Also, click “Enable write caching on the device.”

Here’s what that final page looks like, with the described selections made:

USB NVMe HW Tweak Delivers Big.removal-policy

This page is four levels deep into the device properties hierarchy. It offers a useful “Better Performance” option.

What About Those Results?

I built a spreadsheet using both sets of results. Note that for every cell in each set of results, the tweaked drive was faster than the untweaked one. Some of the differences are negligible (under 10%). Some are minor, but noticeable (under 35%). The entire write column, however, offers at least doubled speed (top two columns). The random writes are 30 times faster when one thread works against a queue depth of 32. That drops to “merely” 11 times faster for a single thread and a single write request. Amazing!

Tweak(R) Tw(W) Notweak (R) Notw(W) Delta (R) Delta (W)
3049.53  2898.59  3004.07  1326.67  101.51% 218.49%
1760.91 2020.40 1620.99 857.20 108.63% 235.70%
499.74 361.83 411.16 12.00  121.54%  3015.25%
50.92 110.77  38,74 9.52 131.44% 1163.55%

This represents a significant boost in performance for a quick settings tweak. It does mean, though, that you must use the “Safe Eject” tool in the notification bar to eject the drive before you can disconnect it. Or, if you’re like me, you’ll simply do it the next time the host PC is rebooting (best done right when the restart gets underway, after shutdown is complete).

But gosh! Consider the money for a fast-ish NVMe drive (about US$120 – 150 for the 1 TB Sabrent Rocket 4 Plus). Then, factor in US$150-170 for a fast, USB4 NVMe enclosure. The tweak takes under a minute and really helps with drive performance. If you spend the money, you need to spend the time and effort to apply the tweak. You’ll get the most from your investment that way.

Realworld Results Change

Untweaked, it takes Macrium Reflect 5:30 to image the system drive on the P16 Mobile Workstation where the USB4 NVMe drive is attached. Tweaked, that same drive finished the job in 2:25. That’s over twice as fast. To me, that’s much more meaningful than synthetic benchmark results like those from CystalDiskMark. It also shows those benchmark results have some truth to them as well. Good-oh!

Facebooklinkedin
Facebooklinkedin

Windows 365 App Now Available

Too cool!  The Windows 365 app — now available in the MS Store — is out. Search on either “Windows 365” or “Windows 365 Preview” and it should come right up. The app’s Store page appears as the lead-in graphic for this story, in fact.

With Windows 365 App Now Available, What Else Is Needed?

Good question! I immediately downloaded and installed the app. Upon running same, I learned that a valid Windows 365 subscription is required so that the app can connect and interact with a Cloud PC instance. Because I lack such a subscription, here’s what I got from the cloud when I logged into my AD tenant account:

Windows 365 App Now Available.noacct

Drat! I was afraid that Preview didn’t confer temporary or evaluation access. I was right, alas…

Looking at Windows 365 Business Plans for SMBs, I see they cost from US$31 to 61 per month. Ouch! That’s costish, for something I don’t really need, but would love to play with.

Visiting the MS Evaluation Center, nowhere do I see Cloud PC among its various offerings. I guess that makes sense: it doesn’t cost MS anything more than storage space to provide ISOs for download. Hosting (extra) cloud PCs for evaluation means they bear more or less the same costs that the real thing imposes, with none of the revenue generating benefits.

Ifs and Buts for Cloud PC, Windows 365 App

Too bad! I’ve wanted to give the Cloud PC thing a try since it was first announced in 2018-2019. Right now, it seems like there’s no way to try it out without buying it. And with costs at US$372 per year and up, that means tangible costs. I’ll have to think about this, to see if I want to “pay to play.”

But those who already have Windows 365 subscriptions can simply download the app. When they log into an AD tenant with associated Cloud PC instances, the app should take it from there…

Facebooklinkedin
Facebooklinkedin

HDDs Still Have Their Uses

Hmmmm. Just saw a fascinating story at Neowin.net. It provides links to some low-cost deals for hard disk drives (HDDs) that range in size from 3 to 14 TB, with prices from US$60 (3TB) to US$210 (14 TB). I’m not endorsing the brand (WD) or the deals (listed from Amazon and — in some instances — Newegg). But I am amazed at just how cheap conventional hard disks can be today. And because HDDs still have their uses — particularly for archiving and spare backups — buying may make sense.

Economics Also Verify That HDDs Still Have Their Uses

I’m struck by the contrast between HDD and NVMe prices, especially for 4 and 8 TB devices. Looking at Amazon, I see that 4TB NVMe drives go for US$460 and up, with most top-end devices just below or over US$600. When you can find them (not easy), 8TB devices cost from just under US$1,200 to around US$1,500 or so.

The comparison to HDD is pretty stark. The Neowin story cites prices of US$70 for 4, and US$130 for 8 TB. Do the math to figure out the ratios. The 4TB NVMes cost between 6.57 and 8.57 times as much as their HDD counterparts. 8TB models run between 9.23 and 11.53 times as much.

Of course, denser solid-state devices are much more expensive to make. Though higher-capacity HDDs have more platters, achieving denser storage doesn’t magnify costs anywhere near as much. In fact, the HDD cost increment for going from 8TB to 10TB is US$30, and from 8TB to 14TB US$80. That clearly shows the incremental cost of storage is much, much cheaper for HDDs than SSDs.

But given the mind-blowing costs for higher capacity NVMe devices, they’re not going to replace HDDs completely any time soon. They simply cost too much to justify wholesale switchovers. Nobody’s going to use HDDs for serious, real-time workloads any more. They have no place as system drives, either. But for other applications where high capacity trumps I/O performance, they still have a vital role to play. And that explains why I still have over 40TB of spinning storage myself, much of it idle as “backups for my backups.”

Facebooklinkedin
Facebooklinkedin

ThinkPad Universal Thunderbolt4 Dock

It must be because I asked Lenovo for gear to test Thunderbolt4 and USB4. Last week another unexpected and unnanounced device showed up at the door. This time, it was a brand-new ThinkPad Universal Thunderbolt4 Dock. From what I’ve seen so far it has a lot going for it — especially price (relatively speaking, that is).

Why Is TB4/USB4 Gear So Costly?

Before I dig into the details on the mostly excellent ThinkPad Universal Thunderbolt4 dock, I must rant a bit. I’ve got 3 TB4 docks here at the house right now. The Lenovo unit is the cheapest by US$70-plus (that’s a good thing). But all of them cost over US$300, and two of them are at or over the US$400 mark. That stings!

I’ve been looking at a lot of NVMe enclosures that support USB4 lately, too (they work with TB4 controllers, BTW). These puppies cost even more. That means US$80 – 100 more than the cost of decent-to-high quality USB3.1 NVMe enclosures. I’m talking US$30-50 versus US$130-160. That’s a big difference!

One usually pays a premium to climb onto the bleeding edge of technology. And right now, TB4/USB4 is as fast as external devices get. Given a PC that supports these interfaces, I still don’t understand why climbing aboard this latest technology wave incurs such a hefty buy-in. Sigh.

More About ThinkPad Universal Thunderbolt4 Dock

Now that I’ve set the stage for describing and exploring this device, more of what I have to say should make sense. Indeed, this Lenovo dock is a relative bargain among all the TB4 docks I’ve tested so far. That is, with an MSRP of US$322, it costs US$77 less than the Belkin Pro Thunderbolt 4 dock. It enjoys the same price differential when compared to the CalDigit TS4 dock but that device keeps selling out, and is only immediately obtained on eBay for US$500-600!

Thus, the Lenovo Device has a definite price advantage in this very narrow product niche. See this Amazon Search for a fairly good list of the whole product range right now. From what I can tell, Lenovo offers the best price currently available for these kinds of devices.

Here’s a short list of ThinkPad Universal TB4 Dock features and functions (see product page for complete specs):

  • Handles up to 4 external monitors, up to 8K total resolution (1x8K display @ 30Hz or 4x4K display @ 60 Hz via 2xfull-size DP 1.4, 1xfull-size HDMI 2.1, 1xUSB-C)
  • 2 40Gbps Thunderbolt4 ports (one for computer in, one for other uses)
  • 4xUSB-A 3.1 ports and 1xUSB-C (may be used for video, as already indicated)
  • 135W external power brick, up to 100W available for charging
  • RJ-45 GbE (Intel I225-LMvP circuitry)
  • Audio mini-jack for headphones or external audio hookup
  • Universal computer lock port for attaching locked cable
  • Dimensions 220x80x30 mm (8.66×3.15×1.18″)

The Lenovo dock even downloads and handles its own Windows drivers with reasonable aplomb and dispatch. I found it loaded up its own USB Audio driver (under Sound, video and game controllers). It also updated the local Thunderbolt controller driver to a newer version after hook-up.

Stacking Up the Hubs

My testing so far puts all 3 docks — Lenovo, CalDigit, and Belkin — into the same overall performance range for USB4 and Thunderbolt 4 devices. That said, the CalDigit device offers 18 ports including GbE and 2.5 GbE RJ-45 networking hook-ups and SD flash device slots. If you can find one and need that extra functionality, that may make it worth the extra cost. Likewise, the Belkin device also supports a full-size SD slot and dual USB-A 2.0 slots, which may or may not make a different.

By comparison, I’d give the Lenovo device a “Best Buy” rating right now. If you don’t need SD support or lots of (different) USB-A ports, it can handle what you need. I have no difficulty using it as a docking station for a Lenovo X12 hybrid laptop with external mouse, keyboard, and two or three external storage devices. It also works well with HDMI or DP to drive an external Dell U2717 monitor.


Facebooklinkedin
Facebooklinkedin

Recent 22H2 RDP Mystery Widely Reported

For a while there, I was wondering if I’d done something wrong. I’d just gotten RDP working on my P360 Ultra. But after upgrading to Windows 11 22H2, it stopped working again. Annoyingly, it showed the same symptoms I’d just been able to fix  — connection briefly made, then dropped. But nothing I tried was able to return it to work. In frustration, I switched to TeamViewer free (which worked properly no sooner than installed on client and server PCs). Now, I’m reading my recent 22H2 RDP mystery widely reported in the Windows media. Here’s a taste, from MSPowerUser.

Info on Recent 22H2 RDP Mystery Widely Reported

As I read the symptoms described in reporting on the 22H2 RDP issues, I thought to myself: “This sounds familiar.” And indeed, the error message shown strongly supports one of the possible outcomes to which that language leads:

installing the update caused their Remote Desktop on Windows 11 system to fail to connect (or connect only to disconnect or freeze later).

For the P360, the connection would briefly appear as the RDP title bar at the top of my second monitor. It would, however, stay black. In 10 seconds or so, the error message from the lead-in graphic would pop up. Sigh.

Why Did I Drive Myself Crazy?

The funny thing about this error message — and it’s definitely not funny, ha-ha — is that it’s the same darn one I had just fought through and fixed the week before. In that case, it turned out to be a registry hack that fixed my problem.

I jumped to the erroneous conclusion that my old problem had come back, and spent a good 2-3 hours trying to fix it. I knew it had to be something in the registry, but I couldn’t figure out what. Then, recognizing it was taking too much time to troubleshoot, I simply switched over to TeamViewer.

As it turns out, that was exactly the right strategy. Apparently a LOT of people are having RDP troubles with 22H2. So that workaround comes recommended for others who might find themselves in the same boat. OTOH, the MSPowerUser story suggests another reghack that may see some users clear to restored RDP access. I might have to try it, and see if it works for the P360 Ultra.

And that’s the way things sometimes go, here in WindowsWorld. If and when this gets fixed, I’ll report back. Stay tuned!


Facebooklinkedin
Facebooklinkedin

WU Starts Windows 11 22H2 Delivery

OK, then. When I made the rounds of my PCs this morning, the Lenovo X1 Extreme got the offer through Windows Update. That’s right: for me, WU starts Windows 11 22H2 delivery right now. You can see what that offer looks like in the lead-in graphic.

When WU Starts Windows 11 22H2 Delivery, Then What?

Even though WU reports that “You’re up to date” as shown, a “Download & install” button is provided for 22H2. After clicking said button, it took about 5 minutes to download. The GUI-based install took another 25 minutes. It took 2 minutes to cycle through update processing before the first reboot. Post-GUI install took 6 minutes more, and then 2 added minutes to get to the intial desktop. At 35 minutes in all, that’s longer than I remember the Windows 10 to Windows 11 upgrade taking.

At the end of the process, Winver shows me running 22H2, Build 22621.521. A quick follow-up check for updates shows a Defender item, and KB5017271 (.NET Framework 3.5 and 4.8.1 CU). I run those, after shooting this screencap:

WU Starts Windows 11 22H2 Delivery.newwinver

Windows 22H2 Status at Chez Tittel

What about my other production Windows 11 PCs? The Lenovo P16 Mobile Workstation is still on safeguard hold (Intel SST  Audio drivers). I’d already force-upgraded the P360 Ultra, the Ryzen 5800X PC, and the Lenovo Yoga 7i. That means all my production 11 PCs are as upgraded as they get for the moment. It’s a good place to be. I think I’ll enjoy it for a short while, at least…

Facebooklinkedin
Facebooklinkedin

P360 Ultra Gets Second NVMe

A couple of days ago, I praised the interior design of the Lenovo P360 Ultra SFF PC (link). I just had to remove the GPU to access the second NVMe slot on an Asrock B500 Extreme4 motherboard last week. Let’s just say it wasn’t incredibly easy (and some expletives were involved). That really made me appreciate an install that required less than two minutes all the way around. But now that the P360 Ultra gets second NVMe, I want to report on the results.

When P360 Ultra Gets Second NVMe, Speed Abounds

What you see as the lead graphic for this story is a pair of CrystalDiskMark results. To the left, the internal C: furnished with the PC (a Samsung 1TB OEM drive: MSVL21T0HCLR). To the right, the internal D: I installed (WD Black SN850).

First, let’s look at those results. The Samsung drive enjoys an 18% edge on the sequential read (queue depth 32, single thread) and a  33% gain on random read (queue depth 1, single thread). The WD Black comes out ahead on all other readings.

That’s not surprising, given that the WD Black SN850 is a newer, more capable drive. But those results also speak to the notion that one should definitely populate open NVMe slots if speedy storage is helpful to the workloads a PC must handle.

P360 Ultra Gets Second NVMe.external

Same WD Black drive in a USB4 external NVMe enclosure: much slower.

Internal vs. External NVMe

The preceding screengrab shows CrystalDiskMark results for the same drive, but housed in an external NVMe enclosure. It happens to be a USB4 enclosure, and represents as much speed as I’ve been able to get from an external NVMe drive. It’s significantly slower across the board, but still not bad.

If I drop the same drive down to a USB 3.1 enclosure, it runs at standard UASP speeds (at or under 1000 in the top 4 cells). Interestingly the bottom four cells don’t change much for either USB4 or USB3.1. Backup speeds don’t change that much, either. That’s why I’m not convinced the USB4 enclosure is worth a $100 premium (it improves backup speeds by 30 seconds, give or take).

One More Thing…

If you’re buying an NVMe drive for an external enclosure, there’s no need to spend big on a fast, capable storage device. It won’t be able to run full out because the USB link (either 3 or 4) can’t keep up with top-end NVMe speeds. As the preceding CrystalDiskMark chart shows, you can’t come near the 6-7 GBps or so performance that top-end NVMes deliver these days.

On the other hand, if you’re going to put that device into an M.2 slot INSIDE the PC or laptop, that’s a whole ‘nother story. Then, you should buy as fast as you can stand to pay for — assuming, that is, that the PC or laptop can make full use of those capabilities.

Facebooklinkedin
Facebooklinkedin

Advanced Sharing Settings Leaves Control Panel

Here’s an interesting observation. It’s consistent with Microsoft’s long-term migration of functions from Control Panel into the Settings app. I first noticed it on the P360 Ultra (running version 22H2). And I just confirmed it — and took the lead-in screencap — on an X380 running Dev Channel build 25211.1010. Indeed, it shows that Advanced Sharing Settings leaves Control Panel, and runs within the Settings app.

Why Advanced Sharing Settings Leaves Control Panel

As a further point of confirmation, if you click “Change advanced sharing settings” in Control Panel in 22H2 versions, the old control is nowhere in evidence. It now opens the Settings-based pane instead. Looks like this functionality is entirely gone from Control Panel now.

On the plus side, you can expand all three types of sharing options (Private, Guest or Public, and All Networks) at the same time. That’s what’s showing in the lead-in screencap, in fact.

Looking at the old-style Control Panel equivalent in Windows 10 right now, the functionality of old (CP-based) and new (Settings-based) incarnations seems otherwise unchanged.

Could This Change Be News to Some?

Here’s where things get interesting. I searched Google for “advanced sharing settings now in Settings app.” I see no mention of this move online anywhere just yet. I must admit, it came as a surprise to me, too.

It does not apply to Windows 10 at all, nor to Windows 11 21H2 or earlier versions (I checked). Feel free to check your own installations. If you see anything interesting — or different from what I’m reporting here — please post a comment.

But time marches on. And so, apparently, also does the steady migration of functionality from Control Panel to the Settings app. What’s next, I wonder…

Facebooklinkedin
Facebooklinkedin

P360 Ultra Is Beautiful Inside

Holy mackerel! I just popped open the Lenovo P360 Ultra to check out its interior. I’m completely blown away. Starting with a protracted period for Tom’s Hardware in the early 2000s, I built and reviewed several dozen PCs for them. Over the years, I’ve laid hands on the insides of dozens of other PCs, and as many laptops. When I say the P360 Ultra is beautiful inside, I mean it. I’ve never seen a PC — full-sized or SFF — as well engineered for easy interior access as this one.

What P360 Ultra Is Beautiful Inside Means

The only tool I had to use when accessing anything inside the P360 Ultra was a pair of needle-nosed pliers. But a pen would have done just as well. To mount a second NVMe SSD, I had to pop a retaining clip. It required modest, well-directed force, but was easy to do.

The unit opens easily with a single lever release on the back. That release is boxed in red in the lead-in graphic for this story. Pull it down, and use it to pull the interior free of the case. That’s it.

Inside the case, customers have easy and immediate access to two of its four SODIMM memory slots. Getting to the SSD cooler is equally easy. There’s a nice YouTube video that takes a visual tour of the whole interior. Better still, Lenovo has a whole series of maintenance videos that show all the important stuff, item by item.

Where Did I Just Go Inside the P360?

I checked out all the stops along the way. Indeed, it would be dead easy to add two more memory modules to the current configuration (which has a single 32GB SODIMM). I popped up the cooler from the SSD area with a single catch release. I watched the Lenovo video to learn how to release the retaining pin from the second, open SSD slot. Then I inserted the WD Black SN850 I bought last week, returning the retaining pin into its closed position and buttoned the case back up.

The cooler that covers the side-by-side SSD slots comes loose with a single catch (fingertip barely showing at mid right). Pop the clip, drop in the drive, and repeat in reverse. Took me about 30 seconds, all told.

I’m happy to report that new drive came up instantly on the next reboot. The BIOS obligingly beeped to let me know something had changed, but the whole process was dead easy. Tomorrow, I’ll write about the amazing results from using the WD Black drive internally.

A Usability Triumph

As I said earlier, I’ve stuck my hands in a lot of PCs and laptops. That includes numerous SFF PCs, of which I’ve built several for use here at Chez  Tittel. My wife uses a Dell 7080 Micro as her daily beater, in fact. I’ve NEVER seen a PC as well engineered for access and upgrade as this one. It’s amazing. Watch the aforelinked videos; you’ll see exactly what I mean. Astounding!!

My hat’s off to the P360 engineering team. While they marvel at my bald, gleaming head, I’m still marveling at their great work.


Facebooklinkedin
Facebooklinkedin