It’s been a painful last few days here in Windows World. I’ve been working on a loaner, locked-down machine in connection with a code analysis project. Because that code is protected and valuable intellectual property (IP), I’m able to access its GitHub repository only through a VM running on a hardened and isolated system. Essentially, I have to access the VM through a browser tab set up inside a VPN-accessible secure store. It hasn’t been going too well, either: each time I tried to use the VM and left the machine alone for a while, it would drop its connection. And then, to make things worse, I couldn’t get back in without asking an IT admin to reset the server side of the remote access environment. That’s where an unwanted and unexepected Power Options VM surprise came into play.
What Is a Power Options VM Surprise?
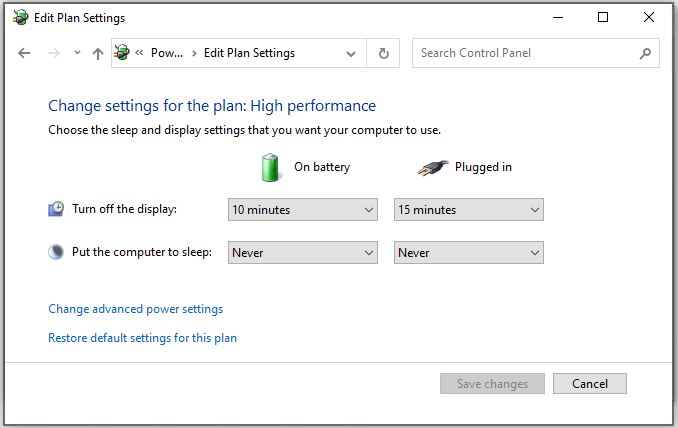
If you look at the lead-in graphic, you’ll see that one change I make on my Windows PCs post-upgrade or install is to change the sleep interval to “Never.” The default is 30 minutes. Accessing the VM used a commercial VPN into a host server. Then, a remote access client (first RDP, then VNC) connected to the VM itself. For a long time, the firm’s IT guy kept fiddling with RDP settings and such. Eventually he switched to VNC for remote access, thinking it might be an RDP protocol issue at work (or not).
But the disconnect issues kept popping up, where the VM connection would drop when the machine was idle for 30 minutes or more. This finally caused him to investigate the Power Options, where it was immediately obvious the default “sleep after 30 minutes” was the culprit. Resetting the value to my usual preference — that is “Never” — has since fixed things, hopefully for good.
Troubleshooting 101: Don’t Overlook the Obvious
As an outsider with only a regular user account, it wasn’t up to me to mess with default settings on the locked-down machine furnished to me for this project. Ditto for default settings for the VM I was accessing to get into the target code base. But gosh: I have to believe we were looking for complex solutions to a seemingly complex problem. Instead, we should have been looking for simple solutions for a straightforward default settings check.
The moral of this story is not lost on me. I hope it will likewise inspire you to make a checklist when working with VMs, and to put “check default settings” (especially in Power Options) right near the head of that list. Sleep may “knit up the raveled sleeve of care,” as the Immortal Bard put it. But sleep causes all kinds of interesting problems for Windows PC — and now I know, for Windows VMs, too. Funny thing, I’ve learned to make this tweak because I use RDP extensively here at Chez Tittel to get from my production desktop to the 10-plus other PCs usually running around here. I shoulda known…