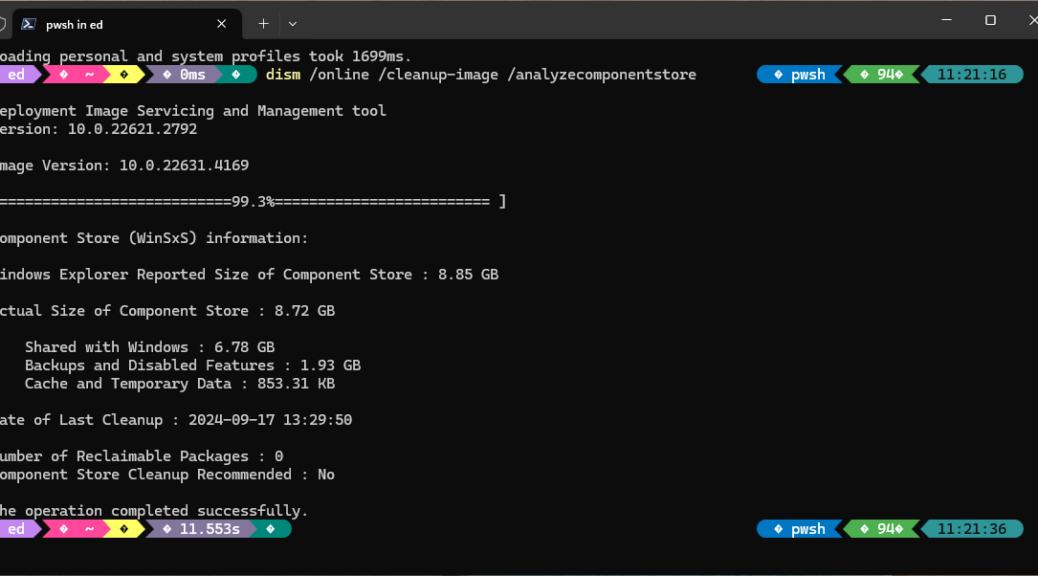
OK, then: thanks to some excellent detective work by ElevenForum stalwart @Bree, it looks like DISM can tell curious Windows users which packages are “stuck.” That is, you run the DISM command sequence: Analyze-Clean-Analyze, with a positive number of reclaimable packages still showing. (You can find all the details in my 11/2023 blog post on this topic.) This time around, I’ll show you how to list out the actual items that identify spurious Windows reclaimables. Warning: some PowerShell hacking is involved!
How-to: Identify Spurious Windows Reclaimables
@Bree shows the source for the data needed to identify these strange offenders. It’s based on analyzing data within a DISM generated text file. Here’s the specific command that creates that data:
DISM /ONLINE /GET-PACKAGES /FORMAT:TABLE > KB.txt
What this does is to inspect the current running Windows image (/online), grab all packages it finds with some related data (/get-packages), and format it into a table (/format:table). That last bit (> KB.txt) redirects command output into that named file. The column headings in that output read: Package Identity, State, Release Type, and Install Time with vertical bars (‘|’) used to separate entries.
Bree’s analysis concurs with my own prior inspection of this same kind of output. We both agree that only lines with the strings “Staged” and “Feature Pack” in them point to spurious Windows packages. His analysis depends on sucking the output into a text file, converting to Excel format, sorting by State, and counting groups of lines to match the spurious reclaimable count to what’s reported by DISM /AnalyzeCompontentStore. Remember: those are packages that stay in the component store even after a DISM /cleanup-image operation has completed successfully. I simply write the output from the /Get-Packages DISM command to a file named KB.txt and filter its results.
Automating Analysis of KB.txt Contents
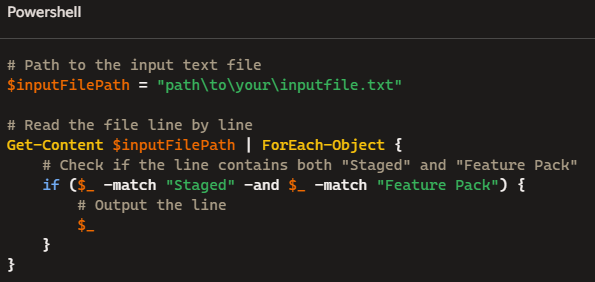
Next, my PowerShell script comes into play (such as it is, it’s pretty primitive). Unzip kbfilt.zip and then move kbfilt.ps1 to the directory where you created kb.txt (to run this file type .\kbfilt.ps1 inside an administrative PS Terminal window: screenshot follows later).
# Path to the input text file
$inputFilePath = "kb.txt"

# Path to the output text file
$outputFilePath = "kbfilt.txt"

# Read the file line by line and filter the lines
Get-Content $inputFilePath | ForEach-Object {
# Check if the line contains both "Staged" and "Feature Pack"
if ($_ -match "Staged" -and $_ -match "Feature Pack") {
# Output the line to the output file
$_ | Out-File -FilePath $outputFilePath -Append}}

# Confirm the script has finished
Write-Host "Lines w/ 'Staged' and 'Feature Pack' written to $outputFilePath"
Write-Host "Remember to delete kb.txt, kbfilt.txt before next use"
I used the -Append directive for Out-file which means the script appends text to the file and doesn’t over-write (“clobber” in PS-speak) other content. That’s why you’ll want to delete these files if you want to run the script again.
My Copilot+ PC (an Intel Aura Yoga Slim 7 model from Lenovo), running Windows 11 24H2 Build 26100.2134, has 2 spurious packages as shown here:
![]()
2 packages with LONG names (typical for Windows)
[Click image to view full-sized.]
This investigation is simply to show you which packages are stuck. You can get rid ofthem with DISM /Remove-Package. But if you do, they’ll most likely pop back up again after you install the next Cumulative Update (CU). Windows images are funny that way. But at least, now you can identify the packages involved.