For most of computing history, the connectors with the fastest, most reliable PCIe signal paths lived in rack servers. They did not sit on your desk inside a palm-sized box. That divide is eroding quickly. MCIO, short for Mini Cool Edge IO, is a connector standard that Amphenol Communications Solutions developed. Better yet, the PCI-SIG formally adopted it for PCIe CopprLink internal cabling. Standardized as SFF-TA-1016, it packs PCIe Gen 5 performance, and soon Gen 7, into a slim 0.60 mm-pitch form factor. Until recently, you would only find it in a data center. In 2026, it is showing up in mini PCs you can buy on Indiegogo, as I learned reading news at TechPowerUp this morning.
How MCIO Ups the Ante on OCuLink
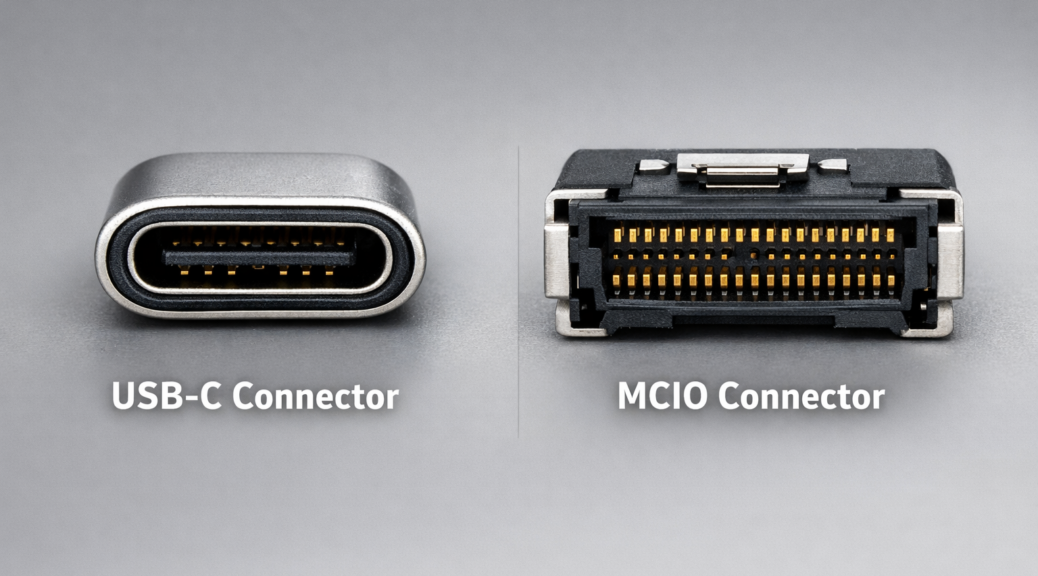
You can see how the MCIO receptacle compares with USB-C, which Thunderbolt 4/5 and USB 2/3/4/5 use. It’s a little bigger but not much. Indeed, MCIO deserves a closer look. It is a next-generation internal interconnect under the OverPass platform. Its defining characteristic is density without compromise. The connector’s 0.60 mm pitch keeps it compact while supporting data rates from 16 Gbps up to 64 Gbps per lane at PCIe Gen 5. Developers are also working on PCIe Gen 7 variants that run at 128 GT/s using PAM4.
Lane configurations span 4x, 8x, 16x, and 20x. The same connector body handles both cable-to-card and card-edge applications. That versatility reduces BOM complexity. It also supports PCIe, NVMe, and SAS, and the connector is rated for cable runs up to one meter. Designers originally created it to enable modular, scalable, easy-to-service data center architectures. As it turns out, those same traits also fit compact, high-performance personal computing.
Bandwidth Showdown: MCIO vs. the Field
To appreciate what MCIO brings to the table, it helps to line it up against the standards it competes against (and leapfrogs). Thunderbolt 4 tops out at 40 Gbps total bandwidth. But it tunnels PCIe thru an Intel controller, adding overhead at every step.
USB4 v2.0 is where things get faster: up to 80 Gbps, or asymmetric 120 Gbps when video bandwidth gets priority. It is the current mainstream performance sweet spot, and it appears in more mini PCs and laptops. Thunderbolt 5 pushes the ceiling higher, delivering roughly 63 Gbps of effective compute bandwidth, or up to 120 Gbps asymmetric for display workloads, with PAM-3 signaling. In real-world eGPU tests, Try Some Tech measured roughly 5.6-5.8 GB/s of host-to-device throughput.
OCuLink is an enthusiast’s current favorite for eGPU use (see my June 8 post on this topic). It’s a native PCIe external connection that sidesteps tunneling overhead entirely. In the same real-world testing, OCuLink hit roughly 6.6 GB/s host-to-device—beating Thunderbolt 5 by approximately 16% in sustained throughput. USB6 is still on the horizon as of mid-2026, not yet officially released, with predictions pointing toward roughly 160 Gbps using PAM-4 modulation.
Then there’s MCIO 8i running PCIe 5.0 x8: approximately 256 Gbps bidirectional at PCIe 4.0 speeds, and up to 512 Gbps bidirectional at full PCIe 5.0. That’s not an incremental improvement over the competition: it’s a category jump. GPD’s G2 eGPU enclosure, which launched in 2026 using MCIO 8i, claims just 2% performance loss when running an RTX 4090 externally. No Thunderbolt or OCuLink setup has come close to that. OCuLink typically imposes a 4–25% performance penalty depending on the workload; Thunderbolt 5 can push past 25% in bandwidth-intensive scenarios.
Data Center Roots, Professional Credibility
MCIO didn’t earn its reputation in hobbyist labs. It earned it in RAID controllers, host bus adapters, JBOD enclosures, NVMe storage arrays, AI inference servers, and high-density compute racks. In those environments, signal integrity and sustained throughput are vital. PCI-SIG adopted MCIO in its CopprLink cable spec in 2021, and Amphenol announced the PCIe Gen 7 variant for CopprLink internal cabling in 2025. It targets AI inference clusters and next-generation high-bandwidth networking.
Molex also manufactures MCIO connectors under the Mini Cool Edge brand, and the pricing reflects the standard’s enterprise practicality: raw surface-mount 8x PCIe Gen 5 connectors can be found for around $2.41 per unit, while a pre-assembled 16x cable assembly runs closer to $66. In enterprise bill-of-materials terms, that’s modest. For context, a Thunderbolt 5 controller chip alone can cost more than an entire MCIO cable assembly—one reason system designers are increasingly drawn to MCIO for cost-sensitive high-performance designs.
MCIO Shows Up in Mini PCs and eGPUs
GPD is best known for its gaming handhelds. But it made a significant statement in April 2026 by announcing two MCIO-equipped products at the same time. First came the GPD BOX mini PC, powered by Intel’s Core Ultra 300 “Panther Lake” processors. Second came the GPD G2 eGPU enclosure. The G2 launched on Indiegogo at $385 early-backer pricing ($459 MSRP) and is designed to pair directly with the GPD BOX over MCIO 8i. Beyond the headline MCIO port, the G2 is a capable dock in its own right. It includes a 16-pin GPU power connector (12VHPWR), an M.2 storage slot, USB 3.2 ports, dual connectivity via USB4 v2.0, and 100W USB Power Delivery output.
TOPC, another Chinese mini PC maker, also entered the MCIO space in 2026 with the TA255—an AMD Ryzen 7 H 255-powered system priced at approximately $394 (16 GB) to $438 (24 GB). The TA255’s MCIO port runs at PCIe 4.0 x8, delivering 128 Gbps—double the bandwidth of a standard OCuLink PCIe 4.0 x4 connection. That said, its current CPU generation stops it from reaching full PCIe 5.0 speeds.
One important caveat worth calling out: unlike OCuLink or Thunderbolt, MCIO is not hot-swappable and was not designed for casual cable-swap scenarios. It requires a deliberate, secure connection. For users building a modular compact workstation or eGPU setup intended to stay put, that’s a perfectly acceptable tradeoff. For users who want to plug and unplug an external GPU the way they’d swap a USB drive, MCIO is not the it—at least, not yet.
Should You Care About MCIO?
Let’s be honest: MCIO isn’t mainstream. As of mid-2026, device support is limited to a handful of mini PCs and eGPU docks. Most of them are Chinese OEMs with uncertain global reach. If you need broad compatibility today, USB4 v2.0 remains a safe, widely supported choice. If you own a capable mini PC or handheld and want the best eGPU performance, OCuLink is a good choice.
But if you’re thinking a few years out—or building a compact computing setup around modular, high-performance components—MCIO deserves serious consideration. PCI-SIG’s formal adoption of MCIO in its CopprLink cable spec for PCIe Gen 7 signals real institutional backing. It’s not just a niche vendor experiment. I expect to see MCIO appear in more PCs, edge boxes, and workstations in 2026/2027 as the ecosystem matures.
In connector technology, the server rack and the desktop have always eventually converged. On that trail, MCIO looks like the next proving ground. Stay tuned: this story is moving faster than most. Ultimately, it should mean that external NVMes work and run the same as internal NVMes. That’s HUGE.