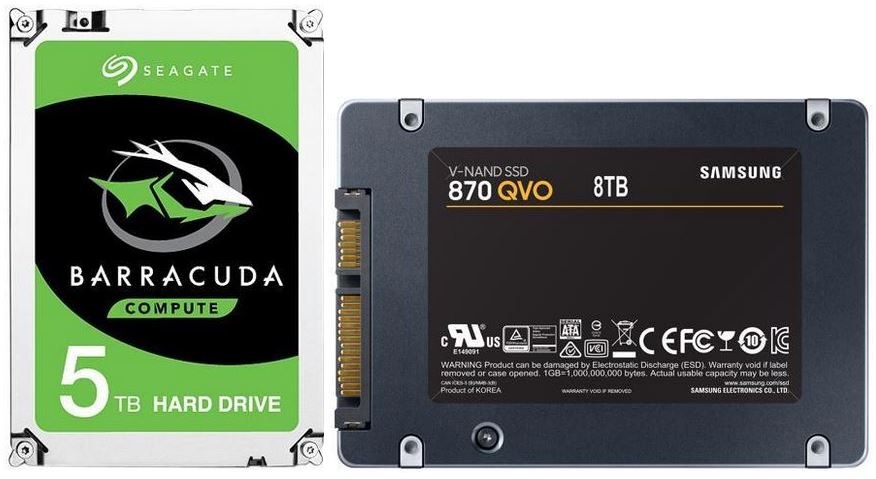
Post-1809 Production PC Hits Perfect 10

There’s been a lot of complaining about the latest Windows 10 version, 1809, of late. A lot of it appears to be entirely justified, too. But with one exception, my experience with 1809 has been superb. In fact, for the first time I can recall, my post-1809 product PC hits Perfect 10 in Reliability Monitor today. Check this graphic out:

Post-1809 Production PC Hits Perfect 10.relimon

After a few initial hiccups, my reliability on this latest build has been rock-solid. Amazing, in view of history over the past 2-3 years.

Why Say Post-1809 Production PC Hits Perfect 10?

Good question! That latest rise to the top stability index level (10) that Reliability Monitor can report is unprecedented prior to the 1809 install. I would routinely show stability index levels of between 2 and 5. Seldom, if ever, did the value creep much higher. It’s normal for the stability index to reach the top when you don’t use a PC much. (By itself, Windows causes few errors that register in this monitor.) But when you use a machine hard every day — as I do on my production PC, day in and day out — things do go wrong from time to time. And when they do, the stability index usually declines apace.

So this is unexplored and welcome territory for me. I mention it to the world, because I think Win10 1809 may be getting dinged unfairly. Or dinged too much. So here’s a lone but interesting counterexample. It comes from a machine I’ve been using daily since I first put it together back in late 2015/early 2016. Since day 1, the stability index hasn’t gotten above 8 except perhaps once or twice. (It was idle during vacation or business travel.) Upon regular use, it’s seldom climbed about 5, as I said earlier. 15 days into the 1809 install, it’s sitting at a perfect 10 index value. That’s with no errors for the past 10 days. And my usage pattern hasn’t changed at all. My thinking is that 1809 may very well be a better OS than it’s currently believed to be.

But as with all things Windows (10), time will tell!

Facebooklinkedin
Facebooklinkedin

PCs Now Eight Ninths Patched for Spectre Meltdown

OK, my long and sometimes odd adventures with Spectre and Meltdown patches are finally concluded. Eight of the nine systems here at Chez Tittel are now patched. That’s as far as I think I’ll ever get because my wife’s PC is built around a Jetway NF9G-QM77 mini-ITX motherboard. Its most current BIOS update is September 2017 from a company for which no word on Spectre/Meltdown updates is available. Thus, for my PCs now eight ninths patched for Spectre Meltdown is as far as I’ll get. It’s been a wild ride. I’d like to document it just a tad to explain what others should be going through, too. Or what they should expect to go through soon.

PCs Now Eight Ninths Patched for Spectre Meltdown

Steve Gibson’s Inspectre utility finally gives the T520 and its Sandy Bridge CPU a clean (but slow) bill of health.

Getting to PCs Now Seven Eighths Patched for Spectre Meltdown

It all started as we got back from our end-of-year skiing/snowboarding holiday just after New Year’s. Word on these vulnerabilities emerged as soon as January 2. But I didn’t find out until I returned to my desk on January 5. After driving back from the northeastern part of Colorado, I wasn’t ready to deal with a major security flaw. But there it was, and we all had to deal with it. It soon became apparent that Meltdown and Spectre Variant 1 could be handled via OS-level patching (all complete now, thank goodness). However, Spectre v2 required a firmware patch. Or, as it turned out, a series of firmware patches. That’s because the first set for Haswell and Broadwell patches caused as many problems as they were supposed to solve.

The Timeline from Discovery to (Mostly) Mitigated

Here’s a rough timeline for how things unfolded for my PCs, as far as those firmware updates went:

January 2018
Surface Pro 3 gets a firmware patch 2nd week (1 of 8)
Dell Venue Pro 11 gets a firmware patch late 2nd week (2 of 8)
On 1/15 Intel advises against applying firmware patches
February 2018
Not much happens with firmware patches
March 2018
Microsoft issues firmware patch for Skylake, Coffee Lake, Kaby Lake 3/8 (3 of 8)
Dell XPS27 (Haswell) gets a firmware patch 2nd week (4 of 8)
Asrock issues firmware updates for Haswell, Skylake, Coffee Lake, Kaby Lake 3/15 (5&6)
Lenovo issues firmware updates for Haswell, Ivy Bridge and Sandy Bridge  3/15 (7&8)

Hiccups and Lessons Learned

I have an issue with the Dell Venue Pro following its first semi-successful BIOS/UEFI update. It closed the Spectre v2 vulnerability but left the machine unable to reboot normally.  I must pop the battery out and remove the power cord before the unit will boot after a shutdown or restart. Thus, I can’t apply the latest update to the UEFI. Among other things, it is supposed to address that very problem. I’m going to have to find and run a flash utility that works from an alternate boot.

That’s what I did with the two Lenovo laptops. Their Lenovo Windows Flash utility works only in Windows XP, Vista, 7 and 8. But I’m running Win10  on those machines. Fortunately, Lenovo also makes the update available in ISO form. It boots to alternate (optical) media and flashes the BIOS from DOS. Even though the Windows utility crashed my Win10 laptops, I eventually booted into DOS to flash them anyway. Along the way, I had to remember to reset boot to support both Legacy and UEFI modes. That’s because DOS is so old, it boots only in legacy mode. On the T520 that was how the machine was set; the X220 Tablet was “UEFI only.” I couldn’t boot to the optical disk until I made that change. Sigh.

One of the Asrock motherboards (Z170 Extreme 7+) delivered the update in a Windows-based flash executable. It was easy to apply. The other, a Z97 Killer Fatal1ty, required using the Instant Flash tool within UEFI. I had to format a USB flash drive to FAT32, unpack the ZIP file to that device, then run the tool from UEFI to apply that update. Took a while, but worked just fine.

No Hiccups Are Nice, Too!

Except for the issue with the Dell Venue Pro and the second UEFI/BIOS update, the Dells and the Surface were by far the easiest to deal with. The Dell Support utility checked for the updates, grabbed them as they became available, and applied them with zero muss and fuss. Ditto for the Surface Pro 3

All in all, while it took longer than I think any of us expected it to, the overall process wasn’t too horrible. Let’s hope this kind of thing doesn’t become too routine, either!


Facebooklinkedin
Facebooklinkedin

Bypass Adblock Detection Gains Importance

Ok, then. I patrol a large number of websites daily looking for blog fodder and article topics. Many of those sites are ad-financed. Of those, some won’t show themselves in browsers with adblockers turned on. They use a technology called “Adblock Detection” to determine when browsers are blocking ads. If an adblocker is detected they take “corrective measures” to induce visitors to turn ads back on. Of course, I — and many other users — would rather not do this. Thus, we seek out countermeasures. In this case, that means figuring out how to bypass or circumvent adblock detection. And of course, that’s why I entitled this post bypass Adbock Detection gains importance.

Why and How Bypass Adblock Detection Gains Importance

If you visit WindowsCentral.com in a browser with an adblocker turned on you’ll see a message like this, instead of the website’s actual content.

Admiral’s adblock detector keeps adding annoying wrinkles.
[Click image to see full-sized view]

In the past week or so, Admiral has added a new wrinkle to its adblock detector. Previously, one could simply click the “Close” item on the adblock detection notice. Then, it would go away and leave you alone. Now, you can do this and browse for up to 30 seconds (or until you transition to another page on the site). When the timer goes off, or when you open a new page on the same site, you’re presented with the same display. After three or four repetitions, this becomes intolerable. I’d more or less decided to avoid those sites until I realized the dictum in my next heading must hold in this situation, too.

Where’s There’s a Will, There’s a Workaround

Once you learn the terminology — that is, adblock detection and the need for a bypass — there is no shortage of information and advice on how to get around this despicable (but all-too-understandable) behavior. My favorite nostrum for this problem comes from TechJunkie.com (itself, ironically enough, an ad-financed website). I like their solution because it involves very little effort on my part. It does, however, require using Firefox to make this as simple as possible. One need only click File → New Private Window inside Firefox, then surf to the site of one’s choosing from inside that window. The same Admiral window pops up once, but stays quiet when closed after that. Works like a charm.

Other adblock detection bypass techniques get more interesting. You can use Google cache to interact with a snapshot of the site instead of a live, interactive version. You can use the Wayback Machine in similar fashion, and interact with a different snapshot. There are also scripts from Greasemonkey or Tampermonkey to kill the scripts that invoke the site’s adblock detection and response behaviors. Guiding Tech also suggests disabling JavaScript for offending sites. For me, all of these involve too much poking around in the browser GUI. I’m best-served by a hands-off technique myself, so I’m using Firefox for those sites going forward — at least for now, until the adblock detectors add another wrinkle. Then, I’ll find another workaround or countermeasure, as the game of cops and robbers goes on!

Facebooklinkedin
Facebooklinkedin

Bye Bye Secunia PSI

Drat! I knew a notification asking me to “view an important message regarding the future of this product” for Secunia’s Personal Software Inspector probably wasn’t good news. Once again, I took no pleasure in being right. That’s because the message was that it will soon be time to say “Bye bye Secunia PSI!” (That’s almost how the company entitled their explanatory blog post, too: “It’s time to say goodbye to PSI.”) Here are the relevant screen captures:

Bye Bye Secunia PSI notification
Bye Bye Secunia PSI msg txt

Less than two months left before end-of-life comes to Secunia PSI. It’s been a mainstay for me for at least a decade. Bummer!

After Bye Bye Secunia PSI, Then What?

Good question! There’s a Flexera CSI (Corporate Software Inspector), which costs money to obtain. I’ve sent them an email asking about their pricing and availability for 15 seats (I have 8 PCs currently, have had as many as 12 here at Chez Tittel at one time, and want to leave some room for growth). I’m hoping it’s not too horribly expensive, because I really want to keep up with the anywhere from 40-120 applications and apps resident on the local tablets, laptops, and PCs around here. Thanks to the labeling and language on the Flexera website, I’m pretty sure that this fits into their Software Vulnerability Manager product.

But looking around for other drop-in (and free) replacements for PSI, I don’t see a whole lot that provides similar capability with equal ease of use. Sure, there’s the Microsoft Baseline Security Analyzer (MBSA) but it doesn’t automate patching or fixing the holes that it finds. Then there’s BeyondTrust’s free vulnerability scanner, Retina Network Community. But I see that it requires an IIS server and  an MS SQL Server to be installed (and it can’t reside on a domain controller or Small Business Server, either). Sounds like more work that I want to do. But that’s it. All the other programs I read about (see Eric Geier’s 2014 Network World story “6 free network vulnerability scanners” as a typical case in point) either limit the scope or the number of scans you can use their tools for. The level of automation also leaves a lot to be desired.

Hmmmm. This is going to leave an interesting gap in my defenses. Hope it doesn’t prove too time-consuming, effort-laden, and expensive to fill. Sigh.

Facebooklinkedin
Facebooklinkedin

Understanding HomeDev PatchCleaner

I strongly recommend the PatchCleaner utility from Australian consulting and software company homedev. It keeps an eye on the contents of the %windir%\Installer directory. Usually, that’s C:\Windows\Installer where the OS stashes installer .msi and patch .msp files. At any given moment, you might need one or more of those files. That’s because they can be called on when patching or installing software components (both Windows and third-party items, in fact). That’s why the developers recommend moving “orphaned” files to another drive/directory rather than deleting them outright. However, the tool will happily delete files when so directed. Here’s some output from the program on my production PC. Examined properly, it should aid readers in understanding HomeDev PatchCleaner.

Understanding HomeDev PatchCleaner

The bigger box at bottom is the output from the second details item for orphaned files in the small box at top.

What’s Involved in Understanding HomeDev PatchCleaner?

PatchCleaner shows a line of data that conveys some important information. Namely, it discloses what’s in the Installer folder that isn’t necessary. The tool identifies such orphaned files by seeking out references to their names in other executables and OS files. Those that lack such references are considered orphans. In the preceding screencap, this key line reads “9 files are orphaned, 289.66 Mb details…” Clicking on that blue details item produces the orphaned files window shown below. There, I’ve zeroed in on an older installer file for Macrium Reflect (version 6.3.1821, now completely obsolete and out-of-date).

In general, I agree with homedev’s advice to move files from the C:\Windows\Installer directory to another directory. But, as I’ve been watching and working with the program, I’ve observed there is a specific class of items that it is almost certainly safe to delete rather than move. These items can be generically described as “applications that update often.” As shown, Macrium Reflect — which gets monthly updates, give or take — is one of those items. Another includes various Adobe programs such as the Flash Reader or Acrobat DC. These get updated about as frequently as Reflect (but usually take an .msp extension).

On some heavily-patched and infrequently-cleaned PCs, I’ve seen this number exceed 10 GB. My PCs, of course, are kept pretty clean, so mine seldom approach even 1 GB. As “the boss” (my wife, Dina) likes to say “the more often you clean, the less you have to clean up each time.” That’s as true for PCs as it is for her house, where by her grace and kindness I am also allowed to reside.

Facebooklinkedin
Facebooklinkedin

Cheap WiFi Upgrade Spurs More Expensive Follow-up

My son will be 14 in a couple of days. He’s definitely maturing, and developing pretty strong interests of his own. He’s taken over one of my flagship PCs, in fact. We’ve tricked it out as something of a mid-range gaming rig. With a Fatal1ty Z97 motherboard, i7-6700K processor, 32-GB RAM, and m.2 SATA 512 GB Samsung SSD it wasn’t too bad to start out with. But he added a Razer Black Widow Chroma keyboard, a Patriot V570 mouse, and an Asus GeForce GTX 1070Ti. We had to equip it with WiFi, though, because there’s no ready access to wired Ethernet in his room. This led us to a USB WiFi upgrade (described in my 1/14 post, “Time Boosts (New) Wireless Hardware Throughput.” A recent ISP upgrade from 300 Mbps to Gigabit meant this cheap WiFi upgrade spurs more expensive follow-up, though. Let me explain…

Why a Cheap WiFi Upgrade Spurs More Expensive Follow-up

The boy’s also becoming something of a videophile. His favorite shows right now include content available online, some on NetFlix, some on Hulu. We decided to rearrange our video streams and purchase subscriptions to both. At the same time, we bumped our Internet speed as described, and removed our premium video feeds (nobody ever watched them). This freed up enough money to cover both subscriptions and the added cost of Gigabit  Internet.

On Friday, a technician came by to drop in a new Gigabit capable cable modem, and a standalone router. That router includes 801.11 1700ac WiFi support. This should’ve bumped the wireless speeds on my son’s machines to unexplored heights. Instead, when I tested his rig it dropped from 90-110 Mbps to under 10 Mbps. It didn’t matter if we used the old Asus or the new Trendnet USB dongles. However, my 802.11ac-equipped Surface Pro 3 when put on his desk, showed upload speeds over 400 Mbps. The technician’s iPad clocked a respectable 140-plus Mbps, and my 6-year-old Lenovo X220 802.11n Tablet got about the same speeds, too.

That’s why we concluded the issue lay with the USB dongles, not the router or its WiFi module. This was puzzling, though, because the older Arris box worked much better with those same devices. But, for whatever reason, they just didn’t jibe well with the new Arris RAC2V1A router. At the technician’s urging, I went back to Fry’s yesterday and purchased a “real” PCI-e 802.11ac NIC with external antennae. It’s an ASUS PCE-AC56, rated at up to 867 Mbps. Normally, it costs $65 but I lucked into a sale at Fry’s for $25 off, and picked it up for around $45 including sales tax. Here’s a product photo:

Cheap WiFi Upgrade Spurs More Expensive Follow-up

With some trepidation, I plunked down another $50 to switch from external USB to internale PCI-e WiFi access.

Fortunately, the investment turned out to be well worth it. From prior speeds of 90-100 Mbps on the older router, the new internal NIC started clocking speeds from 450 – 480 Mbps right after we rebooted the PC following its installation. I didn’t realize that the switchover from USB to PCI-e would be so dramatic. Otherwise, I wouldn’t have bothered spending the money on the Trendnet USB adapter in the first place. Now, however, we’ve got a pretty happy gamer upstairs. His wireless speeds today are better than any of our network speeds, wired or wireless, until the upgrade on Friday. Sometimes when a cheap WiFi upgrade spurs more expensive follow-up, the result is a happy ending. This, fortunately, is one of those times!

Facebooklinkedin
Facebooklinkedin

512 GB microSD Cards Are Coming!

Saw a fascinating announcement over on NeoWin this morning. UK company Integral Memory has announced release of a 512 GB microSDXC card next month (February 2018). No pricing information is available just yet. Even so, NeoWin speculates it will probably cost somewhere around US$249. Personally, it’s astounding that we can now pack half a TB onto a circuit card smaller than my thumbnail. That’s the same size, if not bigger, than all the SSDs I own. So buckle up kids: 512 GB microSD cards are coming, and will be here soon.

512 GB microSD Cards Are Coming!

The inexorable march of technology lets more than a few angels dance on the head of this particular pin, eh?

Get Ready: 512 GB microSD Cards Are Coming!

According to its legend and its maker, the card complies with the Video Speed Class 10 (V10) standard. That means users can record HD video to the device in real time. According to NeoWin, this card supports transfer speeds of up to 80 Mbps. That’s 20% slower than the 400 GB SanDisk card that ruled the size roost at 100 Mbps. Integral’s spokesperson, marketing manager James Danton, explains the target audience for this device. “The need to provide extended memory for smartphones, tablets, and a growing range of other mobile devices such as action cams and drones has been answered.”

At about the same price as a fast 500 GB SSD (a Samsung nVME 950 Pro goes for under $249 right now, while a 960 Pro goes for about $300), one wonders who really needs this device. But the appetite for storage is always there for some segment of the marketplace. I do get its appeal, particularly for GoPro and other mobile cameras that depend on ultra-compact flash storage.

As Capacities Climb, Older “Big Guns” Seem Smaller

I guess this size jump also explains why 128 GB microSDXC cards are cheap now. I bought one each for my Dell Venue Pro 11 and my Surface Pro 3 back in 2014 or 2015 when they were still pretty pricey, too. I’ve gotten good use out of those devices (but have neither the need nor inclination to buy up to this level). You can find them now for under $70 (quite a bit cheaper for slower media). When I bought mine, they were over $100 each.

Samsung is expected to release a 512 GB microSD card of its own manufacture sometime soon, too. I expect it will just be a matter of time before a 1 TB version comes down the road. Then, these pinnacle products have to step down a rung. Maybe then I’ll think about buying up!

Facebooklinkedin
Facebooklinkedin

Time Boosts (New) Wireless Hardware Throughput

A couple of days ago, my son mentioned that Internet speeds on his PC weren’t terribly impressive. So we went up to his room, and visited the Microsoft Store in Win10. While there we installed the handy “Speedtest by Ookla.” And indeed, the initial results weren’t impressive. 33.5 Mbps download speed, and 14.1 Mbps upload speed. Right now, my wired desktop churns out 335.5 download, and 20.93 upload, so I could feel his pain. It also led me to speculate that a new WiFi adapter might improve the situation. In fact, that’s why I entitled this post “Time Boosts (New) Wireless Hardware Throughput.” Continue reading Time Boosts (New) Wireless Hardware Throughput

Facebooklinkedin
Facebooklinkedin

Ed Earns Windows Insider MVP January 2018

On January 2, 2018, I received email notification from Joe Camp at Microsoft. It informed me that I was named a Windows Insider MVP for 2018. This comes mostly thanks to my good friend and frequent-coauthor, Kari Finn, who nominated me in 2017. But also, thanks to everyone who helped make “Ed Earns Windows Insider MVP January 2018” possible.

This award qualifies me to attend the next annual MVP summit in Redmond. It also gets me a variety of goodies, including free one-year Visual Studio Premium and Office 364 E3 subscriptions. But beyond those much-appreciated perks, I’m both honored and pleased to join the ranks of the Microsoft MVPs. I know well many of them well, and have followed and respected their work since this program kicked off in 1999. I’m especially grateful to MVPs Tom and Deb Shinder, Joli Ballew, Jerry Honeycutt, Shawn Brink, Robert Smit, and my friend and co-author Kari Finn.

Read more about the MVP award and its many distinguished holders on Microsoft’s “Most Valuable Professional” page. To learn more about Windows Insider MVPs in particular, and search their ranks, visit Windows Insider MVPs. To my amazement, I see there are over 150 such MVPs for Windows 10, not counting this year’s new admits (like me).

Windows Insider MVP logo

Thanks to the award, I’m allowed to use this logo for blog posts, email, and business cards.

But Wait, There’s More…

This same month — January, 2018 — also sees the launch of the website Win10.guru. Created in partnership with my friend and fellow Windows Insider MVP and co-author, Kari Finn, we plan to provide oodles of online content that includes how-to and other stories, editorial opinion pieces, and more. We will focus primarily on the needs of IT Professionals and power users who work with Windows 10 both professionally and seriously. Please check out this new site and, while you’re there, share your feedback and requests for coverage with us. Thanks!

Facebooklinkedin
Facebooklinkedin

Oh my! AOMEI OneKey Recovery Gets Interesting

I’ve been working with and learning about recovery partitions on Windows boot/system disks lately. My explorations led me to a decent but flawed tool that does some nice things for Windows OS recovery. It’s called AOMEI OneKey Recovery, and it’s available in both free and commercial versions. In theory, installing this program is easy. You must make space on your system/boot drive. Then, AOMEI OneKey Recovery adds partitions to that disk for boot-up and repair. As a bonus, its recovery partition incorporates a backup of your Windows OS partition. But in practice, AOMEI OneKey Recovery gets interesting. It’s particularly so when it comes to sizing the disk space that the program needs for its partitions. Here’s what the nominal 256 GB SSD drive on my Dell Venue Pro 11 7130 looked like when the program finished its work:

AOMEI OneKey Recovery Gets Interesting

Alas, considerable trial and error was required to properly size the F: partition I had to give AOMEI OneKey Recovery to work with.

Lack of Sizing Data Means AOMEI OneKey Recovery Gets Interesting Indeed!

To begin with, the program provides no guidance on how to size the partition from which it will create its partitions. These are labeled AOMEI and AOMEI Recovery Partition in the preceding screen capture from the Disk Management utility. I started small (at around 2 GB), and went through too many muffed attempts last night. I got increasingly vexed as I kept upping the size of the F: partition that OneKey Recovery used for the AOMEI partitions shown. For each try, I had to use MiniTool Partition Wizard to reduce the size of the C: partition. Then I used that space to expand the F: partition. Things didn’t work until the F: partition hit 44 GB in size. Finally, it created the disk layout depicted in the preceding graphic.

The problem was, resizing the C: partition requires a reboot to do its thing. For each attempt, I used MiniTool Partition Wizard to shrink the C: partition. Then I could grow the F: partition by the same amount. Each iteration took 3-4 minutes to complete because of the time involved in shifting partition boundaries and waiting for the reboot to complete. By the time I’d done this five times I was ready to spit nails. Surely AOMEI could expend the programming effort necessary to analyze the files on the C: partition and estimate the partition size needed to accommodate them? I would have been much happier with my experience in using the software if I didn’t have to keep repeating my attempts to set up those pesky partitions.

It’s Not All Tar and Feathers, However…

To give credit where it’s due, AOMEI OneKey Recovery was reasonably well-behaved aside from the lack or partition sizing information or guidance. It added itself nicely to my Boot Configuration Database (BCD data) on the Dell Venue Pro 11. Better yet, it didn’t mess with the Macrium Recovery Partition already installed on that drive. In testing of its onekey functionality, it worked quite nicely. The program offered to restore my backed-up runtime environment to the C: partition without a hitch. It took about 10 minutes to create the two partitions shown. Thus, I’m guessing it would take about the same amount of time to restore the contents of its Recovery Partition to C:, should that become necessary. I’ll try it out this weekend, when I have some spare time to devote to that task. I’ll follow up with an update then.

On balance I think this is a good tool for a free program. But because it does require resizing of the C: partition to create the space needed for its partitions, a commercial partition manager is needed to put it to work. Not coincidentally AOMEI makes one of those, too. But I prefer MiniTool Partition Wizard, mostly because I already know and understand how to use that program.

Facebooklinkedin
Facebooklinkedin

Author, Editor, Expert Witness