Here’s another factoid that falls under the heading of “I didn’t know Windows 10 could do that.” In this case, the particular widget in question is Power Options (Control Panel). The right PowerShell command or its equivalent Registry tweak makes an NVMe item appear. Actually, this item occurs under the Hard Disk entry. Its full name is Primary NVMe Idle Timeout (see below). In fact, it defines an idle timeout value for an NVMe SSD in the boot/system role. Hence my post title: Windows 10 Power Options Include NVMe Idle Timeout. Here’s how it looks:
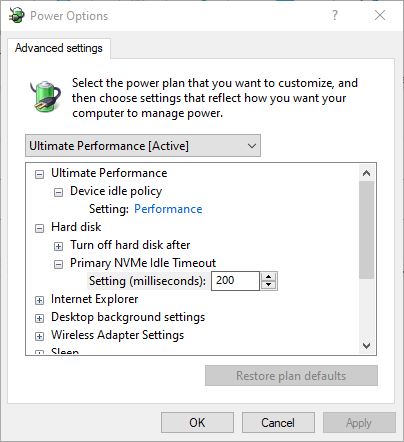
Until you enable this attribute (PowerShell) or set the right RegKey value, you won’t see this in Power Options.
In case you didn’t already know, NVMe stands for Non-Volatile Memory Express. Usually, it’s a kind of flash memory that might be a solid state disk (SSD), a PCIe add-in card, an M.2 card, or something similar. NMVe is incredibly popular because it’s fast and increasingly affordable. Nearly all of my newer systems boot from an NVMe drive. Lots of vendors make NVMe drives. Right now, my systems include such drives from Samsung, LiteOn and Toshiba.
Make Windows 10 Power Options Include NVMe Idle Timeout
In fact, to see this entry in Power Options, you must reverse Windows 10’s default setting. Thus, the operative part of the command string reads -ATTRIB-HIDE. The minus sign does the magic that makes the entry appear. You can cut and paste the whole string (shown below) into PowerShell. For illlustration, it’s also shown in the screencap that follows the command-line text input.
powercfg -attributes SUB_DISK D639518A-E56D-4345-8AF2-B9F32FB26109 -ATTRIB_HIDE

Entering the command gives zero feedback, but the change shows up immediately in Power Options.
[Click image for full-sized view.]
The following command string makes this NVMe entry invisible in Power Options:
powercfg -attributes SUB_DISK D639518A-E56D-4345-8AF2-B9F32FB26109 +ATTRIB_HIDE
Of course, the only difference is the plus sign in the final command element. The preceding value is a GUID for this particular Power Options setting.
Do It in the Registry, If You Prefer
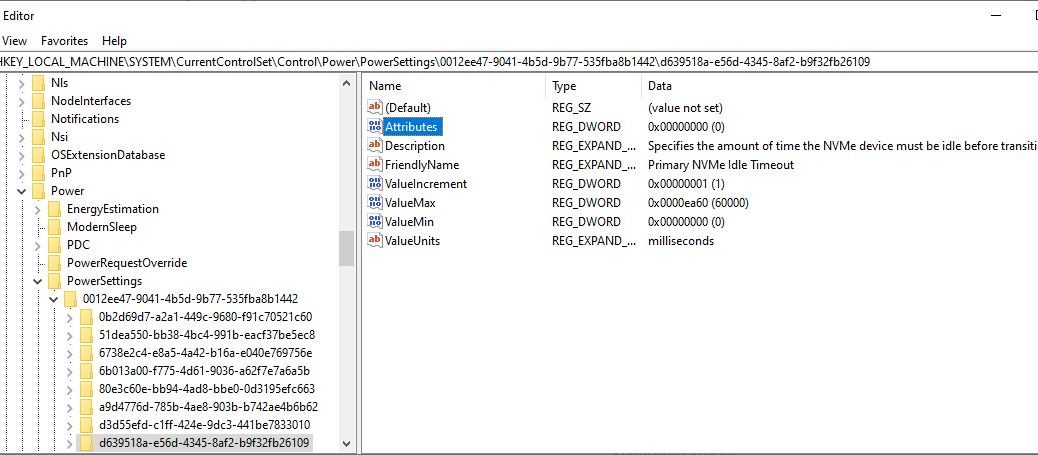
The name of the corresponding registry key is, in fact, the afore-cited GUID. The highlighted Attributes value controls if the NVMe item is visible in Power Options. Here again, a value of 0 makes the option visible; 1 makes it disappear. String alert! The fully-qualified registry key name is:
HKLM\SYSTEM\CurrentControlSet\Control\Power\PowerSettings\0012ee47-9041-4b5d-9b77-535fba8b1442\d639518a-e56d-4345-8af2-b9f32fb26109
Just for the record, HKLM is a common abbreviation for HKEY_LOCAL_MACHINE. For better visualization, here’s a screencap of all that good stuff:
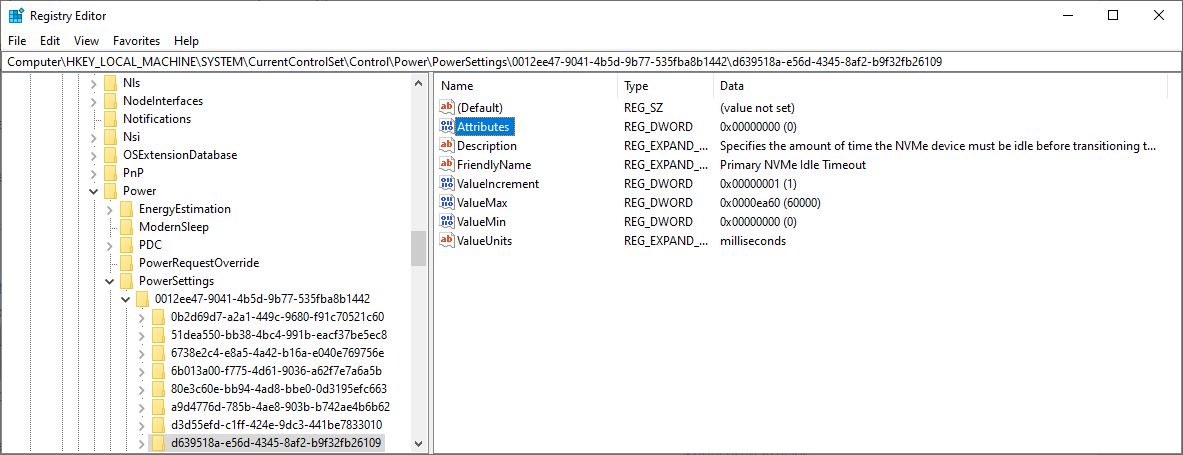
The complete registry location occurs just below the command menu line, and includes two (2) GUIDs in its path.
[Click image for full-sized view.]
Once again, a value of zero (0) for Attributes means the NVME timeout item shows up in Power Options. A value of one (1) means it’s hidden.
Does NVMe Idle Timeout Really Matter?
Looking at the default value (200 ms), I’m inclined to think not. That’s so fast that altering the value won’t affect the PC much (or at all). But it’s always interesting to learn something new about Windows 10. There’s a lot more going on in general, and in Power Options, than one might think. And who knows? Someday, this tidbit may come in handy.
[Note] Thanks, Sergey Tkachenko/WinAero.com for covering this topic. He posted on this topic sometime in the last 24 hours. (Alas, his posts aren’t dated.) Check it out: it’s entitled Add Primary NVME Idle Timeout to Power Options in Windows 10. Bolshaya spaciba, Sergey!