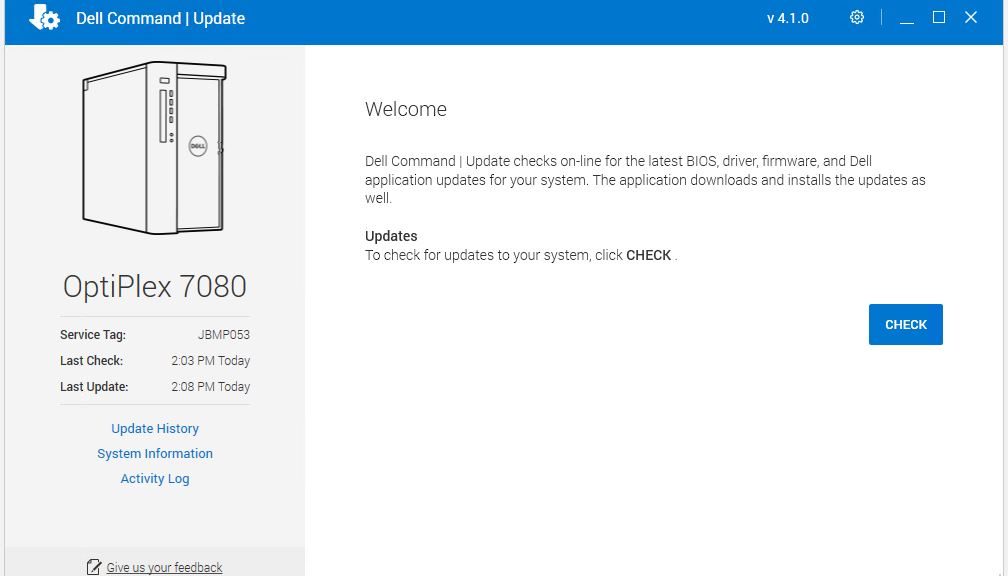
Category Archives: Tips, Tricks and Tweaks

Want to know how to make the most out of your Windows 7 system?
Here we share the things we have learned for what to do (and what not to do) to make Windows 7 perform at its best.

SSD-Z Is Interesting But Incomplete

I’ve been mucking around with SSDs quite a bit lately. Yesterday, that had me rooting around for a utility I could use to tell me more about all of my many SSDs. When I found a utility named SSD-Z (think of Frank Delattre’s outstanding CPU-Z) I was sure I had struck gold. Alas, it’s not quite at the same level as Delattre’s tool, even though it is pretty interesting.

SSD-Z Is Interesting But Incomplete.vertex4Why Say: SSD-Z Is Interesting But Incomplete?

The tool did a great job of telling me more about my older SSDs, If you look at the preceding screenshot, it’s pretty effusive and complete about my nominal 250 GB OCZ-Vertex4 SSD. But if you look at the next screenshot, it’s mostly mum about my no-longer-new-but-still-capable Samsung 950. This runs on my daily driver and is now 6 years old, and still gets the job done.

SSD-Z Is Interesting But Incomplete.sam950

Not much detail here.

What’s remarkable is how little information appears. There’s no data about flash technology, cells, controller, NAND or speed info. TRIM is supported, despite a counter-protestation. Sigh. I’m disappointed.

Upon further investigation, I see the developer hasn’t updated the tool since 2016 (not too much later than I bought the Samsung 950). I guess this is a tougher problem than one might think, at first. I’m sorry to say that SSD-Z doesn’t pass muster, though it does provide a good model of what might be possible, given enough SSD data from the community.

Vendor Tools Might Be More Informative

In looking at an Enterprise Storage Forum story from 2019, I see that vendor tools are most likely to provide details about controller, flash technologies, and so forth.  Samsung, Intel, OCZ, Crucial, and Kingston come in for specific mention. And indeed, Samsung Magician tells me more about all of my Samsung SSDs — even OEM models — than does SSD-Z. The same is true for other vendor-specific tools, when one has drives from those vendors to check into.

Gosh! I’d love to see SSD-Z deliver on its implicit promises. We could all use a utility like that, right? The TechPowerUp contributor behind this tantalizing item, Aezay, has not posted there since 2018. If he’s out there and paying attention, I’d be happy to co-drive a crowdfunding effort to do this tool right, and help the whole community. This leads me to echo the excellent Pink Floyd lyric: “Is there anybody out there?” And that’s the way things go sometimes, here in Windows-World.

Stay tuned: if anything interesting turns up, I’ll report back. Yowza!

Facebooklinkedin
Facebooklinkedin

New Device May Require Second Reboot

In installing the Kioxia (Toshiba) M.2 SSD late last week, I was reminded of something interesting. Hence this article title: new device may require second reboot. In my rush to set up and learn more about the drive, I was initially surprised to find it absent when I first ran Disk Management (diskmgmt.msc) to get that process going. Then it hit me: maybe it’s not showing up in UEFI.

But to access UEFI, another reboot was required. And by the time i did that, sure enough the device appeared in the list of drives present in the 7080. However, I had to reboot a second time to see the UEFi/BIOS settings and that produced the results I was after.

Why New Device May Require Second Reboot

Sure enough, when I rebooted a third time to get into Windows, the drive appeared in the Disk Management utility. I was able to choose GPT disk layout, and to format the drive as a single contiguous volume named Tosh1TB. It shows up as “Disk 1” in the lead-in graphic for this story, in fact.

What sometimes makes a second boot necessary is the way that UEFI/BIOS supports device enumeration. On many laptops, certain changes to the hardware — especially RAM changes — automatically trigger a trip into the BIOS interface upon the next reboot. This gives admins a chance to make and review config changes before booting back into the OS.

Adding the Kioxia (Toshiba) 1 TB SSD didn’t trigger the UEFI on its own. But when I rebooted and forced a trip into that environment, the Toshiba device (identified as such in BIOS, not as Kioxia) appeared along with the primary SSD. The second trip was enough to see the device recognized in BIOS/UEFI. In turn this made it accessible to Windows when I returned to that environment. That’s how I was able to choose GPT layout, format the drive, and give it the name that appears in the screenshot above. Case closed!

Don’t Panic: Boot Again

If you find yourself in similar straits sometime, try another reboot (or two, actually). That will probably get the device recognized and make it available to Windows. Only if this fails should further troubleshooting be needed.  In that case, I’d start looking into possible SATA lane conflicts next.

Facebooklinkedin
Facebooklinkedin

So Long Adobe Add-ons Shockwave & Air

At the end of last year, the Adobe Flash Player hit end of life (EOL). Yet today, when I ran the excellent free Patch My PC Updater on one of my test machines, I noted that Adobe Air was still present, plus Shockwave. too. My thought was; “Time to say so long Adobe add-ons Shockwave & Air!” Upon checking into both, my presumption proved valid. When I checked for Adobe elements on my 2012 Vintage X220 Tablet, I found serveral related elements, all of which I’m removing post-haste (see lead-in graphic).

Why say: “So long Adobe Add-ons Shockwave & Air?”

Both Shockwave and Air are at End-of-Life, at least as far as Adobe is concerned. HARMAN International has taken over Adobe Air support. But I hardly ever use this, so I’ve decided to uninstall on PCs where it’s still present. Not surprisingly it’s absent on all of my PCs acquired in 2018 or later, including 2xLenovo X1 Yoga 380, X1 Yoga 390, and X1 Extreme, among others. The free version of Revo Uninstaller is more than equal to this task. That’s why I used it to generate the lead-in screencap for this story, and to remove Air and Shockwave from machines where they’re still hanging ’round.

For the record, uninstalling Air left 2 registry keys and one value behind, as well as 3 files. Revo happily cleaned those up. Shockwave left 1 key with 13 values and no files behind, and took care of two entries (the one I selected, plus another) on its own.

More Info on Air & Shockwave

Read more about the future and status of these Adobe components online. Check out “The future of Adobe AIR” (5/30/2019) and “End of life/…Shockwave Player” (April 9, 2019). Going, going gone, and (hopefully) soon forgotten. Don’t need ’em or want ’em anymore. Sayonara!


Facebooklinkedin
Facebooklinkedin

Further Windows Explorer Restart Follies

First: an admission. I occasionally have problems with losing access to the Start Menu, and getting Taskbar icons to respond to mouse clicks. I’m pretty sure my troubles are self-inflicted, and come from some interaction with Stardock Software’s Start10. I’ve used some variant of this software since Windows 8 Release Preview emerged in May 2012. Recently, I’ve experienced further Windows Explorer restart follies, as I’ve attempted repair and recovery. That said, the never-fail fix for these symptoms remains “restart Windows Explorer in Task Manager.” In attempting that fix recently, I came a across a new and amusing wrinkle this week. Let me explain…

What Do Further Windows Explorer Restart Follies Entail?

As I mentioned, the fix involves restarting Windows Explorer. When I went to attempt that fix earlier this week, Windows Explorer wasn’t showing under the Apps heading in Task Manager’s Processes view (see lead-in graphic for example). What to do?

You can’t right click something that’s absent to get to the Restart option in the menu shown above. So I did the obvious: I launched an instance of Explorer by clicking its folder icon in the Taskbar. This launched Explorer.exe, and caused the Windows Explorer item to appear where it was needed. Then, it was simple to right-click that entry, pick Restart and forcibly restart the explorer process.

Thankfully, as it always has before, this fixed whatever was wrong with my Taskbar icons and the built-in Start Menu. I’m not sure how long this has been going on. It’s been a while since I last had this problem. But my recollection is that because the Explorer process always runs in the background — it’s necessary to support the Start Menu, Taskbar, Notification Area and Action Center — it used to appear by default under Apps in Task Manager, too. Apparently, that’s no longer the case in 19042 and 19043 builds.

I proceeded from this principle: “If no Windows Explorer shows in Task Manager Apps, then put one there.” That makes it easy to restart. ‘Nuff said.

Facebooklinkedin
Facebooklinkedin

Three-Key Method Enables Instant Screen Snip

I collect and treasure cool keyboard shortcuts. I just learned a fantastic one, from long-time TenForums Guru @Berton. He rightfully describes himself as a “Win10 User/Fixer.” If you press these three keys together: WinKey+Shift+S you’ll launch the newfangled Snip&Sketch screen capture tool built into Windows 10, ready to capture whatever you like. I say this three-key method enables instant screen snip because there’s no need to launch the app to start the capture process in motion.

Which Three-Key Method Enables Instant Screen Snip?

I have to laugh at myself about picking up this tip from a third party. When you launch Snip & Sketch manually, the default screen that shows up is depicted in the lead-in graphic. There’s the tip, right there! (See above.)

You can launch Snip & Sketch in a variety of other ways, including:

  • from the Search box (typing “Snip &” usually suffices)
  • using the Screen Snip button in Action Center
  • entering explorer ms-screenclip: in the Search or Run boxes, or at any command line interface

What Makes the Three-Key Method Attractive/Useful?

It’s fast, easy, and happens immediately following key sequence entry. Because of my writing work, especiallly on Windows 10 topics, I’m capturing screens all the time. Anything that makes this faster and easier is a good thing for me. Others who labor in similar ways — tech writing or documentation, blogging, articles, and so forth — should find this equally useful.

I’m also giving myself the Homer Simpson “Doh!” award for not attending to the default app window’s poignant and informative message. It reads “Press Windows logo key + Shift + S to snip what’s on your screen without starting Snip & Sketch.” If only I’d thought about this (or tried it out sooner) I could’ve been doing this long ago.

That’s life for me these days in Windows World. I may not be first across the finish line, but I still (mostly) get to where I need to go. Tortoises rock!

Facebooklinkedin
Facebooklinkedin

Two Commands Boot Into WinRE

I had the good fortune to provide copy edit and feedback to an MS person who works with Windows 10 recovery tools recently. From the blog post involved in our back-and-forth, I learned that two commands boot into WinRE (that is, the Windows Recovery Environment). Of course, a restart is required to make this happen. It’s not like Advanced Startup in Settings → Update & Security → Recovery → Advanced Startup. That is, you won’t immediately restart your PC as you do when clicking its “Restart now” button. I almost fell over when I tried that out for the first time!

Which Two Commands Boot Into WinRE?

One I already knew about, the other is a welcome and interesting surprise. The surprising one uses a special switch for the Windows RE configuration tool — namely REAgentC. Turns out there’s a special option named “boottore” that does the trick. If you parse the string properly, it’s self-advertising: “boottore” = “Boot to R(ecovery )Environment.” Thus, that complete command is:

reagentc /boottore

The second one is a special version of the good old, familiar shutdown command. It takes two parameters–namely:

  • /r Restarts the computer after shutdown
  • /o Goes to Advanced boot options menu and restarts device, then boots into WinRE

Thus, the complete command is:

shutdown /r /o

What’re These Commands Good For?

Good question. In this modern era, transfer of control to the Windows loader often occurs extremely fast. This means that it can be difficult to impossible to interrupt the initial bootstrap process to divert over to an alternate boot menu — such as WinRE, BIOS/UEFI, boot device menus, and so forth. These commands put you in control over what happens after your next boot in advance. This has become my preferred method, because of the degree of control and guaranteed results that occur.

Shoot! Give one or both of them a try. You might come to like one or the other of them, too! For best results, run them in an administrative command prompt window or PowerShell session.

Facebooklinkedin
Facebooklinkedin

MediaCreationTool.bat Gets 21H1 Update

There’s an interesting spin on Microsoft’s Media Creation Tool available on GitHub. It’s known as MediaCreationTool.bat, and basically it allows users to build an ISO (or a bootable USB device) for any version of Windows 10 from 1507 all the way up to 21H1. By saying “MediaCreationTool.bat Gets 21H1 Update” I’m informing readers an updated version now includes 19043 Builds (21H1).

If MediaCreationTool.bat Gets 21H1 Update, Then What?

I wrote about this tool last year for Win10.Guru where you’ll find background and info about the developer. This GitHub project throws up a menu (see center of Command Prompt window above) that lets users pick the version of Windows 10 for which they want to grab an image. As MCT has always done, it lets them apply an update to the current PC. More commonly, it also lets them create an ISO or build bootable USB media with the chosen image aboard.

A couple of steps are needed to make the batch file usable, however. First, it won’t run unless it gets a .bat extension. You can right-click the GitHub page, select “Save-as” and then make sure to pick “All files” from the File type option. Otherwise, it saves with a .txt extension which must be removed through a file rename operation. Either way, you’ll want to open the properties for this file in Explorer, then click the Unblock button to make sure the OS doesn’t prevent its execution.

Using the Batch File Is a Snap

Then, open an Administrator: Command Prompt window, navigate to the directory where the batch file resides, and run it. I right-click the file name in explorer and grab the name from the Properties window. Then I can simply paste the string into Command Prompt to avoid re-typing. It’s what produced the lead-in graphic for this story.

Because the batch file changes each time a new Windows version comes out, you should get in the habit of visiting the developer’s home page for the script to grab the latest version. From there, click the “Raw” button to open a Web page with the latest version inside.

MediaCreationTool.bat Gets 21H1 Update.homepage

Click the Raw button at upper right and web page with the script text inside will open. Then you can follow the preceding “Save” instructions for your very own copy.
[Click image for full-sized view.]

I’ve gotten in the habit of naming the file to include the version number for the most current one it supports. Thus, I named the most recent such file MediaCreationTool21H1.bat. Hope that makes sense. Enjoy! Good stuff.

Facebooklinkedin
Facebooklinkedin

When WU Repairs Fail Try UUPDump

I’ve got two test machines on the Beta Channel release right now. The older of the pair — a 2014 vintage Surface Pro 3 — is stuck on KB5000842 and keeps throwing install errors. Others reporting into the TenForums thread on this update have had success using the terrific UUPdump tool to build a customized image to install 19043.906. So that’s what I’m trying, too. In general, my strategy is “When WU repairs fail try UUPDump” next anyway. Glad to see others use that strategy, too.

When WU Repairs Fail Try UUPDump.WUerror

A couple of failures, including a complete WU reset, means it’s time to change update strategies.
[Click image for full-sized view.]

Why Say: When WU Repairs Fail Try UUPDump?

The update installs fail each time with an error code of 0x800F081F. This is interesting, and a bit strange, because the error is often associated with the Windows Update Assistant nowhere present in this situation. It can also pop up when items are missing from the download packages that WU delivers to the desktop.

That latter reason explains why a switchover to UUPDump makes sense. It grabs the ISO-based image for the base OS version from MS servers  (19043 aka 21H1 in this case). Then, it uses DISM to apply all newer updates packages up to and including the problematic KB5000842 item that’s throwing the error here. It’s perfectly safe because it uses only Microsoft Servers as the source for its OS and update files.

Building the 19043.906 ISO File

Running UUPDump to build an ISO for a patched OS takes some time because of the many and various steps involved. For the SP3 PC, it took over an hour before it got stuck mounting the image for Build 19041.1. That’s when I realized it makes sense to run UUPdump batch files on the fastest PC around.

Thus, I ran the same job on my Lenovo X1 Extreme, with its 6-core i7-8850H CPU. Given more threads and a faster CPU and much faster Samsung OEM PCIe x3 SSDs, it ran noticeably faster, though the KB5000842 cab file update still took 5 minutes to complete (click “view image” inside the lead-in graphic for this story). The whole thing still took 35 minutes from start to finish.

And it went that fast only because we have fast (nominal GbE, actual 900 Mbps or so) Internet service here at Chez Tittel. What takes the real time, however, is bringing the windows image (.wim) file up from base level Build 19043.844 to the current/highest level Build 19043.906. This takes several steps, each one involving mounting the image, adding packages, the dismounting the image, and continuing forward. There’s some mucking around with a WinRE.wim file along the way, too.

Performing the In-Place Repair Install

This is the easy part: mount the image, run setup.exe and let the installer do its thing. This takes a while, too — considerably longer than applying the update would (checking the PC, agreeing to the EULA, checking for updates,  and so forth; then finally into OS installation). This entire process took another hour or so to complete. But here’s the end result, straight from winver.exe:

When WU Repairs Fail Try UUPDump.final

All’s well that ends well: here’s Build info from the upgraded SP3, right where I want it to be

More About UUPDump

I’ve written about UUPDump for numerous other sites, including TechTarget and Win10.Guru, both for my Windows Enterprise Desktop blog. Here are some links, if you’d like to learn more:

  1. UUPDump Invaluable Resource (TechTarget)
  2. A Peek Inside UUPDump (Win10.Guru) includes a brief interview with its developer who goes by the handle “Whatever”
  3. UUPDump Outdoes Windows Update (Win10.Guru)

Cheers!

Facebooklinkedin
Facebooklinkedin

Lenovo Vantage Updates Take Patience

Here’s a sticky situation I’ve found myself in more than once. I’m reasonably fond of the Lenovo Vantage update tool, which handles BIOS, firmware, driver and ancillary software updates pretty well. Occasionally, two or more updates requiring a reboot appear together therein. That’s what happened today, as an Intel Manage-ment Engine (IME) firmware update and a BIOS update appeared in tandem. It’s also what reminded me that Lenovo Vantage updates take patience.

Why Say: Lenovo Vantage Updates Take Patience?

This doesn’t happen with Windows Update, but when you’re applying low-level updates to a system, items that require a reboot must be applied one at a time. I’ve learned this working with Vantage over the past few years. If a firmware update and a BIOS update show up on the same day, it’s best to download and install one by itself. Then, repeat for the second item.

What happens if you try to do more than one? When you attempt to install the second item with a reboot pending, installation fails because it is smart enough to recognize that two separate and distinct reboots are needed.

I don’t always remember this, so I got bitten today when Vantage finished the pre-reboot phase of the BIOS update and transitioned into the IME update. As soon as the IME update got going, it stopped itself and reported an error. Part of the text read “An installation failed to complete properly. Please reboot and try again.”

The Reboot’s the Thing

Of course, as soon as the reboot got through shutdown and into restart, the BIOS update ran to completion and the system rebooted again. After that reboot, I returned to Vantage to generate the lead-in graphic for this story that shows the IME firmware update still pending. As soon as I clicked install, I got an explicit reboot warning, to wit:

If I’d run the sequence IME first, BIOS second, I’d have seen this warning right away, and not been caught in an error. Sigh.

In general, it’s a good idea to make firmware and BIOS changes piecemeal anyway. You don’t want more than one thing at a time to blow up. That could complicate troubleshooting beyond belief. That’s NOT what anyone wants when making deep-level system changes.

Live and learn — or in my case, keep living and get an occasional reminder. Cheers!

Facebooklinkedin
Facebooklinkedin

Windows 10 Driver Go-To Tool DriverStore Explorer

I’ll confess. I’ve been a fan of lostindark’s DriverStore Explorer tool for a decade or more now. Aka RAPR.exe, this tool lays bare the complete contents of the Windows DriverStore for versions 7 and newer. It also makes it pretty easy to clean up old drivers, thanks to its “Select Old Driver(s)” (SOD) button. That what makes my main Windows 10 driver go-to tool DriverStore Explorer. Accept no substitutes!

Windows 10 Driver Go-To Tool DriverStore Explorer Shows ALL Drivers

If you look at the lead-in graphic for this story, you’ll see 8 copies of the same Intel Bluetooth driver installed on my Lenovo X1 Extreme (Gen 8) laptop.  Three older versions of the same driver are also present. When I click the SOD button, 6 copies of the 1/22/2021 driver get marked, along with all 3 2020 versions. When I then click the “Delete Driver(s)” button, and confirm that instruction, exactly 2 copies remain behind. Because they’re different sizes  — one is 2 MB, the other 6 MB — I conclude they’re different even though they share a common filename. All the rest of them (31 MB total) are gone.

Some Drivers Are Special Cases

Sometimes, when you use the SOD button, a selected driver won’t be deleted. Typically, that means the still-present item is in use, despite being older than something else also present in the DriverStore. You can force deletion on such items, but are risking system instability by doing so. I recommend against this unless you’re dead sure the newer driver will work correctly.

Even so, I typically recover anywhere from 50MB to several GB of disk space when I use RAPR to clean out my Windows 10 DriverStores. Nvidia graphics drivers are particularly big space consumers (and generally run from 900 MB to 1.1 or 1.2 GB in size). Cleaning up a half-dozen of these can recover some real space.

Try it for yourself. You can’t help but like it. Visit the GitHub page for more information and the most current download. As I write this story, that version is numbered v0.11.64.


Facebooklinkedin
Facebooklinkedin