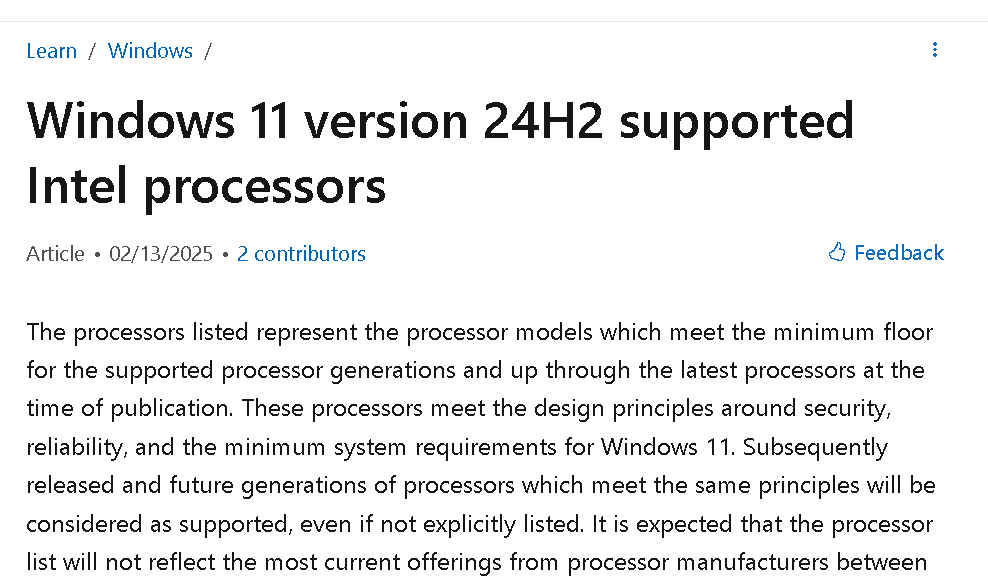
Category Archives: WED Blog

Beta Build 22631 Loses Update Button

It’s not the first change I encountered in this new release. But as soon as I visited the Windows Update page in settings (see lead-in graphic) I couldn’t help but notice that Beta Build 22631 loses Update button. It’s not just gone either — it’s also resistant to restoration according to all known fixes. I felt a little better when I tuned into the ElevenForum discussion for the release and learned that my problem was pretty common. So now, I just chuckle when I think about things.

One of the recommended fixes was to pause (then unpause) updates. As you can see from the lead-in graphic as well, I did that. But there’s no button to turn the updates back on, either. So while I’m chuckling again, I’m down another button. Sigh.

Getting Updates, When Beta Build 22631 Loses Update Button

Even as the obvious approach to updating goes MIA, there are ways to make Windows 11 check for and install updates. I found two pretty good methods that do the trick.

The Windows command USOClient StartInteractiveScreen will actually run WU just as if you’d clicked that missing button. Indeed, if you open WU and watch the top of the screen after you fire off this account you’ll see the panning progress bar as it performs its check.

Beta Build 22631 Loses Update Button.uso-fix

Even though WU is paused, running the USOClient command as shown above still runs the update check anyway.

There’s also a PowerShell Module named PSWindowsUpdate you can install from the PowerShell Gallery (a favorite or at least recurring haunt of mine lately). To add it to your PowerShell environment run this command string:

Install-Module -name PSWindowsUpdate -force

This provides access to the Get-WindowsUpdate and Install-WindowsUpdate cmdlets. As the names suggest, the former shows you what updates are available, while the latter provides a variety of means to install updates by KB ID or name (both values appear in the Get-… output which is handy).

Where There’s a Will…

While we’re waiting for MS to fix this odd little deficit in this Beta release, there are workarounds available to keep things going. It gave me a chance to learn a few new tricks while working around the missing button. And that’s just the way things go sometimes, here in Windows-World.

Note Added September 7: It’s Baaaaaaack!!

OK then: I’m back from a 10-day hiatus for some cool weather in Maine and getting son Gregory moved into his Boston-based college dorm. I just checked WU and the “Check for updates” button is not only back — it also works as expected. Knew this couldn’t last long. Cheers!

Facebooklinkedin
Facebooklinkedin

Occam’s Razor Cuts My Intel PROset Problem

OK, then: let’s take a short trip back to medieval England (14th century) and drop in on philosopher William of Ockham. His original Latin epigram is “Entia non sunt multiplicanda praeter necessitatem.” That’s often translated as “Don’t add more factors to an explanation than are strictly necessary.” Many people take it to mean “The simplest explanation is usually the best (or correct) one.” From a troubleshooting standpoint, I take a different lesson.  Eliminate the obvious causes before looking for more exotic ones. And indeed, yesterday Occam’s Razor cuts my Intel PROset problem. I discover it’s the software itself that prevents its installation on Windows 10.

Why Say Occam’s Razor Cuts My Intel PROset Problem?

You can see why I had to haul this old blade out of storage by examining the lead-in graphic. It’s from the Release Notes for the latest version of the Intel PROset and driver software for its wired Ethernet adapters, including for Windows Client OSes. Take a close look at that list. Then consider the version of Windows 10 for which I sought to install this latest 28.2 version — namely Windows 10 22H2.

The installer fired up just fine, but then it took quite a while to do anything. Instead of asking my persmission to commence installation, I got this error message instead:

Occam's Razor Cuts My Intel PROset Problem.10-22H2-error

Despite repeated efforts, I got only this when attempting an install on Windows 10 22H2.

After a couple of failed tries, I figured I’d better check the release notes. And sure enough, I saw what’s missing in the lead-in graphic. This release does NOT support Windows 10 22H2. And that, of course, is why I get that error message. Given that 22H2 is the current Windows 10 version and that 21H2 hit its EOL date on June 13 (a couple of months ago), I have to believe this was a mistake on Intel’s part. But it is what it is, and I have to wait for them to fix it. Until then, I’ll keep running the preceding driver version. Sigh.

FWIW, I just summarized this info in a post to the Intel online forums for their Ethernet adapters and software. I’ll be interested to see what kind of response it evokes, if any. Stay tuned!

Facebooklinkedin
Facebooklinkedin

Sideload Brings Windows 10 New Photos App

Here’s something interesting. Thanks to eagle-eyed software maker and reporter Sergey Tkachenko, I’ve just learned you can grab the new Windows 11 version of the Photos app and install it on Windows 10. On 11, it comes from the Windows Store; if you’re left out, a sideload brings Window 10 new Photos app. See the WinAero story Windows 11 Photos app now supports Windows 10 for pointers and such.

How Sideload Brings Windows 10 New Photos App

If you examine the lead-in graphic closely you’ll see the About info for the Windows 11 version of Photos (lower left). Once you download and install that version, the Store offers a renamed version of its predecessor as “Photos Legacy” (right, with about information at bottom). I installed that also to keep my existing (and enormous) trove of meta-data and image info available. Just for grins, I superimposed winver.exe at right center to show it was all indeed running on Windows 10. Good stuff!

One thing: you will visit the mirror of the Microsoft Store downloads to grab the Windows 11 version of Photos for Windows 10. When you do, scroll down to the first Microsoft.Windows.Photos entry that ends with the extension .msixbundle. That’s the one you need to actually perform the install.

It will ask you if you want to update Microsoft Photos? Click the Update button.

Then it will go through the update process and actually install the Windows 11 version on your Windows 10 PC. As soon as it’s done the Store will offer you the Photos Legacy app as well.

So now, I have both the old version (Photos Legacy) and the new version (Photos) running on my Windows 10 PC. As I watch what happens with this new addition to my app stable, I’ll report further if I see anything noteworthy. So far, it all seems pretty routine.

Facebooklinkedin
Facebooklinkedin

Backing Up P16

I’ve recently swapped out the Lenovo loaner unit for the ThinkPad P16 Mobile workstation here at Chez Tittel. In the same recent period, I’ve written stories for AskWoody about using USB and Thunderbolt versions 3 and 4 for a variety of purposes. When it comes to using any of those technologies with USB-C attached NVMe drives, backup looms large. And boy, are the results for faster storage hookups compelling when it comes to backing up P16. Let me explain…

TB4 Shines When Backing Up P16

The lead-in graphic shows a 1:03 completion time for an image backup on that device inside Macrium Reflect. That’s the fastest I’ve ever seen a full image backup complete on that (or any other) PC, whether to an internal or an external drive. Why doesn’t everybody do it that way?

Let me count the reasons:

  1. Not all PCs or Laptops have fast Thunderbolt4 ports.
  2. TB4 NVMe enclosures are expensive: US$130 and up. Count on spending at least another US$70 or so for a 1 TB NVMe to put inside same. In contrast, you can buy a portable 1 TB NVMe right now for about US$70 (but it’s not TB4, nor even TB3).
  3. One *MUST* use TB4 cables to get those results. Nothing else will do.
  4. USB-C ports can be scarce, so it may be necessary to acquire a TB4 dock. That’ll set you back another US$200-400 depending on ports and features.

But Hey! Look at Them Snappers…

All those caveats said and understood, 1:03 remains a remarkable timeframe for a full image backup. WizTree reports that the P16’s C: drive currently stores 82.8 GB’s worth of stuff. If I’m doing the math correctly that’s 10.48 Gbps as a backup speed. I’ll take it!

I spent over US$200 to put the NVMe enclosure to work, and another US$25 for a year’s worth of access to Macrium Reflect. Is is worth it? IMO, it is. IYO perhaps not…


Facebooklinkedin
Facebooklinkedin

Using Get-WUHistory Requires Finesse

I’m a big fan of PowerShell. That’s why I was excited to learn about a collection of cmdlets from the PowerShell Gallery named PSWindowsUpdate. Chief among its constituents is a cmdlet named Get-WUHistory that I’ve been finding both helpful and vexing. I say that using Get-WUHistory requires finesse because it works well on Windows 10, but hangs on PCs with longer “history trails” in Windows 11. Let me explain and illustrate what that means…

Why Using Get-WUHistory Requires Finesse

I’m only running Windows 10 on one actual PC (not counting VMs). By chance, that’s where I started working with the PSWindowsUpdate cmdlets. To begin with, you’ll need to install this collection, using this command:

Install-Module -Name PSWindowsUpdate -Force

If you haven’t visited the PowerShell Gallery before, you’ll be asked to grant various permissions so your PC (or VM) can access and use its contents. If necessary, please do so. Then, your installation will complete. After it’s done, you can use the Get-WUHistory command (among others — see a complete list of all 25 cmdlets from this package).

There’s something going on in Windows 11 that will sometimes cause Get-WUHistory to “hang.” How can you tell? The output won’t complete, you won’t get a prompt back, and the cursor keeps blinking. Indeed, it doesn’t even respond to CTRL-C to terminate the command. You must close the open PowerShell window (or tab) to regain control over Windows Terminal.

What’s the Trick to Make Things Work?

For some odd reason limiting the scope of output keeps the Get-WUHistory cmdlet working. Thus, in Windows 11 instead of simply entering Get-WUHistory at the command line, try this version instead:

Get-WUHistory -last 1000

This tells the cmdlet to limit its output to only the first 1000 entries it finds in the update history. Notice that on one of my test PCs, the actual number of entries in the update history is only 157 items, yet the command hangs anyway — except when it’s scoped. Go figure!

Unless scoped [-last 1000] Get-WUHistory hangs on Windows 11.

The lead-in graphic shows the first screen of output from a scoped version of the Get-WUHistory cmdlet. Notice that most of the updates relate to Windows Security (Windows Defender intelligence updates, antimalware platform updates, and so forth). Too much chaff, not enough wheat, IMO. Here’s a way to turn down the volume…

Reducing Get-WUHistory Output Volume

One can, of course, filter Get-WUHistory Output — in addition to limiting its scope — to reduce the output volume. Here’s a command string I found to be incredibly helpful in seeing what’s there, sans security-related stuff:

Get-WUHistory -last 1000 |
Where-Object {$_.Title -notlike "*Security*"}

What you see broken across two lines (or more) in the preceding is actually a single (if complex) PowerShell command string. Be sure to remove or ignore any internal line breaks when running this inside Windows Terminal. You’ll get back a mercifully much shorter list of items, mostly cumulative updates (CUs), MSRTs, Update Stack Packages, and the odd antimalware platform update. As you can see, this cuts 157 items down to a more manageable 12. Good stuff!

Eliminating the word security in the “Title” field filters out most of the dross. [Click image for full-sized view.]

Facebooklinkedin
Facebooklinkedin

Persistent Windows Intelligence Update Failure

For the past two weeks and more, I’ve had a recurring problem on one of my Canary Channel Insider Preview test PCs. On that Lenovo ThinkPad X380 Yoga, each time I run WU the same error appears upon completion. It reports a specific installation error  — namely 0x80070057 for a so-called “Windows Intelligence Update.”  And despite all my research and repair attempts — including use of TenForums excellent reset/re-register batch file — nothing has cleared this error message. That’s why I see it as a persistent Windows Intelligence Update failure mystery.

Handling a Persistent Windows Intelligence Update Failure

I’ve been hoping — perhaps against the odds — that some new feature update would fix this issue. But so far, it hasn’t. What makes this whole thing a mystery is that you can find these failures in Update history, they still don’t help illuminate things much.  Here’s a snapshot, which I’ll explain afterward as best I can:

Persistent Windows Intelligence Update Failure.other-history

Turns out this update shows up under “Other Update” but it references no related KB number.

Notice that the error repeats thrice (3) on both reported days. Though it’s been going on far longer than August 10 and 11, that’s all the information about this error that shows up in this update history view. Even checking alternate views using the old-fashion wmic command or the Get-WUHistory PowerShell cmdlet fail to shed further light What really vexes me is that this type of update includes no corresponding Knowledge Baase article number to explain what it is and what it does.

About that Error Message

If you look up the error code online, you’ll find a MakeUseOf story that includes these suggestions (I have bolded the one I think applies here):

Error 0x80070057 usually occurs when:

  • You are trying to back up your files, and there is corruption.
  • You are trying to install a Windows operating system and the System Reserved Partition is corrupted.
  • Corrupt registry or policy entries are interfering with the Windows Update process.
  • There were some problems installing updates, and the system will attempt to try again later.

Alas, this doesn’t tell me much about how to fix the underlying issues which have now persisted through two feature updates. I’ve attempted to fix the disk structure, run both dism /restorehealth and sfc /scannow, used the TenForums reset-reregister-WU batch file, and even run an in-place repair install. Nothing has worked. This remains a mystery despite my various attempts to find and fix things. If I can’t come up with another strategy soon, I may just perform a clean install and start over. Time will tell.

And that’s the way things go here in Windows-World. Sometimes you fix the error, and sometimes you have to extirpate it by starting over afresh.

Note Added August 18

Sometime earlier this week, this mysterious failure disappeared. I’m now able to run WU sans error messages of any kind. My WU update history shows no more failure messages either — but I do see two successful “Windows Intelligence Updates” therein. One’s on August 11 (the very day I filed this item); the next is on August 17 (yesterday). Even a more detailed examination with Get-WUHistory fails to turn those earlier issues up (but then, it got upgraded a couple of days ago. I think that clears earlier update history).

Facebooklinkedin
Facebooklinkedin

Winget Version Numbering Hiccup

Here’s an odd, but interesting, Winget situation. While setting up the replacement Lenovo  ThinkPad P16 Mobile Workstation, I installed CrystalDiskMark (standard “free” version). As you can see in the lead-in graphic, the maker’s website gives it a version number of 8.0.4c. This causes an interesting winget version numbering hiccup, because its manifest contains numbers only (8.0.4) rather than the complete version designator (8.0.4c). This causes an error when running the “do-everything” winget command — namely:

winget upgrade --all --include-unknown

The upgrade command grinds along for a good long while — several minutes, in fact — before it fails with an unexpected error, like so:

Winget Version Numbering Hiccup:c-error

Apparently, the manifest points to a badly-formed or MIA URL, so the upgrade can’t proceed.

Overcoming Winget Version Numbering Hiccup

Attempts to specify an version number (8.0.4), along with an explicit ID (CrystalDewWorld.CrystalDiskMark) likewise fail to complete  (same error message). Then it gets more interesting:

Winget is happy to uninstall the 8.0.4c version, as long as I specify it explicitly.

But winget won’t install CrystalDiskMark, so the only option is to download and install the maker’s version — which doesn’t work with winget right now. I’m communicating this to the winget team (via Demitrius Nelon). Hopefully they’ll figure out a fix. I figure the version number mismatch between the manifest (8.0.4) and the maker’s actual number (8.0.4c) is what’s causing the issue. As soon as that gets resolved, I image things will start working as they oughter.

We’ll see!

Facebooklinkedin
Facebooklinkedin

Foiling False Upgrade Positives

I use a collection of tools to keep my Windows fleet updated. These include winget (in PowerShell), plus KC Softwares’ Software Update Monitor (SUMo) and PatchMyPC Home Updater. Occasionally one or more of these tools will throw a “false positive” — that is, report an update that doesn’t exist. When that happens I have my way of foiling false upgrade positives to prevent wasting time. Let me explain…

About Foiling False Upgrade Positives

This is a case where one tool can occasionally backstop another, so that one tool’s claim of an existing upgrade can be challenged successfully. Case in point: the item SUMo reported this morning, which refers to a new version of Microsoft PC Manager numbered 3.4.6.0 — look at the lower right in the lead-in image above. A quick hop to the home page for Microsoft PC Manager (Beta), a download (you’ll find two buttons there), and display of Properties details from that  download shows:Foiling False Upgrade Positives.pcmgrproperties

Notice the version number reads 1.2.4.22027. Compare that to the “Version” column in SUMo: same!

Likewise, when I turn to winget inside PowerShell, I use its “list” command to show me what’s on my machine, then use its “show” command to show me the latest manifest in its public database. Again, both agree. That tells me pretty unequivocally that the latest version is indeed 1.2.4.22027 — and that’s the one I’ve already got. SUMo, in asserting that version 3.4.6.0 is the most current, is somewhere off the beaten track.

What Now, Young Jedi?

I’ve got Kyle Katarn’s email and twitter feed at my disposal. So when something like this happens with SUMo I send him a message saying what SUMo reports and what the software maker (MS in this case) tells me. He’s usually very quick about fixing false positives (on a same-day basis, in fact). Ditto for issues with winget (I likewise interact with Demitrius Nelon, Winget Team Lead at MS). He is also responsive to feedback, and often provides same-day fixes as well. So far, I’ve not yet had a false positive experience with PatchMyPC (but it covers far fewer software items than SUMo’s 400+ and winget’s 2000+ manifests).

Good stuff!

Note Added August 9 Afternoon

At 4:15 PM Central (-05:00 GMT) Mr. Katarn sent me a message this item had been fixed. Ran SUMo again, and sure enough: the false positive is gone. THAT’s what I call customer service…

Facebooklinkedin
Facebooklinkedin

Replacement P16 Goes Through Intake

OK, then: I started working on the replacement Lenovo ThinkPad P16 Gen1 Mobile Workstation. It showed up at the house on Friday afternoon. Because I was on deadline I didn’t get to begin until Saturday afternoon. I kicked things off upon return from our usual weekend food shopping trip.  As this replacement P16 goes through intake here at Chez Tittel, I’ve been keeping track of what (and how) I put it back to work. That started yesterday, for an upcoming AskWoody story about USB3/4 interfaces. Buckle up: there’s a lot to cover…

Following Along as Replacement
P16 Goes Through Intake

The unit appears with a password-less login into a Lenovo account, to make it easy for reviewers to get in and start working. I always add an admin account tied to one of my Microsoft logins and switch over to that going forward. Then I logged into my office WAP for a Wi-Fi connection, and made sure everything was up-to-date. The very next item was a Macrium Reflect install (commercial license) so I could capture a pristine backup to an external TB4 USB-C attached NVMe drive.

After the initial snapshot was saved, I added a bunch of applications using the PatchMyPC Home Updater. It’s as good at new installs as it is at updating the applications it knows how to handle. Here’s the list of what I used it to install:

7-Zip                 CrystalDiskMark        IrfanView
8GadgetPack           VoidTools Everything   SUMo
Advanced IP Scanner   FileZilla              Revo Uninstaller
CPUID CPU-Z           Google Chrome          Speccy
CrystalDiskInfo       GPU-Z                  WinAero Tweaker

There were a few other odds-n-ends I had to grab to customize Windows Terminal to my usual set-up. This meant using Install-program to install Winfetch, downloading and installing nerd fonts, then going through the OhMyPosh set-up drill to customize my Windows Terminal prompt. I also checked device drivers (and updated the BIOS [UEFI] to version 1.21, using Lenovo Commercial Vantage). A quick download and check of the Intel DSA updated my Arc graphics, Wi-Fi and Bluetooth drivers and supporting software, too. Total time invested: somewhere between 7 and 8 hours over 2 days.

All’s Well … and Working Well, Too!

Yesterday I started working on my AskWoody story and learned a few things I didn’t know about the already familiar P16 ThinkPad. This unit has 64GB RAM (rather than the 128GB as in its predecessor).  USB-A Port 5 (see tech specs) is supposedly USB 3.2 but behaved like USB 2 when I ran CrystalDiskMark on an mSATA device. It jumped to more normal non-UASP SSD speeds when I used a USB-AtoC converter and plugged it into Port 10.2 which is listed as a pair of TB4/USB4 USB-C ports on the rear edge of the laptop. Much better!

So now, I’m back at work and making headway using the replacement P16. Once again, my thanks to the Lenovo Reviews team for their prompt and friendly turnaround on restoring my ability to work (and test) unfettered on this beast of a laptop. Go team!

Facebooklinkedin
Facebooklinkedin

Some Deletions Are Easier Than Others

Whoa Nelly! I just came off a Windows filesystem adventure. Apparently, the 2TB 2.5″ HDD used for peripheral storage on the Boss’s Dell SFF D7080 PC once served somebody as a system disk. That’s the only way I can explain how two System-owned folders named ProgramData (hidden, too) and Users popped up thereupon. Making them go away led to this post’s title — namely, some deletions are easier than others. Let me explain…

Why Some Deletions Are Easier Than Others

Part of the difficulty stems from Dell, and part from Windows. On the D7080 to get into WinRE from bootable media, you must first disable Secure Boot. This allowed me to boot from “Alternate Media” — in this case, the Macrium Reflect Rescue Media, from whence I ran its Command Prompt facility.

Part of the difficulty comes from Windows. It really, really wants to make it hard to delete System-owned folders like the ones on the Boss’s F: drive for very good reasons. Unwanted deletion could render programs (in the case of ProgramData) and perhaps even the OS (in the case of Users) unusable. Consequently, one must go to great lengths to remove such folders, even on disks no longer playing the system/boot role. Sigh.

Two Quick Secrets Solve the Command-Line Puzzle

To remove the two directories (and their plethora of sub-folders) I had to use this command syntax:

rmdir /s path-spec

where one spec was F:\ProgramData and the other F:\Users. To confirm the presence of the hidden F:\ProgramData; item, I first had to run this command, though:

dir /a:h

That shows items with a “hidden” attribute, along with those more easily viewed.

How I Got to the Finish Line

So first, I had to turn off Secure Boot. That required the following sequence of activities. I went into Start → Settings → Recovery; and clicked the “Restart now” button under the “Advanced Startup” heading. First reboot. From there I clicked Troubleshoot, then the UEFI Firmware Settings option. Second reboot, whereupon I went into the UEFI/BIOS and disabled “Secure Boot” under that self-same heading. Save the change, then third reboot.

Next, I plugged the Macrium Rescue Disk UFD into the D7080. I rebooted (4th time) into its embrace by starting once again with Start → Settings → Recovery; and clicked the “Restart now” button under the “Advanced Startup” heading. Inside the WinRE menu that serves as the lead-in graphic above, I picked “Use a device.” Next, I elected the Mushkin UFD in the alternate boot selections and booted into that environment (5th reboot). There, I ran the Command Prompt facility. Inside that facility I used the afore-described commands to find and delete the system-owned folders. Then I exited Command Prompt and the Macrium Rescue Disk environment. That led to the 6th reboot.

This took me back into Windows, where I used the System → Restore → etc. sequence again to get back into WinRE main menu. 7th reboot. To undo Secure boot, I had to once again pick UEFI Firmware Settings, then reboot again (8th), find the “Secure Boot” option and re-enable it. Save the settings, exit UEFI and reboot for the last time. NINE (9) reboots in all to delete a couple of folders. Sheesh!

But gosh, isn’t that just the way things sometimes go, here in Windows-World. Making the world safe for system-owned folders is hard work. So is making them disappear…

Facebooklinkedin
Facebooklinkedin