Category Archives: Secure Boot

Fixing Macrium Rescue Disk

Microsoft updated its Secure Boot revocation database (DBX) in mid-2026. That update requires Boot Manager binaries to carry a minimum Security Version Number (SVN) of 11.0. It also bans the older “Production PCA 2011” signing certificate. Rescue media that Macrium Reflect X builds fails both tests out of the box. That means with Secure Boot enabled, the Reflect’s boot media won’t work. That’s why I’m writing today about what’s involved in fixing Macrium Rescue Disk.

Most important, this post walks you through a PowerShell script named fixmrrd.ps1 that fixes all three BANNED files in a single pass. Buckle up! There’s LOTS of ground to cover…

Why Fixing Macrium Rescue Disk Is Necessary

Macrium Reflect X builds its WinPE rescue environment from the Windows ADK (Assessment and Deployment Kit). The ADK ships once per Windows release and never gets Patch Tuesday updates. Its boot files stay frozen at the SVN level they carried on release day.

For Windows 11 24H2, the WADK 11 ADK shipped with boot files at SVN 2.0. The current DBX floor is SVN 11.0. That nine-version gap is the core problem that requires fixing.

The standard boot manager file, aka bootmgfw.efi that lives under C:\Windows\Boot\EFI\ also carries the banned Production PCA 2011 certificate. Even when the SVN is correct, that certificate triggers a hard BANNED result. Garlin’s check_bootMedia.ps1 diagnostic tool makes both problems visible immediately.

Introducing fixmrrdv2.ps1

fixmrrdv2.ps1 bridges the gap Macrium leaves open. It pulls every replacement file from your live, fully patched Windows 11 installation. Those files already meet the SVN 11.0 requirement and carry the correct Windows UEFI CA 2023 certificate. It’s a v2 version because @Monica1491 over at ElevenForums pointed out an error that I fixed.

Here is what the script does at each step:

  1. Validates the target USB drive and confirms it carries a MACRIUM label.
  2. Locates boot.wim on the rescue media, typically at sources\boot.wim.
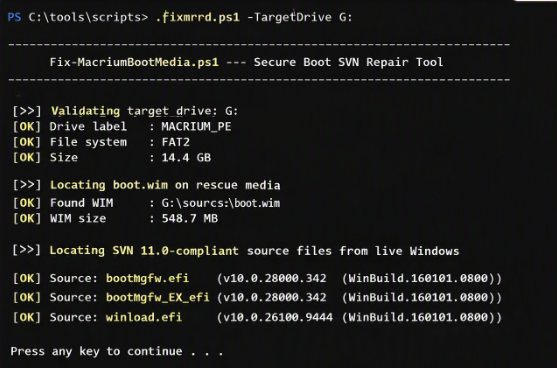
  3. Identifies three source files from your live Windows installation: bootmgfw.efi, bootmgfw_EX.efi, and winload.efi. It reports the version number of each file.
  4. Replaces the external bootmgfw.efi on the USB EFI partition. It uses the EX variant (bootmgfw_EX.efi) as the source — not the standard bootmgfw.efi. The standard file carries the banned Production PCA 2011 certificate. The EX variant carries the required Windows UEFI CA 2023 certificate.
  5. Mounts boot.wim using DISM. Then it adjusts ACLs on the internal target files. WIM images lock their contents with restrictive ACLs. Even Administrator hits an access-denied error without a takeown and icacls step first.
  6. Replaces bootmgfw_EX.efi and winload.efi inside the mounted WIM.
  7. Commits the changes and unmounts the WIM. If any step fails, DISM discards the mount and leaves the original WIM intact.

The script backs up every replaced file with a timestamped .bak_ suffix before touching it. Color-coded [OK], [!!], and [FAIL] status lines show progress at each step.

Before You Run the Script…

There are four prerequisites apply before you run fixmrrdv2.ps1.

  • Run as Administrator. DISM mount operations require elevation.
  • Use Windows PowerShell 5.1 (powershell.exe). Do NOT use PowerShell 7.x (pwsh.exe). The DISM /Mount-Image command does not work correctly under PowerShell Core. The script detects PS 7.x automatically and exits with a clear message if you start it from the wrong shell.
  • Your Macrium rescue USB must be plugged in and assigned a drive letter. Note that letter before you start.
  • Your execution policy must allow local scripts. Run this in an elevated PS 5.1 window if needed:

Set-ExecutionPolicy -ExecutionPolicy RemoteSigned -Scope CurrentUser

Download fixmrrdv2.txt from its OneDrive link (read only). Rename it to fixmrrd.ps1. Place it in a convenient location, such as C:\tools\scripts\.

Running the Script…

Open an elevated Windows PowerShell 5.1 window. Navigate to the folder holding fixmrrd.ps1. Then run:

.\fixmrrd.ps1 -TargetDrive G:

Substitute your actual rescue drive letter for G:. If you omit -TargetDrive, the script prompts you for it.

The script runs without further interaction. The DISM commit step takes the longest — typically 30 to 60 seconds. Do not interrupt that step.

Each replaced file gets a timestamped .bak_ backup before the script writes anything new. You can restore any original file by renaming the matching backup.

One timing note: the script reports source file versions from C:\Windows\Boot\EFI\ and C:\Windows\Boot\EFI_EX\. You may notice the version number on the USB after copy differs slightly from what the script reported. This is a FAT32 metadata quirk. The SVN level is what really matters, and transfers correctly.

Verifying Results

Run Garlin’s check_bootMedia.ps1 against the drive when the script finishes:

.\check_bootMedia.ps1 G: -audit -verbose

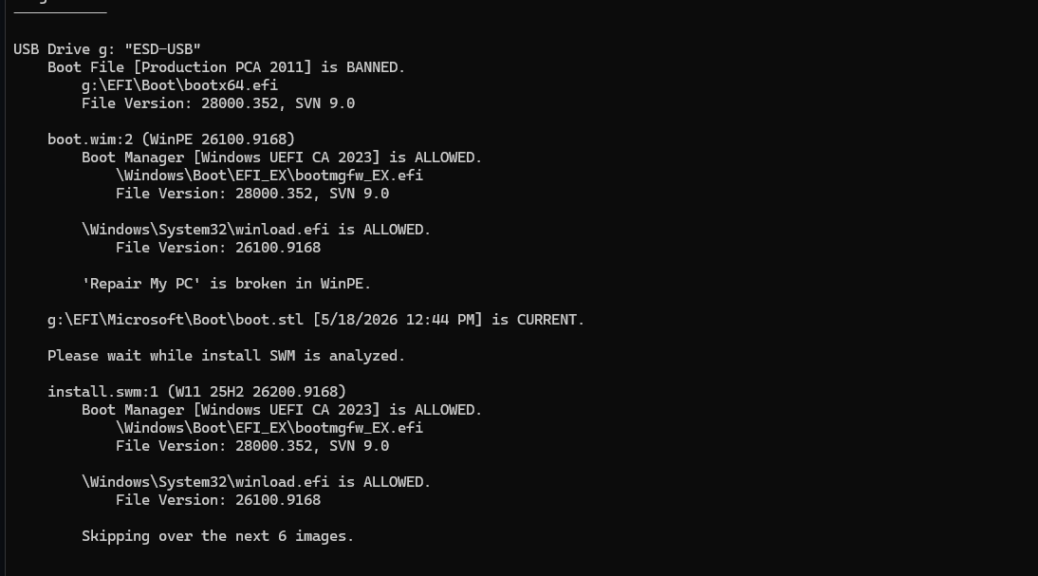
A correctly fixed drive shows all three boot files as ALLOWED:

USB Drive g: "MACRIUM_PE"
    Windows Boot Manager [Windows UEFI CA 2023] is ALLOWED.
        g:\EFI\Microsoft\Boot\bootmgfw.efi
        File Version: 28000.367, SVN 11.0

    boot.wim:1 (WinPE 26100.1)
        Boot Manager [Windows UEFI CA 2023] is ALLOWED.
            \Windows\Boot\EFI_EX\bootmgfw_EX.efi
            File version: 28000.367, SVN 11.0

    \Windows\System32\winload.efi is ALLOWED.
        File version: 26100.9444

If any file still shows BANNED, check that you ran the script in PowerShell 5.1 with elevation. Re-run if needed — the backup files let you roll back safely.

The Net-Net: Working Rescue Disk

This is a product gap in Macrium Reflect X, not a user error. Macrium builds from ADK components that Microsoft does not update through Patch Tuesday. The recoverydrive.exe tool that ships with Windows sources its boot files directly from the live OS. Macrium does not. Until Macrium ships a fix that closes that gap, fixmrrd.ps1 fills it. It ticks me off, and that’s why I decided to script my way around it.

Keep this script on hand. The next time you rebuild a Macrium rescue drive, perhaps after a major Windows update or a new ADK release, you will need it again. The whole process takes under two minutes once you know the steps. Here in Windows-World, when vendors don’t fix their stuff, we users must sometimes step in to help out. Cheers!


Facebooklinkedin
Facebooklinkedin

Doing the Recovery Drive Rebuild

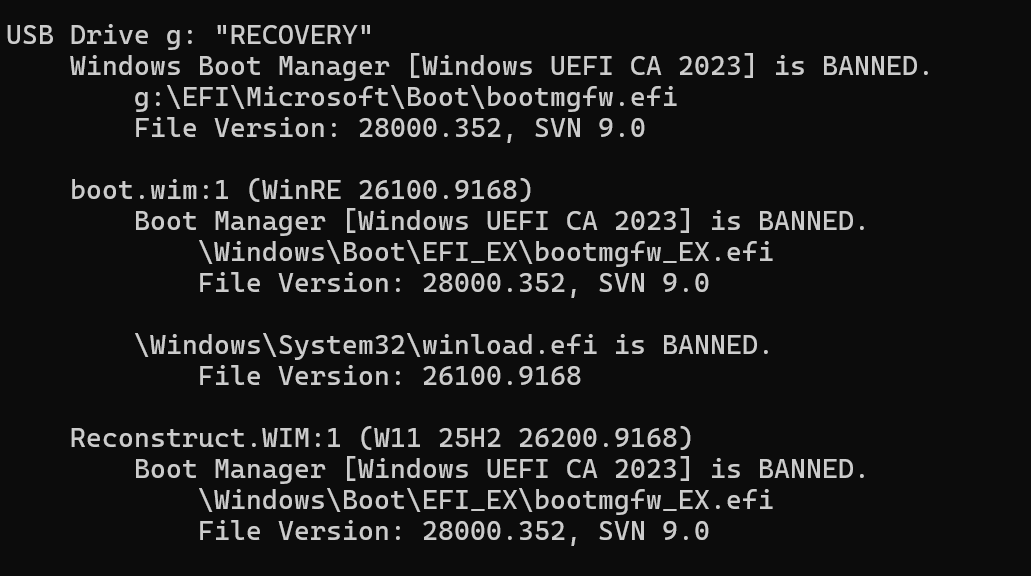
If you’ve been following Microsoft’s ongoing Secure Boot shenanigans, you already know the company has been rolling out a series of Secure Boot certificate revocations. This is a deliberate effort to invalidate boot signatures tied to older, potentially vulnerable boot components. The practical consequence is both important and easy to overlook. Boot media you created even last month may now carry BANNED boot files. That’s what had me doing the Recovery Drive rebuild this morning, in fact. Let me explain…but first look at the lead-in graphic from Garlin’s check_bootmedia script to see why I’m doing it.

Why I’m Doing the Recovery Drive Rebuild

The lead-in screencap shows the results of the Garlin script against the Recovery (G:) disk I built after last month’s Patch Tuesday (August 11). As you can see, it’s sadly out of date, BANNED across the board.

Alas, after this month’s Patch Tuesday (September 8) the G: drive features a boot manager or Windows Recovery Environment image signed with certificates that  on Microsoft’s revocation list. On a fully-patched system with current DBX (Forbidden Signatures Database) entries loaded into firmware, that old recovery drive simply will not boot.

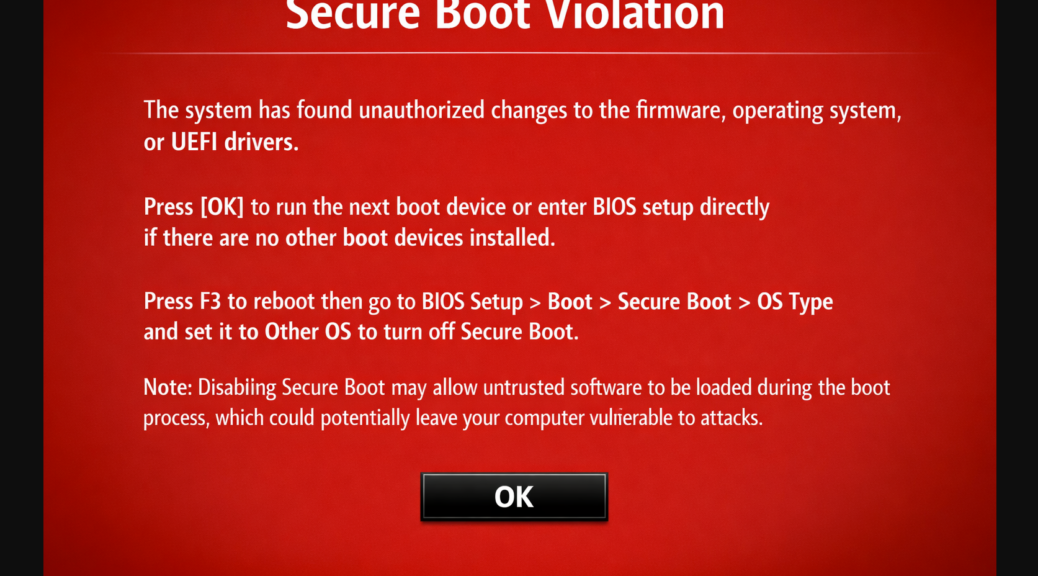
It fails Secure Boot validation with a “Secure Boot Violation” error from UEFI, leaving you with nothing but a blinking cursor when you need help most. Fortunately, a community member named Garlin created a PowerShell script called check_bootmedia.ps1 that diagnoses your boot media in seconds and tells you exactly which files are ALLOWED and which are BANNED. I’ve been running it across machines in my lab, and the results on my production desktop (named) Flo6 tell a very clear story.

Before the Rebuild: BANNED Rules!

Working from last month’s Recovery (G:) UFD, I ran Garlin’s check_bootmedia.ps1 against it. The output was unambiguous,but not in a good way. It appears as the lead-in graphic above. Indeed, this script reports that Flo6’s existing recovery drive is running WinRE.wim at build 26100.9168, with a File Version of 28000.352 and a SVN (Security Version Number) of 9.0. Every boot file examined — the boot manager and the WinRE image alike, comes back flagged as BANNED.

That designation is not positive: it means those files carry Secure Boot signatures that Microsoft has since explicitly revoked. Any PC with current DBX entries loaded into its UEFI firmware would refuse to execute those files at boot time. In other words, if Flo6 hit a serious failure tomorrow and I reached for that recovery drive, it simply wouldn’t boot on a fully-patched machine. Not acceptable!

After the Rebuild: ALLOWED Everywhere

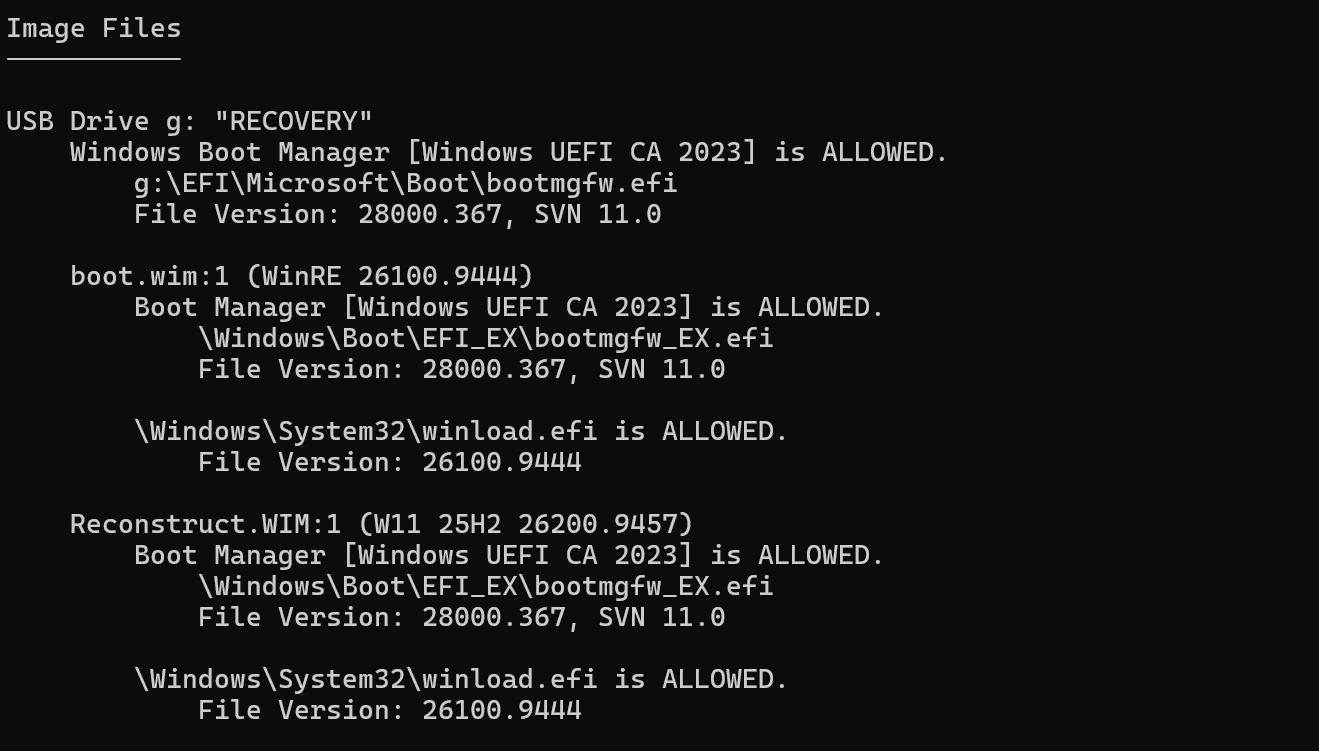
I rebuilt Flo6’s recovery drive using the built-in Windows “Create a recovery drive” wizard. This requires no third-party tools, nor manual WIM manipulation, just theRecoveryDrive.exeutility. Once that process finished, I ran check_bootmedia.ps1 again. Take a look:

Everything that was BANNED before, is now ALLOWED. Good!

The transformation was total. The new drive reports WinRE.wim build 26100.9444, File Version 28000.367, and SVN 11.0. Every boot file now shows ALLOWED. The drive is clean, current, and will boot cleanly on any fully-patched Secure Boot system. The SVN jump from 9.0 to 11.0 is especially noteworthy: that’s two full security version increments, reflecting two distinct rounds of certificate revocations that have rolled through since the original image was created. Each SVN increment represents a deliberate decision by Microsoft to bar an entire generation of signed boot binaries from executing. Flo6’s old drive had missed both of them.

Why Did This Take SOOOOOOOOOO Long?

The recovery drive rebuild on Flo6 took well over an hour. If you’ve ever watched the progress bar crawl through a drive creation and wondered whether something was wrong, the answer is almost certainly: no, this is normal. Sigh. Here’s why.

These three main contributors to that long interval are worth understanding:

  1. USB write speed. Flo6’s target drive is a SanDisk SDC2340 UFD. Even though it’s a USB 3.x device, flash writes, especially the large, sequential writes that a WinRE.wim deployment demands  are constrained by the drive’s NAND controller throughput and its write-endurance headroom. Consumer-grade flash storage routinely delivers sustained write speeds at a fraction of the peak specifications. Those rated speeds represent brief burst perfor-mance under ideal conditions, not multi-gigabyte sequential writes the wizard performs.
  2. WinRE.wim compression and decompression. The Windows Recovery Environment image is stored in compressed WIM format. The wizard decompresses it, processes its contents, and then recompresses it to the target drive. That’s a full double-pass operation.Thus, it’s CPU-intensive on the decompression side, and I/O-intensive on both sides. This step alone accounts for the majority of the elapsed time on most systems.
  3. Verification. The wizard doesn’t just write and walk away. It verifies written blocks after the write completes. That adds another full sequential read pass across the whole drive. On a slow UFD, that additional pass adds 15 to 25 minutes by itself.

On a faster USB 3.2 Gen 2 drive with a quality controller (something like a Samsung Flash Drive or a Kingston DataTraveler Max)  the same operation takes 15 to 20 minutes. On Flo6’s SanDisk SDC2340, over an hour is entirely too normal. Slow, but not broken.

Check Your Boot Media!

Here’s my recommendation. After any Windows Update CU, run Garlin’s check_bootmedia.ps1 against every bootable UFD you have.  A recovery drive that passed muster six months ago may now carry BANNED files. That’s because the DBX doesn’t stop growing, and Microsoft shows no sign of slowing its revocation cadence.

The fix, as Flo6 demonstrates, is simply to rebuild. It costs you a USB drive, an hour of clock time, and nothing else. Flo6 is my production desktop, but the same process and the same stakes apply to every Windows 10 and Windows 11 PC you manage.

Maintaining a current, bootable recovery drive is table-stakes Windows hygiene. Also, it’s the kind of thing that feels unnecessary right until it’s the only thing that matters. Now, thanks to Garlin’s script, you have a fast, reliable way to prove yours is good. There’s no excuse not to check. Here in Windows-World, I call those “marching orders.” Start walking…

Facebooklinkedin
Facebooklinkedin

Post Patch Tuesday Secure Boot Cleanup

September’s Patch Tuesday landed on 9/8. And it brought more than the usual security fixes. KB5124008 and KB5124012 quietly expanded device targeting for Microsoft’s ongoing Secure Boot trust chain. If you haven’t verified your machines yet, now is the time. Secure Boot cleanup is not optional — it is essential maintenance for every managed Windows environment. Indeed, I’d argue that a routine post Patch Tuesday Secure Boot checkup is part of a “new normal” for Windows, with a cleanup to follow if needed.

Why Do a Post Patch Tuesday Secure Boot Check?

Here is the backstory. The old Microsoft UEFI CA certificates that were issued back in 2011, expired in June 2026. Microsoft has been rolling out replacement 2023 certificates through Windows Update for months. September’s updates expanded that rollout further.

KB5124008 and KB5124012 added more “high confidence” device targeting data. That means more PCs are now eligible to receive the new certs automatically. However, some devices still fall through the cracks.

Don’t panic. Devices that haven’t received the new certificates will still boot. Standard Windows updates will still install. But the clock is ticking. A second major deadline arrives in October 2026. You don’t want to be scrambling then.

Why It Matters

Devices that miss the Secure Boot cleanup lose future boot-level security protections. Over time, they become progressively more exposed to boot-level threats. These are the kind that load before Windows even starts. Also, BitLocker and device encryption may break on out-of-synch systems. That means recovery key prompts, startup hangs, and frustrated users calling the help desk.

Running the Garlin Remediation

Garlin is a long-time, high-status (and value) member of the online community for ElevenForum.com. He’s been stewarding a long-running thread (now at 188 pages) entitled “garlin’s PowerShell scripts for updating Secure Boot CA 2023” since January 2025. He’s got scripts to handle certificate synch-ups, with all the related DB and DBX fixes to boot (pun intended). Just remember to visit his GitHub site regularly to download the latest ZIP file with scripts to match (his latest update on 9/8 handles the newest Patch Tuesday updates).

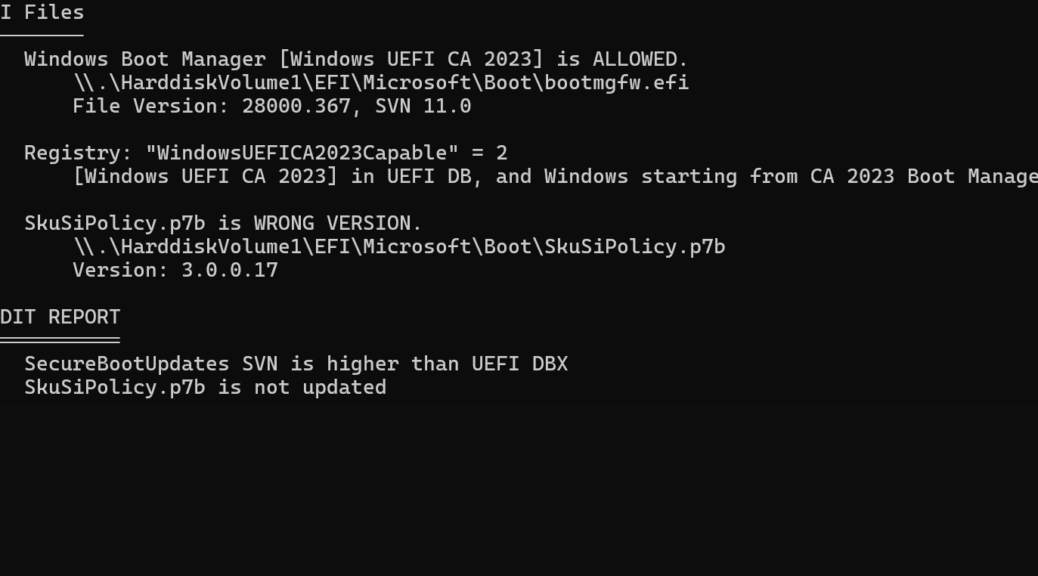
As you can see in the lead-in screenshot, after the update Windows incremented SkuSiPolicy.p7b from version 3.0.0.17 to 3.0.0.18. It also updates the Secure Version Variable (SVN) stored in NVM in firmware as part of Secure Boot’s DBX values. After the OS update, certain operations are need to catch the UEFI up with the OS.

Actual Remediation : SkuSiPolicy.p7b

The SkuSiPolicy.p7b value governs which Windows editions (aka “SKUs” such as Home, Pro, Education, etc.) that Secure Boot regards as trusted and bootable. If the policy in the OS and the policy in a boot structure (whether in EFI, on disk, or on bootable media) don’t match, you get “Secure Boot Violation” when you try to boot and nothing more. Not good!

No worries. Garlin’s got a fix for that. If you run his latest Update UEFI script with the right argument it will fix it for you (reboot required). Here’s the syntax:

Update_UEFI-CA2023.ps1 -SkuSiPolicy

If you’re running this in an admin PowerShell session, prepend “.\” (period-backslash) to get it to run. Tip: if you unblock the ZIP file after downloading it from GitHub, the archive’s content will also be unblocked. Otherwise, you’ll end up unblocking them piecemeal. I speak from direct experience on this…

Actual Remediation: SVN

The Secure Version Number (acronym: SVN) is a monotonically increasing integer value also stored in the UEFI DBX value. It provides anti-rollback enforcement. When a bootloader or boot manager tries to loan, UEFI checks its built-in SVN against the minimum SVN stored in firmware. If the boot agent SVN is lower than what’s in UEFI, UEFI won’t load it. Here again, it’s necessary for what’s in the OS and what in the bootloader to agree. After an update (like Patch Tuesday) remediation may be needed.

Here’s what that looks like in PowerShell (admin):

manage-bde -Protectors -Disable C: -RebootCount 1


reg add HKEY_LOCAL_MACHINE\SYSTEM\CurrentControlSet\Control\Secureboot /v AvailableUpdates /t REG_DWORD /d 0x200 /f


powershell Start-ScheduledTask -TaskName "\Microsoft\Windows\PI\Secure-Boot-Update"

The first line turns off BitLocker for the next boot to avoid key lookup and entry. It’s only needed for PCs whose C: drive is BitLocker protected. The next line adds a registry key to define and schedule a Secure Boot update task to update the SVN. The third line calls powershell to run that scheduled task immediately. All this stuff shows up in the output of the Garlin check script if you run it properly, so you can copy it from there, right inside PowerShell.

Here’s that syntax:
check_uEFI-CA2023.ps1 -verbose -audit

Don’t forget to prepend the “.\” (period backslash) to run it in PS.

Also: Boot Media Needs Catchup, Too

Here is a step that many admins overlook. Your Windows installation USB drives and WinPE recovery media also need attention. For sure, any media created before January 2025 won’t include the new 2023 Secure Boot certificates. I’ve gotten in the habit of rebuilding boot media each time that SkuSiPolicy.p7b or the SVN increments myself.

What happens if you don’t build new boot media? They may fail to launch on a fully updated machine. Rebuild everything from the latest Windows ADK, MCT (Media Creation Tool), or a current Windows ISO. Then test the rebuilt media on at least one device before you rely on it to get something done.

Run through this quick checklist before you close this task out:

  • ☑ Rebuild WinPE USB from the latest ADK
  • ☑ Rebuild Windows installation USB from a current ISO
  • ☑ Update MDT and WDS boot images if applicable
  • ☑ Test rebuilt media on a pilot device before wide deployment
  • ☑ Document any devices that cannot update (unsupported hardware) as formal exceptions

This is a new and interesting wrinkle on dealing with Windows Updates, especially around the Patch Tuesday milestone. Here in Windows-World such wrinkles accumulate. Don’t let them put your PCs and boot media in peril. Do the necessary, please!

Facebooklinkedin
Facebooklinkedin

FAT32 UFD Nixes “Repair My PC”

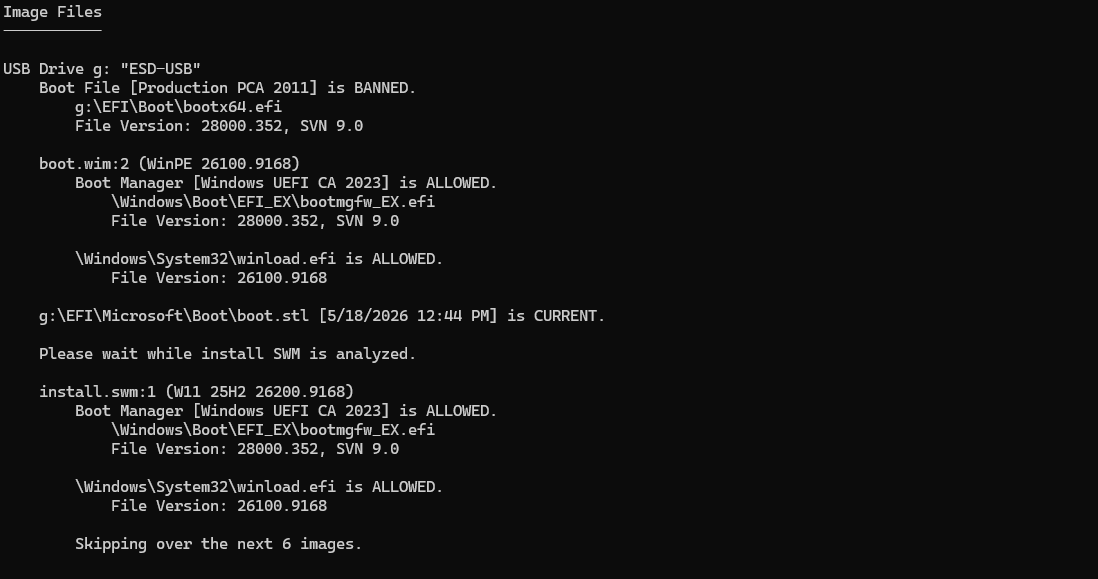
Here’s an interesting one. I tried out the latest Garlin scripts this morning (dated 8/24). The boot media check turned up something new. It reported that a new Windows 11 facility wouldn’t run from my MCT-based Windows installer UFD. And indeed, upon investigation, it turns out that using a FAT32 UFD nixes “Repair my PC” capabilities in WinPE. But that’s for a good and understandable reason, as I’ll explain.

TLDR version: Boot an MCT-generated Windows 11 setup USB and click “Repair your computer.” On many FAT32-formatted drives, including these, nothing happens. That option is simply broken. Here is why, and what you can do about it.

Why FAT32 UFD Nixes “Repair My PC”

Windows 11 setup media built with the Media Creation Tool on a FAT32 drive hits a hard wall. FAT32 caps individual file sizes at 4 GB. A Windows 11 install image blows past that ceiling.

Microsoft’s solution is to split the image into two files named install.swm and install2.swm(swm is, of course, a “split WIM file” ICYDK). On the drive I examined, that pair totaled about 5.6 GB compressed. Setup.exe handles this format just fine during installation. The problem surfaces elsewhere.

WinPE Can’t Find (or Handle) the Source

Clicking “Repair your computer” in the Setup UI triggers a search. The WinPE environment in boot.wim looks for install.wim or install.esd in the sources folder. Neither file exists on a FAT32 UFD.

Only install.swm and install2.swm are present. WinPE recovery tools cannot enumerate split WIM files for repair operations. They expect a single, monolithic image file. Without it, the repair chain fails before it starts.

Please note that this is neither a certificate nor a Secure Boot issue. Garlin confirmed that all signing credentials in boot.wim were valid. Strictly speaking, the “broken” label emerges from a missing monolithic image, nothing more.

NTFS Can Fix What’s Broken, But…

The root cause is FAT32. The cure is straightforward: rebuild the drive using NTFS.

Rufus handles this cleanly. Point it at a Windows 11 25H2 ISO, choose NTFS as the file system, and let it run. NTFS has no 4 GB per-file ceiling. A Rufus NTFS build produces a single install.wim that WinPE can locate and read without complaint.

Rufus also ships a current, properly signed bootloader. That quietly resolves a secondary Garlin finding as well: a BANNED bootx64.efi signed by the deprecated Production PCA 2011 certificate. On an NTFS Rufus build, that file is replaced automatically.

Practicing Proper WinRE/WinPE Repairs

A FAT32 Windows 11 setup USB remains fully functional for clean installs. The split WIM has no effect on setup.exe. However, the “Repair your computer” path is dead on arrival.

On a machine that refuses to boot, that missing option could matter a great deal. Building setup media on NTFS costs nothing extra. Rufus is free, and a rebuild takes only a few minutes.

For a USB you may need under pressure, a working repair option is worth the small extra effort. That said, I have observed that some PCs (notably, various Lenovo and Toughbook laptops in my custody) simply won’t boot to an NTFS-formatted UFD. That takes “Repair my PC” off those particular tables, for good or ill.

Check It for Yourself

Run Garlin’s check-bootmedia script against your Windows 11 setup drives. If you see ‘Repair My PC’ is broken in WinPE, you now know why that shows up. If you rebuild on NTFS using Rufus with a current ISO, that repair option will be there when you actually need it. But only if your target PC will boot from an NTFS-formatted UFD. That’s why you have to check! Here in Windows-World, it’s best to know such things beforehand.

Note to Microsoft: Maybe you guys should buy or license Rufus so you can quickly jump MCT and “Create a recovery drive” into a completely modern, Secure Boot aware (and friendly) stance. IMO, that’s a good idea, so please give it some thought.

Oho! There’s ANOTHER Garlin Script for That…

Turns out you can download and apply yet another Garlin script to fix this very issue. It’s called Repair_My_BootWIM.ps1. Run it against your offending boot media and the problem gets fixed automagically. It just worked on my test G: drive created from MCT last week. No Rufus needed. Go figure!

Notice the text that reads “‘Repair My PC’ is broken in WinPE.”  no longer appears. Fixed!

Facebooklinkedin
Facebooklinkedin

Updating Outdated Win11 Boot Media

There’s a scenario that may feel familiar to plenty of Windows power users and IT admins. You’ve got a USB flash drive, aka UFD, sitting on your desk. You carefully imaged it months ago using MCT, or a backup too, or Rufus, or whatever. It booted perfectly, it installed or ran cleanly, and life was good. Fast forward to today: alas, that once-trusty UFD is probably out of date. In fact, if you try to boot using that UFD, you may get a “Secure Boot Violation” error message from UEFI and nothing more. That’s why updating outdated Win11 boot media is a real maintenance item, especially after Patch Tuesday rolls through and reshuffles key files inside the Windows boot chain.

Why bother? Because Patch Tuesday updates don’t just patch the running OS on your machines. They also advance critical files that get embedded in installation media — things like Secure Boot policy manifests, component catalogs, and EFI boot binaries. Hence, a UFD built on a pre-patch image may carry stale versions of those files. Indeed, subtle boot-time validation mismatches are possible. Worse, your installation media might silently enforce an older policy against a fully updated target system.

In this post, I’ll walk through exactly what changes, which files on your UFD need attention, and explain how to make things current, step by step. Spoiler alert: I also advise against such repairs unless they’re absolutely necessary. It’s much easier to generate fresh boot media than to repair outdated UFDs.

Why Updating Outdated Win11 Boot Media Matters

One might think of Patch Tuesday as a monthly ritual that involves rebooting workstations and crossing your fingers that nothing breaks. Fair enough. However, other side effects come from updates. That is, they reach inside the Windows installation ecosystem and bump version numbers on files that govern how setup media validates and boots a system.

The most relevant example for this post, and the primary driver for updating outdated Win11 boot media right now, is SkuSiPolicy.p7b. The most recent Patch Tuesday advanced this file from version 3.0.0.16 to version 3.0.0.17. That’s a tiny increment, but carries real significance.

So, what exactly does SkuSiPolicy.p7b do? In short, it’s a Secure Boot SKU policy file. It governs which Windows editions (SKUs =Home, Pro, Enterprise, Education, and so on) that Secure Boot views as trusted and bootable.

When the running OS expects version 3.0.0.17 and your UFD’s boot chain presents version 3.0.0.16, you get validation mismatches. Those mismatches may not always produce a hard error, but they represent a policy drift you don’t want living in your production boot media. Worst case: no boot with the dread “Secure Boot Violation” error message showing (see my August 4 post for an illustration).

Bottom line: whenever SkuSiPolicy.p7b advances, it’s time to audit your UFDs. You may also end up having to update or replace/regenerate them.

Possible UFD Deltas After Patch Tuesday

Here’s the thing: SkuSiPolicy.p7b doesn’t live in just one place on your UFD. It lives in multiple places. Some are obvious, others live inside image files. Plus, other boot-chain components may also need refreshing. The following table lays out that landscape, where the numbered list that follows briefly explains each item.

UFD Component Location on UFD Affected by SkuSiPolicy Bump? Action Required
SkuSiPolicy.p7b \sources\ Yes — primary location Replace with updated version
boot.wim \sources\ Yes — embedded in index:2 Mount, update, unmount/commit
install.wim / install.esd \sources\ Yes — per-edition indexes Mount each index, update, commit
efisys.bin / efisys_noprompt.bin \boot\ Occasionally Replace if ISO version is newer
bootmgr.efi / bootx64.efi \efi\boot\ or \boot\ Occasionally Replace if ISO version is newer
cdboot.efi \boot\ Rarely Check version; replace if needed
winpe.wim / WinRE.wim Varies (recovery partition) Yes — if recovery env. included Mount, update, commit

Working through the List

Now let’s go through each item in the same order as the table:

  1. p7b (\sources\SkuSiPolicy.p7b on the UFD): This is the standalone Secure Boot SKU policy file that Windows Setup reads directly during the installation process. As noted, this file advanced from version 3.0.0.16 to 3.0.0.17 on the most recent Patch Tuesday. This is the clearest, most unambiguous indicator that your boot media needs updating or replacing. You must replace it with the current version, which you can extract from a freshly downloaded Windows 11 ISO or from a mounted updated WinPE image.
  2. wim (\sources\boot.wim): This is the WinPE and Windows Setup environment image. It contains two indexes: index:1 is the minimal WinPE environment (the initial RAM disk boot stage), and index:2 is the full Windows Setup environment. Both indexes embed their own copy of SkuSiPolicy.p7b inside \Windows\System32\. Index:2, in particular, participates in Secure Boot policy enforcement during setup and therefore should be updated. Index:1 is discussed separately later in this post.
  3. wim / install.esd (\sources\install.wim or \sources\install.esd): This is the main OS image that actually gets deployed to the target drive. Each edition index (Home, Pro, Enterprise, etc.) embeds its own copy of SkuSiPolicy.p7b inside \Windows\System32\ within the image. Therefore, each applicable index needs to be individually mounted and updated. Note that install.esd files are compressed and cannot be mounted directly — they must first be converted to install.wim format using DISM’s /Export-Image with /Compress:none before mounting.
  4. bin / efisys_noprompt.bin (\boot\ folder): These are EFI boot sector binary files. They are not directly version-stamped by SkuSiPolicy.p7b changes; however, when a cumulative update also updates the broader boot chain, newer versions of these files may ship in the refreshed ISO. Consequently, it’s worth doing a file-date comparison between your UFD’s copies and those in the freshly downloaded ISO.
  5. efi / bootx64.efi (\efi\boot\ or \boot\ folder): The EFI boot manager binaries. The same considerations apply as for efisys.bin: they don’t change with every Patch Tuesday, but when they do advance, you’ll want the fresh copies on your UFD. Always compare versions against a current ISO before deciding whether to replace.
  6. efi: This EFI binary handles optical-media boot paths. If your UFD was created from an ISO (as most are), this file is present. It is, however, less commonly updated than the other EFI binaries. Worth checking, but don’t lose sleep over it.
  7. wim / WinRE.wim — If your UFD includes a Windows Recovery Environment, that image also embeds SkuSiPolicy.p7b. The update workflow is identical to the boot.wim process: mount the image, overwrite the policy file inside \Windows\System32\, commit, and unmount.
Note

Not all of these components will change with every Patch Tuesday. The SkuSiPolicy.p7b version bump is your clearest indicator that a media refresh is warranted. On August 11, for example, the version jumped from 3.0.0.16 to 3.0.0.17. OTOH, EFI binaries may remain unchanged over several update cycles.

How to Update Each Affected UFD Item

Alright — here’s where we roll up our sleeves. The process is methodical, but it’s not complicated. Follow these steps in order, and you’ll have a fully refreshed UFD by the time you’re done.

Step 1: Gather Your Prerequisites

Before you touch any files, have the following at your disposal:

  • DISM — Built into Windows 10 and Windows 11. No additional download required. Run all commands from an elevated command prompt (right-click > Run as administrator). You MUST run powershell.exe (version 5.1) not PowerShell 7 (the app, or from inside Windows Terminal). Why? Because the DISM wim mount commands don’t work inside the newer PS version.
  • A fresh Windows 11 ISO — Download the current release directly from Microsoft’s Media Creation Tool at com/software-download/windows11, or from MSDN/VLSC if you have a volume license subscription. Do not use an ISO that’s more than a few weeks old — the whole point is to work from a current image.
  • Sufficient disk space — Mounting WIM images requires working space. Budget at least 15–20 GB on your working drive (typically C:\) for mount directories, working copies, and temp files.
  • A writable UFD — Sounds obvious, but double-check that your UFD’s write-protect switch (if it has one) is off. I’ve also learned the hard way that some UFDs work when building Secure Boot compliant media, and others don’t. If you get stuck, try switching to a faster, newer name brand device (I’ve had good luck with never Kington Data Travelers recently, for example).
  • Ownership and permissions — Some protected files on the UFD or within mounted images may require you to take ownership before overwriting them. We’ll cover that in detail in tomorrow’s post. It’s kind of a doozy!

Step 2: Extract the Updated SkuSiPolicy.p7b from the Fresh ISO

Mount the fresh ISO in Windows Explorer (double-click the ISO file — Windows will mount it as a virtual drive, typically D:\). Then, navigate to D:\sources\ and copy SkuSiPolicy.p7b to a working folder on your local drive. For example:

mkdir C:\work copy D:\sources\SkuSiPolicy.p7b C:\work\SkuSiPolicy.p7b

This extracted file is your authoritative source for all subsequent update steps. Keep it handy — you’ll be copying it into several locations.

Step 3: Update the Standalone SkuSiPolicy.p7b on the UFD

This is the simplest step. Simply overwrite the existing file in \sources\ on your UFD. Assuming your UFD is drive E:\:

copy /Y C:\work\SkuSiPolicy.p7b E:\sources\SkuSiPolicy.p7b

The /Y flag suppresses the overwrite confirmation prompt. Done. One location down, several to go.

Step 4: Update boot.wim (Index:2 — Windows Setup)

This requires DISM to mount the image, copy in the updated policy file, and then commit the changes on unmount. First, create your mount directory:

mkdir C:\mount\boot

Then, mount index:2 of boot.wim from your UFD:

Dism /Mount-Image /ImageFile:”E:\sources\boot.wim” /Index:2 /MountDir:”C:\mount\boot”

Next, copy the updated SkuSiPolicy.p7b into the mounted image’s \Windows\System32\ folder:

copy /Y “C:\work\SkuSiPolicy.p7b” “C:\mount\boot\Windows\System32\SkuSiPolicy.p7b”

Finally, commit and unmount:

Dism /Unmount-Image /MountDir:”C:\mount\boot” /Commit

Warning

Never terminate a DISM mount session midway. If your session is interrupted (e.g. power loss, unexpected reboot) use Dism /Cleanup-Mountpoints to recover before attempting to remount. Partially committed mounts can corrupt your WIM.

Step 5: Update install.wim (Each Edition Index)

The install.wim (or install.esd) update is the most time-consuming step, because you need to process each edition index individually. Start by listing the available indexes:

Dism /Get-ImageInfo /ImageFile:”E:\sources\install.wim”

This will show you something like Index 1 = Home, Index 2 = Home N, Index 3 = Pro, Index 4 = Pro N, and so on — depending on which edition set your ISO contains. For each index you wish to update, repeat the mount-copy-commit workflow:

mkdir C:\mount\install  REM — Example for Index 3 (Pro): Dism /Mount-Image /ImageFile:”E:\sources\install.wim” /Index:3 /MountDir:”C:\mount\install” copy /Y “C:\work\SkuSiPolicy.p7b” “C:\mount\install\Windows\System32\SkuSiPolicy.p7b” Dism /Unmount-Image /MountDir:”C:\mount\install” /Commit

Repeat for each index. It’s tedious, admittedly — but it’s the thorough approach.

A note on install.esd: If your UFD uses install.esd rather than install.wim, you cannot mount it directly. Therefore, you must first export it to an uncompressed WIM:

Dism /Export-Image /SourceImageFile:”E:\sources\install.esd” /SourceIndex:1 /DestinationImageFile:”C:\work\install.wim” /Compress:none

Repeat the export for each index you need to update, then mount, update, and commit the resulting install.wim. When finished, copy the updated WIM back to your UFD (replacing the original ESD, or alongside it as a WIM if your media configuration supports that).

Step 6: Replace EFI Binaries (If Newer Versions Exist in the ISO)

Compare the file dates on the following pairs — ISO source vs. UFD destination — and replace only if the ISO version is newer:

  • D:\boot\efisys.bin → E:\boot\efisys.bin
  • D:\boot\efisys_noprompt.bin → E:\boot\efisys_noprompt.bin
  • D:\efi\boot\bootx64.efi → E:\efi\boot\bootx64.efi
  • D:\boot\bootmgr.efi → E:\boot\bootmgr.efi

If the ISO’s copies are dated more recently, copy them over. If they match, leave your UFD copies alone — there’s no point in replacing identical files.

Garlin’s check_bootmedia Reports a Non-Problem

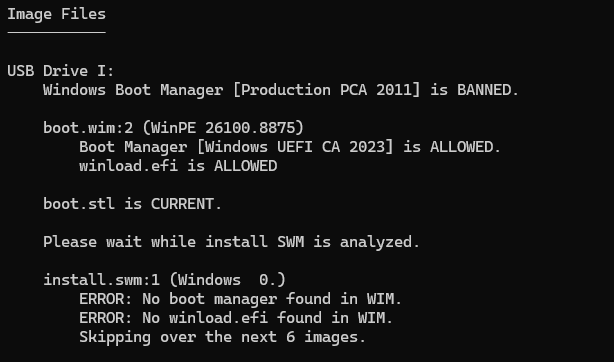
Here’s the thing: if you run the check_bootmedia script — a tool from Garlin’s GitHub repo that inspects boot media for version consistency across boot-related files — you may encounter a flag that looks alarming at first glance in your freshly-updated UFD. Specifically, the script reports that boot.wim’s index:1 (the base WinPE environment) contains an older version of SkuSiPolicy.p7b than at index:2 (the Windows Setup environment) after you’ve completed Step 4 above. You can see its output for my updated UFD (Drive I:) in the lead-in graphic for this blog post.

Take a breath. This does not actually represent a real problem. Indeed, this UFD booted right into the Windows 11 installer (as it should). Here’s why the info may look scary, but isn’t:

  • What index:1 actually does: Index:1 in wim is the minimal WinPE environment — the initial RAM disk stage that loads just enough of an operating environment to hand control over to the Windows Setup process. It is responsible for loading drivers, initializing hardware, and presenting the early pre-Setup UI. It does not participate in Secure Boot SKU policy enforcement during a normal Windows installation.
  • Where SKU policy enforcement actually happens: The actual Secure Boot SKU policy enforcement — the part that p7b governs — occurs at the OS loader level. That means it relies on index:2 of boot.wim and the standalone \sources\SkuSiPolicy.p7b on your UFD. Both of those, as a result of Steps 2–4 above, are now current.
  • Why check_bootmedia flags it anyway: The script is thorough — admirably so. It compares p7b versions across all image indexes and the standalone sources copy, and reports any mismatch it finds. For completeness and consistency-checking purposes, that’s the right behavior. However, in practice, having an older SkuSiPolicy.p7b sitting inside index:1 of boot.wim creates no functional issue whatsoever during a Windows installation.
  • Can you update index:1 anyway? Yes, absolutely — and if strict consistency is important to you (perhaps for audit or compliance reasons), go ahead. Use the same DISM mount/update/commit workflow with /Index:1 instead of /Index:2. It won’t hurt anything.
Bottom Line

If check_bootmedia is the only tool reporting a version discrepancy, and the discrepancy is limited to boot.wim index:1, you can safely disregard that flag. Your media is functionally correct. The flag is informational — a cosmetic inconsistency, not a real-world boot problem. I had that situation pop up on a test UFD, and it booted into the Windows 11 Installer just fine (no Secure Boot issues presented).

Wrapping Up: Key Takeaways

Let’s bring it all home. If you’ve made it this far, you now have a solid handle on why updating outdated Win11 boot media matters, what files are involved, and fixed involved. Here’s the condensed version for your notes:

  • Patch Tuesday can advance p7b and other boot-chain files. The most recent update bumped SkuSiPolicy.p7b from version 3.0.0.16 to 3.0.0.17. That’s your cue to refresh your UFDs.
  • Multiple UFD locations are affected, not just \sources\. The policy file is embedded inside wim (index:2), inside each edition index of install.wim, and potentially inside recovery environment images as well. All those locations need fixing for a complete update.
  • The Garlin check_bootmedia flag for wim index:1 is interesting, not definitive. Index:1 doesn’t enforce Secure Boot SKU policy during Windows installation. You can update it for strict consistency, but it is absolutely not required for correct boot media behavior.
  • EFI binaries deserve a version check, not an automatic replacement. Compare bin, bootmgr.efi, and bootx64.efi from your UFD versus a fresh ISO; replace only if the ISO copies are newer.
  • Tomorrow’s post covers ownership and permissions for protected files. For good reason, MS goes out of its way to protect boot files and images. Thus, there are certain steps you must take before you can overwrite system-owned files inside mounted WIM images. Stay tuned: I’m writing a whole ‘nother post on this topic. Again: it’s a doozy, and taught me more about ICACLS than I ever wanted to know.
  • Keeping boot media current is a best practice for Windows IT admins and power users. Stale media isn’t just a minor annoyance — it’s a policy gap. A few DISM commands and twenty minutes of your time is all it takes to close it.

Ask Yourself: Is Repair Really Needed?

Determining repairs took me the better part of day, and then getting things fixed in Windows 11 installation media for the SkuSiPolicy version bump. I could’ve simply grabbed a fresh Media Creation Tool (MCT) from the download Windows 11 page, and built a new UFD in under an hour.

Now that I’ve been through this ordeal, I’ve learned a valuable lesson. Don’t fix a boot media UFD unless you absolutely must. If you can regenerate a fresh, new updated one, do that instead. It’s faster and much, much easier that way. Here in Windows-World, going the long way around sometimes underscores the value and importance of workable shortcuts. My advice: take this shortcut, if you can. Otherwise, you’ll spend real time going the long way!

Facebooklinkedin
Facebooklinkedin

The Dog Ate My Boot UFD

I’ve been trying to document how to repair recovery media when MS updates its VBS boot policy (as happened with Tuesday’s updates). Instead I’ve been fighting with UFD oddities that keep me from making the changes I need to bring them into line with said new policy. I’m feeling flustered and flabbergasted by an improbable series of setbacks, which is why I’m saying “The dog ate my UFD.” Honest: it kind of did.

Digging Into Why the Dog Ate My Boot UFD

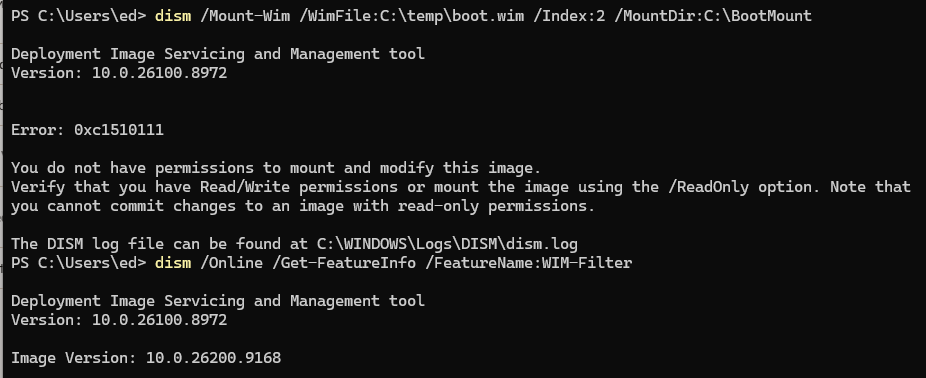
As it turns out, the first setback was Smart App Control (SAC). It’s a Windows 11 security feature that evaluates application reputation through Microsoft’s cloud-based Intelligent Security Graph before allowing anything to run. When I tried to mount an image using DISM, it kept citing a permission block. Media checks showed no blocks, so it turned into a “whack-a-policy” hunt.

Long story short: my research suggested that turning SAC off might fix things. Alas, it didn’t help my problem. So I had to keep looking.

Next Suspect: HVCI

Once I worked around SAC (more on that in a moment), I ran into obstacle number two: HVCI, which stands for Hypervisor-Enforced Code Integrity. Microsoft also calls it Memory Integrity, and you’ll find it under Windows Security > Device Security > Core Isolation. HVCI runs kernel-mode code verification inside an isolated Virtualization-Based Security (VBS) enclave. It’s essentially a walled-off compartment that the rest of the OS can’t touch. On Flo6, HVCI was enabled by default, which is typical in most new Windows 11 installs.

Here’s the rub: many bootable UFD environments load kernel-mode drivers that predate HVCI’s signing requirements.  That goes double for older Windows PE (Preinstallation Environment) images. When HVCI sees a driver it doesn’t recognize or trust, it rejects it. The UFD boot process stalls or silently falls back to the local drive. This is by design, not a bug (I keep telling myself that). Unfortunately, that design choice has zero sympathy for the guy who just wants to test a drive image before his second cup of coffee.

Turning it off didn’t help things, either. So I’ve still got a problem, and must keep looking for the cause. Sigh.

Still No Joy…

I still need to mount a windows image (.wim) file so I can fiddle with its bits to make it current. But first, I have to figure out how (or possibly, where) to make this happen. It comes in service of a story to document how to repair or replace outmoded UFD’s for repair, recovery, restoring backups, and so forth. That’s important stuff, but it’s not surrendering its secrets easily.

I wish I knew exactly what I needed to do. I’m still figuring it out. Since I’ve not succeeded yet, consider this an interim status report. Here in Windows-World, an inordinate amount of head-scratching is sometimes required to fix things.

Stay tuned! When I do get it sorted, I’ll post again here. It’s a fascinating fix hunt, but I’ll be glad to get to the end of this road.

Facebooklinkedin
Facebooklinkedin

Two Reboots ARE Better Than One

During the repair process for the X12 Hybrid Tablet (see Friday’s blog for details), I got to the point where I was ready to reboot after a couple of repairs. Those involved (1) running bcdboot to rebuild my boot files from scratch, and (2) telling Garlin’s update_UEFI... script to emplace SkuSiPolicy.P7b. After a first reboot, the boot screen showed red error text for a Secure Boot mismatch error (reporting that what’s in firmware differs from what wants to run). After a second reboot, the system came up clean with no errors at all. Indeed, that’s what’s supposed to happen and why I claim that two reboots are better than one!

To begin, it’s worth noting what those two steps actually do. Running bcdboot rebuilt the EFI System Partition boot files and restored a working Windows Boot Manager entry. The Garlin script then installed the production-variant SkuSiPolicy.p7b, which writes itself as a UEFI firmware variable enforcing production-level Secure Boot signing rules — rules stricter than the defaults many machines ship with. Consequently, the UEFI firmware suddenly had new staged SVN values sitting alongside the existing committed values in NVRAM. The first reboot is, therefore, where things got genuinely interesting.

Exploring Why Two Reboots ARE Better Than One: First Reboot

When the X12 attempted its first boot after the script ran, the firmware compared the newly staged SVN (Security Version Number) values against whatever was already written into UEFI NVRAM. Naturally, they didn’t match — because the new policy was not yet committed. That mismatch triggered the Secure Boot error you see mocked up as the lead-in graphic. However, and this is the critical part, that same first boot is exactly when Windows Boot Manager wrote the new SVN values out to the UEFI NVRAM, permanently committing the production policy into the chip’s non-volatile storage. The error, in other words, was not a failure. In fact, it was the system doing its job exactly as designed. The Secure Boot commit phase looks alarming on the surface; nonetheless, it is entirely intentional behavior.

Microsoft engineered this two-phase mechanism deliberately so that a mid-commit crash or power loss cannot brick the machine. Old NVRAM values stay valid until the new ones are fully written and confirmed. As a result, if the lights go out halfway through the commit, the firmware simply falls back to the previous known-good state. It is a genuinely elegant safety net (one that I have come to deeply appreciate after years of watching less careful UEFI implementations leave machines unbootable).

Reboot Two: Verifying a Clean Bill of Health

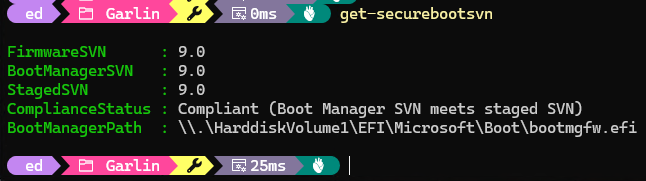
Furthermore, once the X12 had committed the new values on reboot one, the second reboot was simply the verification phase. With the NVRAM now holding the freshly committed data, the firmware ran its Secure Boot checks again. This time, FirmwareSVN, BootManagerSVN, and StagedSVN all agreed — and the machine booted clean, no error, no complaint. Running Get-SecureBootSVN from an elevated PowerShell prompt confirmed the result:

At this time, in fact, 9.0 is the current maximum enforced SVN — so this is a perfect result, not merely a passing grade. All three values align, and the ComplianceStatus line says exactly what you want it to say. The Secure Boot commit phase had done its work on reboot one; verification simply confirmed it on reboot two. The X12 was, in every sense, fully compliant with proper Secure Boot policy.

Two Reboots Makes a Pattern…

Moreover, this two-reboot pattern is not unique to my ThinkPad X12 repair scenario. It is the same deliberate mechanism Windows uses for DBX enforcement updates such as KB5012170. Microsoft designed it this way intentionally — if the machine loses power or crashes mid-commit, the old NVRAM values remain valid until the new ones are fully written and confirmed by a clean second boot.

IMO, the mismatch error on reboot one is a feature, not a bug. The Secure Boot commit phase genuinely requires two boots to complete safelyIndeed, that’s by design, not by accident. So next time you see a Secure Boot mismatch error on the first reboot after a repair or a policy update — don’t panic, don’t reach for the BIOS reset jumper, and definitely don’t call Microsoft support just yet. Just reboot again. Chances are, you’ll be greeted by a perfectly clean boot and Secure Boot status check outputs that make you smile.

Here in Windows-World, we take those smiles as we can get them, cheerfully and with good humor. Once the panic subsides, that is…

Facebooklinkedin
Facebooklinkedin

X12 Runs Production Win11 After Boot Repair

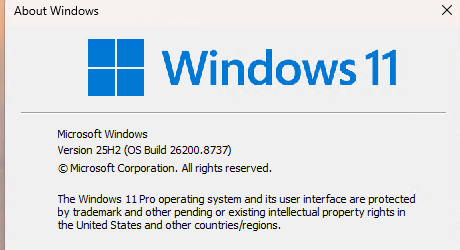
Here’s an odd one. I just  fixed a broken boot environment on my ThinkPad X12 (Gen 1) Hybrid Tablet. Oddly enough, Winver is now showing Windows 25H2 Build 26200.8737. What makes that odd? Prior to the fix, I’d been running the Beta release, Build 26220.8370. Hence my conclusion that the X12 runs production Win11 after boot repair. All I can say is: WTF?@*

Why X12 Runs Production Win11 After Boot Repair?

That’s the question I asked Copilot right away once I figured things out. Here’s what it said (bold emphasis mine):

bcdboot reconstructed the EFI boot environment from the on-disk Windows 25H2 partition, laying down a clean, production-signed bootloader baseline with no awareness of the machine’s prior Beta channel enrollment. The Garlin script then installed the production-variant SkuSiPolicy.p7b, which writes itself as a UEFI firmware variable and enforces production-level Secure Boot signing rules. This blocked the pre-release trust chain that Beta channel builds rely on, so Windows Update classified the device as a retail endpoint. It then served it the latest production-signed CU, build 26200.8737, not a Beta flight.

Whoa! Who knew that could happen? But sure enough when I visit Settings > Windows Update > Windows Insider Program on the X12, it tells me to “Join the Windows Insider Program.” This PC is clearly unenrolled and running a production build. Amazing!

Plus ça change…

Here in Windows-World, strange is just part of the day-to-day game. This latest little wrinkle, however, ranks pretty high on my own Strange-O-Meter. But as long as the laptop is working and doing what it should, I’m happy. In fact, I’m bemused because the official word is you can’t leave the Insider Builds unless you do so at a precise moment when it’s allowed, or perform a clean install. Seems like — at this moment, at least — here’s another way!


Facebooklinkedin
Facebooklinkedin

USB-C UFD Restores X12 Boot

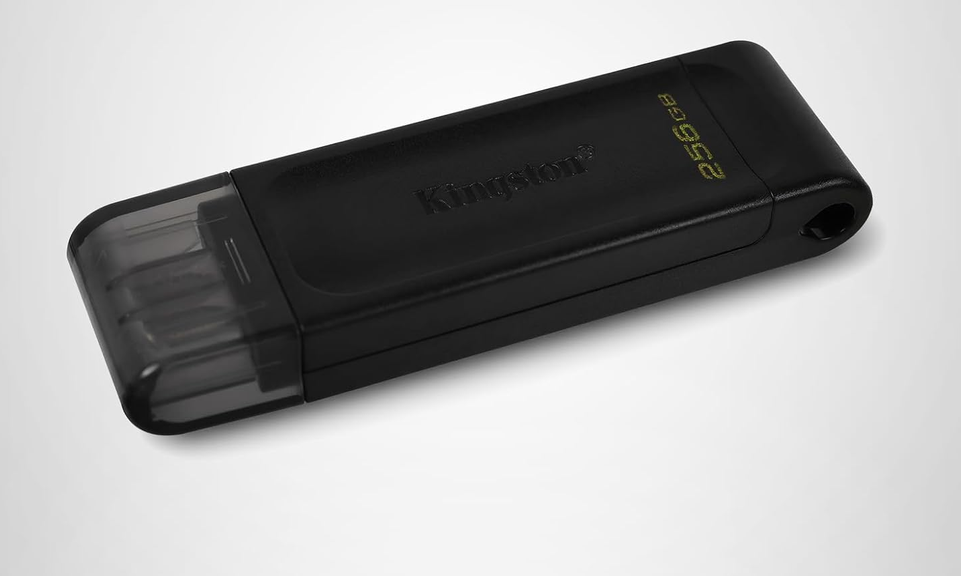
I wasn’t sure Copilot was right. Even some of my regular commenters here at edtittel.com were sure Copilot was wrong. Fact is, I couldn’t get into WinRE to repair my damaged BCD until I inserted a brand-new USB-C based Kingston Data Traveler 70 (US$28) into the X12 Hybrid Tablet (Gen 1). Now it’s working. More explicitly using the USB-C UFD restores X12 boot capability.

Before that, I had tried known, good working USB-A UFDs via a USBA2C adapter. I’d also tried native USB-C NVMe SSDs as well. Apparently — as Copilot averred and my experience shows — it will only boot to a real USB-C UFD. Same format, same files, same creation approach on the other devices just didn’t result in a boot into WinRE for on-disk boot repairs to the C: drive. That much of the travail, at least, is now over…

After USB-C UFD Restores X12 Boot, Then?

Now I need to fix Secure Boot (SB), which is what got me in trouble in the first place. Right now, the unit boots fine with SB disabled. I’ve run the Garlin check script and have installed SkuSiPolicy.P7b. But still, I get the red text “Secure Boot mismatch” error info when I try to book with SB turned on. I’m going to reset the keys to factory default, and pick up from there to see what happens next.

But first, after I rebooted again on the X12 without making any changes, it took me to the Windows 11 lock screen. Windows Security gives the system its blessing (green checkmark on the Secure boot entry). So I may already be over the hump, because of the second reboot.

If at First You Don’t Succeed, Reboot Again…

On a third reboot, I get the spinning circles while the OS loads and get right to the Windows 11 lock screen. No more boot issues, no more “boot mismatch” refusals. I seem to have things working again.

As the old saying goes “Get the right tool for the job.” In my case I had to learn the hard way that I MUST use a USB-C UFD to boot the X12 into anything. Now I know. It’s in my little plastic bin of UFDs and I guess I know how to use it. Case closed, I hope!

Facebooklinkedin
Facebooklinkedin

Long Trip From 26H1 To 25H2 On P16G3

Now that I have a Snapdragon X2 PC with a “REAL” version of Windows 11 26H1 installed, I no longer needed the “experimental” version on the Lenovo ThinkPad P16 Gen 3 Mobile Workstation. SO I decided to clean install Windows 11 Pro for Workstations 25H2 on that machine instead. Wow! Did I ever choose a wicked path to follow. It turned out to be a long, long trip from 26H1 to 25H2 on P16G3 (machine name for the afore-named ThinkPad). Buckle up!

Why Such a Long Trip From 26H1 To 25H2 On P16G3?

TLDR answer: Secure Boot foul-ups. After the install, I ran garlin’s Check_UEFI-CA2023.ps1 script on my ThinkPad P16 Gen 3, fully expecting the usual audit output I see on other Windows 11 machines. Instead, I got something that stopped me cold — a warning that certain Secure Boot certificate operations were blocked. The focus keyword here is Secure Boot Deployed Mode ThinkPad P16 Gen 3, and if you’ve landed on this post, you’re probably staring at the same bewildering output I was.

Here’s the short version: the machine was stuck in UEFI Deployed Mode — the strictest Secure Boot state in the UEFI specification. Windows reported Secure Boot as “On,” everything looked fine in Windows Security, and yet the Secure Boot certificate update operations the script needed to perform were completely blocked. No error. Just a quiet wall.

As it turns out, Lenovo began shipping 2024-and-newer ThinkPads — including the P16 Gen 3 — in Deployed Mode by default. That’s a deliberate policy change, not a quirk or a misconfig. And once I understood what it meant, the fix turned out to be a two-minute BIOS menu operation. Let me walk you through it.

What Is UEFI Deployed Mode, Exactly?

The UEFI specification defines four platform security modes, and it helps to know all of them before you go poking around in the BIOS.

Mode Platform Key (PK) DeployedMode Flag Can Modify Secure Boot Variables?
Setup Mode Not installed Off Yes — fully open
User Mode Installed Off With proper authentication
Audit Mode Not installed Off Yes — for testing only
Deployed Mode Installed On No — physical BIOS access required

Deployed Mode is the strictest of the four. The vendor’s Platform Key (PK) is installed, and a separate DeployedMode flag is set to active — which means no software running inside Windows, no matter how privileged, can touch the Secure Boot variables: PK, KEK, db, or dbx. The firmware physically refuses those writes. Therefore, any tool that tries to update Secure Boot certificates from within the OS is going to hit a hard stop.

Here’s the generational split that matters: ThinkPads from 2023 and earlier shipped in User Mode, where the PK is installed but the DeployedMode flag is off, leaving the certificate database accessible via authenticated software. The P16 Gen 3 — along with other 2024-and-newer Lenovo models — ships in Deployed Mode by design. That’s a meaningful architectural difference, and it’s why older tutorials and community scripts don’t account for it. [Source: Lenovo CDRT Docs — Guide to Secure Boot Modes]

Garlin’s Scripts Hit A Wall

Let me be clear: garlin’s PowerShell scripts are excellent community work. The Check_UEFI-CA2023.ps1 and Update_UEFI-CA2023.ps1 scripts are the most thorough tools available for migrating from the expiring 2011 UEFI CA to the 2023 UEFI CA. That’s a transition Microsoft is pushing hard as it tightens Secure Boot enforcement. However, they presuppose a machine in User Mode, where certificate variable writes are at least possible with the right credentials.

On a machine in Deployed Mode, that presupposition falls flat. The firmware’s DeployedMode flag instructs the UEFI runtime to reject all Secure Boot variable modifications originating from the OS environment — full stop. Garlin himself acknowledges as much: you can’t make certain changes while the vendor’s PK is in place and the DeployedMode flag is active. The scripts detect this condition and report it, which is exactly what I saw.

There’s a second layer to this on my specific machine. The P16 Gen 3 runs Windows 11 Pro for Workstations — a meaningfully different edition from Home, Pro, or Enterprise. Pro for Workstations ships with Virtualization-Based Security (VBS) and HVCI enabled by default and uses an edition-specific SkuSiPolicy.p7b file. In addition, it’s designed for domain and enterprise management workflows. The scripts were built around the more common consumer and business editions; Pro for Workstations introduces just enough architectural divergence that some operations require extra care. As a result, even if Deployed Mode weren’t in the picture, this wouldn’t be a straight plug-and-play situation.

The Fix: Exiting Deployed Mode via BIOS

Here’s what I did. The good news is that Lenovo provides a clean, supported path to exit Deployed Mode directly from the BIOS Setup interface — without clearing Secure Boot keys, without entering Setup Mode, and without reinstalling anything. The machine transitions from Deployed Mode to User Mode: the PK stays installed, Secure Boot stays on, and the OS-level certificate update path opens back up.

⚠ Warning — Read Before You Touch Anything

Do NOT select “Reset to Setup Mode” or “Clear All Secure Boot Keys” in the BIOS menu. Either action removes the Platform Key entirely, disables Secure Boot, and requires full manual key reinstallation to recover — a process that is very much not two minutes. If you’re unsure at any step, “Restore Factory Keys” is a safe fallback that gets you back to Lenovo’s shipped state.

Step-by-Step: Exit Deployed Mode on the ThinkPad P16 Gen 3

  1. Enter BIOS Setup. Restart the machine. Press F1 (or Fn+F1 if function-key lock is on) repeatedly at the Lenovo logo during POST. The ThinkPad UEFI BIOS Setup menu opens.
  2. Navigate to Security → Secure Boot . Use the arrow keys. You’re looking specifically for the sub-entries one level down.
  3. Select “Exit Deployed Mode.” This is the one you want. Confirm the action when prompted. This clears the DeployedMode flag only — the Platform Key remains installed and Secure Boot stays active. The machine moves from Deployed Mode to User Mode.
  4. Save and exit. Press F10 and confirm the save. The system reboots.
  5. Verify in Windows. Open msinfo32 (Win+R → msinfo32 → Enter). Under System Summary, confirm: Secure Boot State = On and Platform Mode = User Mode. Both should now read correctly.
  6. Re-run garlin’s Check script. Open an elevated PowerShell prompt and run Check_UEFI-CA2023.ps1 again. The Deployed Mode warning should be gone, and the script should now report actionable certificate update steps as intended.
💡 Tip

If “Exit Deployed Mode” doesn’t appear in your Key Management menu, confirm you’re running a current BIOS version. Lenovo has updated the P16 Gen 3 firmware several times since launch — older BIOS revisions may expose the option differently or label it under a slightly different path. [Source: Lenovo Support HT515493]

Bottom Line

The ThinkPad P16 Gen 3’s Deployed Mode is a feature, not a bug — Lenovo added it to give enterprise customers the highest available firmware integrity assurance right out of the box. Garlin’s scripts are genuinely excellent community tools for the Secure Boot CA 2023 migration, but they presuppose User Mode and a standard Windows edition. Alas, on the P16 Gen 3 running Pro for Workstations, those assumptions don’t hold without first making one BIOS menu change. That said, once you exit Deployed Mode and land back in User Mode, the standard Windows Secure Boot update path works exactly as intended — and the whole detour costs you about two minutes and one reboot.

One more thing: Garlin will tell you to edit the registry and run a scheduled Secure-Boot-Update task. Works on most Windows editions, but not on Pro for Workstations. Follow his advice, unless you’re running that version. I wasted hours until I figured out it just wouldn’t work. Sigh.

Facebooklinkedin
Facebooklinkedin