OK, I confess. I’m more than a little OCD in keeping my Windows PCs updated. That applies to Secure Boot as much as anything else. And recently, in bringing my mini-fleet here at Chez Tittel up to snuff, I’ve found myself with old boot UFDs and current PCs. Yesterday, I blogged about that in a post about “Checking Boot/Recovery Media…” Today, in reading the ElevenForum threads I learned that Garlin’s check script now includes boot media status. I also learned how to make my dozen or so bootable UFDs current.
Bootloader Is Key: Making Boot/Recovery Media CA-2023 Compliant
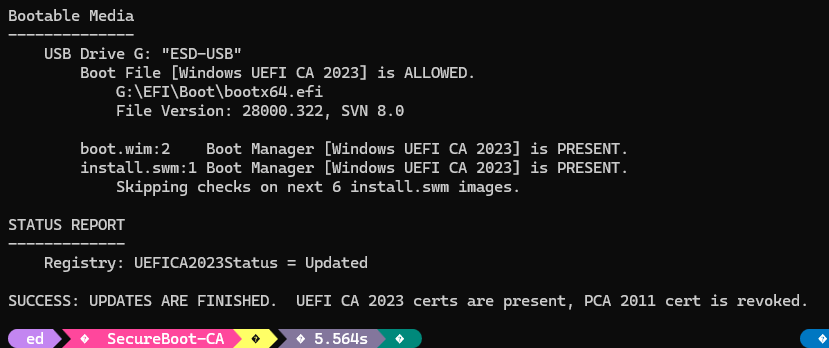
As you can see in the lead-in graphic the file named bootx64.efi is key to compliance. If the file is signed with CA-2023, it’s good; if it’s signed with CA-2011; it’s banned. Fortunately replacing a banned file with the good version is pretty straightforward. But because Windows doesn’t keep the C:\Windows\Boot\efi folder synched to what’s actually in the EFI partition, boot files are best garnered from the latter, not the former.
The steps in the process to provide a CA-2023 signed bootx64.efi therefore go best as follows:
1. Mount the EFI partition as an accessible drive: mountvol /S S:
2. Rename the existing UFD file to .old:
rename g:\efi\boot\bootx64.efi bootx64.old
3. Copy the CA-2023 bootloader into place:
copy S:\efi\boot\bootx64.efi to G:\efi\boot\bootx64.efi
4. Unmount the EFI partition for cleanup:
Note: On Macrium Reflect rescue disks you want to copy the CA-2023 version of bootx64.efi onto bootmgfw.efi instead.
Check Your Work: Run Garlin Script
You can use the latest version (be sure to download before use) of the Garlin Check_UEFI-CA2023.ps1 script to check your work. The correct syntax for this invocation reads (be sure to Unblock in advance):
.\check_UEFI-CA2023.ps1 -bootmedia -verbose
If all goes well the output should (nearly) match what you see in the lead-in graphic. If status shows BANNED, not ALLOWED, then the bootloader is signed with CA-2011, not CA-2023.
It’s pretty easy to fix, though. Hopefully you can do what I just did and bring all of your boot media into compliance. Cheers!
Had some trouble with the commands you posted.
What worked for me on Windows 10 25H2…
1. Mount the EFI partition as an accessible drive: mountvol /S S:
Changed to “mountvol S: /S”
If S: has been used before, an error will occur If so, run
“mountvol S: /d” first
2. Rename the existing UFD file to .old:
rename G:\efi\boot\bootx64.efi bootx64.old
Changed to “ren” instead of rename
3. Copy the CA-2023 bootloader into place:
copy S:\efi\boot\bootx64.efi to G:\efi\boot\bootx64.efi
Removed the “to” to make the command copy/paste/runnable.
Should be “Windows 11” 25H2…
I’m missing something here. I don’t see a mention of 25H2 in the blog post to which to attach Windows 11. Help me fix what needs fixing and give me more info or context, please.
As always, thanks for your interest and feedback.
Cheers!
–Ed–
Thanks for the reply.
I was mentioning what version of Windows I was using, and mistyped Windows 10 25H2, when I meant Windows 11 25H2…so purely informational.
The “mountvol” command line did not work as listed in the article, either in PowerShell or the Command prompt. The change I made that did is listed.
I also added a suggestion to include the “/d” option in the article in case mountvol for S: had been run before.
The “Rename” command line in the article did not work because I was using PowerShell instead of the Command prompt. “Ren” did. Rename works fine in the Command prompt…so a difference that folks may run in to.
The “Copy” command change was simply a suggestion to remove the “to” in the article, to make it copy/paste/runnable…which is what I tried initially, didn’t look closely enough to see the “to” in the line, and it failed.
Thanks for the detailed feedback. I’m on deadline today (6/15), but will fix the commands later this week once I get “over the hump.” Thanks again, –Ed–
I didn’t change the mountvol syntax because it works properly here at Chez Tittel for all systems on which I tried it. Something odd, here, but I don’t have enough to go on to figure out what that might be. Any ideas?
I did change the rename command to use the proper ren string for the command name.
I did drop the “to” in the copy command, turning pseudo-code into real code (or p-script to r-script) as the case may be.
Again, thanks for your feedback and input. I appreciate you taking the time to read my work closely, and even more to share those observations with me.
–Ed–
The “ren” vs “rename” was due to working in PowerShell.
Rename works fine with the Command prompt.
Thanks for posting
I guess if your an expert this all makes sense. So are we working on efi partition on our SSD and making changes to it? Scary process.
As long as you have an image backup of the whole thing, a bootable rescue disk, and the knowledge to use it, it’s no big thing. Otherwise, heck yeah!
–Ed–