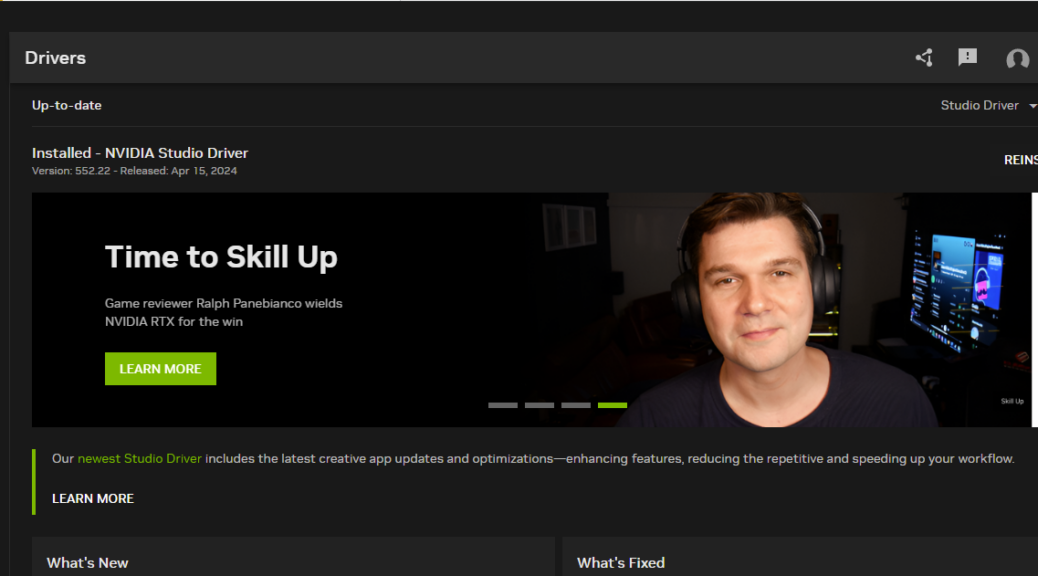
Category Archives: Insider stuff

Thunderbolt Software Upgrade Strategy

At first I thought “Catch-22.” Those using PCs old enough to run Intel’s Thunderbolt Software have reason to ponder Heller’s famous catch. An updated replacement — namely, Thunderbolt Control Center — is available from the Microsoft Store. But if you run Thunderbolt Software, it doesn’t show up there. Nor is there an easy upgrade path. That’s why, in fact, I had to come with a Thunderbolt Software upgrade strategy.

Finding a Thunderbolt Software Upgrade Strategy

All I can say is “I got lucky.” I chose as my search string to dig into this topic “Thunderbolt Software vs. Thunderbolt Control Center.” It immediately struck gold in a Forum post from Mac/PC oriented website egpu.io. There, those same terms appeared in inverted order.

There’s a trick involved in making this upgrade. It works as follows: if one downloads newer DCH drivers for the Thunderbolt device in DevMgr → System Devices, updating that driver causes Windows 11 (or 10, for that matter) to update the related software automatically. It’s actually pretty easy. I’m going to upgrade my remaining holdover system (one of my Lenovo X380 Yogas, acquired in late 2018) and take you through the steps involved.

NOTE:For a Thunderbolt device to show up in DevMgr, you may need to plug in an actual Thunderbolt or USB4 device. That’s what I had to do on each of my three 2018 vintage systems that needed this upgrade.

Making the Transition, Step-by-Step

Step 1: Visit this Intel Download page and download the ZIP file available there. Don’t be put off by the NUC notation: I’ve run in on a Yoga 380 and an X1 Extreme, and it worked on both systems. It seems to work on any Intel Thunderbolt controller.

Step 2: Unzip the file into a target directory. I named mine TBdev to make it easy to identify.

Thunderbolt Software Upgrade Strategy.unzipped

Contents of the ZIP file in the V:\TBdev folder. The INF folder is where the action will be.

Step 3: Open DevMgr, navigate to the Thunderbolt controller, right-click, and pick “Update driver.” In the resulting pop-up window, pick “Browse my computer for drivers “(lower item). Browse to your TBdev\INF folder, as shown here, then click “Next.”

Click “Next” and the driver should update itself from the various files in the INF folder.

If this process succeeds, you’ll see something like the following Window appear.

Guess what? If this worked, you’re finished. Windows will now visit the MS Store on its own and install the Thunderbolt Control Center app for you. Until you next reboot your PC, you’ll see both the old software and the new side-by-side if you type “Thu” into the Windows 11 (or 10) search box:

Old (Thunderbolt software) on the left, new (Thunderbolt Control Center) on the right. Only TCC will work, tho…

After the next reboot, Thunderbolt Software no longer appears. Case closed!

Facebooklinkedin
Facebooklinkedin

P16 Safeguard Hold Blocks Windows11 22H2

When the news hit yesterday that the gradual rollout for Windows 11 22H2 was underway, I had a feeling… I’m someone who’s perpetually or chronically excluded from the first round of many new Windows releases or features. And so it was for my brand spanking new Lenovo P16 Gen1 Mobile Workstation. Because a P16 Safeguard Hold blocks Windows11 22H2, it gets the “coming soon” message shown in the lead-in graphic. Sigh: here I go again.

If P16 Safeguard Hold Blocks Windows11 22H2, Then What?

Wait for MS to lift the hold, and check the other machines. My two- week-old Lenovo P360 Ultra didn’t even get the “coming soon” message. Those are both 12th Gen i9 CPU based machines. Right now, I’m checking my Lenovo Yoga 7i (11th Gen i7) and X1 Carbon (8th Gen i7) PCs. So far, neither has gotten the offer either. That still leaves the Ryzen 5800X build upstairs to check, but I think I know what I’ll find…

That said, the MS Download Windows 11 page is already offering ISOs for 22H2. I can force the upgrade if WU isn’t offering and it’s not on Safeguard Hold status. That describes 4 of my 5 PCs running Windows 11 21H2 right now. I’ll have to think about what I want to do with them, item-by-item.

P16 Safeguard Hold Blocks Windows11 22H2.dl22h2

For those who want to push the boundaries, MS also makes 22H2 ISOs available for download. [Click image for full-sized view.]

What’s Next, at Chez Tittel?

Right now, I’m standing pat. I’ve got a couple of other projects underway. I want to make progress on those, and then I’ll start thinking about which PCs to advance to 22H2, and which to leave alone. Given that the P16 is on Safeguard Hold, I’ll wait on that one. But as a straight-up test machine, I’ll probably push the P360 Ultra forward first. The others will vary (I use the X1 Carbon as a road PC, so I’m not inclined to push that one forward ahead of its time).

Stay tuned! I’ll keep you posted as things develop. It’s all fun, all the time, here in Windows World.

Note Added 1 Hour Later

I just force-upgraded the Lenovo Yoga 7i to 22H2 (11th gen i5-1135G7, 12GB RAM, 500 GB Samsung OEM NVMe SSD). Despite downloading via Wi-Fi, the whole process using the Windows 11 Update Assistant took under 18 minutes to complete. I see no errors in DevMgr either. So far, so good…

Note Added End of Day (?5? hours later)

I have now also force-upgraded the P360 Ultra and the Ryzen 5800X builds. Because the Nvidia driver was auto-updated during the upgrade (and I already know that’s a non-starter) I had to switch over to the built-in Intel UHD 770. I’ll have to roll back the Nvidia driver again to get the discrete GPU working. Again, I used the Upgrade Assistant.

For the 5800X I downloaded an ISO file, mounted it, then ran setup.exe from the root of that virtual drive. Took a bit longer to download, but was also a pretty quick install. So that’s 3 PCs upgraded today without too much drama or drivel.

Facebooklinkedin
Facebooklinkedin

Thinking About Windows 10/11 SSDs

I’m still busy benchmarking away on the two Thunderbolt4/USB4 PCs that Lenovo has recently sent my way. But as I’ve been doing so, I’ve been thinking about Windows 10/11 SSDs in general. On that path, I’ve realized certain principles that I’d like to share with you, dear readers.

I’m spurred in part to these statements from a sponsored (and pretty contrived) story from MSPowerUser entitled “Is NVMe a Good Choice for Gamers?” My instant response, without reading the story — which actually focuses on storage media beyond the boot/system drive — was “Yes, as much as you can afford.” Spoiler alert: that’s what the story says, too.

Where Thinking About Windows 10/11 SSDs Leads….

Here are some storage media principles that flow from making the most of a new PC investment.

  1. The more you spend on a PC, the more worthwhile it is to also spend more on NVMe storage.
  2. Right now, PCIe Gen4 drives run about 2X the speed of PCIe Gen3 drives. They don’t cost quite twice as much. Simple economics says: buy the fastest NVMe technology your PC will support.
  3. Buy as much NVMe storage as you can afford (or force yourself to spend). For pre-built PCs and laptops, you may want to buy NVMe on the aftermarket, rather than get the drives pre-installed. Markup on NVMe drives can be painful. Hint: I use Tom’s Hardware to keep up with price/performance info on NVMe SSDs and other PC components (it’s also the source for the lead-in graphic for this story, which still prominently displays the now-passe Intel Optane as an SSD option. Caveat emptor!).
  4. Corollary to the preceding point: fill every M.2 slot you can in your build. For both my recent Lenovo loaners — the P360 Ultra and the P16 Mobile Workstation — that means populating both slots with up to 4TB each. Right now, the Kingston KC3000 looks like a 4TB best buy of sorts.

Thinking Further (and Outside the Box)

More thoughts in this vein, with an eye toward external drives and multi-tiered storage (archives and extra backups):

  1. If you’re going to put an NVMe SSD in an external enclosure, you will be OK for the time being in a USB 3.2 rather than a USB 4 enclosure. Right now, the newer enclosures cost more than twice as much but don’t deliver anywhere near 2x the speed (except on synthetic benchmarks — I used C: imaging times as a more reliable indicator). Over time this will no doubt change, and I’ll keep an eye on that, too.
  2. I don’t consider spinners (conventional mechanical hard disk drives, or HDDs) any more, except for archival and inactive storage. If I need something for work or play, it goes on an SSD. If I might need something, someday (or to restore same) then it’s ok on an HDD.

I used to restrain spending on NVMe SSDs because of its high price differential. I’m now inclined to believe that restraint is a false economy and forces less productivity as a result. That’s why I’m rethinking my philosophy. I haven’t quite yet gotten to Les Blanc’s famous dictum (“Spend It All”) but I am coming around to “Spend As Much as You Can”…

Remember This Fundamental Assumption, Tho…

My reasoning aims at high-end PCs where users run data-, graphics-, and/or compute-intensive workloads. It does not apply, therefore, to home, hobbyist, and low-end office users. For them typical productivity apps  (e.g. MS Office or equivalent), email, web browsing and so forth predominate. They wouldn’t need, nor benefit much from, buying lots of fast NVMe storage. That said, a 1 TB fast-as-possible NVMe for the boot/system drive is the baseline. Other storage options will balance themselves against budget to dictate other choices and PC builds for such users.

In different terms, if you’re not maxing out your PC running data analytics, 3D models and other high-end graphics rendering, or AI or machine learning stuff, this advice is most likely overkill. Too, too costly. But for this user community, more spent on NVMe (and GPUs and memory as well) will repay itself with increased productivity. ‘Nuff said.

Facebooklinkedin
Facebooklinkedin

Lenovo P16 Gen1 Gets Unboxed

Just over a month ago, I reached out to my contacts at Lenovo. I’d been wanting to lay hands on some newer PCs so I could dig into Thunderbolt 4 and USB 4 to understand its workings. A couple of weeks ago, I received a P360 Ultra SFF PC equipped with 2 each TB4/USB4 ports. Last Friday, unannounced and unexpected, another so-endowed laptop arrived at my door. Here, I’ll report on my initial findings as this Lenovo P16 Gen1 gets unboxed and set up. It’s a doozy!

Details: Lenovo P16 Gen1 Gets Unboxed

I’ll provide a recitation of facts and figures for this powerful portable workstation PC. In fact, it’s the most expensive personal computer I’ve ever worked on. Indeed, its website price, as configured, is a staggering US$9,719! It’s a big heavy sucker, too: 30.23mm x 364mm x 266mm / 1.2″ x 14.3″ x 10.5″, and 6.6 lbs/3.0 kg.

Here’s a selective list of what’s inside this beast of a Widows 11 Pro laptop. (Find all details on its product page under “Tech Specs”):

CPU: i9-12950HX (16 cores, 24 threads)
RAM: 128 GB (4 x 32GB  4800 MHz DDR5)
GPU (built-in): Intel UHD 770
GPU (discrete): Nvidia RTX A5500 (16 GB VRAM)
Display: 16.0″ WQUXGA (3840×2400) OLED touchscreen
SSD: 2 TB Kioxia KXG7APNV2T04 (PCIe 4.0 Gen4 NVMe)
Biometrics: Fingerprint reader and Hello IR Camera

As cool and impressive as all this stuff is — and it is all that for sure — the real reason I’m using this monster appears in the next image, enumerating the unit’s various ports:

My real reason for using this laptop is item 10, boxed in red.
[Click image for full-sized view.]

I’m jazzed, of course, by the panoply of features and stuff on this giant luggable PC. But I’m most interested in working with its two rear USB-C ports, both of which support Thunderbolt4 and USB4. And indeed, I’ve confirmed that both work as claimed. That’s not always the easiest or most obvious thing, as I’ll explain next.

Getting to TB4/USB4

As I’m learning, it takes some diligence to get either or both of these fast bus technologies to work. The PC port has to support these technologies, as does the target device, and the cable between the two. This is not always the easiest thing in the word to ensure or arrange. But as the following screenshot shows, I’ve gotten both working on the ThinkPad P16 Gen1 Mobile Workstation:

Intel TB Control Center: Above, the CalDigit TS4 dock; Below: an NVMe drive inside the Konyead USB4 enclosure.
[Click image for full-sized view.]

Both TB4 and USB4 remain cutting edge connection types. Everything about them is expensive right now. The CalDigit TS4 dock goes for over US$350 when you can find one for sale. The Konyead M.2 USB4 enclosure costs US$130, which is about what I paid for the Sabrent 1TB Rocket 4 Plus I put inside.

And then, one MUST use TB4/USB4 cables which aren’t cheap either (I got mine with the CalDigit) but they routinely go for US$20-40 for 1 M. Cables are not always well-labeled. It’s a good idea to go for those explicitly specced out for 40Gpbs data and marked as such. I’ve had lots of interesting issues from using lower-spec cables. Mostly, USB4/TB4 simply doesn’t work as promised and the device drops to UASP/USB 3.1/2 levels of performance.

Tomorrow, I’ll follow up and explain what all that means… Stay tuned!

Facebooklinkedin
Facebooklinkedin

Old School Driver Repair Still Works

Whoa! I’ve had the Lenovo P360 Ultra SFF PC for a week now, and I FINALLY got the discrete Nvidia RTX A2000 GPU working. It showed only a black screen with the Acer XR382CQK monitor. With a Dell 2717 from my wife’s PC as a stand-in, it would run (briefly) then fall over (AppCrash on NvidiaContainer.exe). My suspicion of driver issues were confirmed by the ace Lenovo engineering team. And I was happy to learn that an old school driver repair still works.

What Old School Driver Repair Still Works?

Good question! Having just written a story for TechTarget about fixing black screens, this was chapter and verse for me. If the current GPU driver falls over, received wisdom goes “roll back a version. Keep going till it works…” I’m actually not sure how far that would have gotten me.

But what the Lenovo engineering folks told me falls in line with that approach. They simply said “install version 511.65” and furnished me with a Lenovo download link for same.

Long story short: I installed the older driver. When I rebooted the machine, the previously non-functional XR382CQK monitor worked like a champ in the miniDP port. I didn’t even have to lug my wife’s Dell 2717 into position instead.

A Further Bulletin from Engineering…

Here’s what one of the engineering team emailed to the group assembled to help me over this hump:

 I checked with our lab and there is a known recent issue with Nvidia’s latest driver 513.12 and later. There will be a P360 Ultra BIOS release by end of month to address the issue. However, the workaround in the meantime is to use driver 511.65.  The symptoms are similar to what Ed is seeing – driver crashes.

Given that insight, a quick confirmation that I was running 516.94, and a link to the download for that older driver version, I got straight to work. Problem solved! Nice to know the old school repair still works. Even nicer to get pointed at the last known working version by the Lenovo team.

Facebooklinkedin
Facebooklinkedin

Accidental Pause Kills In-Process Updates

I just learned something I didn’t really want to know. I “oopsed” my way into pausing updates on a Dev Channel test PC this morning. As I did so, the download for Build 25201 was underway, as was the install for KB5017257 (CU for .NET 3.5 and 4.8.1). Alas, this accidental pause kills in-process updates. Thus, I had to restart to apply all the other stuff that had finished, then un-pause updates. Next, I had to redownload Build 25201. Both installed correctly, and another reboot finished the job.

Living with Accidental Pause Kills In-Process Updates

Oh well. If that’s the worst thing that happens to me today, it will still be a good day. What I didn’t know was that in-process items would come to a screeching halt. That’s because I’d never accidentally clicked “Pause for 1 week” during the update process before. Sigh.

Hopefully, alert readers can profit from my mistake without having to learn the hard way for themselves. Tip: stay away from the “Pause…” button while updates are in process. That’s the best way I can think of to skip the whole learning experience entirely.

Compounding the Mistake…

Because I hadn’t yet applied last week’s Patch Tuesday updates to the affected machine, as well as pending Dev Channel build 25201, this was a pretty big update cycle for that machine. I count 1 driver update, 2 Definition updates, and 3 “Other” updates among that number, as well as the items already recited.

But alas, that’s the way things sometimes go in Windows World. Fumble fingers got me pretty good this time. Hopefully, we’ll all be exempt from this particular gotcha going forward. Sigh.

Facebooklinkedin
Facebooklinkedin

Backblaze Data Confirms SSD Trumps HDD Reliability

It’s always made sense on an intuitive basis. Hard Disk Drives (HDDs) include spinning platters, moving arms with read/write heads, motors to power things, and gears to control action. SDDs are made entirely of circuitry: no moving parts. Thus, it’s compelling to assert that SDDs should be more reliable, and less prone to failure than HDDS. And indeed, the latest 2022 Drive State report from online backup and storage provider Backblaze weighs in on this topic. As I read it, that Backblaze data confirms SSD trumps HDD reliability.

The lead-in graphic shows 4 years’ worth of SSD data vs. 8 years for HDDs for boot drivers in their thousands of datacenter based servers. Whereas there’s a dramatic upward knee in the curve for HDDS between years 4 and 5 (from 1.83% to 3.55%), failures actually dipped for SDDs during that interval (from 1.05% to 0.95%). Interesting!

How Backblaze Data Confirms SSD Trumps HDD Reliability

The afore-linked report explains that boot drives function in multiple roles on the company’s plethora of storage servers. They store log and temprorary files; they maintain storage holdings based on each day’s storage activities and volume. The disparity in the number of years for which data is available comes from later adoption of SDDs as boot drives at BackBlaze. That practice started in Q4 2018. Today, all new servers boot from SSDs; older servers whose HDD boot drives fail get SSD replacements.

The numbers of SSDs keep going up, too. The end-of-year 2021 SSD report encompassed 2,200 SSDs. By June 30, 2022, that count grew to 2,558. Failure rates for such devices show much lower numbers than for HDD (see the tables labeled Backblaze SSD Quarterly Failure Rates in the latest report for more detail). Models included come from the following vendors: Crucial, Dell, Micron, Seagate and WDC.

Note: the report itself says:

For any given drive model in this cohort of SSDs, we like to see at least 100 drives and 10,000 drive-days in a given quarter as a minimum before we begin to consider the calculated AFR to be “reasonable”.

The real news, of course, is that quarterly, annualized and lifetime failure rates for SSDs are significantly lower than for HDDs, based on Backblaze’s own long-running data collection. Thus their conclusion comes with the weight of evidence “…we can reasonably claim that SSDs are more reliable than HDDs, at least when used as boot drives in our environment.”

Good stuff! As for me, I like SSDs not just because they’re less prone to failure. They’re also FAST, if more expensive per storage unit than spinners.


Facebooklinkedin
Facebooklinkedin

Exploring TB4/USB4 Backup Speeds

OK, then. I’m starting to dig into the capabilities of my new loaner SFF Lenovo P360 Ultra PC. It’s a beast, especially for such a small package (3.4 x 8.7 x 7.9″, 87 x 223 x 202 mm, weight 4.4lb/2.0 kg). Right now I’m giving the front USB-C ports a workout, and exploring TB4/USB4 backup speeds. They’re amazing.

Exploring TB4/USB4 Backup Speeds.f&rview

About the preceding graphic. It shows a front and rear view of the P360 chassis. Here’s what those numbered items convey:

1. Power switch (on/off)
2. Audio/headphone jack
3. USB 3.1 Gen 2 Type A port
4. 2 x Thunderbolt4/USB 3.1 Gen 2 Type C ports
5. Wi-Fi antenna mount
6. 2.5 GbE wired network (RJ-45)
7. 1.0 GbE wired network (RJ-45)
8. 4 x miniDP GPU (connects to Nvidia GPU)
9.  Chassis latch release
10. 3 x full-size DP GPU (connects to on-chip Intel GPU)
11. 4 x USB 3.1 Gen 2 Type A ports
12.  Optional PCIe card slot/port
13. Power in from 300W power brick

What Exploring TB4/USB4 Backup Speeds Says

First things first: I ran comparatives using CrystalDiskMark on a set of different NVMe enclosures with their own drives, as follows:

Enclosure                NVMe SSD              Price (Date)
======================   ==================    ==============
Sabrent NVMe PCIe x1.3   ADATA XPG 256GB       US$ 60  (2019)
Puhui USB 3.1 USB-C      Samsung OEM 512GB     US$ 30  (2022)
Konyead M.2 TB4/USB4     Rocket 4 Plus 1TB     US$162  (2022)

I didn’t get a lot of useful data out of that comparison, though the numbers for all three devices increase their readings down the preceding list. The final item shows most readings between 2x and 3x those for the first item. However, I decided to compare backup results for all three setups, working through a brand-new Belkin Pro Thunderbolt 4 Dock.

The results turn out to be a bit of a good new/bad news scenario.  New TB4/USB4 NVMe enclosures are still punishingly expensive. Performance results from backup show them not yet worth the $132 differential vis-a-vis a cheap0 USB 3 3.1 Gen2 version. About the only thing they can do right now, as far as I can tell, is bring up the “USB 4.0 SSD” label in the Thunderbolt Control Center, as shown in the lead-in graphic.

Big Price Diffs Don’t Translate to Performance

Here’s a table of backup times from Macrium Reflect Free to the three drives, listed by Enclosure name (consult previous table for more info on innards):

Enclosure                Backup (times)
======================   ==============
Sabrent NVMe PCIe x1.3     162 (2:42)
Puhui USB 3.1 USB-C        131 (2:11)
Konyead M.2 TB4/USB4       132 (2:12)

While there’s a 31/32 second difference (about 20%) between the older Sabrent enclosure and the two newer ones, there’s so little difference (1 second) between the other two that I’m sure that falls in the margin of measurement error one would expect.

What’s interesting here is that these backup speeds — even on the slowest/oldest device — are about twice as fast as on my other, similarly loaded test machines (which top out at USB 3.1 Gen 2). That tells me for those who do a lot of backing up, video editing, or other data intensive stuff there’s some real benefit to be gained from investing in TB4/USB4 ports and devices.

Lessons Learned

What lessons do I draw from this experiment? Glad you asked! Here’s a list:

  • It’s definitely worth adding an interface to older desktops to support TB4/USB4 for the speed bump it provides.
  • This new technology provides a “speed reason” to consider buying in on a newer laptop or PC.
  • Newer, more expensive TB4/USB4 NVMe enclosures may not be worth the added cost as compared to USB 3.1 Gen 2/TB3 counterparts.
  • From what I’m reading, it’s a good idea to use as short a USB4/TB4 rated cable as possible.
  • It’s also best to hook the NVMe enclosure directly to the PC if you can (going through the dock reduced performance by about 5% overall)

A terrific experiment, and a  great learning lesson, too. Thanks to the nice folks at Belkin and Lenovo who made their gear available to me.

Facebooklinkedin
Facebooklinkedin

RDP Mystery Finally Resolved

For years now, I’ve wondered why some of my RDP connections work only some of the time. Now I know why, and it’s provokes a Homer Simpson response “Doh!” Now that I’m done laughing at myself, let me explain how I got that RDP mystery finally resolved.

I was working with my various Thunderbolt docks this weekend, and I noticed that a previously not-working RDP connection started working again. Turns out that of necessity devices with both GbE and Wi-Fi adapters have separate and distinct IP addresses for each such adapter. Therein lies the key to the mystery, as shown in the lead-in graphic.

Explaining How RDP Mystery Finally Resolved Itself

This all started when I had to move my X12Hybrid dock upstairs. When I disconnected from the dock, and its GbE connection, the RDP connection defined for X12Hybrid (also the machine name used in RDP) resumed working. Then it hit me: because the GbE connection uses a different IP address from the Wi-Fi connection, my RDP definition works only when the IP address it knows about matches the address actually in use. Again: “Doh!”

You can see this clearly in the dual windows shown in the lead-in graphic. PowerShell is in top position, and shows that nslookup stores the IP address associated with the Wi-Fi interface (192.168.1.20). But when I plug the GbE interface in, it takes a different address instead. That private IP address ends with .39, as shown in the NetBScanner window at bottom of the same graphic.

How to Adapt to Changing Connections

The primary router on my local network is an Arris model: it comes from Spectrum as part of its Internet connection and services. I’ve not figured out how to forcibly reset its address tables for DNS lookups on Windows machine names. Instead, I use NirSoft NetBScanner when an RDP connection fails and enter the correct IP address instead of machine name in its “Computer” data field. This works every time.

By observation, it looks like this data updates every 24 hours or so. If I leave the RDP connection unchanged (no switch from Wi-Fi to GbE, or vice-versa) over that interval, nslookup eventually matches the current address. But at least I now know why this is happening, and why using the IP address for the NIC in use fixes the issue.

That’s the way things go here in Windows World, where I still manage to surprise myself by  relearning the obvious. Sigh.

Facebooklinkedin
Facebooklinkedin

CarPlay Cable Connections Are Key

Here’s another recent lesson learned from our just-completed trip to New England. On our reconnaissance mission in late July, we quickly figured out that a Lightning cable between iPhone and in-car USB makes connecting simple and fast. This time around, we learned that the cable itself also matters. Though I packed 3 such cables in our cable bag, only one of them worked well to support CarPlay. Hence my title: CarPlay cable connections are key. Let me explain…

Why CarPlay Cable Connections Are Key

One of the cables was probably shorted: the charge indicator kept turning on and off when it was in use in the car. That simply won’t do.

The second cable was an old — iPhone 6 vintage, at least — Apple-provided charging cable. Clearly, it couldn’t handle the bandwidth requirements needed to ferry comm traffic between the iPhone and the car’s built-in display. It simply didn’t work reliably or well.

The third cable proved to be the charm. It was a 10-foot Amazon Basics USB A for iPhone and iPad cable purchased in 2019. This item is no longer in stock, but something like this iPhone 11 model (US$16.99) would undoubtedly work. I gave one to my son when he went off to school, so I’m ordering 2 more right now.

Underlying USB Support in CarPlay

As I understand it, Lightning cables support USB 2.0 more or less uniformly (here’s an interesting discussion from Volvo, and an informative Reddit thread). My guess is that both of my old cables were sufficiently “used” that they simply couldn’t provide full USB 2.0 capability/bandwidth. The newer cable — despite its 10ft (~3M) length — worked just fine.

Hint/tip: before you take off on a road trip, it’s probably a good idea to test your chosen Lightning cables (listening to music is a fair method) to make sure they can carry the load. I’d also recommend taking a spare — I always do — just in case you lose or damage one while traveling.

Facebooklinkedin
Facebooklinkedin