Category Archives: Insider stuff

Fixing Winget Source Update Fail

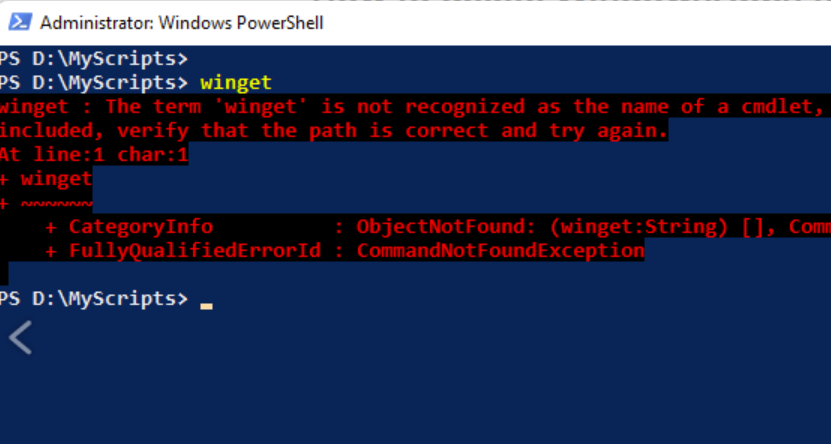
In the past two-plus years that I’ve used WinGet nearly every day, I’ve seen one error show up occasionally. It reads “Failed in attempting to update the source: winget.” This means that the winget command is looking to its own repository of known packages to obtain the latest list but unable to complete that access request. You can see what this looks like at the top of the lead-in graphic. The error follows right after the initial WinGet upgrade… command. The bottom part of that same screencap (it’s two pieces stitched together, actually) shows what’s involved in fixing WinGet Source update fail.

Fixing Winget Source Update Fail Has Its Own Command

It should come as no surprise that there’s a WinGet Source command that takes various subcommands to add, list, update, remove, reset and export WinGet sources. You can read all about these items in this MS Learn item The winget source command.

As you can see at the bottom of the lead-in graphic I used WinGet Source Update -n WinGet for my fix. Basically, that tells Winget to “try again” with updating the default WinGet source named WinGet. It does so automatically when you run WinGet Upgrade… But it does occasionally fail. And when it does, most of the time the Source Update at the head of this paragraph fixes things.

When Might WinGet Source Update Itself Fail?

A variety of problems could provoke error messages from the WinGet Source Update -n WinGet command I used for my fix. It might be that the WinGet source is offline. It might be some kind of networking communication problem is preventing access. I’ve never had this happen, but it would no doubt produce a different error message to help point you in the right direction. WinGet is well engineered that way.

Indeed, WinGet is now an essential part of my admin toolbox. I simply can’t live without it anymore. Cheers!

Facebooklinkedin
Facebooklinkedin

Replacement Production PC Planning

All righty, now. I’m making the move to switch over from my now-ancient i7 Skylake B550 desktop to a Lenovo ThinkStation P3 Ultra. That has me jumping 6 Intel generations: the Skylake is a 7th-Gen beast; and the P3 is home to a Core i9-13900. I’ll also be switching over to a newish 46″ 2022 vintage monitor from a pair of 2017 Dell 27″ UltraSharps. As I get into the minutae of replacement production PC planning, big changes are afoot. It’s past time — and I’ll keep the Windows 10 box running to observe EOS and beyond — but I need to get production on a newer footing.

Comparing Cases: Replacement Production PC Planning

The lead-in graphic shows two PC cases side by side. On the left: the new SFF case on its side for the P3 Ultra. On the right, the Rosewill BlackHawk Ultra case (ordered from Newegg in 2015).  The picture is emphatically not to scale. By volume the P3 case would fit 4.77 times into the Rosewill case. The old beast is MUCH bigger.

But much of that size is meant  to accommodate as many as 8 3.5″ HDDs. By contrast, the P3 can accommodate 1 2.5″ SATA device and 2 M.2 NVMe SSDs. This is driving a lot of my pre-migration acquisition plans. Here’s the current iteration:

  • A modestly-priced Gen4 NVMe for the 2nd unoccupied slot in the P3 (estimated cost ~US$200).
  • 2 more 32GB DDR5-5600 SO-DIMMs to bring the unit up from 64GB to 128GB RAM. ($US150 or so).
  • If it will fit, I’ll use one of my Seagate 5 TB 2.5″ SATA drives in the unit’s SATA enclosure (it’s a tall drive heightwise: 15mm). If not, I’ll probably buy another 4TB SATA SSD (US$180 or so)

I’ve got everything else I need to bring the build together and start moving everything over. Max total budget looks like US$530 or so. Not too shabby. I’ll probably buy another copy of PC Mover to get everything moved over, unless I somehow get persuaded otherwise. It’s been my modus operandi for my last two production moves and seems to work reasonably well.

Stay tuned: more is surely coming … and soon, I hope.

Facebooklinkedin
Facebooklinkedin

WinTerm Customization Remembered & Repeated

I’m closing setting up and tweaking my Lenovo loaner SFF PC , just the way I like it. Indeed, I plan to switch my production desktop over from the 2016 vintage Skylake i7 I now use.Instead I’ll go with an uber-powerful ThinkStation P3 Ultra. It’s equipped with a 13th-Gen i9-13900, 64 GB RAM, Nvidia RTX A2000 12 GB, and a Hynix 2TB Gen 4 SSD. As a near-final step, I am fumbling through WinTerm customization remembered & repeated. You can see what I mean in the lead-in graphic…

Digging Thru WinTerm Customization Remembered & Repeated

It took four steps to get all the pieces lined up to customize my Windows Terminal as you see it in the graphic:

  1. Install Jan DeDobbeleer’s OhMyPosh for a custom prompt. That also required creating a $Profile file for startup. There are plenty of good how-tos around on this. I’m sad to report, however, that TekkiGurus.com is off the air. And thus, my series on this subject, too — find it instead on the WayBack Machine.
  2. Download and install the CaskaydiaCove Nerd Font (which I grabbed from NerdFonts.com) so that OhMyPosh can do its fancy thing with Windows Terminal prompt characters and environment variables. Handy now that drag-n-drop font install works inside Settings > Personalization > Fonts.
  3. Grabbed one of my favorite MS SpotLight images and then dimmed it up (30% opacity or thereabouts) to use as the Windows Terminal background. Dare I say I find it fetching?
  4. Ran the command Install-script WinFetch inside WinTerm to visit the script archive and install the eye candy that this displays about target systems when run.

Looks pretty good, doesn’t it? I’ve learned to expect and appreciate a bit of Windows Terminal pizazz to keep my eyeballs entertained while working at the command line.

And there you have it. Just another day in the paradise known to some as Windows-World. Good stuff!

Facebooklinkedin
Facebooklinkedin

PatchMyPC Home Updater Mini Annoyance

First things first: I’m a HUGE fan of PatchMyPC’s Home Updater product. Indeed, I got invited to try out the company’s latest version — an app-based implementation that supersedes PatchMyPC.exe — because I’ve written about it often and positively. In the interests of sharing my enthusiasm and support, I also have to report a recent PatchMyPC Home update “mini annoyance.” Let me tell you more…

What Is the PatchMyPC Home Updater Mini Annoyance?

It’s a Store app, so you must call it via the Start menu as “PatchMyPC Home Updater” to launch the program. But it’s NOT available in the Windows Store. Rather you must download it direct from the maker’s website, from the PatchMyPC Home Updater home page. If you try to find it in the MS Store, you get a big fat zip instead. Ditto for a search on “Patch My PC” as it appears here:

Only the website will do: the app is NOT in the MS Store.

Forewarned is forearmed, I guess. But gosh, it’s kind of a minor thing to add an app to the Store, isn’t it? C’mon guys: fix this sooner, rather than later. I applaud the new UI and the switch to a modern app style for this excellent tool. But please: finish the job and put it in the Store. Just sayin…

Facebooklinkedin
Facebooklinkedin

MS Sez: Copilot+ PCs 5X Faster Than 2019 Models

Here’s an interesting MS announcement from last week. I saw it, but didn’t read it all the way through. This morning, I read follow-up coverage (e.g. this WindowsLatest story). It’s entitled “How prepare for Windows end of support by moving to Windows 11 today.” Overall, it’s an eminently predictable bit of upgrade rah-rah. But specifically MS sez: Copilot+ PCs 5X faster than 2019 models.  I translated “5-year old PCs” from the original to get this year.

Weighing Copilot+ PCs 5X Faster Than 2019 Models

It just so happens that this cut-off equates to 10th Generation Intel CPUs (e.g. Comet Lake and Ice Lake). It also hits 3rdGeneration AMD Ryzen models (Matisse and Renoir). I’ve got 4 8th Gen Intel laptops here at Chez Tittel. I’ve also worked with 3 Copilot+ PCs (2 Snapdragon X models, and 1 Intel Aura/Lunar Lake model). My own gut feel, and my ongoing observation of resource intensive tasks — such as disk cleanup, updates, upgrades, big installs, and so forth — absolutely agrees with this claim.

If you dig into the October 31 announcement, you’ll find a section entitled “Benefits of upgrading to Windows 11.” Therein, author and MS EVP/Consumer Chief Marketing Office Yusuf Mehdi avers that when compared to Windows 10, 11 is

  • more sure and trusted
  • better optimized for speed and efficiency
  • better at multitasking
  • more accessible
  • more energy efficient

The 5x speed claim is footnoted to a May 2024 MS Learn item entitled Copilot+ PC performance details. That’s where the 5X claim gets some substance, which turns out to rest on the Cinebench 2024 Multi-Core benchmark. Further investigation shows this to be a 10-minute rendering test using the Redshift engine. Looking at the laptop segment at CPU Monkey, I see the first recognizable Copilot + PC in 17th place, with a value of 1,150 (Apple M2 Ultra (76-GPU) takes 1st place , with a value of 1,918).

Moving Up Probably Means Copilot+

With a handful of older PCs that I’ll need to upgrade in the next year or two, I am thinking about “what’s next” here at Chez Tittel. And indeed, most of what I’m thinking about buying into is Copilot. My first such purchase will probably be a Yoga Slim 7x (blogged July 1, 2024). It’s got a killer screen, runs like a demon, and represents a good value for its cost (~US$1,200 for 16 GB RAM, 0.5 TB SSD, and X1E-78-100 Snapdragon X CPU).

There will be plenty of other models to consider in the months ahead, as the Intel and AMD offerings get fleshed out alongside the earlier ARM Snapdragon X offerings. I’ll be choosing among those, or their successors, in the next year or two as I start upgrade. You should probably be thinking along those same lines. Unless and until something better comes along…

Facebooklinkedin
Facebooklinkedin

Forced 24H2 Upgrade Throws BSOD

I couldn’t help myself: I HAD to try it. On the Lenovo ThinkStation P3 Ultra, I used the Windows 11 Installation Assistant to bring on the newest version. Alas, my forced 24H2 upgrade throws BSOD with error code 0X85 SETUP_FAILURE. Quick research found an MS Learn article on that very topic. Alas, it also says “a fatal error occurred during setup” and suggests unplugging peripherals and trying again, but provides no real repair advice. You can see my iPhone BSOD photo, skews and all, as the lead-in graphic here.

Bad Cess As Forced 24H2 Upgrade Throws BSOD

Please note: even though the BSOD text reads in part “We’ll restart for you,” I had to toggle the power button to bring the P3 Ultra back to life. Sigh: looks like its Intel i9-13900 Intel CPU is subject to some documented issues. Indeed, I just found an Intel Community post that says if Turbo Boost is enabled in the BIOS, it can crash during the Windows 11 upgrade process.

So I visited Settings > System > Recovery > Advanced Startup and then entered the BIOS. Sure enough, Turbo Mode was enabled, so I disabled same. Now, I’m running the Installation Assistant again. It zoomed through download and verification phases, so the files from the original download were obviously still present. Now it’s doing the GUI install portion …

Is the 2nd Try Charmed, or Doomed?

It took about 10-15 minutes for GUI install to complete. Turning off Turbo Mode notably slows things down. The post-GUI install went much slower, though: it zoomed up to 71% in 5-8 minutes, then took the better part of an hour to work its way to completion and OOBE.

But I’ve now got a working 24H2 installation on the ThinkStation P3 Ultra,  as you can see in the next screencap. It shows Lenovo Vantage device info, above which I’ve positioned Winver output. Then I had to go back into the BIOS and turn Turbo Mode back on. With Turbo Mode restored, the system runs very much faster.

Winver 24H2 in front, Lenovo Vantage Device Details in back.

Now, I have to ask: is this disable/enable in BIOS looming over all future upgrades, or is it just a one-time 24H2 thing? As the clue that pointed me toward this fix came from 22H2, probably not. Another thing for me to remember, in that case…

And isn’t that just the ways things go from time to time, here in Windows-World? You betcha!


Facebooklinkedin
Facebooklinkedin

PC Manager Gains Advanced Browser Cleanup

Thanks to a recent story in Windows Latest, I just learned that a new version of the Chinese-built MS store app named PC Manager is out. For those who don’t already know, this tool offers performance boost, health check, storage  and startup cleanup tools, and more. Though I’ve heard from plenty of used inclined to be skeptical, if not distrustful, of this tool, I’ve never had it cause me a problem in the 16 months I’ve been writing about it (here’s my first intro post from July 2023). With the latest 3.14.10.0 release, PC Manager gains advanced browser cleanup tools.

Showing PC Manager Gains Advanced Browser Cleanup

You can see the results of such a cleanup in the lead-in graphic: especially for Chrome, they’re substantial (5.0 GB). Of the 9.7 GB in disk space that the Deep Cleanup tool freed up, 6.84 GB (~70%) comes from this newly-minted browser cleanup facility. IMO, that’s pretty major — especially because web browsers account for plenty of the CPU and memory cycles, and disk and memory space on Windows PCs.

Indeed, Copilot says that on a typical Windows PC, web browsers generally consume around 10-20% of the total runtime resources (CPU, memory, network and storage). I think that’s on the low side, but then I nearly always have 20 or more Chrome, Edge and Firefox processes visible in Task Manager (each), and at least a half-dozen tabs open in all 3 browsers. Seems like double (or more) in my case as compared to Copilot’s estimate.

Whatever your typical usage patterns might be, this newly-added cleanup tool will probably be worth running once in a while. I’m going to try it daily and see if it makes any difference.

Give It a Try?

If you’re not using PC Manager already, this new facility makes it even more compelling. If you don’t have it installed, you can find in the MS Store, or grab it via this MS Store link. Go ahead, check it out. You may enjoy it!

Facebooklinkedin
Facebooklinkedin

Macrium X Next Migration Step: P360 Ultra

As I manage my small fleet of desktops and laptops lately, I’ve been slowly but surely updating Macrium Reflect. I’m transitioning from version 8 to version X (as in Roman Numeral 10). At this point, I’ve allocated 5 of my 8 licenses for X. Today’s effort for my Macrium X next migration step: P360 Ultra switches a temporary 8 preview version out for the “real thing.”

Taking Macrium X Next Migration Step: P360 Ultra

“What is involved in upgrading” one might ask? I just did one. Now, I can say it requires getting the configuration and schedule right. On the P360 Ultra that meant:

  • switching from a no-longer-attached USB4 NVMe enclosure to an older mSATA NVMe that stays constantly plugged in.
  • Defining a daily backup task, to see how that works out in this situation.

Total time and effort required: about 8 minutes, most of which went to accessing my Macrium Reflect login to grab a 5th license to take the upgrade/install process to completion.

Here’s where things get interesting: Macium X is a LOT faster than Macrium 8. Even on a 10-year-old Samsung EVO 500GB mSATA SSD, X reported whopping I/O performance of: 25.7 Gb/s read and 2.7 Gb/s write. Total elapsed time for the backup was 2:13. And that backup image occupies about 32.8 GB on the EVO500 (D:) drive, as you can see in the lead-in graphic. It’s at least 2:00 faster than version 8.

This has been my experience on all the PCs I’ve upgraded so far. It’s also been blazing fast on new installs on a trio of Copilot+ PCs (two ARM Snapdragons and one Intel Aura model). That provides a sweet reward for the time and effort involved in moving on up to that new version. Good job, Macrium Reflect developer team!!

Facebooklinkedin
Facebooklinkedin

BIOS Update Demands Cable Switch

Whoa: this time, things got just a little bit TOO interesting. I’ve got a Lenovo P360 Ultra ThinkStation on loan, and a BIOS update came through today (to version S0JKT2AA). But when I would install the update, the usual BIOS flash screens did not come up after a reboot. It wasn’t until I swapped the graphics cable from the full-size DP to full-size DP port, to a full-size DP (monitor) to mini DP (PC) that the splash screen showed up at boot, and the BIOS flash ran through to completion. Thus, the BIOS update demands cable switch to succeed. Go figure!

How Did I Figure Out That BIOS Update Demands Cable Switch

By watching the post-reboot behavior on-screen, I realized it wasn’t showing me what it was supposed to. Basically, the screen stayed black post-restart until the lock screen for Windows 11 appeared. I knew I was supposed to see the boot-up splash screen (which reads “Lenovo” in white letters on a black background on this device). But instead: nada.

So on a whim, I brought down the video & power cables box from atop my bookshelves. Then, I grabbed a full-size DisplayPort to mini-DP cable and used it to replace the full-size DP to full-size DP I was currently using. Immediately thereafter, I got a splash screen and the BIOS update started processing. It took a while, but it eventually ground through to a successful update.

What About those Intel Graphics?

The next item of business was to get the built-in Intel graphics (UHD Graphics 770) updated. After a handful of failed attempts to get the Lenovo version to run, I visited the Intel DSA (Driver & Support Assistant) and installed that version instead. It worked. You can see the results for my final — and entirely welcome — update check using the Lenovo Commercial Vantage tool as the lead-in graphic above.

That was a wild ride. But indeed, that’s the way things go in Windows-World far too often, based on my current level of interest vs. fatigue. Today, fatigue wins out. Sigh.

Facebooklinkedin
Facebooklinkedin

Ongoing Win11 DISM WinSxS Cleanup Issues

I’ve been writing about this since late 2021 or early 2022 — within months of the initial preview release for Windows 11. Something in the update environment produces ongoing Win11 DISM WinSxS cleanup issues. That is, running /analyzecomponentstore keeps popping up reclaimable packages even after /startcomponentcleanup reports cleanup success. Right now, I see this in almost every version of Windows 11 I have running, which includes:

  • Windows 11 23H2 Production (Build 22635.4435: 13 items)
  • Windows 11 24H2 Production (Build 26100.2161: 2 items)
  • Windows 11 Beta Channel (Build 222635.4435: 13 items)
  • Windows 11 Canary Channel (Build 277729.1000: 0 items)
  • Windows 11 24H2 Copilot+ PCs (26100.2033:  2 items)

You can see this at work in the lead-in graphic. Notice the initial reclaimables count is 16 at the top of that screencap.  After running cleanup, then analyzing again,  that count drops to lucky 13 instead of zero as one might expect. (Note: you may need to right-click the image and open it in its own tab to see that 13 value.) I’ve seen that count as high as 14 and as low as 1 or 2 in various Windows 11 builds over the past 3 years.

Fixing Ongoing Win11 DISM WinSxS Cleanup Issues

As Windows 11 issues go, this one is quite benign. I’m pretty sure that’s why it has been allowed to pop in and out of various Windows versions pretty much since the get-go. That said, one can fix this if one must (and you OCD types know who I mean). How do I know? I’ve done it myself…

You can perform an in-place upgrade repair install to make this issue go away. But it takes time (30 minutes  and counting on my Windows 11 PCs) and the issue keeps coming back after you apply upcoming Cumulative Updates. That’s why I don’t bother with fixing this myself (except when I need pristine screencaps for writing work) anymore. If you must zero this out, use Settings > System > Recovery, then click the “Reinstall now” button under the “Fix problems using Windows Update” heading. Easy-peasey!

There is a spot of forward-looking cheer, too. The current Canary Channel build (277729.1000) does NOT have this issue. Maybe when production catches up that far, it won’t continue. Fingers crossed…


Facebooklinkedin
Facebooklinkedin