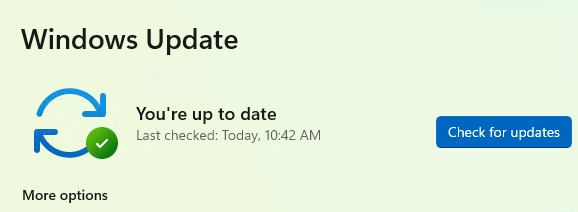
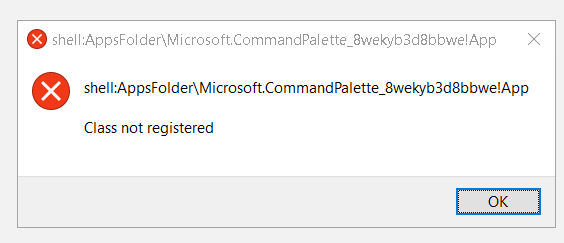
Category Archives: Insider stuff

Why Give PowerToys Admin Access?

I found myself looking at a suggestion from PowerToys on a test PC yesterday. It popped up when I opened Windows Terminal as Administrator, as per usual practice. It warned me that Fancy Zones and other PowerToys tools might not work properly unless I gave PowerToys admin access, too. Hence the question: Why Give PowerToys Admin Access?

Why Give PowerToys Admin Access?
Because other apps use it…

I turned to MS Learn. There I found an item entitled PowerToys running with administrator access. It pretty much explained everything. Here are the salient points from its second heading:

PowerToys only needs elevated administrator permission when interacting with other applications that are running in administrator mode. If those applications are in focus, PowerToys may not function unless it is elevated as well.

These are the two scenarios PowerToys will not work in:

  • Intercepting certain types of keyboard strokes
  • Resizing / moving windows

Seems pretty straightforward to me, and makes perfect sense. Here’s how to get to admin mode in PowerToys from its default “Running as user” mode.

Making the Switch: User to Admin

You must open PowerToys in admin mode to switch to admin mode. If PowerToys is running, right-click its taskbar icon and select exit to terminate its runtime instance. Next, right-click the PowerToys icon in the start menu, and select “Run as administrator.” In Settings, Administrator mode, move the “Always run as administrator” slider from off (as shown in the lead-in graphic) to On. That’s it!

Now, you can run some of your tools and programs in admin mode without warning messages from PowerToys (or concerns that its tools might not work as they’re supposed to). I like it, and I like ready access to simple, intelligible explanations as to why things must change to work properly.

One More Thing: v0.67.1 Is Out

As I write this item, MS has just released PowerToys update to v0.67.1. While you’re poking around inside Settings/General click the “Check for updates” button. If your PC isn’t yet caught up to this latest version, it’ll take care of it for you. Or, try this command

Winget upgrade Microsoft.PowerToys

if you prefer. Cheers!


Facebooklinkedin
Facebooklinkedin

Unscheduled Restore Drill Ends Well

Oh boy! I found myself fighting several interesting Windows issues yesterday. Long story shot: my unscheduled restore drill ends well at the final conclusion. But first: I have to rebuild my boot configuration data and create new Macrium Rescue Media before I can actually boot into the restore environment. It’s always something, right? Let me tell you what that meant yesterday…

After Initial Obstacles, Unscheduled Restore Drill Ends Well

First, a benediction:  I remain grateful that I take a scheduled backup at 9AM every morning, 365 days a year. If it weren’t for that backup, I would have been in real trouble. Indeed, I tried an in-place upgrade repair install during my recovery sequence. That’s when I observed that while it fixes OS files perfectly, it does not fix self-inflicted file system or Registry issues.

My first hint of difficulty came when I tried to restore my 9 AM backup. The timestamp on that file is actually 9:52 so that tells you how long it took to complete as a background task. Turns out my Macrium Rescue Disk wouldn’t or couldn’t boot successfully. It would simply get as far as the bootloader, spinning balls against a black screen, and never get any further. Yikes!

BCD Complications

Next, I unthinkingly added a Macrium Rescue Media element to the boot menu. This did neither harm nor good. But alas, it extended the time it takes to reboot by a good 2 minutes. In a situation where I was rebooting a LOT, that really didn’t help things much. Sigh.

Note: when I did eventually restore the 9AM backup it perforce rewrote the whole boot/system disk, so that little BCD change got undone. Yay! I really don’t need it anyway…

Restore Requires Working, Bootable Rescue Media

Eventually, I turned to the excellent Macrium user forums to find insight on my hung restore. I switched from a faster, bigger NVMe drive in a USB enclosure, to an older, slower, and smaller USB flash drive. That ultimately did the trick.

For some reason, I had to build the rescue disk twice to get it to work. I may have forgotten to check the “Check for devices missing drivers on boot” checkbox the first time around. I was sure to check it on the second try (see lead-in screencap: it’s unchecked by default). After that, the Macrium restore operation proceeded automatically and the process ground through to its lengthy conclusion.

It had been long enough since I did a restore that the time required came as a quasi-revelation. All told, it took about 70 minutes from firing off the restore inside the damaged Windows 10 installation to return to the desktop inside the 9AM image snapshot. That’s quite a bit longer than the 14 minutes or so it takes to backup in single task mode (52 minutes as a background task).

But wow, was I relieved to get over that hump! And now, I have working proof that my backup/restore regime produces its intended outcome. It was an interesting ride in the meantime…

Facebooklinkedin
Facebooklinkedin

PowerToys Application versus App

I’ll be darned. This has been going on for awhile, but I just recently learned about it. If you look, you too can find a September 18, 2021 Thurrott.com story. It says: PowerToys are now available in the MS Store. I spent some time this weekend switching over from the GitHub version (installs as an application) to the Store version (installs as an app). This led me to considering the differences between PowerToys application versus app.

Switching from the application version to its app counterpart is also neither documented nor obvious. Neither installer knows about the other, so it doesn’t clean up old stuff from “the other fork,” either. Let me explain later on here…

Understanding PowerToys Application versus App

In Windows, Applications live in two primary folder trees. 32-bit applications (of which there are fewer and fewer, now that Windows 10 is mostly 64-bit, and Windows 11 completely 64-bit) live in:

C:\Program Files (x86)

Their 64-bit counterparts, alternatives, or replacements live in:

C:/Program Files

Apps live in their own corner of the preceding folder tree — namely:

C:/Program Files/WindowsApps

Distinguishing Application from App

The only way you can tell if you’re running an application or app version of PowerToys is by where it lives in your Windows installation. If it shows up in Programs and Features, it’s an applicatioon. If it shows up under Installed Apps in Settings, it’s an app. Otherwise, they look — and behave — identically.

You can see the Settings-based App info to the left, and the Programs and Features-based Application into at the right, in the lead-in screencap above. Same name, same size, same version, same date.

So why go with the app version rather than the application one? Two primary reasons I can think of:

1. Apps get updated via the Microsoft Store automatically. You have to use the Update function inside PowerToys Settings/General to update the application version.

2. Apps are supposedly more secure than applications, because they run within a sandboxed environment. FWIW, I haven’t seen or read about that playing into the presence or absence of security exploits.

Making the Application to App Switch

First, visit Programs and Features and uninstall PowerToys there (or use your favorite third-party uninstaller: e.g. Revo Free). Then visit the Microsoft Store, search for PowerToys and install the version that comes up there (v.0.67.0 as I write this). Done!

If you try to install the app without removing the application, you’ll end up running both side-by-side. It’s much easier to follow an “out with the old (install), in with the new (install)” approach. How do I know this? I went the other way at first and had to clean up the resulting overlap. Save yourself that trouble, please!

Facebooklinkedin
Facebooklinkedin

PowerToys v0.67.0 Gets Quick Launch

Here’s a nice little tweak for a great set of useful tools. That’s right, the venerable PowerToys v0.67.0 gets Quick Launch in that release. You can see what you get by default on the left of the lead-in graphic. At right, you can see what comes up under the “More” selection scrolled to the top.

What Makes PowerToys v0.67.0 Gets Quick Launch News?

You’ve always been able to launch individual PowerToys using key combinations, once those tools are enabled. You can find those various key combinations (aka “shortcuts”) in the PowerToys documentation files (right-click PowerToys, choose Documentation from the resulting pop-up menu).

What’s new here is that you need now simply left-click PowerToys and the Quick Launch menus shown above become available. This is a great boon to me, because it means I don’t have to learn or remember the various keyboard shortcuts anymore. It takes fewer clicks and key presses, too. Always good! Be sure to check this out for yourself after you update to v0.67.0.

Installing PowerToys…

If you don’t have them already, you don’t need to grab PowerToys from GitHub unless you want to. GitHub does, however, remain the only source for the Preview version of PowerToys. Instead, you can grab the stable version of PowerToys from the MS Store. That’s what I did on the test machine where I captured the screencap(s) above. I couldn’t believe this PC didn’t already have it installed, but it gave me a terrific opportunity to take the MS Store install path. Works like a charm!

Facebooklinkedin
Facebooklinkedin

Frustrating Firefox x86 Follies

Oh boy! I just shot myself rather nicely in the foot but managed to call back the bullet. Let me explain, in the context of unfolding and frustrating Firefox x86 follies here at Chez Tittel. The lead-in graphic for this story shows two entries for Firefox as you can see in the red outline box. Therein hangs this particular tale…

Fixing Frustrating Firefox x86 Follies

I noticed this earlier this week when, after updating Firefox x64 on my production PC, I noticed a second copy still running the previous version. WTF? Using SUMO to show me the containing folders for each instance I saw what was up. One 64-bit copy is running in the Program Files folder tree. More interestingly, a second 64-bit copy is running in the Program Files (x86) folder tree. WTF again?

Nothing loath, I went into Explorer and deleted the Mozilla Firefox folder from the (x86) folder tree. This is the shooting myself in the foot part. Turns out that particular instance has all of my favorites, stored passwords, and yada yada yada. The true x64 instance is a “clean install” — but not in a good way. Sigh.

I called the bullet back by opening the Recycle Bin and restoring the entire, just-deleted Mozilla Firefox folder. I see that I can export all my stuff from one instance and then import it into the other. As soon as I have time to figure all that stuff out I can grab my “vital stats” from the x86 instance and make ready to transfer it into the x64 instance. Then, I should be able to safely delete the x86 instance without losing my valuable accreted data. Sigh again.

This Raises an Interesting Question…

What I really want to know is: how did an x64 instance of Firefox wind up in the x86 folder? I’m pretty sure that’s another self-inflicted wound. When I updated the trailing second instance earlier this week, whaddya bet it was a now-obsolete 32-bit instance for which only a 64-bit instance can serve as an update? Sigh one more time, and wonder why Firefox let me do this to myself. Go figure!

Alas, that’s the way things go for me sometimes in Windows-World. I’m just glad I was able to figure out and recover from my own foible without losing too much time or wasting too much effort.

Facebooklinkedin
Facebooklinkedin

MS AI Survey Shows Strong Appetite for Automation

Hmmm. A story today at MSPowerUser pointed me to a recently published (but infuriatingly, undated) survey from Microsoft. It’s entitled Four Ways Leaders Can Empower People for How Work Gets Done. Notice, AI appears nowhere in this string. Even so, this MS AI survey shows strong appetite for automation.

That is, the survey documents increasing demand from rank-and-file workers for technology based empowerment. What does this mean? Workers want low-code tools to DIY basic software so they don’t have to wait on the IT/development backlog. They also want “artificial intelligence tools that let them focus on what’s important” to quote from the survey’s tag line. Wow!

How MS AI Survey Shows Strong Appetite for Automation

I’m just going to gloss over some of the survey results in this piece. Those seeking more depth or details will definitely want to read the original MS Briefing. Here are some key elements:

  • To make workforces more efficient and flexible, workers need tools that deliver maximum results from minimal effort.
  • MS surveyed 2,700 employees (in-house) and 1,800 business decision makers (out-of-house) in the US, Japan, and the UK.
  • Questions posed included: (quoted verbatim)
    • Do people feel empowered by the tools they currently have?
    • Are teams equipped to collaborate effectively in a world of flexible work?
    • Can new technology like AI and low-code and no-code tools help solve their challenges and open up new opportunities?
  • 9 of 10  respondents want simpler ways to automate daily tasks, to focus on more important work.
  • 4 key principles to guide business leaders to empower workers: (paraphrased for brevity)
    1. Empower people with more say in choosing new technology
    2. Use collaborative apps to connect workers so  they can share info in workflows
    3. Equip everybody with low-code tools to accelerate innovation
    4. Implement AI to automate busywork: this improves worker satisfaction and engagement

There Is No East or West in AI Empowerment

The most interesting findings show that the majority of workers (and mostly a supermajority, at that) agree that AI and automation can help them do more, better and faster. I have to believe this “AI dividend” is what’s driving MS to invest tens of billions into AI tools and technologies. They’re already convinced — in large part because of their own experiences and observations in-house — that the payoff will more than justify their investment.

Personally, I can’t wait to start seeing more of that payoff for myself in my own daily life and work. For more insights and info, though, please read this survey brief for yourself.


Facebooklinkedin
Facebooklinkedin

Updating WingetUI Brings Follow-On

I have to laugh. When I wrote yesterday about Winget moving up to version 1.4, I should’ve known it would carry items in its wake. Hence my update to the GUI front-end for Winget this morning — namely, the Github project known as WingetUI. I might have guessed, but did not, that updating WingetUI brings follow-on packages in its wake.

Instead I simply fired off the update process for WingetUI this morning, and moved onto another open window. I was happily surfing some traffic at ElevenForum.com when outta nowhere an install window for the Microsoft Visual C++ 2015-2022 Redistributable popped up on my screen. You can see the trace it left behind in “Programs and Features” (dated 1/31/2023) in the screencap above.

If Updating WingetUI Brings Follow-On, Then What?

I guess it makes sense that if Winget is updated, WingetUI should follow suit. I’m not sure if the new C++ Redistributable is a natural consequence of the update, or just a coincidence. But gosh! I’m of the opinion that if one program needs to install other stuff so it can work, it should at least notify you beforehand. Or even, ask permission.

But what do I know? Thus, I was a bit taken aback when the install window for the C++ Redistributable popped up today. It seemed kind of random and unexpected to me. Maybe it’s my fault for covering up the WingetUI install window with something else. Maybe it’s just one of those things that sometimes happens when you update software here in Windows-World. You tell me!

Facebooklinkedin
Facebooklinkedin

Obvious Fix Addresses 0xC1900101 Install Error

I run two Dev Channel test PCs. Yesterday, the Lenovo ThinkPad X12 Hybrid failed to upgrade to Build 25284. And it threw a familiar error code — one I’d just written about on ElevenForum just two days ago. Fortunately, the obvious fix addresses 0xC1900101 install error, as I will explain. But gosh! What a coincidence to have dispensed advice about this error only to experience it myself shortly afterward.

What Obvious Fix Addresses 0xC1900101 Install Error?

First let me share the text from my ElevenForum post (from which a screencap appears above):

Check out this MS Learn article: it asserts that an incompatible driver is present when this error code presents: https://learn.microsoft.com/en-us/troubleshoot/windows-client/deployment/windows-10-upgrade-resolution-procedures

So what I did next was to review all of the device drivers on the problem PC, and to upgrade those that weren’t current. To that end, I used a 3rd-party tool from IObit called Driver Booster (available in both free and for-a-fee versions). It found over 20 drivers in need of updating, and I updated all of them.

Long story short: two reboots later (one from the drivers the program found, another from a Lenovo Vantage update) I retried the 25254 install. And this time it completed successfully, sans the driver-related error. As I poke around online, I also see this is a fairly common install error where the obvious repair strategy is most often effective.

Shoot! It’s nice when things work the way they’re supposed to. Luckily, that does happen here in Windows-World from time to time.

Facebooklinkedin
Facebooklinkedin

Winget Install Technology Hiccup

When I ran Winget to check for updates on the Lenovo P16 Workstation yesterday, something interesting happened. As you can see in the lead-in graphic, Winget found 2 packages in need of update. But it installed only one of them upon command. I discovered why when I attempted to force install the missing item. Indeed it produced what I’m calling a Winget install technology hiccup. Let me explain…

Overcoming the Winget Install Technology Hiccup Is Easy

The error message that resulted when I tried to force install RingCentral told me everything I needed to know. It reads:

A newer version was found, but the install technology is different from the current version installed. Please uninstall the package and install the newer version.

So that’s exactly what I did in the next two commands shown–namely:

winget uninstall ringcentral

winget install ringcentral

Luckily for me, the simple name “ringcentral” is sufficient to identify the unique and actual package name (“RingCentral.RingCentral”). Otherwise, I’d have been compelled to use that full, complete nomenclature to pull off the remove/replace maneuver that saw the hiccup overcome. That happens when multiple packages share common nomenclature, and a unique string for the desired package must be fully specified.

In this case, everything was easy-peasey. Just the way I like it: hiccup fixed!

Facebooklinkedin
Facebooklinkedin

Intel Drops iGPU OEM Warning

Once upon a time, the Intel Driver & Support Assistant (IDSA) used to warn laptop owners about its built-in GPU driver updates. There’s even an Intel Support Note on this topic. It reads in part “Installing this graphics driver from Intel may overwrite customizations from your … OEM.” Recently, Intel drops iGPU OEM warning. Why? Because it’s been reworked NOT to overwrite customizations. No more need, no more warning, I guess.

When Intel Drops iGPU OEM Warning, Then What?

If you look at the latest finding inside the IDSA in the graphic up top, you’ll see the warnings are gone. Nothing loath, I tried it out on my Lenovo ThinkPad X380 Yoga Dev Channel test laptop. It spun away for a bit before throwing up a “Begin installation” pane from the installer.

Intel Drops iGPU OEM Warning.begin

Next, it displayed the phases it would walk through, starting with a huge honkin license agreement to which installers must accede before the process gets underway. Click “I agree” to continue, as I just did.

Intel Drops iGPU OEM Warning.agree

Setup says it will install a driver and a graphics command center, after which one clicks start. Install shows progress bars for said driver and command center, with an option to “Show details” (lists changes as they’re made including registry entries, installing files, and so forth). Driver install takes several minutes to complete.

A reboot is required for changes to take effect. Once I had done so, I didn’t find the Intel Graphics Command Center (IGCC) installed. Thus, I visited the Microsoft Store to download and install same. It had me uninstall the apparently now-unnecessary Intel Graphics Control Panel.

Post Reboot, Things Get Interesting…

Once the PC restarted, the unit booted normally (the shut-down phase, when it was presumably writing new driver stuff did take a bit longer than usual). After the reboot the graphics look and work enough like the preceding iteration that I can’t see or tell anything different.

But when I tried to open the IGCC, it hung in “loading mode” (a line of balls moving from left to right at the bottom of the window). It never went anywhere. Turns out running two user sessions, each trying to start up IGCC isn’t a good idea. As soon as I killed one, the other started working. From there I was able to explore and play with the IGCC without further difficulty. Looks like I’ll have fun digging in and learning more. Stay tuned: I’ll report back.

Facebooklinkedin
Facebooklinkedin