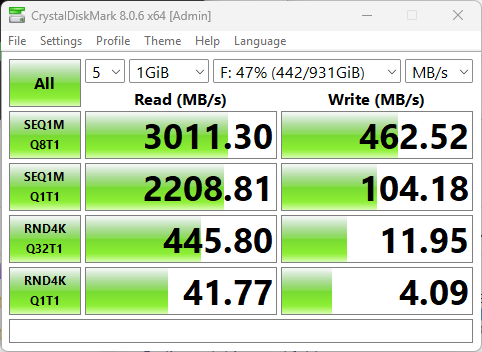
Category Archives: USB devices

Newer USB Justifies Added Costs

I had a revelation via contrasting benchmarks yesterday. A friend returned a mid-range USB 3.1 NVMe drive enclosure after an extended loan. Thus, I popped it into my production desktop (an i7 Skylake Gen 4 PC) to see how fast it ran. Good enough. Then, just for grins I popped it into the 2021 vintage Lenovo P16 Gen 1 Mobile Workstation (an i9 Gen 12 PC). Much faster! Enough so, in fact, that it’s clear that newer USB justifies added costs of acquisition. Let me explain…

Why Say: Newer USB Justifies Added Costs?

Take a look at the lead-in graphic. It shows the difference between older USB technology in the Skylake desktop vs. newer USB technology in the Gen 12 mobile workstation. Both are using USB 3.1 ports (though the older PC goes via USB-A, the newer goes thru USB-C) to the same hardware running the same benchmark. Why is the new so much faster than the old?

Short answer: UASP, aka the USB Attached SCSI Protocol. The newer PC supports it, while the older one does not. You can see there’s a driver difference in Device Manager when it comes to accessing the NVMe drive enclosure and its installed SSD: the older machine runs a driver named USBSTOR.sys, while the newer one runs UASPStor.sys. Plain as day.

The Deal With UASP

The Wikipedia article on UASP is a good place to find some explanation. To wit: “UAS [USB Attached SCSI] generally provide faster transfers when compared to the older USB Mass Storage Bulk-only (BOT) protocol drivers.” In a nutshell, that’s UASPStor.sys versus USBSTOR.sys.

As I learned about this technology in the period from 2016 to 2019, the word at TenForums.com ran something like “Speeds of 500 MBps mean USB bulk transfer; 1 Gbps or better means UAS transfer.” And that, dear readers, is the difference you see between the right-hand side in the lead-in graphic (USBSTOR.sys on the Skylake) and the left-hand side (UASPStor.sys on the Gen 12).

In practical terms, this translates into much, much faster IO on the newer PC vis-a-vis the older one. I think it’s incredibly worthwhile, given that backups complete 2-3 times faster on the P16 than the Skylake. Likewise for big, bulk file transfers (such as Windows ISOs, which I mess with frequently).

Retrofit and Replacement

Does this mean one has to toss older PCs and replace them with newer models? Maybe, but not necessarily. For between US$50 and 100, you can purchase UASP capable PCIe adapter USB cards. As long as you’ve got an open PCIe x4 port available on your motherboard (desktops only, so sorry) this could be a good solution. I’m a fan of this US$95 StarTech unit for that purpose.

Older laptops can be dicey and depend on support for USB ExpressCards. I mucked around with these on some 2012-vintage Lenovo ThinkPads in the 2014-2016 timeframe (an X1 and a T420). They work, but they’re cumbersome and expensive (see this Amazon Review for a great discussion).

For best results, it may be time to shell out for a new desktop or laptop PC. That way, the fastest USB (and even Thunderbolt) technologies are likely to come built-in and ready to go. Could be worthwhile!


Facebooklinkedin
Facebooklinkedin

SSDs Versus HDDs Revisited

I just saw some pretty amazing sales prices on external 2TB SSDs at Neowin. I’m talking something in the neighborhood of US$120 -140 for something rated at 800 – 1,000 MBps. This has me thinking about SSDs versus HDDs revisited. Why? Because over the past 6 years, I’ve been moving steadily away from HDDs to increasingly fast and affordable SSDs. These prices kind of put a cap on the whole phenom, IMO.

SSDs Versus HDDs Revisited: Late 2022

I realized the value of compact, portable 2.5″ external drives in the first decade of this millenium, when laptops really took over business computing. I carried my first luggables far back as 1988. But compact, usable external storage for field use really didn’t catch on until small, USB-attached drives became practical in the wake of USB 2.0’s introduction in 2000.

Right now, I’ve still got 4 2.0 TB USB 3 HDDs (which I hardly use anymore: Seagate Firecudas purchased in 2016/2017). I’ve also got 2 5.0 TB Seagate BarraCudas purchased in 2018/2019. Those I still use. But the fact is, those drives all cost me more when I bought them than what you’ll pay for a 2TB Crucial X8 NVMe SSD on sale right now (pictured above). That shows the immense increase in storage density, and decrease in power needed to drive such storage in the recent past.

What Now, Storage Wise?

I’m getting ready to gift off all of my older 2 TB 2.5″ drives to the nice folks at Goodwill (my old friend, Ken Starks, has retired and shut down ReGlue.org). Except for very big 3.5″ drives (12 TB+) I don’t plan on buying any more HDDs, ever.

In fact, I’ve already moved onto NVMe-based USB drives, with USB 3.1/3.2 as my baseline, and USB4/ThunderBolt4 as my “stretch target.” The latter are still kinda expensive. I think it’s more than the current performance bump is worth, but that will change substantially in the next 12-18 months.

For the Record: The Speed Hierarchy

The following data is enough to convince me that portable USB-based NVMe storage is the right way to go nowadays. How ’bout you?

Type     Drive              Fastest R/W
HDD      FireCuda 2TB       ~61/71    MBps
HDD      BarraCuda 5TB     ~137/131   MBps
mSATA    Samsung 1TB       ~455/400   MBps
NVMe-3   Samsung 950 1TB   ~1060/1040 MBps
NVMe-4   Sabrent R4 1 TB   ~2820/1290 MBps

I just took all these measurements using CrystalDiskMark’s highest large-block read/write values (version 8.0.4.0). I know where I want to be on this performance ladder, especially for image backups (one of my primary reasons for using and carrying portable storage on the road). Again: how ’bout you?

Notes on the Test Rig

I ran the external drives via a Lenovo ThinkPad Universal Dock Pro (TB4-capable) through a TB4 connection into a Lenovo ThinkPad X12 Hybrid Tablet. FWIW, the NVMe-4 results are the best I’ve ever seen from an external drive. Nifty!

Facebooklinkedin
Facebooklinkedin

Thunderbolt Docks Add Helpful Future-Proofing

I’m thinking about what kinds of hardware experiments I’ve conducted over the past couple of years. Especially this year (2022). Along the way, I’ve learned that Thunderbolt docks add helpful future-proofing for home and office users. Let me explain…

How Thunderbolt Docks Add Helpful Future-Proofing

Right now, Lenovo offers what can only be called a “Best Buy” in the arena of Thunderbolt 4 docks. Or maybe a couple of them, as I’ll recount shortly. Called the Universal TB4 Dock, it currently retails for just under US$290. This is about US$110 cheaper than its nearest competitors (e.g. Belkin and CalDigit, among others).

On December 8, I also wrote here about the Lenovo P27-u20 monitor, which includes a built-in TB4 dock. At US$527, with a 4K monitor included in the mix, it too, qualifies as a “Best Buy” IMO.

There is one thing, though: to make proper use of TB4, you also need TB4 peripherals. They will be no more than two years old (TB4 made its debut in H2’2020). There’s a lot of expense involved in climbing this technology bump. But if you’ve got newer peripherals, a TB4 dock is a great way to mate them up to PCs and laptops back to 8th Gen Intel (and equivalent AMD) CPUs. I’ve done that, and it works great.

Try TB3 for a Lower-Budget Approach

For readers who want to extend the life of a Windows 11 capable PC or laptop, it may make sense to invest in Thunderbolt 3 (TB3) instead. Such docks cost as little as US$40 (e.g. Dell refurb), and are readily available new for around or just under US$100. If you’ve already bought into USB-C (3.1 or 3.2 capability) or TB3 peripherals, this is a less expensive way to dock up. Worth researching anyway: I see lots of attractive options at Amazon and other online outlets.

Thanks, Lenovo!

While I’ve got your eye, I’d like to thank the laptop and peripherals teams at Lenovo for their outstanding support. They’ve sent me half-a-dozen different laptops (and one great SFF workstation), multiple docks and the aforementioned monitor this year to review.

It’s been incredibly educational and lots of fun to put different TB4 scenarios together. This lets me understand and measure how they work, and how to make them work best. A special shout-out to Jeff Witt and Amanda Heater for their great help and quick assistance this year (and beforehand). Happy holidays to one and all.

Facebooklinkedin
Facebooklinkedin

Thunderbolt Monitor Makes Life Easy

OK, then. Lenovo sent me a terrific Thunderbolt 4 4K ThinkVision P27-u20 monitor. It actually showed up the day before Thanksgiving. It’s been sitting on my office floor since then, waiting patiently for me to get around to it. I’m working with the company to get a better sense of how Thunderbolt 4 works in an office environment. And indeed, now I can say from experience that a Thunderbolt monitor makes life easy for properly-equipped PCs and laptops.

Extremely narrow side and top bezels make for a compelling and nicely stackable monitor. [Click image for full-size view.]

Why Thunderbolt Monitor Makes Life Easy

Simple: plug it it, turn it on, set the device for dual displays and extend the desktop on a laptop. You can see how this looks in the Thunderbolt Control Center on the X12 Hybrid Tablet in the top graphic.

On the P360 Ultra, it fired up on its own when plugged into the front Thunderbolt 4 port. Colors are crisp, and the monitor appears to work as fast using TB4 as it does under either HDMI or DisplayPort. Better yet, the Thunderbolt-accessible ports on the monitor include TB4 in/out, 2xHDMI 2.0, DP 1.2, GbE (RJ-45), an audio mini-jack, and 2xUSB3.1 (1 USB-Type B, and USB-C is TB4 capable). It’s also got integrated speakers (3W each, so not really major, but adequate). It runs a 60Hz refresh rate with a response time of 4 -6 ms so it’s not really a gaming monitor by any stretch. That said, it’s nice for productivity and static creation work.

Resolution is nominal 4K (3840 x 2160), and it supports DCI-PC3 and Adobe RGB. It’s also DisplayHDR 400 certified (that means 10-bit color). See the product page for complete tech specs.

Built-in TB4 Hub Makes For a Killer Price

Yes, that’s right: the monitor includes an entirely capable, built-in Thunderbolt 4 hub as part of its equipage. Very cool, for a device with an MSRP of under US$550. Indeed, even the cheapest TB4 hubs, similarly equipped, cost over US$300 nowadays. It also includes a DP cable, a TB 4 cable, and a USB TypeB2A cable to hook an external USB 3.1 device up to its Type B port. Note: I just happened to hook the monitor up through a Lenovo TB4 Dock because I have one, but it will act as a dock by itself. That’s why two devices (dock and monitor) show up in the Thunderbolt Control Center up top.

To me, this functionality makes the price of the monitor easy to justify given that it comes ready to support Thunderbolt 4 based audio, video, networking and peripherals right out of the box. If you need another monitor and you can also benefit from TB4 connectivity and access, this could be too good to pass up.

Upon first exposure and short-term use, I’m wowed. I’ll follow up with more details after I’ve had a chance to spend some time with this puppy.

Notes Added December 7

A few more noteworthy things have occurred to me as I ponder this new peripheral and its inner workings. The USB C port delivers up to 100 W of power, so it should be able to handle most laptops without a separate AC connection for juice. The on-screen menus do take some fooling with to figure out. It is kind of heavy (28 lbs/12.7 Kg) but easy to assemble, move around and adjust. Here’s an interesting technical review from PC Magazine for your consideration, too.


Facebooklinkedin
Facebooklinkedin

Windows 11 22H2 File Copy Fix Works

OK, then: I read the WinAero story about fixing the “slow file copy bug” in Windows 11 22H2. Indeed, it picqued my interest. “Hmmm,” I thought, “Maybe I can see on the P16 Mobile Workstation?” Yes, I could. I’m happy to confirm that the Windows 11 22H2 file copy fix works — on that PC, at least. What does this mean?

Take a look at the lead-in graphic. It’s a paused file copy. The file comes from my external F: Drive. (That’s a Sabrent Rocket 4 Plus 1 TB PCIe x4 NVMe SSD in a USB4 Acasis drive enclosure.) It’s copied to my built-in C drive. (That’s an internal Kioxio 2TB PCIe x4 NVMe SSD). Except for a dip about half-way through, it shows data rates from 1.2 to 2.3 GBps for a 20-plus GB file copy (a Macrium Reflect backup image).

That’s much, much better than the 600 – 950 Mbps I’d observed the last time I tried this with the same pair of devices. Looks like KB501738 issue does indeed get resolved in the latest Dev Channel Build (25252). I’m jazzed.

More Data: Windows 11 22H2 File Copy Fix Works

Even my slower USB3.2 NVMe Sabrent PCIe x3 with its older Samsung 950 1 TB SSD also shows a similar improvement. It shows a range of 750 MBps to a momentary high of 1.1 GBps in its copy of the same Macrium image file instead.

Gosh! It’s always nice when a usable performance bump occurs. It’s even better when the bump is both noticeable and measurable. And it makes the cost of relatively expensive NVMe drive enclosures more tolerable — maybe more justifiable, too — when the bump helps improve productivity.

Who knows? I might need to rethink my current take that paying US$100 extra to upgrade a USB3.2 NVMe enclosure to USB4 is too expensive. Stay tuned: more to follow next week!

Facebooklinkedin
Facebooklinkedin

USB4 Delivers Consistent NVMe Performance

OK, then. I finally laid hands on my second USB4 NVMe SSD enclosure yesterday. I deliberately sought out the cheapest one I could find so I could compare it to a more expensive alternative already on hand. When I say that USB4 delivers consistent NVMe performance here’s what that means:

1. The same SSD, cable, and host PC are used for comparison. Both drives have the “cache tweak” applied (this Oct 14 post has deets). Same tests performed, too (CrystalDiskMark and a Macrium Reflect backup).
2. The only thing that changes is the enclosure itself.

In short, I wanted to see if spending more on hardware returned a noticeable performance advantage (I’ll talk more about this below). Long story short: it doesn’t seem to make much, if any, difference. Let me explain…

Why Say: USB4 Delivers Consistent NVMe Performance?

The lead-in graphic shows the results from the cheap enclosure on the left, and the more expensive one on the right. The average difference in CrystalDiskMark performance shows 2 wins for el cheapo, 5 wins for the higher priced item, and 1 tie. On first blush, that gives the more expensive device an advantage. So the next question is: how much advantage?

This is where a little delta analysis can help. I calculate that the average performance difference between devices varies from a high of 6.2% to a low of 0.03% (not including the tie). That said, the average performance difference across all cells is merely 1.54%. (Calculated by taking absolute value for each delta, then dividing by the number of cells.) That’s not much difference, especially given the prices of the two devices: $128.82 and $140.71. That delta is 8.4% (~5.5 times the average performance delta).

I will also argue that comparing CystalDiskMark results is interesting, but not much of a real-world metric. Thus, I’ll compare completion times for a Macrium Reflect image backup on the same PC, same OS image. The expensive device took 2:25, the cheap one 2:44. That’s an 11.5% difference, greater than the price delta but not amazingly so.

Deciding What’s Worthwhile

I can actually see some differences between the two enclosures I bought. One thing to ponder is that NVMe drives tend to heat up when run full out for any length of time (as when handling large data sets, making backups, and so forth). I’ve seen temps (as reported in CrystalDiskInfo, reading SMART data) go as high as 60° C while M.2 SSDs are busy in these enclosures. At idle, they usually run at around 28° C. The more expensive NVMe enclosures tend to offer more surface area to radiate heat while active, so that’s worth factoring into the analysis.

But here’s the deal: I can buy a decent USB3.1 NVMe enclosure for around US$33 right now. The cheapest USB4 NVMe enclosure I could find cost almost US$96 more. That’s a multiplier of just under 4X in price for a device that delivers less than 2X in improved performance. Let me also observe that there are several such enclosures that cost US$160 and up also on the market. I still have trouble justifying the added expense for everyday use, including backup.

There will be some high-end users — especially those working with huge datasets — who might be able to justify the incremental cost because of their workloads and the incremental value of higher throughput. But for most business users, especially SOHO types like me, the ouch factor exceeds the wow value too much to make it worthwhile. ‘Nuff said.

Facebooklinkedin
Facebooklinkedin

USB NVMe HW Tweak Delivers Big

I’m still noodling about, trying to figure how to get the best performance out of high end USB NVMe drive enclosures. To that end, I was reminded of something I already knew but hadn’t considered. That is: deep down in the hardware policies for Windows removable devices — including NVMe drives — is something called “Removal policy.” As a quick and easy item, this USB NVMe HW tweak delivers big results.

Those results appear in the lead-in graphic for this story. Both sets of CrystalDiskMark results come from the same system, same USB-C port, and the same NVMe hardware. The only difference is that one is tweaked (selected “Better Performance”) and one is not. As you can see, this tweak makes a big difference. (Hint: the left-hand item shows tweaked results.)

How-To: Set Up NVMe HW Tweak Delivers Big

This takes a bit of digging to get into. This properties page is several levels deep in the storage device properties hierarchy. There are multiple ways to get to this page. I’ll illustrate one with step-by-step instructions using Disk Management:

1. Use Winkey+X to open the quick access menu.
2. Select Disk Management.
3. Right-click the drive letter for the NVMe device, then select Properties.
4. On the General tab, click the Properties button at lower right.
5. On that General tab, click the “Change Settings” button at lower left.
6. Click the Policies tab on the resulting Properties page, and click the radio button next to “Better Performance.” Also, click “Enable write caching on the device.”

Here’s what that final page looks like, with the described selections made:

USB NVMe HW Tweak Delivers Big.removal-policy

This page is four levels deep into the device properties hierarchy. It offers a useful “Better Performance” option.

What About Those Results?

I built a spreadsheet using both sets of results. Note that for every cell in each set of results, the tweaked drive was faster than the untweaked one. Some of the differences are negligible (under 10%). Some are minor, but noticeable (under 35%). The entire write column, however, offers at least doubled speed (top two columns). The random writes are 30 times faster when one thread works against a queue depth of 32. That drops to “merely” 11 times faster for a single thread and a single write request. Amazing!

Tweak(R) Tw(W) Notweak (R) Notw(W) Delta (R) Delta (W)
3049.53  2898.59  3004.07  1326.67  101.51% 218.49%
1760.91 2020.40 1620.99 857.20 108.63% 235.70%
499.74 361.83 411.16 12.00  121.54%  3015.25%
50.92 110.77  38,74 9.52 131.44% 1163.55%

This represents a significant boost in performance for a quick settings tweak. It does mean, though, that you must use the “Safe Eject” tool in the notification bar to eject the drive before you can disconnect it. Or, if you’re like me, you’ll simply do it the next time the host PC is rebooting (best done right when the restart gets underway, after shutdown is complete).

But gosh! Consider the money for a fast-ish NVMe drive (about US$120 – 150 for the 1 TB Sabrent Rocket 4 Plus). Then, factor in US$150-170 for a fast, USB4 NVMe enclosure. The tweak takes under a minute and really helps with drive performance. If you spend the money, you need to spend the time and effort to apply the tweak. You’ll get the most from your investment that way.

Realworld Results Change

Untweaked, it takes Macrium Reflect 5:30 to image the system drive on the P16 Mobile Workstation where the USB4 NVMe drive is attached. Tweaked, that same drive finished the job in 2:25. That’s over twice as fast. To me, that’s much more meaningful than synthetic benchmark results like those from CystalDiskMark. It also shows those benchmark results have some truth to them as well. Good-oh!

Facebooklinkedin
Facebooklinkedin

WD Black SN850 SSD Heatshield Bites Me

It’s sometimes said: “It’s the little things that get you.” Boy, was that true for my latest SSD purchase. Alas, as shown in the lead-in photo, I accidentally ordered a version with heatshield. It’s pretty impressive. Formed of solid aluminum, it’s least 5mm tall. It upped the cost by US$30, too. Even so, the WD Black SN850 SSD heatshield bites me — or my deployment plans — right in the hindquarters.

How WD Black SN850 SSD Heatshield Bites Me

Why is this a problem? Well, I’d planned on emplacing the SSD in an NVMe enclosure. Such enclosures, however, only accommodate circuit boards, not massive (and thick) heatshields.

WD Black SN850 SSD Heatshield Bites Me.barebones

What I needed, in fact, was the barebones version (image above). Costs US$99.50, and fits an NVMe enclosure just fine. I guess that’s what I get for giving into techno-lust. Amazon’s one-click ordering gave no time for thought. Sigh. I blame the government…

We Don’t Need No Stinkin’ Heatshield…

A little poking around online showed me that I was not the only buyer so surprised. Another party confirmed the heatshield would come off (but only destructively). Caution was my watchword.

Armed with a pair of needle-nose pliers, I carefully bent the heatshield away from the PCB. Next stop: Disk Management, for new drive setup. Worked! Happily, here are the results in File Explorer from my cheapo new NVMe enclosure.

Live and learn, I hope. Going forward, I’ll read my product details more carefully. Gosh, perhaps I can avoid the same mistake in future. We’ll see!

Facebooklinkedin
Facebooklinkedin

Flash Drive Goes Incredibly Slowly

Here’ s an interesting item. Last week, when trying to troubleshoot the graphics driver on the Lenovo P360 Ultra SFF PC, I ran into an interesting follow-on issue. I decided to copy the “old driver” file to a flash drive to take it upstairs where the unit lives (networking issues temporarily kept me from using RDP, as is my more typical practice). And gosh, I couldn’t help but notice my Mushkin Atom flash drive goes incredibly slowly when copying that 649K file.  The deets, courtesy of File Explorer, provide the lead-in graphic for this story.

If Flash Drive Goes Incredibly Slowly, Then What?

Just for grins, I plugged in an older USB3 mSATA device and copied the target file again. Despite its antique vintage (2014 or thereabouts) it beat the snot out of the flash drive. As you can see in the next screencap, it achieved a data rate of 236 MB/sec. That’s a whale of a lot faster than the paltry 12.5 MB/sec shown in the lead-in graphic.

Flash Drive Goes Incredibly Slowly.copy-speed

The SSD-based USB device is more than 18 times faster than the flash-based device. Wow!

What does this say? It says that older mSATA SSDs are worth keeping as a much speedier alternative to flash drives. Back when I bought the Sabrent enclosures in which my 3 mSATA drives are housed — I have one each 256, 512 and 1,024 MB devices — I paid US$60 or thereabouts to buy them. Now, you can pick them up at Amazon for US$14.

Flash Drive Goes Incredibly Slowly.msata-device

For US$14, you can move files around a whole lot faster!

To me, that’s money incredibly well spent, given the half-dozen or so mSATA drives I still have kicking around here. If you’ve got one or more sitting idle, this would be a smart buy for you, too.

Note Added 2 Hrs Later: Cheaper Than Flash!

You can buy a 256GB mSATA SSD for under US$30 right now. That makes the total price around US$45 for enclosure and drive. That’s about 3X what you’ll pay for a 128 GB flash drive, and less than some “faster” 256 GB flash drives cost. To me, this argues even more strongly that this is a good way to boost your USB storage arsenal without breaking the bank.

Facebooklinkedin
Facebooklinkedin

Exploring TB4/USB4 Backup Speeds

OK, then. I’m starting to dig into the capabilities of my new loaner SFF Lenovo P360 Ultra PC. It’s a beast, especially for such a small package (3.4 x 8.7 x 7.9″, 87 x 223 x 202 mm, weight 4.4lb/2.0 kg). Right now I’m giving the front USB-C ports a workout, and exploring TB4/USB4 backup speeds. They’re amazing.

Exploring TB4/USB4 Backup Speeds.f&rview

About the preceding graphic. It shows a front and rear view of the P360 chassis. Here’s what those numbered items convey:

1. Power switch (on/off)
2. Audio/headphone jack
3. USB 3.1 Gen 2 Type A port
4. 2 x Thunderbolt4/USB 3.1 Gen 2 Type C ports
5. Wi-Fi antenna mount
6. 2.5 GbE wired network (RJ-45)
7. 1.0 GbE wired network (RJ-45)
8. 4 x miniDP GPU (connects to Nvidia GPU)
9.  Chassis latch release
10. 3 x full-size DP GPU (connects to on-chip Intel GPU)
11. 4 x USB 3.1 Gen 2 Type A ports
12.  Optional PCIe card slot/port
13. Power in from 300W power brick

What Exploring TB4/USB4 Backup Speeds Says

First things first: I ran comparatives using CrystalDiskMark on a set of different NVMe enclosures with their own drives, as follows:

Enclosure                NVMe SSD              Price (Date)
======================   ==================    ==============
Sabrent NVMe PCIe x1.3   ADATA XPG 256GB       US$ 60  (2019)
Puhui USB 3.1 USB-C      Samsung OEM 512GB     US$ 30  (2022)
Konyead M.2 TB4/USB4     Rocket 4 Plus 1TB     US$162  (2022)

I didn’t get a lot of useful data out of that comparison, though the numbers for all three devices increase their readings down the preceding list. The final item shows most readings between 2x and 3x those for the first item. However, I decided to compare backup results for all three setups, working through a brand-new Belkin Pro Thunderbolt 4 Dock.

The results turn out to be a bit of a good new/bad news scenario.  New TB4/USB4 NVMe enclosures are still punishingly expensive. Performance results from backup show them not yet worth the $132 differential vis-a-vis a cheap0 USB 3 3.1 Gen2 version. About the only thing they can do right now, as far as I can tell, is bring up the “USB 4.0 SSD” label in the Thunderbolt Control Center, as shown in the lead-in graphic.

Big Price Diffs Don’t Translate to Performance

Here’s a table of backup times from Macrium Reflect Free to the three drives, listed by Enclosure name (consult previous table for more info on innards):

Enclosure                Backup (times)
======================   ==============
Sabrent NVMe PCIe x1.3     162 (2:42)
Puhui USB 3.1 USB-C        131 (2:11)
Konyead M.2 TB4/USB4       132 (2:12)

While there’s a 31/32 second difference (about 20%) between the older Sabrent enclosure and the two newer ones, there’s so little difference (1 second) between the other two that I’m sure that falls in the margin of measurement error one would expect.

What’s interesting here is that these backup speeds — even on the slowest/oldest device — are about twice as fast as on my other, similarly loaded test machines (which top out at USB 3.1 Gen 2). That tells me for those who do a lot of backing up, video editing, or other data intensive stuff there’s some real benefit to be gained from investing in TB4/USB4 ports and devices.

Lessons Learned

What lessons do I draw from this experiment? Glad you asked! Here’s a list:

  • It’s definitely worth adding an interface to older desktops to support TB4/USB4 for the speed bump it provides.
  • This new technology provides a “speed reason” to consider buying in on a newer laptop or PC.
  • Newer, more expensive TB4/USB4 NVMe enclosures may not be worth the added cost as compared to USB 3.1 Gen 2/TB3 counterparts.
  • From what I’m reading, it’s a good idea to use as short a USB4/TB4 rated cable as possible.
  • It’s also best to hook the NVMe enclosure directly to the PC if you can (going through the dock reduced performance by about 5% overall)

A terrific experiment, and a  great learning lesson, too. Thanks to the nice folks at Belkin and Lenovo who made their gear available to me.

Facebooklinkedin
Facebooklinkedin