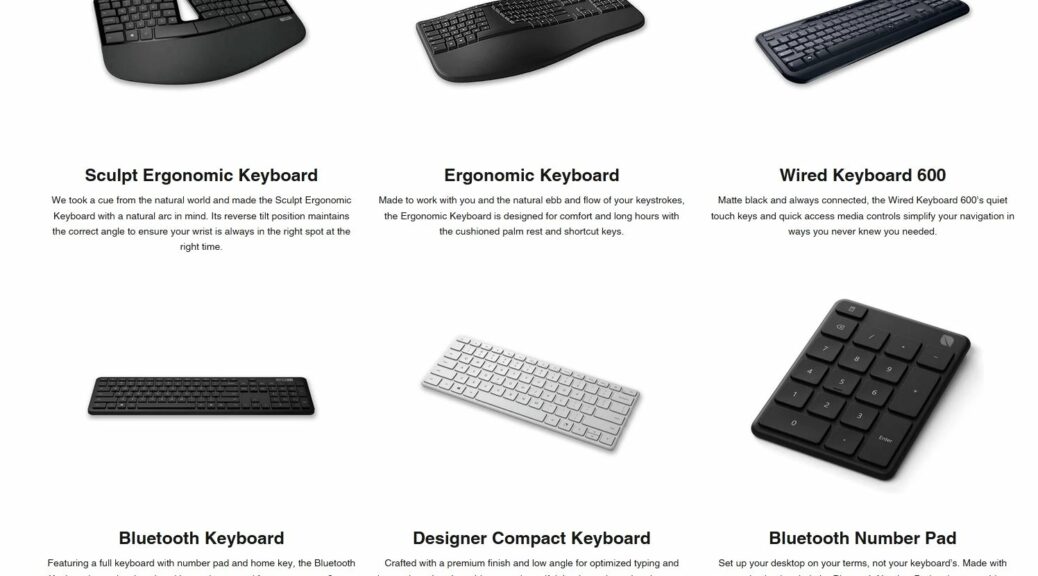
Category Archives: USB devices

Windows 11 22H2 File Copy Fix Works

OK, then: I read the WinAero story about fixing the “slow file copy bug” in Windows 11 22H2. Indeed, it picqued my interest. “Hmmm,” I thought, “Maybe I can see on the P16 Mobile Workstation?” Yes, I could. I’m happy to confirm that the Windows 11 22H2 file copy fix works — on that PC, at least. What does this mean?

Take a look at the lead-in graphic. It’s a paused file copy. The file comes from my external F: Drive. (That’s a Sabrent Rocket 4 Plus 1 TB PCIe x4 NVMe SSD in a USB4 Acasis drive enclosure.) It’s copied to my built-in C drive. (That’s an internal Kioxio 2TB PCIe x4 NVMe SSD). Except for a dip about half-way through, it shows data rates from 1.2 to 2.3 GBps for a 20-plus GB file copy (a Macrium Reflect backup image).

That’s much, much better than the 600 – 950 Mbps I’d observed the last time I tried this with the same pair of devices. Looks like KB501738 issue does indeed get resolved in the latest Dev Channel Build (25252). I’m jazzed.

More Data: Windows 11 22H2 File Copy Fix Works

Even my slower USB3.2 NVMe Sabrent PCIe x3 with its older Samsung 950 1 TB SSD also shows a similar improvement. It shows a range of 750 MBps to a momentary high of 1.1 GBps in its copy of the same Macrium image file instead.

Gosh! It’s always nice when a usable performance bump occurs. It’s even better when the bump is both noticeable and measurable. And it makes the cost of relatively expensive NVMe drive enclosures more tolerable — maybe more justifiable, too — when the bump helps improve productivity.

Who knows? I might need to rethink my current take that paying US$100 extra to upgrade a USB3.2 NVMe enclosure to USB4 is too expensive. Stay tuned: more to follow next week!

Facebooklinkedin
Facebooklinkedin

USB4 Delivers Consistent NVMe Performance

OK, then. I finally laid hands on my second USB4 NVMe SSD enclosure yesterday. I deliberately sought out the cheapest one I could find so I could compare it to a more expensive alternative already on hand. When I say that USB4 delivers consistent NVMe performance here’s what that means:

1. The same SSD, cable, and host PC are used for comparison. Both drives have the “cache tweak” applied (this Oct 14 post has deets). Same tests performed, too (CrystalDiskMark and a Macrium Reflect backup).
2. The only thing that changes is the enclosure itself.

In short, I wanted to see if spending more on hardware returned a noticeable performance advantage (I’ll talk more about this below). Long story short: it doesn’t seem to make much, if any, difference. Let me explain…

Why Say: USB4 Delivers Consistent NVMe Performance?

The lead-in graphic shows the results from the cheap enclosure on the left, and the more expensive one on the right. The average difference in CrystalDiskMark performance shows 2 wins for el cheapo, 5 wins for the higher priced item, and 1 tie. On first blush, that gives the more expensive device an advantage. So the next question is: how much advantage?

This is where a little delta analysis can help. I calculate that the average performance difference between devices varies from a high of 6.2% to a low of 0.03% (not including the tie). That said, the average performance difference across all cells is merely 1.54%. (Calculated by taking absolute value for each delta, then dividing by the number of cells.) That’s not much difference, especially given the prices of the two devices: $128.82 and $140.71. That delta is 8.4% (~5.5 times the average performance delta).

I will also argue that comparing CystalDiskMark results is interesting, but not much of a real-world metric. Thus, I’ll compare completion times for a Macrium Reflect image backup on the same PC, same OS image. The expensive device took 2:25, the cheap one 2:44. That’s an 11.5% difference, greater than the price delta but not amazingly so.

Deciding What’s Worthwhile

I can actually see some differences between the two enclosures I bought. One thing to ponder is that NVMe drives tend to heat up when run full out for any length of time (as when handling large data sets, making backups, and so forth). I’ve seen temps (as reported in CrystalDiskInfo, reading SMART data) go as high as 60° C while M.2 SSDs are busy in these enclosures. At idle, they usually run at around 28° C. The more expensive NVMe enclosures tend to offer more surface area to radiate heat while active, so that’s worth factoring into the analysis.

But here’s the deal: I can buy a decent USB3.1 NVMe enclosure for around US$33 right now. The cheapest USB4 NVMe enclosure I could find cost almost US$96 more. That’s a multiplier of just under 4X in price for a device that delivers less than 2X in improved performance. Let me also observe that there are several such enclosures that cost US$160 and up also on the market. I still have trouble justifying the added expense for everyday use, including backup.

There will be some high-end users — especially those working with huge datasets — who might be able to justify the incremental cost because of their workloads and the incremental value of higher throughput. But for most business users, especially SOHO types like me, the ouch factor exceeds the wow value too much to make it worthwhile. ‘Nuff said.

Facebooklinkedin
Facebooklinkedin

USB NVMe HW Tweak Delivers Big

I’m still noodling about, trying to figure how to get the best performance out of high end USB NVMe drive enclosures. To that end, I was reminded of something I already knew but hadn’t considered. That is: deep down in the hardware policies for Windows removable devices — including NVMe drives — is something called “Removal policy.” As a quick and easy item, this USB NVMe HW tweak delivers big results.

Those results appear in the lead-in graphic for this story. Both sets of CrystalDiskMark results come from the same system, same USB-C port, and the same NVMe hardware. The only difference is that one is tweaked (selected “Better Performance”) and one is not. As you can see, this tweak makes a big difference. (Hint: the left-hand item shows tweaked results.)

How-To: Set Up NVMe HW Tweak Delivers Big

This takes a bit of digging to get into. This properties page is several levels deep in the storage device properties hierarchy. There are multiple ways to get to this page. I’ll illustrate one with step-by-step instructions using Disk Management:

1. Use Winkey+X to open the quick access menu.
2. Select Disk Management.
3. Right-click the drive letter for the NVMe device, then select Properties.
4. On the General tab, click the Properties button at lower right.
5. On that General tab, click the “Change Settings” button at lower left.
6. Click the Policies tab on the resulting Properties page, and click the radio button next to “Better Performance.” Also, click “Enable write caching on the device.”

Here’s what that final page looks like, with the described selections made:

USB NVMe HW Tweak Delivers Big.removal-policy

This page is four levels deep into the device properties hierarchy. It offers a useful “Better Performance” option.

What About Those Results?

I built a spreadsheet using both sets of results. Note that for every cell in each set of results, the tweaked drive was faster than the untweaked one. Some of the differences are negligible (under 10%). Some are minor, but noticeable (under 35%). The entire write column, however, offers at least doubled speed (top two columns). The random writes are 30 times faster when one thread works against a queue depth of 32. That drops to “merely” 11 times faster for a single thread and a single write request. Amazing!

Tweak(R) Tw(W) Notweak (R) Notw(W) Delta (R) Delta (W)
3049.53  2898.59  3004.07  1326.67  101.51% 218.49%
1760.91 2020.40 1620.99 857.20 108.63% 235.70%
499.74 361.83 411.16 12.00  121.54%  3015.25%
50.92 110.77  38,74 9.52 131.44% 1163.55%

This represents a significant boost in performance for a quick settings tweak. It does mean, though, that you must use the “Safe Eject” tool in the notification bar to eject the drive before you can disconnect it. Or, if you’re like me, you’ll simply do it the next time the host PC is rebooting (best done right when the restart gets underway, after shutdown is complete).

But gosh! Consider the money for a fast-ish NVMe drive (about US$120 – 150 for the 1 TB Sabrent Rocket 4 Plus). Then, factor in US$150-170 for a fast, USB4 NVMe enclosure. The tweak takes under a minute and really helps with drive performance. If you spend the money, you need to spend the time and effort to apply the tweak. You’ll get the most from your investment that way.

Realworld Results Change

Untweaked, it takes Macrium Reflect 5:30 to image the system drive on the P16 Mobile Workstation where the USB4 NVMe drive is attached. Tweaked, that same drive finished the job in 2:25. That’s over twice as fast. To me, that’s much more meaningful than synthetic benchmark results like those from CystalDiskMark. It also shows those benchmark results have some truth to them as well. Good-oh!

Facebooklinkedin
Facebooklinkedin

WD Black SN850 SSD Heatshield Bites Me

It’s sometimes said: “It’s the little things that get you.” Boy, was that true for my latest SSD purchase. Alas, as shown in the lead-in photo, I accidentally ordered a version with heatshield. It’s pretty impressive. Formed of solid aluminum, it’s least 5mm tall. It upped the cost by US$30, too. Even so, the WD Black SN850 SSD heatshield bites me — or my deployment plans — right in the hindquarters.

How WD Black SN850 SSD Heatshield Bites Me

Why is this a problem? Well, I’d planned on emplacing the SSD in an NVMe enclosure. Such enclosures, however, only accommodate circuit boards, not massive (and thick) heatshields.

WD Black SN850 SSD Heatshield Bites Me.barebones

What I needed, in fact, was the barebones version (image above). Costs US$99.50, and fits an NVMe enclosure just fine. I guess that’s what I get for giving into techno-lust. Amazon’s one-click ordering gave no time for thought. Sigh. I blame the government…

We Don’t Need No Stinkin’ Heatshield…

A little poking around online showed me that I was not the only buyer so surprised. Another party confirmed the heatshield would come off (but only destructively). Caution was my watchword.

Armed with a pair of needle-nose pliers, I carefully bent the heatshield away from the PCB. Next stop: Disk Management, for new drive setup. Worked! Happily, here are the results in File Explorer from my cheapo new NVMe enclosure.

Live and learn, I hope. Going forward, I’ll read my product details more carefully. Gosh, perhaps I can avoid the same mistake in future. We’ll see!

Facebooklinkedin
Facebooklinkedin

Flash Drive Goes Incredibly Slowly

Here’ s an interesting item. Last week, when trying to troubleshoot the graphics driver on the Lenovo P360 Ultra SFF PC, I ran into an interesting follow-on issue. I decided to copy the “old driver” file to a flash drive to take it upstairs where the unit lives (networking issues temporarily kept me from using RDP, as is my more typical practice). And gosh, I couldn’t help but notice my Mushkin Atom flash drive goes incredibly slowly when copying that 649K file.  The deets, courtesy of File Explorer, provide the lead-in graphic for this story.

If Flash Drive Goes Incredibly Slowly, Then What?

Just for grins, I plugged in an older USB3 mSATA device and copied the target file again. Despite its antique vintage (2014 or thereabouts) it beat the snot out of the flash drive. As you can see in the next screencap, it achieved a data rate of 236 MB/sec. That’s a whale of a lot faster than the paltry 12.5 MB/sec shown in the lead-in graphic.

Flash Drive Goes Incredibly Slowly.copy-speed

The SSD-based USB device is more than 18 times faster than the flash-based device. Wow!

What does this say? It says that older mSATA SSDs are worth keeping as a much speedier alternative to flash drives. Back when I bought the Sabrent enclosures in which my 3 mSATA drives are housed — I have one each 256, 512 and 1,024 MB devices — I paid US$60 or thereabouts to buy them. Now, you can pick them up at Amazon for US$14.

Flash Drive Goes Incredibly Slowly.msata-device

For US$14, you can move files around a whole lot faster!

To me, that’s money incredibly well spent, given the half-dozen or so mSATA drives I still have kicking around here. If you’ve got one or more sitting idle, this would be a smart buy for you, too.

Note Added 2 Hrs Later: Cheaper Than Flash!

You can buy a 256GB mSATA SSD for under US$30 right now. That makes the total price around US$45 for enclosure and drive. That’s about 3X what you’ll pay for a 128 GB flash drive, and less than some “faster” 256 GB flash drives cost. To me, this argues even more strongly that this is a good way to boost your USB storage arsenal without breaking the bank.

Facebooklinkedin
Facebooklinkedin

Exploring TB4/USB4 Backup Speeds

OK, then. I’m starting to dig into the capabilities of my new loaner SFF Lenovo P360 Ultra PC. It’s a beast, especially for such a small package (3.4 x 8.7 x 7.9″, 87 x 223 x 202 mm, weight 4.4lb/2.0 kg). Right now I’m giving the front USB-C ports a workout, and exploring TB4/USB4 backup speeds. They’re amazing.

Exploring TB4/USB4 Backup Speeds.f&rview

About the preceding graphic. It shows a front and rear view of the P360 chassis. Here’s what those numbered items convey:

1. Power switch (on/off)
2. Audio/headphone jack
3. USB 3.1 Gen 2 Type A port
4. 2 x Thunderbolt4/USB 3.1 Gen 2 Type C ports
5. Wi-Fi antenna mount
6. 2.5 GbE wired network (RJ-45)
7. 1.0 GbE wired network (RJ-45)
8. 4 x miniDP GPU (connects to Nvidia GPU)
9.  Chassis latch release
10. 3 x full-size DP GPU (connects to on-chip Intel GPU)
11. 4 x USB 3.1 Gen 2 Type A ports
12.  Optional PCIe card slot/port
13. Power in from 300W power brick

What Exploring TB4/USB4 Backup Speeds Says

First things first: I ran comparatives using CrystalDiskMark on a set of different NVMe enclosures with their own drives, as follows:

Enclosure                NVMe SSD              Price (Date)
======================   ==================    ==============
Sabrent NVMe PCIe x1.3   ADATA XPG 256GB       US$ 60  (2019)
Puhui USB 3.1 USB-C      Samsung OEM 512GB     US$ 30  (2022)
Konyead M.2 TB4/USB4     Rocket 4 Plus 1TB     US$162  (2022)

I didn’t get a lot of useful data out of that comparison, though the numbers for all three devices increase their readings down the preceding list. The final item shows most readings between 2x and 3x those for the first item. However, I decided to compare backup results for all three setups, working through a brand-new Belkin Pro Thunderbolt 4 Dock.

The results turn out to be a bit of a good new/bad news scenario.  New TB4/USB4 NVMe enclosures are still punishingly expensive. Performance results from backup show them not yet worth the $132 differential vis-a-vis a cheap0 USB 3 3.1 Gen2 version. About the only thing they can do right now, as far as I can tell, is bring up the “USB 4.0 SSD” label in the Thunderbolt Control Center, as shown in the lead-in graphic.

Big Price Diffs Don’t Translate to Performance

Here’s a table of backup times from Macrium Reflect Free to the three drives, listed by Enclosure name (consult previous table for more info on innards):

Enclosure                Backup (times)
======================   ==============
Sabrent NVMe PCIe x1.3     162 (2:42)
Puhui USB 3.1 USB-C        131 (2:11)
Konyead M.2 TB4/USB4       132 (2:12)

While there’s a 31/32 second difference (about 20%) between the older Sabrent enclosure and the two newer ones, there’s so little difference (1 second) between the other two that I’m sure that falls in the margin of measurement error one would expect.

What’s interesting here is that these backup speeds — even on the slowest/oldest device — are about twice as fast as on my other, similarly loaded test machines (which top out at USB 3.1 Gen 2). That tells me for those who do a lot of backing up, video editing, or other data intensive stuff there’s some real benefit to be gained from investing in TB4/USB4 ports and devices.

Lessons Learned

What lessons do I draw from this experiment? Glad you asked! Here’s a list:

  • It’s definitely worth adding an interface to older desktops to support TB4/USB4 for the speed bump it provides.
  • This new technology provides a “speed reason” to consider buying in on a newer laptop or PC.
  • Newer, more expensive TB4/USB4 NVMe enclosures may not be worth the added cost as compared to USB 3.1 Gen 2/TB3 counterparts.
  • From what I’m reading, it’s a good idea to use as short a USB4/TB4 rated cable as possible.
  • It’s also best to hook the NVMe enclosure directly to the PC if you can (going through the dock reduced performance by about 5% overall)

A terrific experiment, and a  great learning lesson, too. Thanks to the nice folks at Belkin and Lenovo who made their gear available to me.

Facebooklinkedin
Facebooklinkedin

CarPlay Cable Connections Are Key

Here’s another recent lesson learned from our just-completed trip to New England. On our reconnaissance mission in late July, we quickly figured out that a Lightning cable between iPhone and in-car USB makes connecting simple and fast. This time around, we learned that the cable itself also matters. Though I packed 3 such cables in our cable bag, only one of them worked well to support CarPlay. Hence my title: CarPlay cable connections are key. Let me explain…

Why CarPlay Cable Connections Are Key

One of the cables was probably shorted: the charge indicator kept turning on and off when it was in use in the car. That simply won’t do.

The second cable was an old — iPhone 6 vintage, at least — Apple-provided charging cable. Clearly, it couldn’t handle the bandwidth requirements needed to ferry comm traffic between the iPhone and the car’s built-in display. It simply didn’t work reliably or well.

The third cable proved to be the charm. It was a 10-foot Amazon Basics USB A for iPhone and iPad cable purchased in 2019. This item is no longer in stock, but something like this iPhone 11 model (US$16.99) would undoubtedly work. I gave one to my son when he went off to school, so I’m ordering 2 more right now.

Underlying USB Support in CarPlay

As I understand it, Lightning cables support USB 2.0 more or less uniformly (here’s an interesting discussion from Volvo, and an informative Reddit thread). My guess is that both of my old cables were sufficiently “used” that they simply couldn’t provide full USB 2.0 capability/bandwidth. The newer cable — despite its 10ft (~3M) length — worked just fine.

Hint/tip: before you take off on a road trip, it’s probably a good idea to test your chosen Lightning cables (listening to music is a fair method) to make sure they can carry the load. I’d also recommend taking a spare — I always do — just in case you lose or damage one while traveling.

Facebooklinkedin
Facebooklinkedin

USB-C Port Choice Really Matters

Here’s an interesting discovery. Or maybe it should be called a “realization.” Yesterday, upon trying out my new Belkin and CalDigit Thunderbolt 4 docks, I learned that USB-C port choice really matters. In fact, my reported GbE issues with the Belkin Thunderbolt 3 port are probably related. Please: let me explain…

Why USB-C Port Choice Really Matters

Simply put, if you plug a dock into the upper USB-C port in the Lenovo X12 hybrid laptop it works as it should. Plug it into the lower USB-C port and the GbE connection disappears. Also, the device does not show up in the Thunderbolt Control Center app, either.

More details:

  • The Ethernet controller built into the CalDigit unit depicted in the lead in graphic is an Intel I225-LMvP. When the unit is plugged into the upper USB-C port it appears in Device Manager. If plugged into the lower USB-C port it does not.

  • When I plug the dock into the lower USB-C port, it vanishes from Thunderbolt Control Center, which then shows no attached devices. Interestingly, Windows still finds attached storage devices. But wired networking through the dock no longer works.

Extremely interesting!

What Does It All Mean, Mr. Wizard?

What it means is that on this Lenovo model, only one of its two USB-C ports also supports Thunderbolt (and it’s version 4, interestingly enough). Here’s my clue from the product family specifications page, which reads as follows under “Ports/Slots”:

    • USB 4 Type-C with Thunderbolt™ 4 (DisplayPort, Power Delivery and Data Transfer)
    • USB 3.2 Gen 2 Type-C

The reason why storage keeps working, but why networking and video — and presumably  other high-bandwidth connections — do not, is because Thunderbolt support is required for such things. If I’d still had a monitor attached to the X12 (I sent it off to school with my son) I might have figured this out faster. But now I know . . . and so do you! And it goes to show that sometimes, where you plug in really matters, even if the “gozintas” look the same.

Facebooklinkedin
Facebooklinkedin

Thunderbolt Dock Loses GbE Port

Drat! In jacking around with my Belkin Thunderbolt 3 Dock Plus today, I couldn’t help but notice that the wired Ethernet port wasn’t blinking. Further testing included multiple cables and connections to the same port, none of which worked. When I tried a passive Thunderbolt 3 mini-dock in the other USB-C port on the Lenovo X12, that wired Ethernet port worked immediately. Thus, I can only conclude that Thunderbolt Dock loses GbE port is the right diagnosis. Sigh.

Note: The lead-in graphic for this story shows the rear view of the aforementioned Belkin device, with its RJ-45/GbE port at the left. No blinkin’ lights, man!

If Thunderbolt Dock Loses GbE Port, Then What?

For the time being, I’m using another dock — the Thunderbolt 3 Minidock — just for its RJ-45 GbE connection. Good thing my X12 Hybrid has a spare USB-C/Thunderbolt port, eh?

Longer term, I’ve already contacted Belkin about sending me a replacement. They’ve got a nice looking Thunderbolt 4 dock for sale now, so hopefully they’ll ship one my way. I’ve also gone ahead and ordered the CalDigit TS4, reputedly one of the best Thunderbolt 4 docks on the market today.

Thunderbolt 4 Docking Brings Other Benefits

Acquiring one or more Thunderbolt 4 docks will also help with my ongoing testing of NVMe SSD enclosures. As I reported a few days ago, switching from USB-C/3.1 or 3.2 to Thunderbolt 3 makes a difference in IO performance on my fastest SSD enclosure/drive combos. I’m curious to see if a bump to Thunderbolt 4 will make any additional difference.

According to what I read, throughput doesn’t vary that much for external drives from Thunderbolt 3 to 4. I’ve also observed that synthetic IO tests (e.g. CystalDiskMark) tend to overstate the real-world speed-ups available from faster buses. Thus it will be interesting to observe exactly how much difference the bump from 3 to 4 makes.

Stay tuned! I’ll let you know what comes of that testing. Should be fun!

Facebooklinkedin
Facebooklinkedin

Thunderbolt Turns Up NVMe IO Speeds

This is too cool. I’m finally starting to make sense of how to get the best performance out of external NVMe-based storage devices. As far as I can tell, bus speed is key. In fact, Thunderbolt turns up NVMe IO speeds. I apparently have only one laptop that’s new enough to show off the difference, but those results speak for themselves.

It also took me a while to lay hands on an NVMe enclosure that could deliver the performance goods. If you look at the lead-in graphic above, you’ll see two sets of CrystalDiskMark results from the same storage device and PC. The left-hand set comes from a USB-C port (USB 3.2, according to the Lenovo Yoga 7i specs). The right-hand set comes via a Belkin Thunderbolt 3 dock with the NVMe enclosure snuggled into one of its two available USB-C ports.

Showing That Thunderbolt Turns Up NVMe IO Speeds

The graphic speaks for itself. It shows speed boosts that range from ~2.5 X (Read SEQ1M Q8T1) to ~1.2X (Read RND4K Q1T1) faster for Thunderbolt versus a direct USB-C connection. I’m going to spring for the CalDigit Thunderbolt 4 dock, in the belief that it will improve speeds still further. Time will tell if that’s wishful thinking or actually worthwhile.

I can tell you this much from direct observation. Through the USB-C port on the Lenovo Yoga 7i, Macrium Reflect takes 4:03 to make an image backup (with reported read/write speeds of 7.6 and 7.2 Gb/s, respectively). Through the Thunderbolt 3 dock the same device takes 3:33 (with reported read/write speeds of 8.6 and 6.9 Gb/s). The former is what I would call “reasonably speedy;” the latter is 14%  (30 seconds) faster.

I’m not sure that’s a big enough difference to count. You tell me…

Heat Can Be an Issue

Running backups back-to-back also showed me that heat can be an issue if you drive an NVMe SSD hard in an unventilated metal enclosure. So I parked the aluminum case on an ice-pack and it sailed through repeated backups with a reported temp of 13 C. Where there’s the will, there’s almost always a way! LOL

Facebooklinkedin
Facebooklinkedin