Category Archives: Recent Activity

Yoga Pro 9i Shows Incredible SSD Speed Variations

I’m digging into the behaviors of the svelte and powerful Yoga Pro 9i I’ve had for two weeks today. It’s a speedy and powerful beast of a laptop. It’s half the thickness (30.23mm/1.2″ vs 19.4mm/0.77″ on average) and ¾ the weight (2.95kg/6.5 lbs vs 2.23kg/4.9 lbs) of the Lenovo P16 Mobile Workstation (Gen1). But it’s either on par with or faster than that bigger beast of a desktop replacement. All this said, though, running various NVMe drives and enclosures, I’ve observed that the Yoga Pro 9i shows incredible SSD speed variations.

Why Say: Yoga Pro 9i Shows Incredible SSD Speed Variations

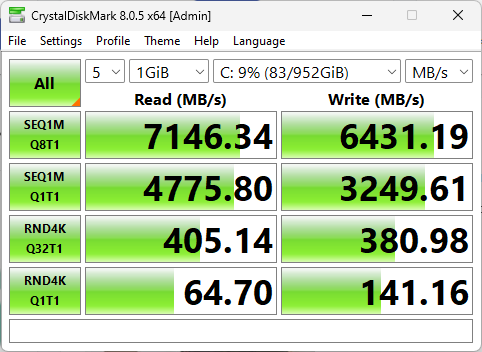
The first set of CrystalDiskMark (CDM) results for the Yoga Pro 9i serve as the lead graphic up top here. These come from the internal SSD inside the unit’s M.2 drive slot. According to Device Manager that drive is an SKHynix_HFS001TEJ9X115N (1TB PCIe x4 NVMe 1.4). Those are pretty respectable results, and serve as a point of reference against external drives.

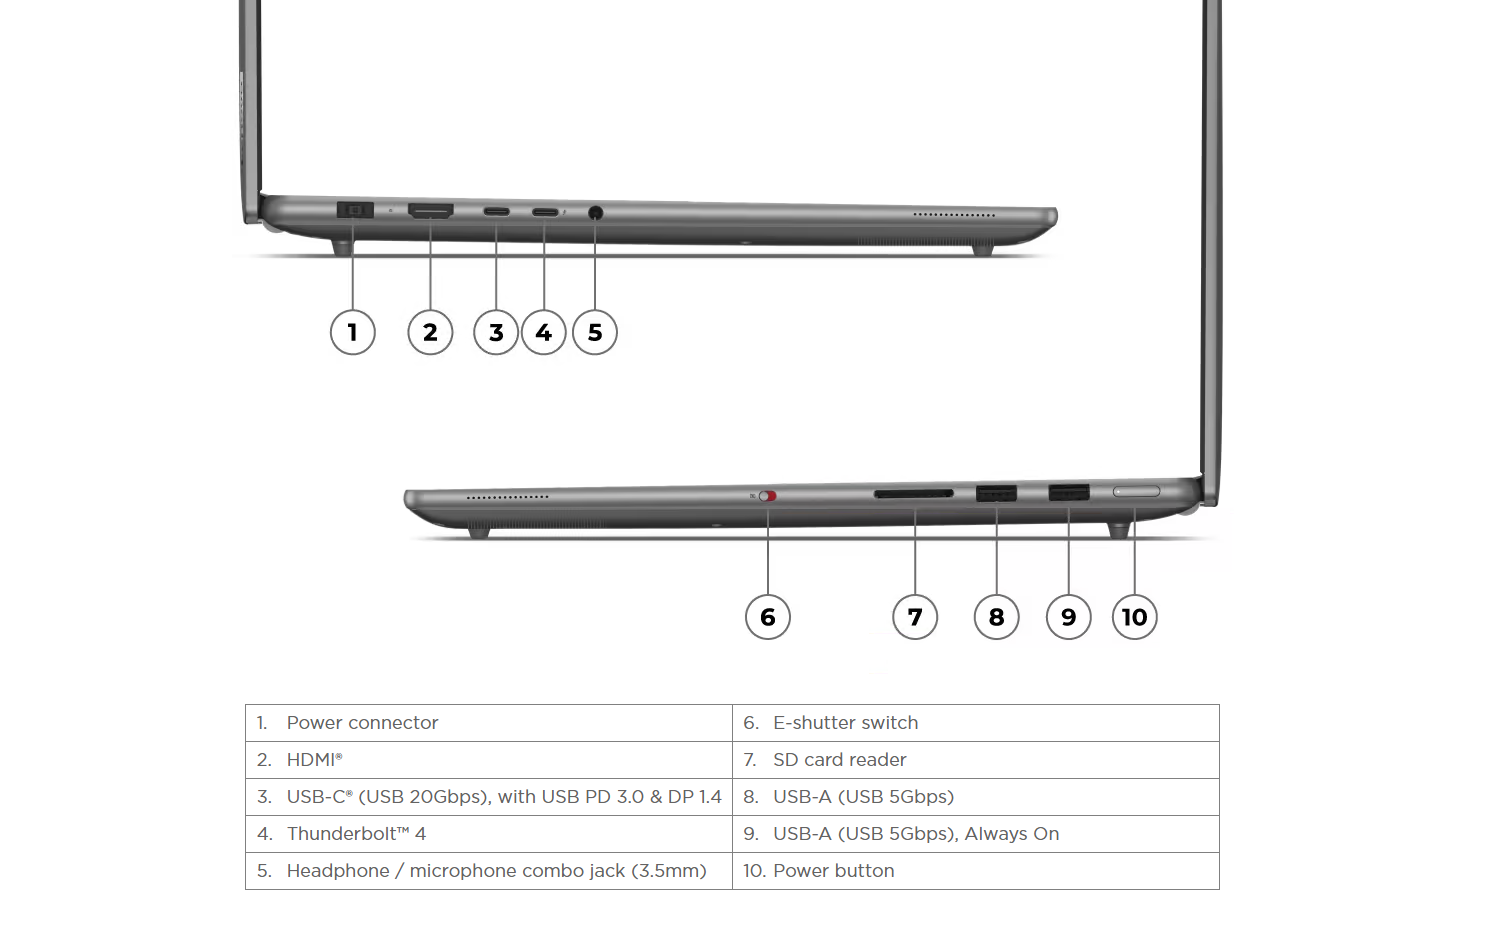
What makes the Yoga Pro 9i interesting is its two USB-C ports. One is labeled USB-C (20 Gbps) and the other is labeled Thunderbolt 4 (which means 40 Gbps) [see the ports diagram from this April 29 post]. Theoretically that means port 3 (USB-C 20 Gbps) tops out at half the speed of port 4 (USB-C Thunderbolt 4 40 Gbps).

And indeed my only Thunderbolt 4 NVMe enclosure — an Acasis TB-401u claims to support that 40 Gbps top rate. The on-the-ground reality is, however, something quite different with a Sabrent Rocket 1TB NVMe 1.3 SSD  installed therein. Much of this comes from an older v1.3 SSD inside a 1.4 enclosure with access to TB4/USB4 compatible ports. But these results fall far short of what I’d expected to see:

Yoga Pro 9i Shows Incredible SSD Speed Variations.acasis

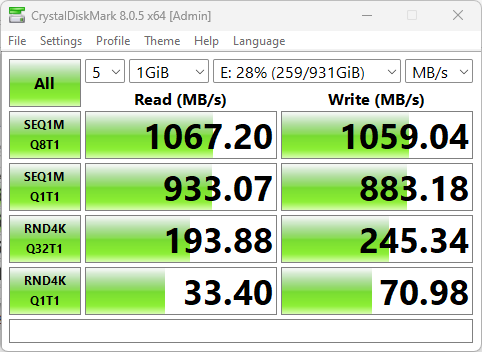
This looks like results for a typical USB 3.x UASP device IMO

In fact, I got at least some better results from a less-capable Crucial CTP2000P3SSD8 (2TB, NVMe 1.3) inside a less capable enclosure (Sabrent EC-NVME: USB 3.1 Gen2) in the slower USB-C 20 Gbps port. Here they are:

Yoga Pro 9i Shows Incredible SSD Speed Variations.sabrent/crucial

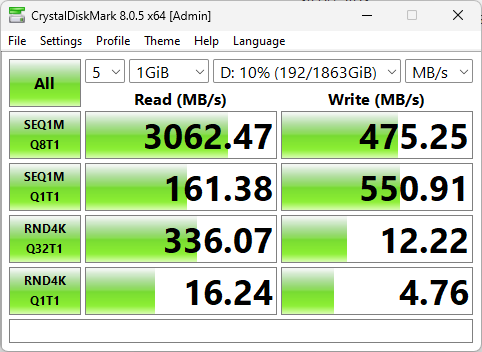
Big bulk reads (top left) are much faster, but everything else is (mostly) slower.

There’s a lot of interesting stuff going on here. What I take from it is that for the fastest backups and big file transfers (video, AI models, and the like) you’re better off spending more on a faster enclosure and a faster SSD to get the most out of the connection. I’m going to have to systematize this, and run some more tests. Great fun!

Facebooklinkedin
Facebooklinkedin

Dev Home Environments Missing Local ISO Access

As far as I can tell the ability to create and manage Hyper-V VMs using the latest release of Dev Home (Preview) is nothing short of terrific. Whereas Hyper-V Manager makes it difficult or blocks use of RDP during VM set-up and install, Dev Home is completely friendly to this oh-so-common way to get stuff done on Windows networks. I have 8 PCs (1 desktop, 7 laptops) in  my office right now. I work on the desktop and RDP into the other machines as a matter of course. Alas, I suffer with Dev Home Environments missing local ISO. Let me explain…

Why Say: Dev Home Environments Missing Local ISO Access

I could be wrong, but I don’t see any way to access a local image source on the “Choose an image to use*” pane when setting up a Hyper-V VM inside Dev Home. If you look at the lead-in graphic you’ll see dev options for Windows 10 (top) and 11 (bottom) with three Ubuntu items inbetween. That’s it!

Given Dev Home’s focus on developers and developer environments, this may make sense. But given that Dev Home works seamlessly and properly in an RDP session, and Hyper-V does not, it makes me want more. Specifically, it makes me want the ability to use a local ISO file of my choosing as the basis for a Hyper-V VM when I click the Create Environment button in Dev Home.

Why? Because it “just works” in setting things up and getting them running. Working with Hyper-V Manager to create VMs through RDP is tricky and frustrating. Working with Dev Home to create VMs is an absolute breeze.

A Different Alternative: Fix Hyper-V Manager

If MS doesn’t want to add a local filesystem link to this aspect of Dev Home, that’s OK. But if so, they should fix Hyper-V Manager so that it works properly with Windows 11 (default to TPM support, turn off Windows hello login that doesn’t work on RDP). Is that too much to ask? Gosh, I hope not!

Facebooklinkedin
Facebooklinkedin

Pondering AI PCs Means TOPS

Since last Friday (April 26) I’ve been working with the Lenovo Yoga Pro 9 laptop. It’s also called a Yoga Pro 9i. I’m a little mystified by the “i” that comes and goes for this device name. If you look at the lead-in graphic you can see the User Guide calls it “Pro 9i” while Lenovo Vantage calls it “Pro 9.” It’s an early AI PC from Lenovo, which means it has a Copilot key and a built-in AI processor, aka NPU (Neural Processing Unit). As I’m now learning, pondering AI PCs means TOPS (trillions of AI or “tera” operations per second) matter — a lot!

If Pondering AI PCs Means TOPS Matters, What’s the 9(i) Got?

According to Intel Ark the name of the NPU integrated into the Intel Ultra Core i9 185H CPU is “Intel AI boost.” Otherwise, there’s precious little info available about its capabilities except for the frameworks it support. For the record, those are Intel’s own Open VINO, WindowsML, DirectML and OMNX RT.

I had to turn to Copilot to get more information about the 185H NPU. Here’s what it told me:

Intel’s Core Ultra “Meteor Lake” offers an AI Boost NPU with 10 TOPS

Since I’ve learned to verify whatever Copilot tells me, I found this stat verified at Tom’s Hardware in an April 9 story. When I asked Copilot directly “What’s the TOPS rating for the AI Boost NPU in the Intel i9 185H?” it came back with a higher number that I couldn’t verify. Here’s what it said:

The Intel Core Ultra 9 185H processor features an AI Boost NPU that can perform approximately 34 trillion operations per second, which translates to 34 TOPS (Tera Operations Per Second)12.

The second source it cites may explain this apparent discrepancy, though: the 10 TOPS is what the NPU itself contributes. But Arc and NVIDIA GPUs can also support the same AI frameworks mentioned above, and can thus add to a unit’s overall TOPS rating.

Put this into more Copilot context that asks if it itself can use NPU resources:

Microsoft Copilot is now set to run locally on AI PCs with at least 40 TOPS (Tera Operations Per Second) of NPU (Neural Processing Unit) performance.

Given that the Yoga 9(i) comes close to that number, I’m still wondering if it qualifies or not. So far, I can’t find any details that lead me definitively to an unequivocal “Yes” or “No.” Sigh.

The Next Generation Gets It, For Sure?

Another Tom’s story, also dated April 9, says the next “Lunar Lake” generation will include an NPU rated at 45 TOPS. Further it also asserts that PCs with such chips will offer 100+ TOPS overall when they become available. AMD likewise says it will play in that same ballpark, as will the Snapdragon X Elite chips.

I’m still unsure as to whether or not my current review unit — that is, the Lenovo Yoga 9(i) has enough AI oomph to run Copilot workloads locally. I’ll keep banging away at this, though. Eventually, I’ll figure it out. At this point, I’m still at the start of the learning curve…

Rereading Tom’s Hardware I See This…

The Tom’s Copilot Locally story relies mostly on quotes from Intel to set things up — namely, from Todd Lewellen, VP of Intel Client Computing Group. He says:

“[..]And as we go to that next gen, it’s just going to enable us to run more things locally, just like they will run Copilot with more elements of Copilot running locally on the client. That may not mean that everything in Copilot is running local, but you’ll get a lot of key capabilities that will show up running on the NPU.”

This seems pretty clear that the current generation — including the Core Ultra i9 185H in the Lenovo Pro 9i  — does NOT fall under this umbrella. That said, I think it leaves open whether or not it will make any difference for other AI workloads. Should be interesting to get to the bottom of this!

Facebooklinkedin
Facebooklinkedin

IPRI Spawns Desktop Oddities

OK, then.  I had to try it again after Windows 11 Insider Preview, Beta Channel, went to Build 22635.3566. DISM … /analyzecomponentstore was showing what’s become a “typical” 13 reclaimable packages that really weren’t there. (Note: I blogged about this back on April 4 for an earlier such build.) Last time, an in-place repair install (IPRI) fixed the issue. So I tried again, but observed that IPRI spawns desktop oddities even as it fixes the bogus reclaimables issue. That required some cleanup. Sigh: let me explain…

What IPRI Spawns Desktop Oddities Means

After the initial reboot following the IPRI, the taskbar and its icons failed to appear at the bottom of the display. That meant I had to open Task Manager (Ctrl+Alt+Esc did the trick), click on Run task, then type explorer.exe into the input box. That set my desktop mostly back to rights, with icons on taskbar in their usual places and positions.

But there was one more thing: icon spacing on my desktop was totally bizarre. I only allow 7 items on my desktop as a matter of routine, mostly repair stuff and default stuff — e.g. Recycle Bin and the two desktop.ini items that show up because of my folder settings choices. But icons were spaced about 2″ apart horizontally and vertically. Ultimately, I resorted to WinAero Tweaker to establish minimum horizontal and vertical spacing between icons (32 pixels’ worth, as it happens). And BTW, I had to reboot to get those settings to “take.”

All’s Well That Ends Well

I can’t remember even niggling issues at the desktop in the wake of an IPRI before this matter of the bogus reclaimables started showing up in the Beta Channel releases about two months ago. But since then, I’ve sometimes had to choose between cleaning those bogus items out and a working desktop. Because the former doesn’t really seem to cause any problems, while the latter is definitely a productivity buster, it’s not a hard choice to make.

But gosh, I’m still glad when I can clean up a mess AND get to a working desktop. I’d love to know what’s causing this to occur, and why the number of bogus reclaimables has so far been “Lucky 13.” But such minor mysteries are part of the allure when one lives in Windows-World. Cheers!

IPRI Spawns Desktop Oddities.nobogus

Number of reclaimable packages: 0! And a working desktop, too… [Double-click image to display in own window.]

Facebooklinkedin
Facebooklinkedin

Lenovo Yoga Pro 9 Intake

When I got home from a visit to a dental lab around lunchtime on Friday, the Boss asked “Were you expecting a package?” I’d asked Lenovo to send me a Yoga Pro 9 earlier that week, so my answer was a tentative “Maybe…” And sure enough, that’s what it was. Over the weekend, I had time to get through all steps in the Lenovo Yoga Pro 9 intake process. It proved more interesting — and educational — than I expected…

What I Got for Lenovo Yoga Pro 9 Intake

There were some interesting surprises in what showed up. Basics of the unit’s configuration include:

  • Intel Core Ultra 9 185H (Meteor Lake/13th Gen+)
  • 32 GB LPDDR5x-7467 (soldered)
  • Hynix 1TiB NVMe SSD PCIe x4
  • 16″ Lenovo LEN8BAI Monitor 3200×2000 resolution monitor
  • Intel Wi-Fi 6E AX211 network adapter
  • Intel AI Boost NPU & Copilot key

There’s more, but I’ll get to some of that in the next section. The main reason I requested a short loan of this formidable PC was for access to a machine with NPU and Copilot key to take them for a spin. Looks like this unit retails for around US$2,100 at the Lenovo Store.

What I  Learned During the Intake Process

TLDR answer: LOTS of things. I’ll elaborate by noting first that the unit came with Windows 11 Home installed (immediately upgraded to Build 22631.3527 Enterprise). Because I usually interact with most PCs — personal, production and test/loaner units — via RDP, sticking with Home was not an option for me. It’s OK: because I’m an MVP I get a MAK key for Enterprise as part of my Visual Studio subscription. Lenovo will destroy my image upon its return anyway. But if you decide to purchase one, you can indeed configure it with Pro for a mere US$2 extra. That’s what I’d do, for sure…

I found myself a little mystified by the new Meteor Lake Intel Core Ultra 9 185HCore Ultra 9 185H CPU. Intel refers to this CPU as “formerly Meteor Lake” but doesn’t really assign a “Generation” number. Its Intel home page studiously avoids mentioning such info. My unit was built in early February 2024 according to its outside sticker. Its Intel Ark page describes it as Intel Core Ultra processors (Series 1) so it looks like NPU endowed chips are starting a new numbering scheme instead. This should be interested to see play out, expecially with Snapdragon X systems on their way into this same niche.

I also observed that read/write speeds vary significantly by USB-C port type. As you can see in the next graphic, port3 is USB -C 20Gbps, and 4 is Thunderbolt 4. These produce “interesting” benchmark results where one is noticeably faster than the other for some values. Indeed, TB4 is faster for 1M read and 4K random writes, while USB 4 is faster for 1M write and 4K random reads. Others are more or less a wash. I’m going to have to try faster SSDs to see if that makes a difference (I suspect it will).

Lenovo Yoga Pro 9 ports (left & right sides)
Lenovo Yoga Pro 9 ports (left & right sides) [Double-click image for full-size view]

What About AI Stuff?

I can tell that Copilot runs faster on this laptop than on other, older models (even a ThinkPad P16 Mobile workstation with a 12th-Gen i9-12950HX CPU but no NPU). But other than that I haven’t really messed around enough with Copilot and other AI functions to get a sense of the differences. Stay tuned! I only get to keep this unit for a month, so I’ll be writing about it regularly over the next few weeks.

Other Observations

Here are some bullet points that reflect other stuff I noticed while unpacking, setting up and using the new Lenovo Yoga 9 Pro:

  • The shipping materials proudly proclaim “plastic-free packaging” in several places on the boxes. Two egg-crate holders supported the laptop, with one small internal cardboard box for the brick and power cord. There was some soft material labeled 22/PAP between the upper and lower decks of the clamshell. Ditto for the label on the black bag inside which the laptop itself was sitting. The material uses a plastic-recycling symbol (three arrows forming a triangle) but lookup tells me … yep, it’s paper! Even the twist-tie that held the power cord together was covered in brown paper. Good job, Lenovo.
  • For some unholy reason, Lenovo included McAfee AV on the Yoga 9 Pro. I uninstalled it right after I performed the OS updates on that PC. Defender is fine with me: I no longer use much, if any, third party security software.
  • Have to laugh: the Copilot key is a big deal on these new Windows AI-Ready PCs. But the onscreen keyboard (Ctrl+Winkey+O) does not include such a key. I bet MS will fix this before these AI-Ready PCs get into wider circulation.
  • The Open Source Snappy Driver installer (SDIO version) gives the drives already installed on this laptop its blessing. It’s not an absolute guarantee that everything’s up to date, but it’s pretty darn close. Good-oh!
Facebooklinkedin
Facebooklinkedin

Dev Home Now Creates VMs

A new release of the Dev Home (Preview) toolbox hit the streets on Tuesday, April 23 (v0.13). I updated but didn’t really pay much attention. Then, this morning I learned something noteworthy from WindowsLatest — namely, that you can now use Dev Home (DH) to set up and manage Windows VMs including Hyper-V instances. Because I’m working on a “How-to” story right now on such VMs, this definitely caught my eye. And indeed, on a test PC, I see strong evidence that Dev Home now creates VMs. Not too much effort involved, either…

If Dev Home Now Creates VMs, Then What?

It took me a while to get where I needed to go with setting the right environment toggles. Eventually, I settled on the first three (Environments Creation, Environments Management, and Environments Configuration) and turned all three on. Then, I had to close and re-open Dev Home to gain the ability to actually use the “Create environment” button.  It’s hiding in the upper right corner of the lead-in image; you can see it up there if you check.

At that point you can give your environment a name (I called it DHWin11 to indicate I was using Dev Home to build a new test Windows 11 VM in Hyper-V). Then you pick the reference image from which it gets built. I chose the Windows 11 Development Environment option that Dev Home supplied. I’m sure I could have navigated to another ISO of my choosing.

Take a While, But Gets Things Right…

It took over 15 minutes for the setup, download, and install processes to get far enough along to do something. But gosh, I was able to get into the Hyper-V window to fire things off, then get to the desktop with no hiccups or gotchas along the way inside RDP. Things don’t work that well using Hyper-V Manager.

I found myself running a 22H2 Windows 11 instance labeled “Windows 11 Enterprise Evaluation” for Build 22621.3447. I know from prior experience this is a 30-day eval or thereabouts. Indeed, Copilot tells me it expires on June 19, 2024. But gosh, this makes standing up and using a plain-vanilla Hyper-V VM as easy as it’s ever been in my personal experience.

Now, I need to do it again, and use an image of my own choosing. That should be interesting! Stay tuned, I’ll write about this soon. Meanwhile, you can see that VM running on my P16 test PC as shown in an RDP window for the whole shebang.

Wow! That was almost TOO EASY. I must say, I’m impressed. Need more time and exploration to really formulate a more useful opinion, though. First look is a doozy, though.

Facebooklinkedin
Facebooklinkedin

Hope MS Makes Good on Classic Teams Uninstall

I’ve got to admit: I’ve lost count. I’ve seen oodles of updates and versions of Teams come and go on my various Windows 10 and 11 PCs lately. Take a look at Monday’s MS Teams article “End of availability for classic Teams client.”  Among much other stuff it says “This rollout involves installing the new Teams client for users who still have the classic Teams client, with Microsoft attempting to uninstall the classic Teams client 14 days after the installation of new Teams.” Gosh, I hope MS makes good on Classic Teams uninstall promises.

Why I Hope MS Makes Good on Classic Teams Uninstall

I’ve tried uninstalling Classic Teams on Windows 10 PCs and VMs. (Note: I do NOT have this issue on Windows 11 PCs of any build or version, stable or Insider Preview channels.) But it often returns to those Windows desktops on its own, through means mysterious and marvelous. In short: it’s attaining zombie-like status except it doesn’t relentlessly chant “Brains! Brains! Brains!”

Better (or worse) still, when I try to use Teams on Windows 10 (it’s still my production work environment), Classic tends to come up by default. I know why — it’s because I use MSAs that aren’t part of an AD/Entra domain — but it’s still irksome.

Gosh! I’ll be glad when July 1 comes and goes and I get to see if the zombie that is Classic Teams will finally get exorcized — err, uninstalled — from my Windows 10 PCs and VMs. Stay tuned! I’ll keep you posted. Fingers crossed, in the meantime. . .

Results from Remove/Replace Operation

Just for grins, I used Revo Uninstaller to get rid of all Teams traces on my production PC. Then I went to the MS Store to download and install its latest version. When I launched for the first time, it asked me if I wanted Teams (New) or Teams (Classic). I chose (New) and now it comes up in the Start menu with no Classic companion. I’ll keep an eye out and let you know if Classic lurches back to life!

Facebooklinkedin
Facebooklinkedin

IPRI Hits Production Windows 11

I’m not sure exactly how long this has been true but Copilot agrees with me that it first appeared in 23H2 Build 22631.3447. Release date for that build: April 9, 2024. It had been available in Insider Previews since earlier this year, but this is when in-place repair install (IPRI) first showed in a production release. Now that IPRI hits production Windows 11, it’s ever so much easier to let WU provide the files to make that happen. Good stuff.

What IPRI Hits Production Windows 11 Means

Before this facility appeared in various Windows 11 versions, the only way to conduct such a repair was to use UUPdump.net to build an ISO that matched the current installed Windows version, then mount same, and run setup.exe from its root-level folder (see red-boxed item in the screencap following):

IPRI Hits Production Windows 11.setup.exe

The old-school IPRI method requires an ISO for the same version.build that’s running, then launching setup.exe from its root-level folder.

Now, with this change you need only navigate to Settings > System > Recovery, then click the “Reinstall now” button as shown in the lead-in graphic. Windows Update does the rest. It does take a while (50-60 minutes in recent test runs for a ComputerWorld story) but that’s because it has to download all the component files, then build and update an ISO. Adding install time to the time UUPDump.net takes to create the ISO, it’s pretty much a wash.

And again: it’s ever so much more convenient and automated. Big win for Windows users everywhere. Thanks, MS!

Facebooklinkedin
Facebooklinkedin

Varying Office Visions for Up-to-date

Here’s an odd one: I find myself trying to reconcile varying office visions for up-to-date. I’ve got a Microsoft 365 Subscription on the one hand, and the Microsoft 365 Apps for enterprise – en-us on the other. Both currently stand at version 16.0.17425.20176. The update checker in the application version (top of lead-in graphic) says it’s up to date. WinGet, however, wants to update the apps version to 16.0.17531.20046, says it’s succeeding, but not getting anywhere. What to do: yikes!

Reconciling Varying Office Visions for Up-to-date

I blogged about a similar gotcha last month (Office Update Hiccup Is Easily Fixed: March 11). Alas, this time the same fix (Repair the office install, then try again) does NOT appear to resolve the issue. Indeed, even though I tell it to fix the apps version, the repair tool works on the subscription version anyway.

Despite some interesting discussion and suggestions at Microsoft.Answers, I can’t get any of their proposed “other fixes” to work, either. Sometimes, when updates get wonky, you just have to wait for MS to get the picture and provide fixes from their side. Methinks this could be one of those times. Indeed, I’ve spent enough time trying to handle this myself, so I’ve decided to wait for a next update and see if that fixes things.

Ain’t that just the way things go from time to time, here in Windows-World? Rhetorical question, I know, but my answer is “Yes!”

Facebooklinkedin
Facebooklinkedin

Bring Up Start Menu Inside Start11v2

Here’s something I hadn’t noticed, nor yet learned how to fix. Seems that there’s no entry in the UI for Start11v2 in “Windows Pro style” for the built-in Windows 11 Start menu. But there’s a trick to bring up Start menu inside Start11v2. That method lurks behind the lead-in graphic which shows all of the available styles and the one I currently have selected — namely “Windows Pro style.”

The Trick to Bring Up Start Menu Inside Start11v2

This trick depends on features available in the Windows 7 style that are missing from Windows Pro (and other more modern styles):

1. Switch to Windows 7 style view
2. Open the Start menu
3. Find the entry that reads “Windows Menu”
4. Right-click that item and select “Pin to start”
5. Inside Start11v2 UI, switch back to Windows Pro style

Now, you can see the “Windows Menu” entry at the lower left of the default app icon grid inside Start11v2.  If you hold down the CTRL key, you can drag that item and put it wherever you like.

Bring Up Start Menu Inside Start11v2.Windows Menu

I used that technique to move it to the upper-left corner position where I can see it more quickly and easily.

Bring Up Start Menu Inside Start11v2.oldmenuulWhy Use the Built-in Start Menu, Anyway?

Some things in Windows 11 don’t work unless you can access the built-in Start menu rather than a third-party version (e.g. Stardock’s various versions, StartAllBack, Open Shell Menu, and so forth).

In this case I wanted to see if a new feature providing access to MS account info directly from the start menu in Beta Build 22635.3500 was present or absent. It’s apparently on a gradual rollout. And, in keeping with my unbroken track record so far, that feature is not yet available on this PC. Go figure!

Facebooklinkedin
Facebooklinkedin