Category Archives: Backup/Restore

Choose Reflect Backup Drives Carefully

I’m a HUGE fan of Macrium Reflect. Available in both free and for-a-fee forms, I’m convinced it’s the best Windows image backup tool available today. Disclosure: I run both free and fee-based versions, and own a Home 4-Pack license that I upgrade as new versions are released. I was reminded to choose Reflect backup drives carefully yesterday, when I targeted an older USB 3 drive with mSATA SSD devices under its hood. Let me explain…

Why Say: Choose Reflect Backup Drives Carefully?

Because the read and write speeds of the underlying device and the speed of the channel (USB 3.1 in my case here) matter. In fact, they strongly affect the time it takes to complete a whole-image backup. In targeting an mSATA device that backup took nearly 40 minutes to complete.

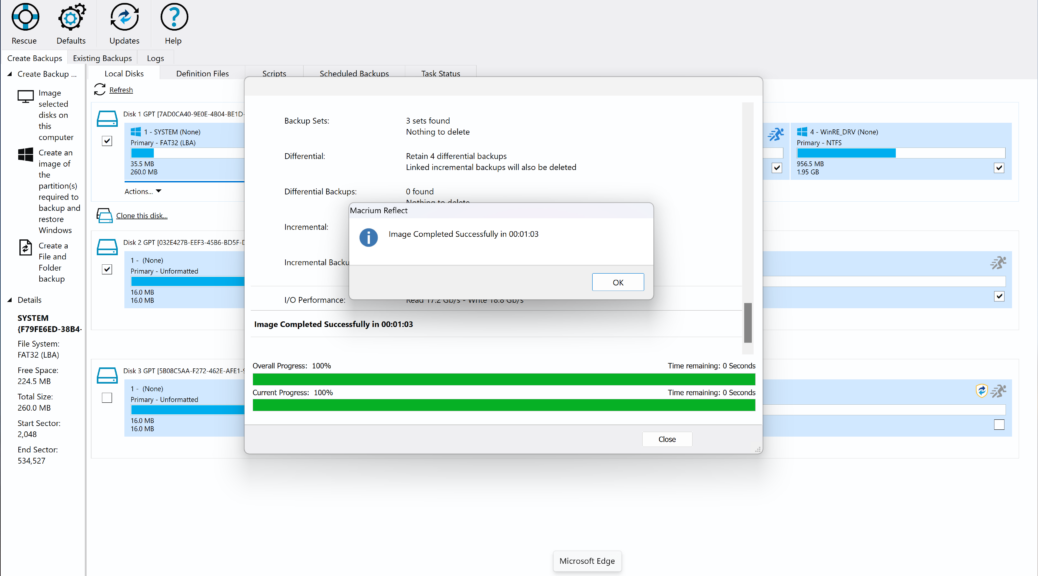
I’m making the same backup right now, and targeting a PCIe x3 NVMe SSD in a Sabrent USB-C enclosure right now. As you can see from the lead-in graphic, Macrium Reflect currently guesstimates it will take 19 minutes to complete. That’s just over 50% faster than the mSATA number, or about 20 minutes overall.

If such a task is running in the background, and can complete whenever it’s done, that doesn’t matter much. But if, as in my case, I was waiting on completion to do something else, it matters a lot.

And There’s More…

While watching the NVMe and mSATA image backups proceed, I noticed another difference. The transfer rate for the two backups not only differed but so did their variability. The NVMe device kept getting faster as it proceeded. It ranged from a low of 1.1 Gbps to a high of 1.8 Gbps. The mSATA device started out at around 600 Mbps, It dropped as low as 220 Mbps, and as high as 1.0 Gbps during the course of the backup process.

Upon completion, Reflect also shared other stats worth noting. The overall read rate for the mSATA device was reported at 1.6 Gbps, while its write rate came in at a less stellar 550 Mbps. On the NVMe device, the overall read rate was 6.6 Gbps, and the write rate 1.9 Gbps. That’s a BIG difference, and explains the title for this story. Yes, these numbers appear inflated because they take compression into account. But those are the numbers that Reflect reports, and they do underscore the importance of device read/write speeds.

Note: Actual time for the NVMe backup was 19:31, while actual time for the mSATA backup was 39:52.

Facebooklinkedin
Facebooklinkedin

Why USB Disk Speeds Matter

It’s been a busy and interesting week. I’ve been messing around with numerous backups and restores. Ditto for mounting ISOs and running Windows repair installs. A LOT of disk reads and writes to USB drives have been involved. Because of the huge amounts of data involved, I’m better prepared to explain why USB disk speeds matter. A LOT!

Why USB Disk Speeds Matter So Very Much

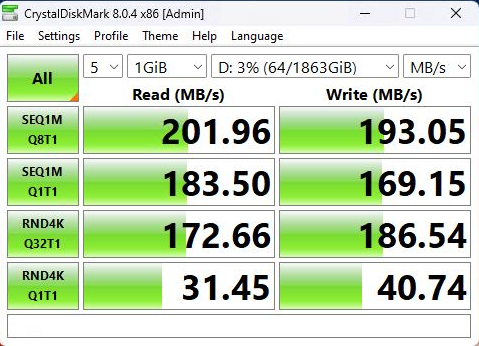
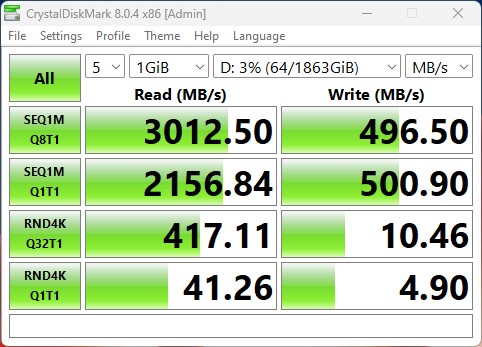
In a word, the shortest possible answer is “Time.” If you can get something done faster, you can do more in a single work interval. Compare the USB disk speeds for an NVMe drive in a USB-C enclosure (left) to those for an mSATA drive in a USB-A 3.1 enclosure (right — see lead-in graphic). When backups and restores are concerned the top lines (which involve large file transfers) actually matter. Of course, all the times matter as well.

But those differences are pretty stark for backup and restore. Let me explain… If you look at the top pairs of numbers, these cover large data transfers with a queue depth of 8 (upper) and 1 (lower). In both pairs of numbers, the NVMe drive is over twice as fast as the mSATA drive. Those same results were born out in backups and restores (7 and 14 minutes for backup; 11 and 23 minutes for restore).

The More You Do, the Better You’ll Like It!

Those results show why I’ve long been a believer in using fast USB drives whenever possible. I’m still waiting to see what kind of bump I can get with a Thunderbolt 4 NVMe enclosure, proper cables and enclosure, and Thunderbolt 4 on the host device. From what I read, it should be 25-40% as fast again.

This realization came to me when I started copying a backup from a BitLocker protected NVMe drive to an mSATA unprotected drive. I got a consistent 26-27 MBps transfer rate between the two devices. It took over 20 minutes to copy the file!

If I could’ve gone Thunderbolt 4 all the way, I could have quadrupled the transfer speed or better. That would cut my wait time from 20 minutes to 5. Waiting for necessary data can’t be completely bypassed — but it surely shows the “need for speed” on such occasions.

Facebooklinkedin
Facebooklinkedin

Wrong Backup Means Wrong Outcome

I have to laugh. I’ve been fighting weird behaviors on my X12 Hybrid Tablet all week long. Only yesterday afternoon did I finally snap to an obvious visual cue that told me what was wrong. Among lots of other interesting things, I learned that wrong backup means wrong outcome when restored. It’s a testament to Windows 11 and to Macrium Reflect, because the target PC actually ran — sort of — even with the wrong image running the works. Let me explain…

If Wrong Backup Means Wrong Outcome, How Wrong Is It?

Here’s what I did: I restored a backup from my Lenovo X380 Yoga to my Lenovo X12 Hyrbrid Tablet. Different CPU, different biometrics devices and capabilities, different Thunderbolt support, and so on. Now that I know what I did, I’m amazed the OS ran at all. And actually, except for refusing to recognize (or work with) hardware present on the X12, but absent on the X380, it worked pretty well.

So how did I finally figure out what I’d done to myself (or rather, to the X12)? The answer’s in the lead-in graphic for this story. I use 8Gadgetpack on all of my PCs. I also use its analog clock gadget, and use the machine name from the target host as the clock name. So there it was on my X12 desktop: X380 (as you can see). That’s what told me I’d restored the wrong backup to the target machine. I have a number of roving SSD devices in USB enclosures. Apparently the backup I chose had moved from a USB port on the X380 to the X12’s Thunderbolt dock.

After that Aha! moment, I quickly located a recent backup from the X12. I had to jump through some hoops because it lived on a BitLocker protected drive (hint: the Macrium Reflect Rescue Disk requires additional options to restore backups from a BitLocker protected volume). But once I restored the right image, all my problems went away. I was able to use a UUPdump image I’d already built to quickly update to the latest Dev Channel version, too.

Lessons Learned

1. I’m glad I use my machine name technique on the Gadget Clock because it’s a good way to see where a backup originated.

2. I’ve started adding the machine name into my Reflect backup image names, so I can tell backups apart quickly and easily.

3, I’ve learned how to deal with BitLocker drives as restore sources, and how to re-enable BitLocker on a recovered C: drive

4. I’ve learned to be more careful in choosing which image to restore to a target PC, when a restore is necessary

Now, all I can hope is that I don’t do this again. Sigh, and sigh again.

Facebooklinkedin
Facebooklinkedin

Ventoy 1.0.73 Requires Interesting Contortions

When I saw a new version of Ventoy came out this morning, I immediately went to update my drive with the new software. It runs on an AData 256 GB (nominal) M.2 SSD inside a Sabrent NVMe enclosure. For some odd reason, the update function did not work properly. Digging into the log, I see the program had trouble writing the new EFI files to the Vtoyefi partition where the program does its boot magic. Indeed, installing Ventoy 1.0.73 requires interesting contortions for me to achieve success. I’ll explain…

What Ventoy 1.0.73 Requires Interesting Contortions Means

First, I backed up the contents of the Ventoy drive, which shows up as E: on my production desktop. Then I tried to use the Install function in the program to over-write the existing disk structures. No go. I switched over to a newer PC, where I was able to cable up using a high-speed USB-C cable into the Sabrent enclosure. Then, I performed a clean install of Ventoy 1.0.73 on the target drive. That worked!

Of course, then I had to go back to my production PC to restore the backup. The whole process ended up taking about half an hour to complete, of which time the bulk went to creating and then restoring a backup of the 28 ISOs in the Ventoy (E:) partition.

Speculation Reigns Supreme

I must confess I don’t know why the update function failed this time around. I’ve not seen this happen before with Ventoy. That said, I’m not surprised that a vintage-2016 PC with USB 3.1 drivers might have trouble with a device that works with USB 3.2 (and Thunderbolt 3) drivers. And indeed, when I hooked up to a device that supported those newer drivers, everything worked as expected.

That’s why I’m thinking something went weird with the USB drivers when the program attempted to rewrite the 32 MB FAT based EFI partition from which Ventoy works its magic. That’s the part that wouldn’t update on the older PC, but which installed flawlessly on the newer PC. If somebody else has a better explanation, please share. But when the next Ventoy update comes out, I’m going to run it from the newer PC. I’ll bet it runs faster that way, too, thanks to those newer — and faster — USB 3.2/Thunderbolt 3 drivers it uses.

Facebooklinkedin
Facebooklinkedin

Troubleshooting Failed Beta 22581 Promotion

I’d like to report on a snag in upgrading my Windows 11 Beta Channel test PC to Build 22581. As I wrote yesterday, MS has paired up the Dev and Beta channels with this build. Both of my Dev Channel PCs updated successfully; the Beta Channel test PC did not. So now, I’m troubleshooting failed Beta 22581 promotion. This is an interim progress report. Although I’ve already learned a lot, I’ve not yet resolved the problem. Here’s what I know so far. . .

Progress on Troubleshooting Failed Beta 22581 Promotion

The list of data about this update failure reads as follows:

1. The update fails during the final, final phase of post-GUI install after update progress gets to 100% complete.

2. WU Update History reports an error code of 0XC1900101 in its “Failed to install” error  message

3. MS Docs offers a Resolution Procedure for this error code,  from which the following $Windows.~bt items appear important:

3.1 This error code most typically indicates a driver install problem during the Windows install/upgrade process

3.2 If present, the \Sources\Rollback folder may include a minidump file named setupmem.dmp. (Mine does not)

3.3 Event logs may appear in \Sources\Rollback*.evtx (I have no such files)

3.4 The device install log can capture driver install issues, and appears in \Sources\Rollback\setupapi\setupapi.dev.log. I *DO* have one of these and have read it over, and shared it with install experts at ElevenForum.com. Looks potentially fruitful because I do see various errors therein.

4. A typical fix attempt when WU updates fail, is to try an ISO from UUPdump.net. I’ve built one, but I’m also reading online that nickel release ISOs — including Build 22581 — from UUPdump.net are not working properly right now. See this Elevenforum thread (especially pages 6 & 7). Just in  case it blows up, I’ve already made a Macrium Reflect image backup of the current working-but-not-upgraded install. Thus, I can restore it easily booting from the MR Rescue Media.

What Should Happen Next. . .

I’m up against a major deadline today, so I don’t have time to follow all the leads I’ve found. But I do have a task list to follow when the weekend rolls around and I have more free time:

1. The afore-linked Resolution Procedure recommends another WU attempt with all nonessential peripherals unplugged. I’ll do that next.

2. If that doesn’t work, I’ll attempt to use the UUPdump ISO to perform an in-place “repair upgrade” by running its setup.exe file.

3. If that doesn’t work, I’ll check back into the ElevenForum thread to see if any of my appeals for guru help have produced suggestions.

4. If I can’t resolve the issue through typical troubleshooting, I’ll wait and try again when the next Dev/Beta build is released. In my experience of nearly 8 years as a Windows 10 and 11 Insider,  that works more often than not. I’m inclined to believe this is possible because one of my other working Dev Channel PCs is a near-identical Lenovo X380 laptop (only config difference is the built-in NVMe drive: one’s a Samsung, the other’s a Toshiba, now Kioxia).

Stay tuned, and I’ll keep reporting on progress. Cheers!

Facebooklinkedin
Facebooklinkedin

Quick Win11 Reghack Shows Removables Recycle Bin

Here’s an interesting item that shows off a difference between Windows 10 and 11. Adding a specific Registry key and value to Windows 11 lets it show the recycle bin (and contents) in File Explorer on removable drives.  Normally (and on Windows 10) it doesn’t appear. A quick Win11 Reghack shows removables recycle bin.

That said, the same hack produces no visible sign of the Recycle Bin in Windows 10 File Explorer. Here’s what one of my 8 GB USB 3 removables looks like therein:

Quick Win11 Reghack Shows Removables Recycle Bin .win10

Notice there’s no entry shown named “Recycle Bin.” But as the lead-in graphic shows, it’s defined, even if it’s not visible.

When Quick Win11 Reghack Shows Removables Recycle Bin, Here’s What’s Shown

After adding a registry key named Explorer to

HKEY_CURRENT_USER\SOFTWARE\Microsoft\Windows\CurrentVersion\Policies\

One must create a DWORD therein named

RecycleBinDrives

Then that DWORD must be assigned the hexadecimal value “ffffffff” (all 1s for all 8 possible hexadecimal digits). Next comes a quick restart to make sure the setting “takes” in the Registry.

Presto! Recycle Bin Appears

As shown in the next screencap (from my X1 Extreme “road laptop”), you can now see the Recycle Bin (and System Volume Information) in the items listed in Explorer. (Note: for these items to appear, File Explorer Options/View must check “Show hidden files…” amidst its settings. As you can see, I also like to uncheck “Hide extensions…”)

Now you can see Recyle Bin and System Volume Info on the USB drive. Good-oh!

Why is access to Recycle Bin a good thing? Because it provides a ready means to recover deleted files from a USB drive directly, if one so desires. I agree with Sergey Tkachenko at WinAero.com (the source for this story and its info, though I had to create the Explorer key from scratch on my test PC) that easy recovery of deleted files can sometimes be a lifesaver!

Facebooklinkedin
Facebooklinkedin

Macrium 8 Free Makes Normal Upgrade Appearance

OK, then: it’s finally making its way into the general Windows user population. I’m a zealous advocate of Paramount Software UK Ltd’s excellent Macrium Reflect Free backup/restore tool. Over the past 10 days or so, the company has now up-versioned that Free version from 7 to 8. This week, Macrium 8 Free makes normal upgrade appearance, via the tool’s built-in update facility. In fact, the lead-in graphic for this story shows a Notification that an 8-version update is available.

Good News for 7 Users: Macrium 8 Free Makes Normal Upgrade Appearance

A Macrium Reflect 8 Free download has been available for some time now through Softonic. It also showed up on the Macrium site a couple of weeks ago. But this development is nicer, because it means Reflect 7 users get an upgrade to Version 8 without requiring them to find, download and install the new version manually. Now, it’s simply part of the program’s own routine upgrade behavior.

For most users, the Free version is all they’ll ever need for home or small office use. Note: the commercial Free license limits the number of instances to 10 per location. Version 8 builds native Windows 11 rescue media, even though Win10 equivalents still work. I particularly like the program’s boot repair facility, its VSS repair and recovery, and its ability to boot backups as Hyper-V VMs.

Why Buy Reflect 8 Workstation?

Personally, when something as good and reliable as Macrium Reflect comes along, I believe in supporting its maker with an outright purchase. I have a 4-pack Reflect 8 Workstation license, and I run Reflect Free on the other 7 machines currently resident here at Chez Tittel. All are test/experimental machines I use for research and writing about Windows stuff.

I strongly recommend Macrium Reflect, in either free for for-a-fee versions. It’s the only backup tool I’ve ever used — and I’ve used many of them over the years — that’s never failed to restore and repair my Windows PC when they encounter difficulties. I blush to confess that many of those issues are self-inflicted, but this tool gives me the courage to try crazy stuff with Windows, knowing that I can fix it if it breaks on me.

Facebooklinkedin
Facebooklinkedin

Macrium Reflect 8 Free Version Now Available

Yes, I know. There have been alternate downloads (e.g. Softonic) for Macrium Reflect 8 Free available for 30 days and longer. This week, however, Paramount Software UK — the maker of Macrium Reflect — is offering an “official” free download of the well-known and respected backup/recovery toolset. Hence my title, which proclaims Macrium Reflect 8 Free version now available. Good stuff

With Macrium Reflect 8 Free Version Now Available, Grab One!

I’ll confess cheerfully and unreservedly, I was converted to MR through my association with TenForums. I’ve been using MR about as long as I’ve been a member there. And indeed, I concur with prevailing opinions there (and at its sister site ElevenForum.com) that MR Free is sufficient to meet the backup needs of most ordinary users.

Because I believe in supporting makers who do good work, I own a 4-pack license for the commercial version of MR8 released earlier this year. But now, I can — and will — upgrade all of my other test and experiment machines to the free version directly from the source.

Macrium 8 Has Windows 11 Covered

The program has been reworked and revamped, especially in light of Windows 11. It supports use of WinPE 11 rescue media, and works well with the new OS. It supports removable media imaging and cloning, and uses VSS to support imaging of running Windows 10 and 11 instances. It’s got great backup exploration tools, and can mount its backups as VMs via Hyper-V.

In all seven years I’ve been using MR, it’s never failed me when it comes to restoring a backup or repairing damaged Windows boot facilities. MR7 was a great tool. MR8 is even better. If you’re not already using it, grab a copy of MR8 today. If you’re using MR7, it’s time to upgrate to MR8 (even on Windows 10 PCs). Cheers.

Facebooklinkedin
Facebooklinkedin