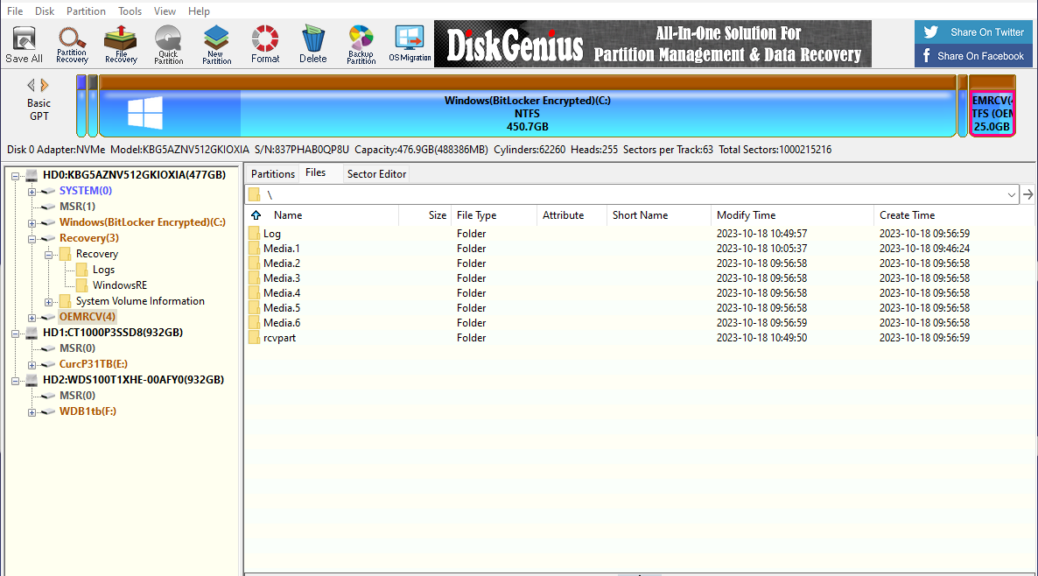
Examination of the disk layout and structure for the Panasonic Toughbook proved both interesting and informative. I used the free version of DiskGenius. With the Toughbook System Disk explored — it appears as Disk 0 (HD0:) — I observed an interesting and useful disk layout, as you can see for yourself in the lead-in graphic above.
Reporting on Toughbook System Disk Explored
There are five (5) partitions on this disk, as follows:
1. EFI Partition (260 MB)
2. Microsoft Reserved (MSR: 16 MB)
3. WindowsBitLocker Encrypted (NTFS: 450.7 GB)
4. Recovery (WinRE: 990 MB)
5. OEM Recovery (OEMRCV: 25.0 GB)
What makes this disk layout interesting is that Partition 5 is basically a map and a replacement for all partitions. It includes a complete version of Windows 11 (Media.1) . It also uses SWM files (partial WIM files, and something new to me) to offer a variety of install and image files from which to build appropriate replacement images.
This feeds into a BIOS level repair utility from Panasonic that can rebuild the disk from scratch, in much the same way that the WinRE utility typically supports a “Factory reset” capability. This one, however, will work even in the absence of a working Windows image. Indeed, Panasonic also offersRecovery Media to perform the same function without reading anything from Disk 0 (via download, as explained below, or for purchase through the website).
Partitions 1-4 are basically a standard Windows 11 disk layout. Partition adds Panasonic’s own twist to this scheme, and provides an alternate means to reset a Toughbook to factory defaults that include this OEM partition. WinRE will rebuild the disk, but will leave this ultimate partition (5) alone.
Insights from Manuals and More
in a section entitled “About the Partition Structure” the Operating Instructions manual says:
Do not add or delete partitions in Windows 11, as the Windows area and recovery partition must be adjacent to each other in Windows 11.
I also found a link to Panasonic Japan for a Recovery Image Download Service. There I found links to an instruction manual and a recovery disk creation utility. Note: access to a valid model and serial number for a Toughbook PC is required to download and use this tool. Section 3.2 explains the recovery process which drives Panasonic recovery from a BIOS selection “Recovery” that rebuilds all partitions on the system disk.
Good to know!
Hello how can I get an ISO of drive with these on them. Hopeing this will the allow the recovery from BIOS to work like original. Why well have a FZ-G1 Toughbook with a blank new drive not original. Any help finding an ISO link or how to make new SSD drive replicate original as not finding any info. Have found info about a Recovery image creator but nil re replicate to make partitions like Diskgenius shows you above.
https://www.edtittel.com/blog/toughbook-system-disk-explored.html
Here’s what Copilot recommends:
1. Get into the BIOS/Setup Utility first
Tap F2 (or Del) repeatedly immediately after powering on, while the Panasonic splash screen is showing. If the splash screen doesn’t appear (which happens when only an external display is connected), hold F2 down as soon as you press the power button. If a Supervisor Password is set, you’ll need it — without it, Boot Override and Load Defaults are locked out.
2. Use Boot Override to target the recovery partition directly
Once in BIOS, go to the Boot menu. Look for a Boot Override section at the bottom — this lets you one-time-boot a specific device or partition without permanently changing boot order. The hidden Panasonic recovery partition often appears here as a separate entry. Select it and press Enter.
3. If Boot Override doesn’t show the recovery partition
Press F9 inside BIOS to reset to factory defaults (confirm Yes), then F10 to save and exit — this clears any boot order corruption that might be hiding the partition.
Under Main, make sure the internal drive is powered on (some models have a drive power toggle).
4. If the on-device recovery partition is itself inaccessible
Panasonic runs a Recovery Image Download Service at Panasonic’s TOUGHBOOK Support site for Windows 10/11 Pro models. You download a recovery ISO, write it to USB or DVD, and boot from external media. One relevant wrinkle given your CA-2023 work: Panasonic’s recovery images for Windows 11 25H2 and later now use CA-2023-signed bootloaders — so if the Toughbook’s BIOS doesn’t yet have the CA-2023 certificate enrolled, those newer recovery images won’t boot either.
global-pc-support.connect.panasonic.com
Quick key reference
Key Function
F2 / Del Enter BIOS Setup at boot
F9 (in BIOS) Reset to factory defaults
F10 (in BIOS) Save and exit
Boot Override One-time boot to a specific partition/device
HTH,
–Ed–
PS: I returned the Toughbook to the OEM about 5 weeks after I received it, so I can only rely on second-hand information to tell you what you might do. If I had one, I’d check it and see!