There’s a scenario that may feel familiar to plenty of Windows power users and IT admins. You’ve got a USB flash drive, aka UFD, sitting on your desk. You carefully imaged it months ago using MCT, or a backup too, or Rufus, or whatever. It booted perfectly, it installed or ran cleanly, and life was good. Fast forward to today: alas, that once-trusty UFD is probably out of date. In fact, if you try to boot using that UFD, you may get a “Secure Boot Violation” error message from UEFI and nothing more. That’s why updating outdated Win11 boot media is a real maintenance item, especially after Patch Tuesday rolls through and reshuffles key files inside the Windows boot chain.
Why bother? Because Patch Tuesday updates don’t just patch the running OS on your machines. They also advance critical files that get embedded in installation media — things like Secure Boot policy manifests, component catalogs, and EFI boot binaries. Hence, a UFD built on a pre-patch image may carry stale versions of those files. Indeed, subtle boot-time validation mismatches are possible. Worse, your installation media might silently enforce an older policy against a fully updated target system.
In this post, I’ll walk through exactly what changes, which files on your UFD need attention, and explain how to make things current, step by step. Spoiler alert: I also advise against such repairs unless they’re absolutely necessary. It’s much easier to generate fresh boot media than to repair outdated UFDs.
Why Updating Outdated Win11 Boot Media Matters
One might think of Patch Tuesday as a monthly ritual that involves rebooting workstations and crossing your fingers that nothing breaks. Fair enough. However, other side effects come from updates. That is, they reach inside the Windows installation ecosystem and bump version numbers on files that govern how setup media validates and boots a system.
The most relevant example for this post, and the primary driver for updating outdated Win11 boot media right now, is SkuSiPolicy.p7b. The most recent Patch Tuesday advanced this file from version 3.0.0.16 to version 3.0.0.17. That’s a tiny increment, but carries real significance.
So, what exactly does SkuSiPolicy.p7b do? In short, it’s a Secure Boot SKU policy file. It governs which Windows editions (SKUs =Home, Pro, Enterprise, Education, and so on) that Secure Boot views as trusted and bootable.
When the running OS expects version 3.0.0.17 and your UFD’s boot chain presents version 3.0.0.16, you get validation mismatches. Those mismatches may not always produce a hard error, but they represent a policy drift you don’t want living in your production boot media. Worst case: no boot with the dread “Secure Boot Violation” error message showing (see my August 4 post for an illustration).
Bottom line: whenever SkuSiPolicy.p7b advances, it’s time to audit your UFDs. You may also end up having to update or replace/regenerate them.
Possible UFD Deltas After Patch Tuesday
Here’s the thing: SkuSiPolicy.p7b doesn’t live in just one place on your UFD. It lives in multiple places. Some are obvious, others live inside image files. Plus, other boot-chain components may also need refreshing. The following table lays out that landscape, where the numbered list that follows briefly explains each item.
| UFD Component | Location on UFD | Affected by SkuSiPolicy Bump? | Action Required |
| SkuSiPolicy.p7b | \sources\ | Yes — primary location | Replace with updated version |
| boot.wim | \sources\ | Yes — embedded in index:2 | Mount, update, unmount/commit |
| install.wim / install.esd | \sources\ | Yes — per-edition indexes | Mount each index, update, commit |
| efisys.bin / efisys_noprompt.bin | \boot\ | Occasionally | Replace if ISO version is newer |
| bootmgr.efi / bootx64.efi | \efi\boot\ or \boot\ | Occasionally | Replace if ISO version is newer |
| cdboot.efi | \boot\ | Rarely | Check version; replace if needed |
| winpe.wim / WinRE.wim | Varies (recovery partition) | Yes — if recovery env. included | Mount, update, commit |
Working through the List
Now let’s go through each item in the same order as the table:
- p7b (\sources\SkuSiPolicy.p7b on the UFD): This is the standalone Secure Boot SKU policy file that Windows Setup reads directly during the installation process. As noted, this file advanced from version 3.0.0.16 to 3.0.0.17 on the most recent Patch Tuesday. This is the clearest, most unambiguous indicator that your boot media needs updating or replacing. You must replace it with the current version, which you can extract from a freshly downloaded Windows 11 ISO or from a mounted updated WinPE image.
- wim (\sources\boot.wim): This is the WinPE and Windows Setup environment image. It contains two indexes: index:1 is the minimal WinPE environment (the initial RAM disk boot stage), and index:2 is the full Windows Setup environment. Both indexes embed their own copy of SkuSiPolicy.p7b inside \Windows\System32\. Index:2, in particular, participates in Secure Boot policy enforcement during setup and therefore should be updated. Index:1 is discussed separately later in this post.
- wim / install.esd (\sources\install.wim or \sources\install.esd): This is the main OS image that actually gets deployed to the target drive. Each edition index (Home, Pro, Enterprise, etc.) embeds its own copy of SkuSiPolicy.p7b inside \Windows\System32\ within the image. Therefore, each applicable index needs to be individually mounted and updated. Note that install.esd files are compressed and cannot be mounted directly — they must first be converted to install.wim format using DISM’s /Export-Image with /Compress:none before mounting.
- bin / efisys_noprompt.bin (\boot\ folder): These are EFI boot sector binary files. They are not directly version-stamped by SkuSiPolicy.p7b changes; however, when a cumulative update also updates the broader boot chain, newer versions of these files may ship in the refreshed ISO. Consequently, it’s worth doing a file-date comparison between your UFD’s copies and those in the freshly downloaded ISO.
- efi / bootx64.efi (\efi\boot\ or \boot\ folder): The EFI boot manager binaries. The same considerations apply as for efisys.bin: they don’t change with every Patch Tuesday, but when they do advance, you’ll want the fresh copies on your UFD. Always compare versions against a current ISO before deciding whether to replace.
- efi: This EFI binary handles optical-media boot paths. If your UFD was created from an ISO (as most are), this file is present. It is, however, less commonly updated than the other EFI binaries. Worth checking, but don’t lose sleep over it.
- wim / WinRE.wim — If your UFD includes a Windows Recovery Environment, that image also embeds SkuSiPolicy.p7b. The update workflow is identical to the boot.wim process: mount the image, overwrite the policy file inside \Windows\System32\, commit, and unmount.
| Note
Not all of these components will change with every Patch Tuesday. The SkuSiPolicy.p7b version bump is your clearest indicator that a media refresh is warranted. On August 11, for example, the version jumped from 3.0.0.16 to 3.0.0.17. OTOH, EFI binaries may remain unchanged over several update cycles. |
How to Update Each Affected UFD Item
Alright — here’s where we roll up our sleeves. The process is methodical, but it’s not complicated. Follow these steps in order, and you’ll have a fully refreshed UFD by the time you’re done.
Step 1: Gather Your Prerequisites
Before you touch any files, have the following at your disposal:
- DISM — Built into Windows 10 and Windows 11. No additional download required. Run all commands from an elevated command prompt (right-click > Run as administrator). You MUST run powershell.exe (version 5.1) not PowerShell 7 (the app, or from inside Windows Terminal). Why? Because the DISM wim mount commands don’t work inside the newer PS version.
- A fresh Windows 11 ISO — Download the current release directly from Microsoft’s Media Creation Tool at com/software-download/windows11, or from MSDN/VLSC if you have a volume license subscription. Do not use an ISO that’s more than a few weeks old — the whole point is to work from a current image.
- Sufficient disk space — Mounting WIM images requires working space. Budget at least 15–20 GB on your working drive (typically C:\) for mount directories, working copies, and temp files.
- A writable UFD — Sounds obvious, but double-check that your UFD’s write-protect switch (if it has one) is off. I’ve also learned the hard way that some UFDs work when building Secure Boot compliant media, and others don’t. If you get stuck, try switching to a faster, newer name brand device (I’ve had good luck with never Kington Data Travelers recently, for example).
- Ownership and permissions — Some protected files on the UFD or within mounted images may require you to take ownership before overwriting them. We’ll cover that in detail in tomorrow’s post. It’s kind of a doozy!
Step 2: Extract the Updated SkuSiPolicy.p7b from the Fresh ISO
Mount the fresh ISO in Windows Explorer (double-click the ISO file — Windows will mount it as a virtual drive, typically D:\). Then, navigate to D:\sources\ and copy SkuSiPolicy.p7b to a working folder on your local drive. For example:
mkdir C:\work copy D:\sources\SkuSiPolicy.p7b C:\work\SkuSiPolicy.p7b
This extracted file is your authoritative source for all subsequent update steps. Keep it handy — you’ll be copying it into several locations.
Step 3: Update the Standalone SkuSiPolicy.p7b on the UFD
This is the simplest step. Simply overwrite the existing file in \sources\ on your UFD. Assuming your UFD is drive E:\:
copy /Y C:\work\SkuSiPolicy.p7b E:\sources\SkuSiPolicy.p7b
The /Y flag suppresses the overwrite confirmation prompt. Done. One location down, several to go.
Step 4: Update boot.wim (Index:2 — Windows Setup)
This requires DISM to mount the image, copy in the updated policy file, and then commit the changes on unmount. First, create your mount directory:
mkdir C:\mount\boot
Then, mount index:2 of boot.wim from your UFD:
Dism /Mount-Image /ImageFile:”E:\sources\boot.wim” /Index:2 /MountDir:”C:\mount\boot”
Next, copy the updated SkuSiPolicy.p7b into the mounted image’s \Windows\System32\ folder:
copy /Y “C:\work\SkuSiPolicy.p7b” “C:\mount\boot\Windows\System32\SkuSiPolicy.p7b”
Finally, commit and unmount:
Dism /Unmount-Image /MountDir:”C:\mount\boot” /Commit
| Warning
Never terminate a DISM mount session midway. If your session is interrupted (e.g. power loss, unexpected reboot) use Dism /Cleanup-Mountpoints to recover before attempting to remount. Partially committed mounts can corrupt your WIM. |
Step 5: Update install.wim (Each Edition Index)
The install.wim (or install.esd) update is the most time-consuming step, because you need to process each edition index individually. Start by listing the available indexes:
Dism /Get-ImageInfo /ImageFile:”E:\sources\install.wim”
This will show you something like Index 1 = Home, Index 2 = Home N, Index 3 = Pro, Index 4 = Pro N, and so on — depending on which edition set your ISO contains. For each index you wish to update, repeat the mount-copy-commit workflow:
mkdir C:\mount\install REM — Example for Index 3 (Pro): Dism /Mount-Image /ImageFile:”E:\sources\install.wim” /Index:3 /MountDir:”C:\mount\install” copy /Y “C:\work\SkuSiPolicy.p7b” “C:\mount\install\Windows\System32\SkuSiPolicy.p7b” Dism /Unmount-Image /MountDir:”C:\mount\install” /Commit
Repeat for each index. It’s tedious, admittedly — but it’s the thorough approach.
A note on install.esd: If your UFD uses install.esd rather than install.wim, you cannot mount it directly. Therefore, you must first export it to an uncompressed WIM:
Dism /Export-Image /SourceImageFile:”E:\sources\install.esd” /SourceIndex:1 /DestinationImageFile:”C:\work\install.wim” /Compress:none
Repeat the export for each index you need to update, then mount, update, and commit the resulting install.wim. When finished, copy the updated WIM back to your UFD (replacing the original ESD, or alongside it as a WIM if your media configuration supports that).
Step 6: Replace EFI Binaries (If Newer Versions Exist in the ISO)
Compare the file dates on the following pairs — ISO source vs. UFD destination — and replace only if the ISO version is newer:
- D:\boot\efisys.bin → E:\boot\efisys.bin
- D:\boot\efisys_noprompt.bin → E:\boot\efisys_noprompt.bin
- D:\efi\boot\bootx64.efi → E:\efi\boot\bootx64.efi
- D:\boot\bootmgr.efi → E:\boot\bootmgr.efi
If the ISO’s copies are dated more recently, copy them over. If they match, leave your UFD copies alone — there’s no point in replacing identical files.
Garlin’s check_bootmedia Reports a Non-Problem
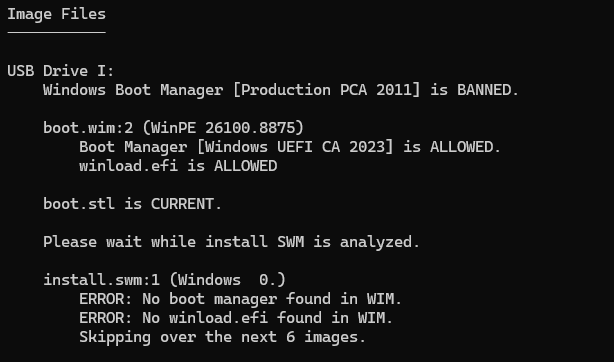
Here’s the thing: if you run the check_bootmedia script — a tool from Garlin’s GitHub repo that inspects boot media for version consistency across boot-related files — you may encounter a flag that looks alarming at first glance in your freshly-updated UFD. Specifically, the script reports that boot.wim’s index:1 (the base WinPE environment) contains an older version of SkuSiPolicy.p7b than at index:2 (the Windows Setup environment) after you’ve completed Step 4 above. You can see its output for my updated UFD (Drive I:) in the lead-in graphic for this blog post.
Take a breath. This does not actually represent a real problem. Indeed, this UFD booted right into the Windows 11 installer (as it should). Here’s why the info may look scary, but isn’t:
- What index:1 actually does: Index:1 in wim is the minimal WinPE environment — the initial RAM disk stage that loads just enough of an operating environment to hand control over to the Windows Setup process. It is responsible for loading drivers, initializing hardware, and presenting the early pre-Setup UI. It does not participate in Secure Boot SKU policy enforcement during a normal Windows installation.
- Where SKU policy enforcement actually happens: The actual Secure Boot SKU policy enforcement — the part that p7b governs — occurs at the OS loader level. That means it relies on index:2 of boot.wim and the standalone \sources\SkuSiPolicy.p7b on your UFD. Both of those, as a result of Steps 2–4 above, are now current.
- Why check_bootmedia flags it anyway: The script is thorough — admirably so. It compares p7b versions across all image indexes and the standalone sources copy, and reports any mismatch it finds. For completeness and consistency-checking purposes, that’s the right behavior. However, in practice, having an older SkuSiPolicy.p7b sitting inside index:1 of boot.wim creates no functional issue whatsoever during a Windows installation.
- Can you update index:1 anyway? Yes, absolutely — and if strict consistency is important to you (perhaps for audit or compliance reasons), go ahead. Use the same DISM mount/update/commit workflow with /Index:1 instead of /Index:2. It won’t hurt anything.
| Bottom Line
If check_bootmedia is the only tool reporting a version discrepancy, and the discrepancy is limited to boot.wim index:1, you can safely disregard that flag. Your media is functionally correct. The flag is informational — a cosmetic inconsistency, not a real-world boot problem. I had that situation pop up on a test UFD, and it booted into the Windows 11 Installer just fine (no Secure Boot issues presented). |
Wrapping Up: Key Takeaways
Let’s bring it all home. If you’ve made it this far, you now have a solid handle on why updating outdated Win11 boot media matters, what files are involved, and fixed involved. Here’s the condensed version for your notes:
- Patch Tuesday can advance p7b and other boot-chain files. The most recent update bumped SkuSiPolicy.p7b from version 3.0.0.16 to 3.0.0.17. That’s your cue to refresh your UFDs.
- Multiple UFD locations are affected, not just \sources\. The policy file is embedded inside wim (index:2), inside each edition index of install.wim, and potentially inside recovery environment images as well. All those locations need fixing for a complete update.
- The Garlin check_bootmedia flag for wim index:1 is interesting, not definitive. Index:1 doesn’t enforce Secure Boot SKU policy during Windows installation. You can update it for strict consistency, but it is absolutely not required for correct boot media behavior.
- EFI binaries deserve a version check, not an automatic replacement. Compare bin, bootmgr.efi, and bootx64.efi from your UFD versus a fresh ISO; replace only if the ISO copies are newer.
- Tomorrow’s post covers ownership and permissions for protected files. For good reason, MS goes out of its way to protect boot files and images. Thus, there are certain steps you must take before you can overwrite system-owned files inside mounted WIM images. Stay tuned: I’m writing a whole ‘nother post on this topic. Again: it’s a doozy, and taught me more about ICACLS than I ever wanted to know.
- Keeping boot media current is a best practice for Windows IT admins and power users. Stale media isn’t just a minor annoyance — it’s a policy gap. A few DISM commands and twenty minutes of your time is all it takes to close it.
Ask Yourself: Is Repair Really Needed?
Determining repairs took me the better part of day, and then getting things fixed in Windows 11 installation media for the SkuSiPolicy version bump. I could’ve simply grabbed a fresh Media Creation Tool (MCT) from the download Windows 11 page, and built a new UFD in under an hour.
Now that I’ve been through this ordeal, I’ve learned a valuable lesson. Don’t fix a boot media UFD unless you absolutely must. If you can regenerate a fresh, new updated one, do that instead. It’s faster and much, much easier that way. Here in Windows-World, going the long way around sometimes underscores the value and importance of workable shortcuts. My advice: take this shortcut, if you can. Otherwise, you’ll spend real time going the long way!

