I’ve been writing about Windows since version 3.1. I remember the floppy disk shuffle. I remember the joy of actually getting TCP/IP running on Windows for Workgroups. You’d think, after thirty-plus years, I’d have an easier time convincing my own workstation to accept a clean OS install. You would be wrong. Instead, in the words of Supertramp I had to “Take the long way home.”
Why I Had to Take the Long Way Home…
My go-to test PC is a Lenovo ThinkStation P3 Ultra Gen 3. It’s a legitimately serious machine, the kind with big SO-DIMM memory modules and a front panel that looks like it means business. It was humming along on Windows 11 24H2 without complaint. Then Microsoft quietly lit up the Windows 11 25H2 branch, and I figured: let’s do this. Simple in-place upgrade, twenty minutes, done by lunch. Instead, I got error code 0xC1900101-0x20017. Twice.
Driver Madness and Mayhem
If you’ve tangled with Windows upgrade failures before, you know that particular error code is frustratingly vague . Indeed, it lives in the SAFE_OS phase of the upgrade process, which means Windows has already swapped out its core OS files. But it chokes when it tries to apply drivers during the rollback-protected transition. In plain English: the driver stack fell over at exactly the wrong moment. I pulled the SetupDiag logs, confirmed it was a driver-related hang in the SAFE_OS phase, and stared at the ceiling for a while.
There’s a particular flavor of irony in being a professional Windows tech writer whose own PC refuses to cooperate with a Windows upgrade. I considered filing it under “job security” and moved on. After two failed in-place attempts, the logs were clear enough: a clean Windows 11 25H2 install was the only sane path forward. OK, fine. Now it’s time to go the long way, and do it the hard way.
Day 2: USB Media Chaos
I grabbed my trusty ADATA S102 32GB USB 3.0 flash drive — the one that has lived in my desk drawer for so long it practically has squatter’s rights. Next, I fired up Rufus to build a bootable installer. Rufus is usually my go-to. Usually.
This time, Rufus misdetected the hybrid image structure inside the Windows 11 25H2 ISO and produced a drive that my P3 Ultra’s UEFI couldn’t see. No error. No explanation. Just a polite boot menu that pretended the USB drive didn’t exist as a bootable option. Lovely.
Switch to balenaEtcher. Flash succeeds cleanly, the drive is recognized, the installer begins to load. Next, it promptly fails because install.wim inside the 25H2 ISO clocks in north of 5 GB. Alas, the FAT32 filesystem that UEFI boot requires has a hard 4 GB per-file ceiling. We’ve known about this limitation for years. It still bites people. It bit me.
The fix is DISM‘s /Split-Image switch, which carves the oversized WIM into a set of smaller SWM files. The command looks like this:
Dism /Split-Image /ImageFile:install.wim /SWMFile:install.swm /FileSize:4000
That produces install.swm, install2.swm, and however many additional slices it needs to keep every piece under the 4 GB limit. The elegant part: Windows Setup natively recognizes and reassembles SWM files on the fly when it finds install.swm sitting on the same drive. This calls for no extra flags, nor manual stitching. You just copy the SWM files onto your FAT32-formatted USB alongside the rest of the installer content and walk away.
For good measure, I also tried my Kingston DataTraveler 70 (USB-C) routed through my Acasis TB5010Pro USB4/Thunderbolt enclosure. That combination booted without a fuss, confirming the Thunderbolt chain was playing nicely with the UEFI boot stack. Good to know for the future.
Day 3: Secure Boot Shenanigans
With bootable media finally usable, I plugged in the drive, rebooted, and hit the BIOS. ThinkStation P3 Ultra runs Lenovo’s UEFI firmware, and if you’ve never spelunked the Lenovo workstation BIOS, know this: it is thorough. Very thorough. There are settings in there I’m fairly certain have never been touched by human hands.
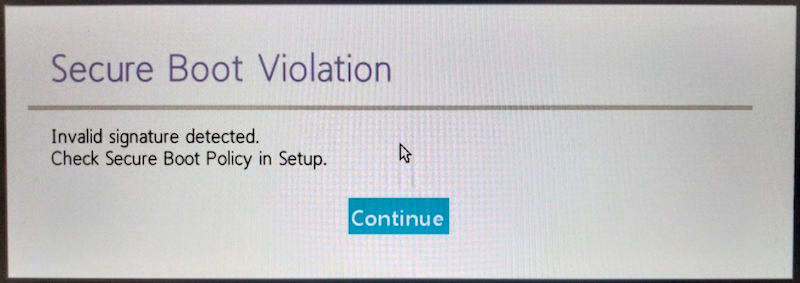
The Secure Boot section alone offers three distinct modes: Setup Mode, User Mode, and Audit Mode. My machine had been enrolled in Secure Boot with Microsoft’s standard production key. That’s normal for a production workstation. Darned if the USB installer didn’t trigger a Secure Boot violation on the very first boot attempt. The system refused to load the installer, flagging it as untrusted.
So, I turned Secure Boot off (Disabled). That’s enough of a foothold to get the installer running. Post-install, I turned it back on and everything was properly locked down again. Annoying? A little. Correct behavior by the firmware? Absolutely.
I also needed to check the Startup tab in the BIOS to confirm boot device priority. As expected, the NVMe SSD was sitting above the USB device in the boot orde. That’s normally what you want and exactly what you don’t want when you’re trying to boot from USB. Bumped the USB device to the top, saved, rebooted. Whoever designed UEFI menus clearly never had to navigate one under deadline pressure. That said, at least the ThinkStation’s implementation is logically laid out once you know where to look.
Day 4: BitLocker’s Takes the Stand
By Day 4, I was feeling cautiously optimistic. The installer booted. The language selection screen appeared. Life was good.
Then Windows Setup looked at my target NVMe drive and politely informed me that it was BitLocker-encrypted and couldn’t be formatted without the recovery key. Of course it was. I had BitLocker enabled on the previous 24H2 install. That’s the default, after all. And, alas, I hadn’t decrypted the drive before starting this whole adventure. Classic.
I retrieved the BitLocker recovery key from my Microsoft account at account.microsoft.com/devices/recoverykey, then dropped into a pre-installation WinPE command prompt from the installer’s repair menu. Using manage-bde, I unlocked the drive with the recovery key and kicked off decryption. Depending on drive size and how much data is on it, this can take a while — budget accordingly.
Building Better Boot Media
With the drive decrypted, I used diskpart to nuke the partition table entirely and start clean:
select disk X
clean
convert gpt
This gives you a genuinely fresh GPT partition table, not just a reformatted volume with old metadata lingering in the corners. Worth the extra two minutes every time.
One more wrinkle worth flagging: the ThinkStation P3 Ultra uses a firmware TPM 2.0 via Intel PTT — the chip Windows 11 relies on for both BitLocker and Secure Boot attestation. Decrypting and wiping the drive before the fresh install prevents TPM ownership conflicts that can otherwise surface post-install, when Windows tries to re-seal the new BitLocker keys to the TPM and finds stale metadata from the previous OS. Getting ahead of that saved me a likely Day 5 headache.
Day 5: Clear Skies at Last
On Day 5, everything finally cooperated. Bootable media: sorted. Secure Boot mode: disabled. Drive: decrypted, wiped, and wearing a fresh GPT partition table. I plugged in the USB drive, rebooted, and watched the Windows 11 25H2 Setup wizard run from start to finish without complaint. It almost felt anticlimactic.
Post-install, the news got better. All Lenovo ThinkStation-specific drivers installed cleanly through Windows Update and Lenovo Vantage. I needed no manual INF hunting, nor saw any Device Manager yellow triangles. The NVIDIA professional GPU drivers (ThinkStation ships with a range of NVIDIA RTX options depending on configuration) updated through Windows Update without drama. The resulting install is fast, clean, and correctly locked down with Secure Boot and BitLocker re-enabled on the fresh volume.
Was it a walk in the park? Not even slightly. It was more obstacle course than OS upgrade — and every single obstacle was one I’ve written about in some form over the years. There’s a certain humbling quality to running face-first into your own documented knowledge. But the system at the end of it is genuinely better for the process: no upgrade cruft, no lingering driver artifacts from the 24H2 stack, no half-migrated settings. Just a clean Windows 11 25H2 install the way the OS was meant to be experienced.
A Looooong Way, Indeed
Supertramp was onto something: sometimes the long way is the only way home. At least when you take the long way, you learn every pothole in the neighborhood. Bonus: you’ll know exactly where they are next time.
Lessons Learned
- Disable BitLocker before any OS swap. Decrypt the target drive before you ever launch Setup — it will save you a WinPE detour.
- Split WIM files over 4 GB. Use DISM’s
/Split-Imageswitch; Windows Setup handles the SWM reassembly natively. - Undo Secure Boot mode before booting to USB. Disable temporarily if your production keys block the installer.
- Use diskpart to clean the target drive. A full
cleanandconvert gptensures you’re starting with a genuinely fresh partition table.
This was a wild adventure, and one strewn with interesting gotchas. About par for the course, here in Windows-World. I hope not to walk this road again soon, but if I must, I’ll know how to dodge and duck. Sigh.


I’ve also seen instructions on creating a bootable Windows USB with both a FAT32, and NTFS partition.
The UEFI boot files go to the FAT32, and the remainder of the ISO goes to NTFS.
I may try it when I get some time.
A couple of additional steps to the straight copy of the UEFI boot files to the FAT32 partition, and the remaining ISO files to the NTFS partition…
1. A “sources” folder (no quotes) needs to be created in the FAT32 partition, and BOOT.WIM from the ISO needs to be copied there.
2. Because neither the MCT ISO, nor the “straight” ISO have caught up to the 2023 certs, I ran garlin’s “update boot media” script.
After that, the new “split partition” Windows USB using the MCT ISO booted with no issues.
However, the straight ISO version got the infamous “winload.efi blue screen”.
After turing off Secure Boot, it also booted with no issues.
Hey! That’s exactly what I’ve been going thru meself. Lately we live in “interesting times.” As always thanks for the input/feedback. -e-
I’ve tried it but it works on some systems (non-Lenovo ones, pretty much) and not on other ones (most Lenovo systems). Interesting, eh?
–Ed–
Indeed…
The WTF moment for me was the 25H2 MCT ISO supports the 2023 certs, but the Windows “standard” ISO (and even the current UUP dump ISO) does not.
Microsoft started “certmageddon”, then doesn’t comply fully with its own directives.