Whoa there! I couldn’t help but notice that my production PC slowed briefly to a crawl this morning. A not-so-welcome first, in fact. A quick jump to Task Manager showed me the Macrium Reflect Backup tool was the culprit, with CPU utlization stuck north of 75%. It took about 5 minutes to subside to normal levels. This tells me quite a lot, but let’s start with the blunt observation that Macrium Reflect swamps CPU short-term.
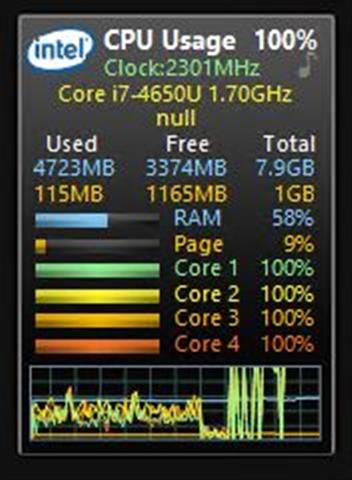
Note: I cheated on the lead-in graphic. It’s from a much older PC where it’s frightfully easy to swamp that CPU. Notice all four cores are pegged at 100% utilization in the ever-handy CPU Usage gadget. I have 8 threads on 4 cores on the i7-Skylake production unit, and they were all likewise pegged at 100%, albeit for a short time. Thus, I saw what I show here, doubled, as that PC bogged down.
What Does Macrium Reflect Swamps CPU Short-Term Mean?
Good question. Beyond the inescapable fact that this program — which was running my daily 9AM backup when this happened — brought my production PC to its knees, there’s more. Let me spell a few things out:
1. This is an i7-Skylake (6th gen) Intel CPU [3.4GHz], 32 GB RAM [DDR4-2133], 512 GB NVMe SSD [Samsung 950 Pro]. I built it in 2017-2018.
2. It’s not Windows 11 capable, so it’s running Windows 10 22H2 Build 19045.2788: that’s the latest preview CU scheduled for general distribution on April Patch Tuesday.
3. It’s never hit the wall performance-wise before to my notice. I beat the beejesus out of this machine daily (there are 13 apps and 148 background processes running, with 4% CPU utilization, as I write this screed). Indeed, this PC (mostly) does what I need it to do.
But it’s old and somewhat out-dated. And I have a Ryzen 7 5800X in an Asrock B550 mobo ready to take over the production PC role. That leads me to a vital question:
Why Not Switch Over, Already?
I have lots of obvious answers including inertia, laziness, ongoing usability and the usual fiddle-faddle. But here’s the real reason, in succinct visual form:

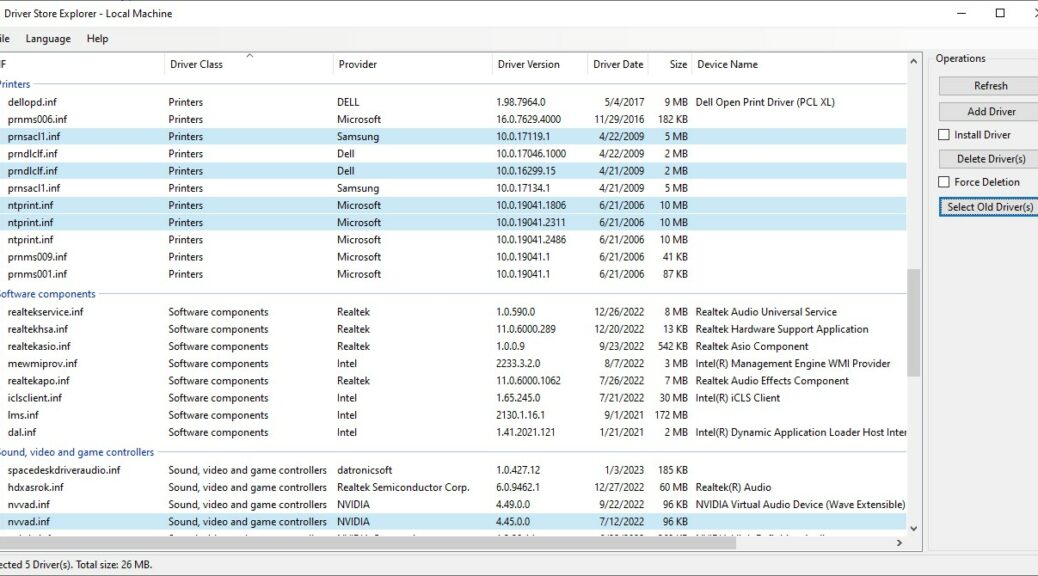
Count ’em: 10 mounted physical drives (4 SSDs, 6 HDDs).
[Click image for full-sized view.]
This totals up to about a nominal 16TB of storage, of which 40% or so is occupied. Thus, we’re talking around ~6.5 TB of stuff, of which I need to keep at least 5TB’s worth. There’s going to be some thinking, planning, time and effort involved in moving my show to another PC. I’ll have to back everything up to another drive (an 8TB unit should do) and then figure how to map it into a new set of storage devices on the target PC. That should be interesting. I guess I’d better get started. This morning, I got my “early warning!”