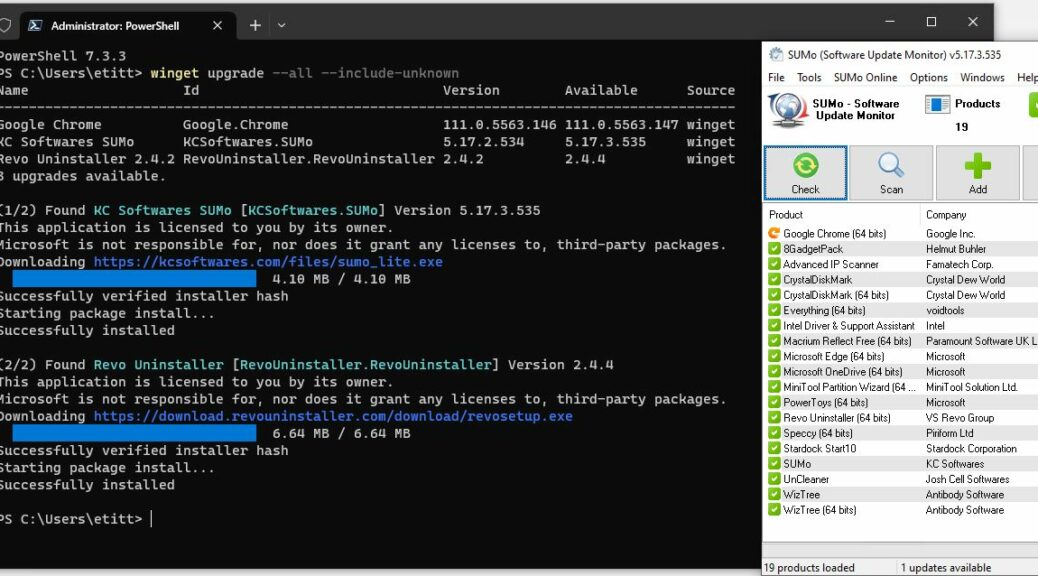
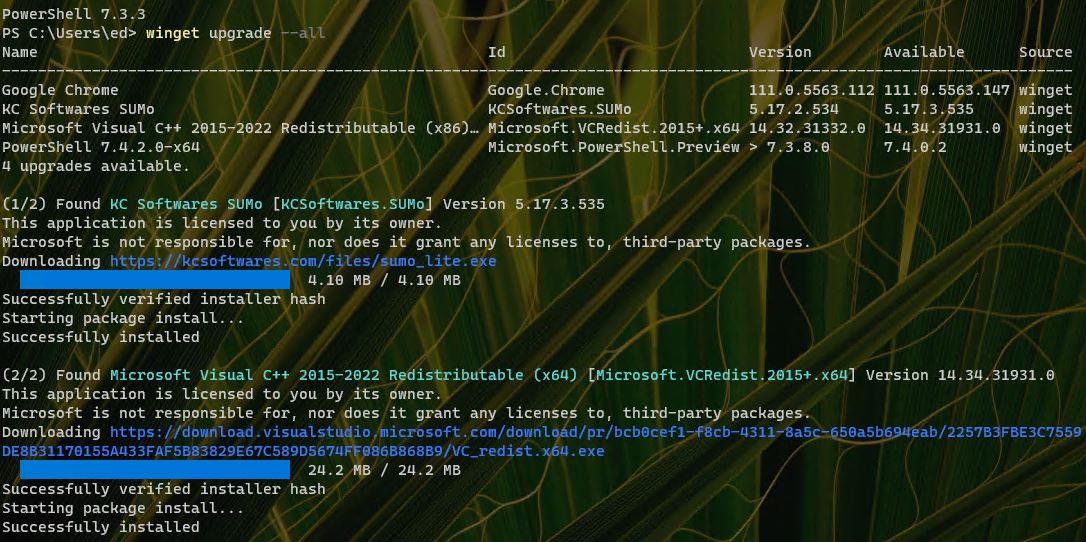
Category Archives: Windows 10

2023 Windows Insider MVP Application

Well, then. The deadline for the 2023 Windows Insider MVP application is in two days (November 4). I just uploaded mine a few minutes ago. I’m nearing the completion of my first 5 years with the program — I was first admitted in 2018 — and hoping to keep it going for at least that long again. As I filled out the application, I perforce took a look at my Windows related activities over the past 12 months. I’d like to report on same to my readers here as well.

2023 Windows Insider MVP Application Highlights

Here’s an abbreviated, bulleted list of what I reported to the Windows Insider Team in making my 2023 application:

  • 217 posts in the period from November 1, 2021 to October 31, 2022 right here to EdTittel.com
  • 27 Windows-related articles for ComputerWorld (including revisions)
  • Over a dozen Windows-related articles for each of Tom’s Hardware and TechTarget
  • Over 500 posts to TenForums.com and over 200 posts to ElevenForum.com
  • Regular social media presence for Windows work on Twitter, LinkedIn and Facebook

It’s not much different from what I’d been doing for the preceding 4 years, but it’s always fun and interesting to see how much happens over the course of a year.

What Comes Next?

It takes a while for the Windows team to handle all the incoming applications, including renewal apps from the 100-plus people who already belong to this program. You can check out that list under the “Get to know Windows Insider MVPs” heading on the program’s home page. Here’s what my listing there looks like:

2023 Windows Insider MVP Application.listing

Hmmm. Looks like I need to update my profile mention of Windows 11, too. [Click image for full-sized view.]

Indeed, Windows 11 certainly took a lot of my time over the past 12-18 months (it made its preview debut on June 28, 2021: I got in the second day of release). I can’t wait to see what happens next, and to learn how to install, use, tweak and troubleshoot same.

Wish me luck: I’m hoping for another 5 years of WIMVP status, if not more. As soon as they let me know if I’m in or out for 2023, I’ll report here. Fingers crossed, in the meantime.

Facebooklinkedin
Facebooklinkedin

Winget Remove/Replace Handles Kindle Directly

I don’t know why this is, but I have the devil’s own time following Amazon’s instructions to download a fresh — and current  — Kindle version. You place and complete a zero-cost order and you’re supposed to be able to click a link in the order record to do the download. Not happening for me! I decided to contact Amazon tech support to confirm that’s how it’s supposed to work. It is, indeed. Interestingly they could or would not provide a direct download link. Next, Winget remove/replace upgrades Kindle directly, if incorrectly. Let me explain…

What Winget Remove/Replace Upgrades Kindle Directly Means

I learned the term remove/replace back in the days when I still did my own car repairs. It basically describes what’s involved in fixing a broken car part. First, you remove the non-working part. Then you replace it with a new, working one. Fixed (unless calibration is also needed)!

In this case, it means uninstall the old, outdated version of a program. Then install the new, up-to-date version in its place. This technique works when other update methods fail. I’ve used it successfully with the Zoom app, for example, when its maker quit offering in-app update facilities on the free version.

With Kindle, it half-way works for me when the Kindle app download service fails to deliver me a new version as it’s supposed to. If you look at the lead-in screencap, you see first the command

winget uninstall Amazon.Kindle

That’s the “remove” part of the sequence. Next, comes the “replace” part:

winget install Amazon.Kindle

Behind the scenes, this uninstalled version 1.39.0.65306, and replaced (installed) version 1.33.0.62002, which is neither current nor up-to-date. Notice the newly-installed version number is lower (and hence, older) than the one it replaces. Shoot, what now?

SUMo to the Rescue

I’ve got a paid-for version of the Software Update Monitor (SUMo) from KCSoftwares. When I checked the update status for Kindle there, it pointed me to a direct download link at Amazon (which their tech support folks were unwilling or unable to furnish). That link is Get started with the free Kindle app. For whatever reason, search engines don’t find this (it’s probably blocked). Using this link, however, you can indeed grab the latest Kindle version and put the remove/replace operation to work.

Why didn’t winget grab this version? The existing package definition for Kindle install is obviously pointing at the wrong download. That’s why you can’t always count on winget to get things right, though it does so most of the time. That’s also why I use multiple update scanners (including PatchMyPC) to help me keep my small PC fleet up-to-date.

Shame on you, Amazon, for not making a direct download link available. And shame again, for not equipping your tech support staff with the direct download link that SUMo provides. Sigh. At least, I got there eventually, if not by the most direct route.

Facebooklinkedin
Facebooklinkedin

Using Winget For 4 Ways To Update

I’ve been researching an upcoming ComputerWorld story about the terrific and powerful PowerShell based Windows packager: Winget. It’s a peach! I mostly use it for keeping applications and supporting elements current. Lately,  I’m  using Winget for 4 ways to update my apps. Let me explain…

How-to: Using Winget for 4 Ways to Update

Way 1: Check Pending /Available Upgrades

By itself, the command winget upgrade simply shows what’s ready to upgrade. It doesn’t actually do any upgrades. Thus, it offers a quick easy way to see what upgrades are available. That’s why it appears as the lead-in graphic for this story.

Ways 2 & 3: Perform Blanket Upgrades

In fact, two different command strings provide varying degrees of upgrade capability

  1. winget upgrade –all
  2. winget upgrade –all –include-unknown

By default winget only upgrades to a new version when it recognizes the current version. Then, if the current installed version is lower-numbered than the pending one, the upgrade goes ahead. Some-times, for whatever reason, winget can’t find the current running version into. In such cases, the upgrade –all variant skips them. Thankfully, adding –include-unknown to the string tells winget to upgrade those anyway. Consequently, I use that more inclusive variant because there’s less follow-up needed.

To illustrate, the next screencap shows winget upgrade –all –include-unknown output on the PC that produced the lead-in snap. Notice please: 5 items found, 5 items upgraded. Good-oh!

The –all –include-unknown variant of winget upgrade covers the most possibilities. On this PC, all 5 candidates upgrade.
[Click image for full-sized view.]

Way 4: Targeted Winget Upgrades

Examined closely, both preceding screencaps shows an ID column. Indeed, that information provides a “package name” for its associated application. Thus, you can always upgrade a single package at time using this syntax:

winget upgrade <package-name>

For example, names shown in the screencaps include Mozilla.Firefox, TeamViewer.Teamviewer, AntibodySoftware.Wiztree, Google.Chrome and Microsoft.WindowsSDK. That follows a mostly predictable structure: builder-name.package-name. For speed, I like to use it when winget presents only a single option, or when a winget blanket command fails.  I’m learning that happens sometimes, for various odd reasons.

There are many ways to work with winget I haven’t yet mentioned. These could appear in future posts here. Certainly, they’ll definitely be covered in my upcoming ComputerWorld piece. Right now, that’s scheduled to appear online before month’s end. Hopefully, you’ll get a chance to catch that during the busy holiday season.


Facebooklinkedin
Facebooklinkedin

KB5018482 Announces Impending 21H2 End

OK, I’ll admit it. I wasn’t expecting much excitement upon downloading and installing KB4018482 yesterday. Sure, it raised the Build level to 19045.2193 on my production desktop. And it brought various modest updates and fixes. What I wasn’t expecting, upon reading its Support blurb, was to see that KB5018482 announces impending 21H2 end of service.

Here’s that it says, reproduced verbatim (dated October 11, two weeks prior to the KB pub date [black, bold emphasis mine]):

IMPORTANT All editions of Windows 10, version 21H1 will reach end of service on December 13, 2022. After December 13, 2022, these devices will not receive monthly security and quality updates. These updates contain protections from the latest security threats. To continue receiving security and quality updates, we recommend that you update to the latest version of Windows.

You could say it kind of jumped out at me as I read the notice. It’s not exactly a surprise — this date’s been known for a long while — but it’s pretty final, and it’s now just over 6.5 weeks away (46 days, as I write this).

Why KB5018482 Announces Impending 21H2 End Counts

Lots of business Windows users run Windows 10 — the vast majority, in fact (e.g. Statcounter says 71.87% of all desktops). I suspect that more than half that population is still running one 21H2 build or another. For those users, this announcement is a wake-up call that it’s time to make some kind of change before time runs out in mid-December.

Business users have two options to stay on Windows 10 — namely:

  • upgrade to 22H2 (this can use any valid Windows upgrade technique, including WSUS, WU, deployment tools, and in-place upgrade)
  • switchover to  LTSC 2021 (works only via ISO and in-place upgrade)

Either way, planning, testing, scheduling and deployment will be necessary. And six weeks (plus 4 days right now) ain’t much time. The clock, as they say, is ticking…

Postscript: So Long, NetMarketShare!

In writing this item, I got a another surprise. And it, too, touches on end of life. For a long, long time NetMarketShare has been my go-to source for Windows OS market share data. Apparently, that’s over now too. Here’s partial text from the Windows OS landing page:

IMPORTANT NOTICE:
After 14 years of service and being used as a primary source in tens of thousands of articles and publications, we are retiring NetMarketShare in its current form. October, 2020 is the last month of data. All billing for existing accounts has been stopped. All outstanding balances are being refunded.

Why? An upcoming change in browsers (https://github.com/WICG/ua-client-hints) will break our device detection technology and will cause inaccuracies for a long period of time.

In addition, we have focused on bot detection and removal as a key part of the quality control process. It is the most complex part of our codebase. As time has gone on, it has become increasingly difficult to manage this process. So, instead of accepting increasing levels of inaccuracy, we thought it would be a good time to call it a day.

Too bad. I’ll be sorry to do without their information and the insights it provided. Auld ang syne, and all that…

Facebooklinkedin
Facebooklinkedin

USB4 Delivers Consistent NVMe Performance

OK, then. I finally laid hands on my second USB4 NVMe SSD enclosure yesterday. I deliberately sought out the cheapest one I could find so I could compare it to a more expensive alternative already on hand. When I say that USB4 delivers consistent NVMe performance here’s what that means:

1. The same SSD, cable, and host PC are used for comparison. Both drives have the “cache tweak” applied (this Oct 14 post has deets). Same tests performed, too (CrystalDiskMark and a Macrium Reflect backup).
2. The only thing that changes is the enclosure itself.

In short, I wanted to see if spending more on hardware returned a noticeable performance advantage (I’ll talk more about this below). Long story short: it doesn’t seem to make much, if any, difference. Let me explain…

Why Say: USB4 Delivers Consistent NVMe Performance?

The lead-in graphic shows the results from the cheap enclosure on the left, and the more expensive one on the right. The average difference in CrystalDiskMark performance shows 2 wins for el cheapo, 5 wins for the higher priced item, and 1 tie. On first blush, that gives the more expensive device an advantage. So the next question is: how much advantage?

This is where a little delta analysis can help. I calculate that the average performance difference between devices varies from a high of 6.2% to a low of 0.03% (not including the tie). That said, the average performance difference across all cells is merely 1.54%. (Calculated by taking absolute value for each delta, then dividing by the number of cells.) That’s not much difference, especially given the prices of the two devices: $128.82 and $140.71. That delta is 8.4% (~5.5 times the average performance delta).

I will also argue that comparing CystalDiskMark results is interesting, but not much of a real-world metric. Thus, I’ll compare completion times for a Macrium Reflect image backup on the same PC, same OS image. The expensive device took 2:25, the cheap one 2:44. That’s an 11.5% difference, greater than the price delta but not amazingly so.

Deciding What’s Worthwhile

I can actually see some differences between the two enclosures I bought. One thing to ponder is that NVMe drives tend to heat up when run full out for any length of time (as when handling large data sets, making backups, and so forth). I’ve seen temps (as reported in CrystalDiskInfo, reading SMART data) go as high as 60° C while M.2 SSDs are busy in these enclosures. At idle, they usually run at around 28° C. The more expensive NVMe enclosures tend to offer more surface area to radiate heat while active, so that’s worth factoring into the analysis.

But here’s the deal: I can buy a decent USB3.1 NVMe enclosure for around US$33 right now. The cheapest USB4 NVMe enclosure I could find cost almost US$96 more. That’s a multiplier of just under 4X in price for a device that delivers less than 2X in improved performance. Let me also observe that there are several such enclosures that cost US$160 and up also on the market. I still have trouble justifying the added expense for everyday use, including backup.

There will be some high-end users — especially those working with huge datasets — who might be able to justify the incremental cost because of their workloads and the incremental value of higher throughput. But for most business users, especially SOHO types like me, the ouch factor exceeds the wow value too much to make it worthwhile. ‘Nuff said.

Facebooklinkedin
Facebooklinkedin

Winget Updates PowerShell 7.2.7

Here’s something new in my personal experience. I ran Winget on one of my Dev Channel test PCs this morning. The latest version of PowerShell came up as an upgrade option. So I exercised it, and indeed the PowerShell version incremented from 7.2.6 to 7.2.7. Hence my claim that now, Winget updates PowerShell 7.2.7. You can see the process underway in the lead-in graphic for this story.

What Happens When Winget Updates PowerShell 7.2.7?

Things get a little weird along the way. Notice that after Winget starts the package install for PowerShell, it shows a “Cancelled” notification at the lower left corner of the Terminal session window. At the same time, the PowerShell installer (small pane at lower right) reports ongoing progress in removing the old version, then installing and configuring the new version.

When the progress bar goes all the way to the right, it simply disappears with no further communication from the installer. On a whim, I closed the open Terminal session window. When I opened a fresh one, here’s what I saw:

Winget Updates PowerShell 7.2.7.new-window

Once the progress bar completes, the installer goes silent. But if you close the open Terminal session, then open a new one, you’ll see it’s indeed been updated to 7.2.7.

I’m not sure how it’s supposed to behave because I’ve never seen winget upgrade PowerShell before. Normally, a full installer window opens with the masked PowerShell avatar (see below). Then, one steps through the typical standalone installation sequence. This time, with PowerShell running things it worked differently. A bit disconcertingly, too. But it’s installed now and works as expected. So I guess, all’s well that ends well. Cheers!

Winget Updates PowerShell 7.2.7.avatar

I guess I’ll miss the avatar going forward, but I do appreciate the convenience of upgrading inside PowerShell.

Facebooklinkedin
Facebooklinkedin

Zoom Updates and Payment

Here’s an interesting set of observations. In the past weeks, I’ve noticed that the free version of Zoom no longer offers the “Check for Updates” option in its menus. I’ve also noticed that Zoom has been asking free users to “upgrade” to the for-a-fee pay version. That got me to thinking about Zoom updates and payment. So I conducted an experiment…

What About Zoom Updates and Payment?

I went ahead and signed up for an individual Zoom license. It’s assessed annually, and costs about US$185 per year. Right now, the first year is discounted, so my actual out-of-pocket was “only” US$95.88. But it renews automatically at full price one year from today. Ouch!

That said, as I suspected — and as you can see in the lead-in graphic above — if you do pay for Zoom, you also get the Check for Updates option back. That raises the interesting question: is automatic updating worth US$95 (this year) or US$185 yearly? I’m not convinced.

There IS Another (Free) Way

If you don’t mind running a few Winget commands, you can keep the free version and update as you need to. FYI, I use SUMo to tell me when it’s time to update, but because I don’t pay for a license to that software on all my PCs, I’ve figured out how to use Winget to handle that instead.

The basic concept is to uninstall the version that’s running. Then, if you install Zoom again it will grab the latest version. That results in an up-to-date version on your PC. Two simple one-liner commands are involved:

  1. Winget uninstall Zoom.Zoom
  2. Winget install Zoom.Zoom

That’s it. Works like a champ. Be sure to keep your sign-in account and password info handy, because you’ll need to sign into the newly installed version after going through this remove/replace operation.

But you can keep using the free version, and stay current, if you follow this simple two-step operation. That’s probably what I’ll revert to next year, when my renewal comes due. To be continued…

It’s Irksome, and Potentially Insecure

C’mon Zoom: this approach is potentially unsafe for lots of users who SHOULD be free (e.g. students, seniors, nonprofit workers, and so on). Sure, it may be an inducement for some people (me, for example) to purchase a commercial license so as to regain auto-update ability. But the vast majority of free users who have no choice but to stay put should not be exposed to potential security vulnerabilities in the name of (modest) incremental revenues.

My plea/request: return the automatic updates to the free version! Find a different way to increment your income, please, in the name of better overall application security.

Facebooklinkedin
Facebooklinkedin

USB NVMe HW Tweak Delivers Big

I’m still noodling about, trying to figure how to get the best performance out of high end USB NVMe drive enclosures. To that end, I was reminded of something I already knew but hadn’t considered. That is: deep down in the hardware policies for Windows removable devices — including NVMe drives — is something called “Removal policy.” As a quick and easy item, this USB NVMe HW tweak delivers big results.

Those results appear in the lead-in graphic for this story. Both sets of CrystalDiskMark results come from the same system, same USB-C port, and the same NVMe hardware. The only difference is that one is tweaked (selected “Better Performance”) and one is not. As you can see, this tweak makes a big difference. (Hint: the left-hand item shows tweaked results.)

How-To: Set Up NVMe HW Tweak Delivers Big

This takes a bit of digging to get into. This properties page is several levels deep in the storage device properties hierarchy. There are multiple ways to get to this page. I’ll illustrate one with step-by-step instructions using Disk Management:

1. Use Winkey+X to open the quick access menu.
2. Select Disk Management.
3. Right-click the drive letter for the NVMe device, then select Properties.
4. On the General tab, click the Properties button at lower right.
5. On that General tab, click the “Change Settings” button at lower left.
6. Click the Policies tab on the resulting Properties page, and click the radio button next to “Better Performance.” Also, click “Enable write caching on the device.”

Here’s what that final page looks like, with the described selections made:

USB NVMe HW Tweak Delivers Big.removal-policy

This page is four levels deep into the device properties hierarchy. It offers a useful “Better Performance” option.

What About Those Results?

I built a spreadsheet using both sets of results. Note that for every cell in each set of results, the tweaked drive was faster than the untweaked one. Some of the differences are negligible (under 10%). Some are minor, but noticeable (under 35%). The entire write column, however, offers at least doubled speed (top two columns). The random writes are 30 times faster when one thread works against a queue depth of 32. That drops to “merely” 11 times faster for a single thread and a single write request. Amazing!

Tweak(R) Tw(W) Notweak (R) Notw(W) Delta (R) Delta (W)
3049.53  2898.59  3004.07  1326.67  101.51% 218.49%
1760.91 2020.40 1620.99 857.20 108.63% 235.70%
499.74 361.83 411.16 12.00  121.54%  3015.25%
50.92 110.77  38,74 9.52 131.44% 1163.55%

This represents a significant boost in performance for a quick settings tweak. It does mean, though, that you must use the “Safe Eject” tool in the notification bar to eject the drive before you can disconnect it. Or, if you’re like me, you’ll simply do it the next time the host PC is rebooting (best done right when the restart gets underway, after shutdown is complete).

But gosh! Consider the money for a fast-ish NVMe drive (about US$120 – 150 for the 1 TB Sabrent Rocket 4 Plus). Then, factor in US$150-170 for a fast, USB4 NVMe enclosure. The tweak takes under a minute and really helps with drive performance. If you spend the money, you need to spend the time and effort to apply the tweak. You’ll get the most from your investment that way.

Realworld Results Change

Untweaked, it takes Macrium Reflect 5:30 to image the system drive on the P16 Mobile Workstation where the USB4 NVMe drive is attached. Tweaked, that same drive finished the job in 2:25. That’s over twice as fast. To me, that’s much more meaningful than synthetic benchmark results like those from CystalDiskMark. It also shows those benchmark results have some truth to them as well. Good-oh!

Facebooklinkedin
Facebooklinkedin

Fixing Windows 10 WinKey-X

I don’t remember anymore how I shot myself in the foot this particular time. All I know is that I somehow removed all traces of PowerShell from the WinKey+X menu on my Windows10 production PC. The lead-in graphic shows that menu from my ancient Surface Pro 3, also still running Windows 10. Recently, I’ve found myself fixing Windows 10 Winkey-X because I want it to show Windows Terminal.

After Some Fumbles, I’m Fixing Windows 10 WinKey-X

If you search on “customizing WinKey+X menu” you’ll find lots of information and advice available. Initially, I was beguiled by Sergey Tkachenko’s WinX Editor. I should’ve known better: it hasn’t been updated since 2017.

A key ingredient in modifying the WinKey+X menu, as it turns out, turns on using the latest version of Rafael Rivera’s hashlnk.exe program. Basically, it creates hash values and associated them with menu shortcuts, so the OS treats the entries in the following path correctly:

%LocalAppdata%\Microsoft\Windows\WinX

The sub-folder “Group3” is where my specific shortcut had to go. But it didn’t work without using the latest (2.0) version of hashlnk. And because WinX Editor doesn’t use that version, it doesn’t work, either.

TenForums to the Rescue

As with many other topics in the Windows world, I found my fix in the TenForums Tutorials. This particular one is called Add Custom Shortcuts to Win+X Quick Link Menu in Windows 10. I followed its guidance, step-by-step, and got an admin version of Windows Terminal installed in my WinKey+X menu without undue difficulty.

As is often the case in fixing Windows issues, it took much longer to find the right solution than it did to implement it. I think we’re talking about an hour-plus of fumbling around and failed attempts before I turned to my unusually reliable and intelligible TenForums resource. Sigh. That’s the way things go around here sometimes….

Here’s what my Winkey+X menu looks like now, with my desired entry up top.

Fixing Windows 10 Winkey+X.i7skyfixed

After going through the motions I get a Windows Terminal entry with admin privileges (reads “Term (Admin)”).

I have long been a proponent of Ten Forums and ElevenForum tutorials. This doesn’t change that stance at all. In fact, it strengthens it!

Facebooklinkedin
Facebooklinkedin

HDDs Still Have Their Uses

Hmmmm. Just saw a fascinating story at Neowin.net. It provides links to some low-cost deals for hard disk drives (HDDs) that range in size from 3 to 14 TB, with prices from US$60 (3TB) to US$210 (14 TB). I’m not endorsing the brand (WD) or the deals (listed from Amazon and — in some instances — Newegg). But I am amazed at just how cheap conventional hard disks can be today. And because HDDs still have their uses — particularly for archiving and spare backups — buying may make sense.

Economics Also Verify That HDDs Still Have Their Uses

I’m struck by the contrast between HDD and NVMe prices, especially for 4 and 8 TB devices. Looking at Amazon, I see that 4TB NVMe drives go for US$460 and up, with most top-end devices just below or over US$600. When you can find them (not easy), 8TB devices cost from just under US$1,200 to around US$1,500 or so.

The comparison to HDD is pretty stark. The Neowin story cites prices of US$70 for 4, and US$130 for 8 TB. Do the math to figure out the ratios. The 4TB NVMes cost between 6.57 and 8.57 times as much as their HDD counterparts. 8TB models run between 9.23 and 11.53 times as much.

Of course, denser solid-state devices are much more expensive to make. Though higher-capacity HDDs have more platters, achieving denser storage doesn’t magnify costs anywhere near as much. In fact, the HDD cost increment for going from 8TB to 10TB is US$30, and from 8TB to 14TB US$80. That clearly shows the incremental cost of storage is much, much cheaper for HDDs than SSDs.

But given the mind-blowing costs for higher capacity NVMe devices, they’re not going to replace HDDs completely any time soon. They simply cost too much to justify wholesale switchovers. Nobody’s going to use HDDs for serious, real-time workloads any more. They have no place as system drives, either. But for other applications where high capacity trumps I/O performance, they still have a vital role to play. And that explains why I still have over 40TB of spinning storage myself, much of it idle as “backups for my backups.”

Facebooklinkedin
Facebooklinkedin