I like to keep an eye on how Windows is using system resources. To that end, I still use Helmut Buhler’s excellent 8GadgetPack utilities. They don’t really tell you anything that Task Manager can’t but you can keep them in view all the time, and they don’t exact much system overhead, either. For a rough and ready picture of what’s up with Windows memory (RAM), those tools (e.g. Task Manager and the CPU Monitor gadget) can tell you how much RAM is on your PC, how much is in use, and how much is free. The gadget also reports page file info: total, free, used as well. But when it comes to digging deeper into how Windows uses memory, the Sysinternals tool for mapping Windows memory usage –namely, RamMap – is what you need. Let me explain…
For Mapping Windows Memory Usage, Try RamMap
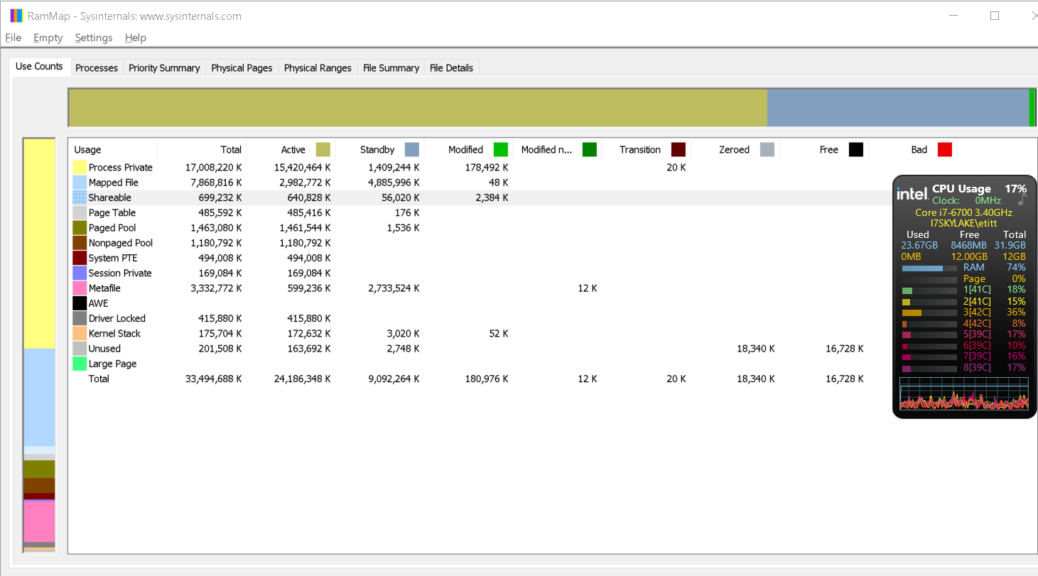
If you look at the lead-in graphic, I’ve superimposed the CPU Usage gadget (aka CPU Monitor) at center far right, with the Sysinternals RamMap tool beneath it. This pretty much shows things as they work and contrasts the minimal level of detail available from Task Manager and the Corresponding CPU gadget to the more detailed and nuanced RamMap.
TLDR version: Use Task Manager or the CPU Gadget to get a gross overview of memory and paging file stuff; use RamMap to get more details about what’s consuming memory and what state that memory is in.
In large part differences are a matter of details. Task Manager and the CPU Gadget tell you how much RAM is used (blue numbers under the Used, Free, Total column heads in white: 23.6GB) and free (~8GB). It also tells you that the page file is not in use (yellow numbers right underneath RAM entries). That’s pretty much it.
RamMap, OTOH, provides a lot more memory status categories: Active, Standby, Modified, Modified No Wire, Transition, Zeroed, Free, and Bad (you want to see THAT one in a memory map). You get a much more informed and detailed view here (and under other tabs besides “Use Counts” in the leftmost position, shows by default).
How “Used” and “Free” Fit RamMap Categories
Here’s something worth knowing: Used Memory in Task Manager/CPU Gadget combines the RamMap totals under Active, Standby and Modified. Free memory in Task Manager/CPU Gagdet combines the RamMap totals under the Zero and Free headings.
But when RamMap runs you can also see how those numbers change as processes execute, tasks get handled, services do their thing and so forth. It’s much more detailed and useful if you want that level of detail, especially if you’re hunting a memory leak of some kind.
Good stuff! Grab yourself a copy today (or you can simply run the web-based executable, to make sure you’re always using the latest and greatest version).