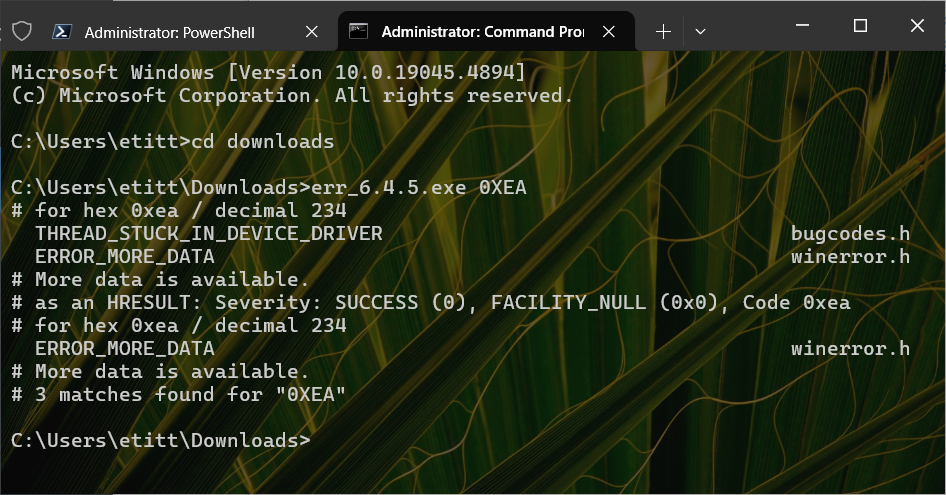
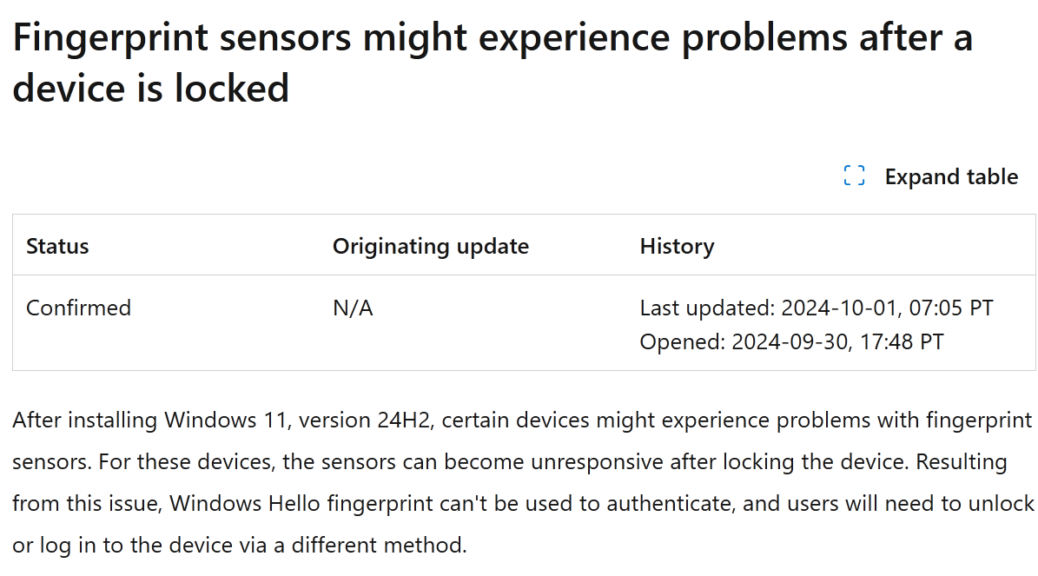
Build 25158 Camera App Reworked

The latest Dev Channel build includes a new iteration of the venerable Camera app. Indeed, in Build25158 Camera app reworked includes a brand-new, much sparser interface with simplified controls. No settings at all, in fact, as far as I can tell.

If Build 25158 Camera App Reworked, Then What?

Contrast that look and feel from the lead-in image with the Windows 10 version (from higher up in the same baker’s rack in my office). Settings are shown this time at left in the following screencap.

Build 25158 Camera App Reworked.win10-compare

Am I wrong to see the lack of more detailed controls as a loss of capability? [Click image for full-sized view.]

Indeed, most image manipulation is a post-processing task. But I occasionally found it useful to use some of the various controls that the old Camera app made available but which — as far as I can tell — the new Camera app does not. Particularly, the framing grid for image selection and layout help, and the photo quality and aspect ratio controls. To me, this turns the new camera into a more limited, image grab only, kind of function. It’s OK, but it’s not as flexible as the older version.

Running Against the Grain

This is kind of interesting, because most of the new-version or reworked apps showing up in Windows 11 include added functionality and capability, rather than a reduction in same. Favorite example: the sometimes elusive tab feature in File Explorer. Although it has turned into something of a now-you-see-it, now-you-don’t phenom in recent Dev and Beta Channel builds, I do like it and think it represents a useful (if not long overdue) extension to what that tool can do.

The camera changed are described in a a July 13 Windows Blog. It does apparently gain improved QR and barcode scanning. The biggest accolade reads “match the beautiful new look and feel of Windows 11.” It says nothing about the banishment of Settings and related controls. Go figure!

Facebooklinkedin
Facebooklinkedin

Choose Reflect Backup Drives Carefully

I’m a HUGE fan of Macrium Reflect. Available in both free and for-a-fee forms, I’m convinced it’s the best Windows image backup tool available today. Disclosure: I run both free and fee-based versions, and own a Home 4-Pack license that I upgrade as new versions are released. I was reminded to choose Reflect backup drives carefully yesterday, when I targeted an older USB 3 drive with mSATA SSD devices under its hood. Let me explain…

Why Say: Choose Reflect Backup Drives Carefully?

Because the read and write speeds of the underlying device and the speed of the channel (USB 3.1 in my case here) matter. In fact, they strongly affect the time it takes to complete a whole-image backup. In targeting an mSATA device that backup took nearly 40 minutes to complete.

I’m making the same backup right now, and targeting a PCIe x3 NVMe SSD in a Sabrent USB-C enclosure right now. As you can see from the lead-in graphic, Macrium Reflect currently guesstimates it will take 19 minutes to complete. That’s just over 50% faster than the mSATA number, or about 20 minutes overall.

If such a task is running in the background, and can complete whenever it’s done, that doesn’t matter much. But if, as in my case, I was waiting on completion to do something else, it matters a lot.

And There’s More…

While watching the NVMe and mSATA image backups proceed, I noticed another difference. The transfer rate for the two backups not only differed but so did their variability. The NVMe device kept getting faster as it proceeded. It ranged from a low of 1.1 Gbps to a high of 1.8 Gbps. The mSATA device started out at around 600 Mbps, It dropped as low as 220 Mbps, and as high as 1.0 Gbps during the course of the backup process.

Upon completion, Reflect also shared other stats worth noting. The overall read rate for the mSATA device was reported at 1.6 Gbps, while its write rate came in at a less stellar 550 Mbps. On the NVMe device, the overall read rate was 6.6 Gbps, and the write rate 1.9 Gbps. That’s a BIG difference, and explains the title for this story. Yes, these numbers appear inflated because they take compression into account. But those are the numbers that Reflect reports, and they do underscore the importance of device read/write speeds.

Note: Actual time for the NVMe backup was 19:31, while actual time for the mSATA backup was 39:52.

Facebooklinkedin
Facebooklinkedin

Build 25158 Gains DNS Over TLS Support

Earlier this week, MS released Build 25158 into the Dev Channel. Among the many notes in this build’s announcements, you’ll find an item that starts off “DNS over TLS testing is now available for Windows DNS client query protection.” Thus, when Build 25158 gains DNS over TLS support, that means improved security for DNS traffic on networks everywhere. Given that DNS is a constant focus for direct and indirect attack, this is a good thing. So, how can you try this new feature out?

Putting Build 25158 Gains DNS Over TLS Support to Work

For brevity and convenience, DNS over TLS is usually abbreviated as DoT. Two ingredients are needed to take DoT for a spin:

1. You need to point your IP stack at a DoT DNS server. You’ll find a list of same at the DNS Privacy Project. It provided the lead-in graphic for this story, in fact. For the nonce, I’m using Google’s 8.8.8.8 and 8.8.4.4 addresses (and associated domain names for certificate authentication). There are several other options available.

2. A series of configuration tweaks, including Settings changes, and netsh and ipconfig commands, are required to set this up and make it work. Fortunately, all those details are covered in an MS Networking Blog post entitled “DNS over TLS available to Windows Insiders.” Therein, Tommy Jensen provides nicely illustrated step-by-step instructions to get you through the process.

More to Follow After Additional Try-Outs

I have two (2) test machines running Build 25158. I’ll try DoT on both of them, and let you know what happens. Mr. Jensen’s post on setting things up includes a potentially scary phrase. That is “This may result in a small performance improvement depending on the network environment at the cost of the flexibility HTTPS-based protocols can provide” (italic emphasis mine).

I’m afraid I know what this means. Indeed, I’ll be curious to see what’s still working — and what’s not — after experimenting with these changes. Given an upcoming out of office adventure, I might wait until week after next to put this to a real test. Stay tuned! In the meantime, you might find this Wikipedia article about DoT worth a quick read-through (good discussion and lots of good additional references there).

Facebooklinkedin
Facebooklinkedin

A-Volute Software Component Mystery Solved

Oho! Yesterday was Patch Tuesday for July. Thus, I’ve been working through my stable of PCs, applying updates as I can. On my Ryzen 5800X Windows 11 desktop, I noticed something new and mysterious. Its MUC (Microsoft Update Catalog) entry provides the lead-in graphic for this story. Upon conducting research, this A-Volute software component mystery solved itself immediately.

How Is A-Volute Software Component Mystery Solved?

As with most such things, a quick trip to Google helps point me in the right direction. It turns out that A-Volute provides drivers for the Asrock B550’s audio circuitry. This also includes support for an Nh3 Audio Effects Component. It pops up under Software Components in Device Manager:

A-Volute Software Component Mystery Solved.dev-mgr-props

Googling online points me to a Realtek-related (Nahimic) audio driver, with matching entry in DevMgr. [Click for full-size view.]

I first found a credible mention of this at TenForums.  It appears in a thread on which I myself have been active. ( It’s entitled “Latest Realtek HD Audio Driver.”) Next, I find an entry named “A-Volute Nh3 Audio Effects Component” inside Device Manager. Presto! That convinces me the mystery is no longer unsolved.

I like to run things down when something new shows up amidst Patch Tuesday updates. It came along for the ride because MS  provides drivers as well as OS and other related updates. In most corporate or production IT environments, this doesn’t happen. Why not? Because untested drivers pose too many potential problems to simply let them through on their own.

Deconstructing Windows Mysteries

In general, when something new or unexpected shows up in Windows, it’s worth the effort to identify it. In most cases, it will be benign — as it was with this item. But sometimes, the mystery might deepen. Or it might even point to something malicious or malign. That’s when remediation comes into play. I’m happy that wasn’t needed this time. I’ll still keep my eye on new stuff going forward, though. One never knows when something wicked might this way come.

Facebooklinkedin
Facebooklinkedin

Windows Terminal PowerShell Selection

I have to laugh. Yesterday, I noticed version 5 of PowerShell  running inside Windows Terminal. So I naturally wondered: “How do I upgrade this?” Turns out, in fact, that no upgrade is needed. It all comes down to the current Windows Terminal PowerShell selection. I’ll explain shortly, but first: look at the window in the lead-in graphic.

Managing Windows Terminal PowerShell Selection

By default, version 5.1.xxx… appears when you open Windows Terminal. But it’s easy to get to a newer PowerShell version. No upgrading is necessary: you need only know how to do this. If you click on the down-caret at the far right of the title bar, a menu appears, like this:

Windows Terminal PowerShell Selection.choose shell

The down-caret menu lets you choose among shells you can run in a Windows Terminal tab. [Click image for full-sized view.]

The trick — if you can call it that — is to choose the right version of PowerShell (and corresponding default) to run. The top item in the menu corresponds to version 5.1.xxx. The fourth item down brings up the latest 7.x PowerShell version (specifically, 7.2.5). If you click Settings, you can also choose this version as the “Default Profile” which makes the new version (rather than the 5.1.xxx version) appear whenever you open Windows Terminal, or click the “Plus” sign to open a new default Terminal tab.

As with many other things in Windows World, foreknowledge and understanding are key to doing things right. In my case, I had no need to update PowerShell. I only needed to pick the right version to run inside Windows Terminal. Now I know how. If you didn’t know how already, this should make things equally simple for you. Cheers!

Facebooklinkedin
Facebooklinkedin

Change Dev Channel Task Manager Default View

Here’s a nice little addition that’s popped up in the Dev Channel version of Task Manager. If you visit its Settings page, you will see a “Default Start Page” pull-down menu there. This makes it easy to change Dev Channel Task Manager default view. My preference is Details, as shown here:

Change Dev Channel Task Manager Default View.details

Because it’s my go-to view, I set “Details” as the default in Task Manager.

Why Change Dev Channel Task Manager Default View?

For convenience, mostly. It’s not a huge deal in terms of added functionality. But anything that saves a mouse click is helpful, when it comes to getting down to work, eh? In general, MS seems to be moving to a move open, less cluttered layout for Task Manager in the Dev Channel version. It takes a little getting used to, but I like it.

My eyeballs are still better trained to make sense of the old-fashioned Task Manager that’s still visible in Windows 10 and other Windows 11 versions (for me that mostly means production version, Build 22000.778). The contrasting yellow shades for data cells are still more recognizable to me.

But, as with all things Windows, changes spur us on to learn and appreciate new things. That’s how I’m going to play the evolution of Task Manager. We’ll probably have side-by-side versions for Windows 10 and 11 for some time anyway, what with Windows 10 EOL not until October 2025.

But Wait, There’s More…

Turns out you can change the default tab for older Task Manager versions, too. The menu fiddling is a bit different though, as shown in the next screencap:

A different sequence of menu picks changes the default view in old Task Manager iterations.

As you can see in the preceding screenshot, click Options → Set default tab → and then any of the items shown (Processes, Performance, App history, Startup, Users, Details, Services) to make your selection. Good stuff!

[Note] Here’s a shout-out to Mauro Huculak at Windows Central, whose July 8 story clued me into this new wrinkle on an old favorite Windows tool. Thanks, Mauro!

Facebooklinkedin
Facebooklinkedin

More WingetUI Interactions

OK, then. I’m using WingetUI as an element of my Windows PC update toolbox. Along the way, I’m finding some areas where it shines, and others where it doesn’t. But as I gain familiarity with this tool, more WingetUI interactions convince me it’s worth using. That said, it’s no silver bullet for Windows updates, either. Let me explain…

After More WingetUI Interactions, Another Status Report

If you look at the lead-in graphic, I can point to elements where WingetUI shines, and those where it doesn’t. It handles most third-party apps perfectly (e.g. 7-Zip, Kindle, SUMo, Python 2, and Spacedesk). Not so for MS components, except for C++ runtime elements. It failed (or I didn’t try based on prior failures) with Edge WebView2, Teams, and the WADK. This is not a huge problem for me.

SUMo also catches the follow items that did not show up on the WingetUI radar: Chrome, Firefox, CrystalDiskInfo, Intel PROSet utility, MyLANViewer, Nitro Pro, Notepad++ (a false positive, IMHO), Snagit and Winaero Tweaker. Thus I must continue to use a collection of tools to get through my entire update roster. But I knew that already.

All’s Well That Ends Well

I was able to use PatchMyPC to handle the routine updates that WingetUI didn’t see. SUMo led me to fix everything except Intel PROSet, Nitro Pro, and Snagit. I got the first and last myself, and skipped Nitro Pro for the moment (though I did find install syntax for the latest version using winget itself, which I’ll try again later…).

[Note added 1 Day later…] Eventually, I jumped to the Nitro Pro download page (Product Updates) to grab and install the latest version (13.67.0.45). That got me completely caught up. What I now can’t understand is why winget will sometimes update Nitro Pro for me, but why I must do it manually at other times. I’m guessing it depends on package prep and info…


Facebooklinkedin
Facebooklinkedin

NetBScanner Blind Spot

I’ve been trying to understand what’s going on with local machine name handling on my LAN this week. Along the way, I’ve found a NetBScanner blind spot in that otherwise excellent NirSoft tool. Here’s the thing: as you can see in the lead-in graphic, NetBScanner does not include the name/address info for the scanning PC in its results. Those appear in the nslookup results in the cmd prompt window below.

What NetBScanner Blind Spot Means

I was quickly able to find another Nirsoft tool that does a complete scan, including the scanning PC — namely FastResolver. But alas, some tinkering with that tool is required to make it show only occupied IP addresses in a target range. That’s shown in the next screencap, which includes the scanning machine in its results:

NetBScanner Blind Spot.FR

Note that the i7Skylake item, IP 192.168.1.63, appears in the list along with all other items that NetBScanner shows above.

One of the most interesting things about using tools properly requires understanding their limitations. I just learned an important limitation for NetBScanner (ditto for FastResolver) in figuring this out.

Other Lessons Learned

I’ve now observed also that it takes the Spectrum router 24 hours to update its LAN entries in its DNS database. That’s entirely consistent with the default timeout of 24 hours for “positive DNS cache” entries. So now I understand that when a machine name won’t resolve to the correct IP address, it’s because DHCP has leased a different IP address to that host sometime in the past day. If I give it time, it will catch up. Good to know!

Facebooklinkedin
Facebooklinkedin

Phone Only App Manages Spectrum Networks

Man! I am NOT a happy camper right now. I just figured out that my DHCP leases have changed, but DNS isn’t tracking same. Thus, my “fixed” correlation between machine name X12Hybrid and 192.168.1.20 is no longer valid. The last digits of the IPv4 have changed. But NSlookup still sees the aforementioned address. And in attempting to troubleshoot the issue, I’ve just learned I can’t login to my router from a PC on my LAN. Because a phone only app manages spectrum networks, I must go through my iPhone.

Why Phone Only App Manages Spectrum Networks Is a Drag

I’m used to getting up close and personal with the Spectrum router through a web-based login. I know that interface, and can use it well. Now I not only have to learn a new interface instead, I must also:

  • run it through a smartphone with a ~3″x6″ display
  • try to figure out how (or perhaps even if) what I already know how to do inside one utility still works in another

It’s frustrating to be FORCED to use a cellphone when I have large screens at my disposal. I’ve shared my sentiments with the Spectrum tech support crew — a nice and genuinely helpful bunch of folks — but it seems to make little difference.

That’s progress, I guess. I can’t say I see this as a step forward. I can approve of using the phone app as an alternative to the old way. I can’t approve of using it as an out-and-out replacement. Sigh.

Facebooklinkedin
Facebooklinkedin

Use NSlookup for Machine Name Checks

Certain recent Dev Channel builds have played intermittent hob with RDP. Thus, for example, I had to switch from using the machine name to its IP address to RDP into one particular PC. In troubleshooting that issue, I quickly realize it makes sense to use NSlookup for machine name checks. Indeed as you can see in the lead-in graphic, when NSlookup resolves that name correctly, RDP will also accept that name to establish a connection.

Why Use NSlookup for Machine Name Checks?

Because it will tell you if RDP can recognize the machine name. Under the hood, both RDP and NSlookup rely on access to local DNS records to resolve the name into an IP address (see lead-in graphic). When the command line works, RDP should also be able to rely on the same underlying service — namely, DNS — to do its thing as well.

Of course, this raises the question as to why my local DNS server — which runs on the boundary device from Spectrum that sits between my LAN and the cable Internet connection — sometimes fails to resolve valid machine names. Feature upgrades can cancel existing IP address leases, and require the DNS cache to be rebuilt. And apparently, recent lightning storms can also mess with that device’s DNS cache when the power fails. So, I’m learning to flush and rebuild that cache as part of local device hygiene.

At least I now know what’s going on and why I must sometimes switch from machine names to IP addresses to access certain devices. Good thing it’s easy to log into and handle the reset over the LAN. It’s always something, right?

Facebooklinkedin
Facebooklinkedin

Author, Editor, Expert Witness