OK, then: I get it. When you run Windows 10 20H2 the OS does something different when Edge is running. Thus, when I say “20H2 alters Alt+Tab experience,” I mean that it goes through all open Edge tabs as you keep repeating that key combination. This is a little disconcerting, but something I guess I can get used to.
Exactly How 20H2 Alters Alt+Tab Experience
Prior to 20H2 if you had three applications open, striking Alt+Tab once would take you from the current application to whichever is next in the Windows sequence of open apps. Strike it again to get the third app, and again to cycle back to the start.
In 20H2, if one of the open apps is Edge, and it has multiple tabs open, things change. When you get to Edge you’ll transition from the first (or currently) open tab, to the next tab in sequence. This continues until you’d cycle back to the first tab you visited in this sequence. Whatever comes up next will be the next app in the Windows sequence, at which point things continue as always.
A Possible Alt+Tab Gotcha?
Mayank Parmar, of Windows Latest, reports that some 20H2 users may find the Alt+Tab sequence disarranged after they upgrade to this new version. He doesn’t say if it applies to upgrades only, or if clean installs qualify as well. Either way, the symptoms are that the order of apps (and tabs) is inconsistent. In addition, stopping the Alt+Tab sequence on App 2 in a 1-2-3-4 sequence may drop the user into App 3, instead of App 2 as users expect it to do.
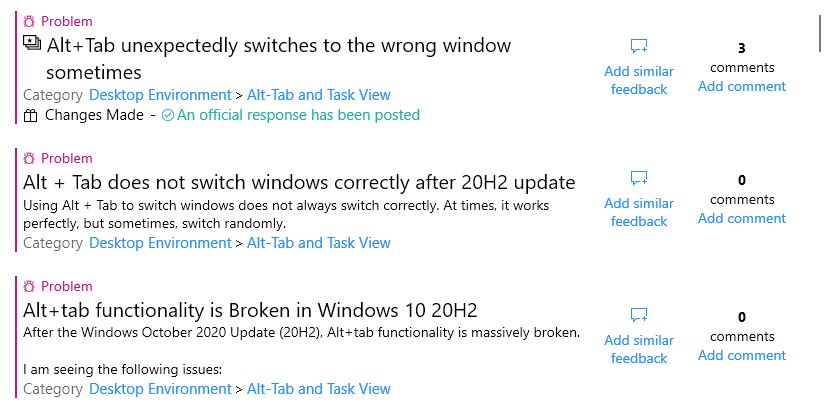
I haven’t been able to replicate this error on any of my 20H2 machines. But if you visit Feedback Hub and search on “Alt+Tab 20H2” you’ll see the top three resulting problem reports all talk their way around this issue. MS claims this has been addressed in Beta and Release Preview channel versions already. It’s not yet clear when that fix will make it to Windows Update, but it should be “coming soon.” Stay tuned, and I’ll let you know when that happens.