Category Archives: PowerShell

Updating WingetUI Brings Follow-On

I have to laugh. When I wrote yesterday about Winget moving up to version 1.4, I should’ve known it would carry items in its wake. Hence my update to the GUI front-end for Winget this morning — namely, the Github project known as WingetUI. I might have guessed, but did not, that updating WingetUI brings follow-on packages in its wake.

Instead I simply fired off the update process for WingetUI this morning, and moved onto another open window. I was happily surfing some traffic at ElevenForum.com when outta nowhere an install window for the Microsoft Visual C++ 2015-2022 Redistributable popped up on my screen. You can see the trace it left behind in “Programs and Features” (dated 1/31/2023) in the screencap above.

If Updating WingetUI Brings Follow-On, Then What?

I guess it makes sense that if Winget is updated, WingetUI should follow suit. I’m not sure if the new C++ Redistributable is a natural consequence of the update, or just a coincidence. But gosh! I’m of the opinion that if one program needs to install other stuff so it can work, it should at least notify you beforehand. Or even, ask permission.

But what do I know? Thus, I was a bit taken aback when the install window for the C++ Redistributable popped up today. It seemed kind of random and unexpected to me. Maybe it’s my fault for covering up the WingetUI install window with something else. Maybe it’s just one of those things that sometimes happens when you update software here in Windows-World. You tell me!

Facebooklinkedin
Facebooklinkedin

Obtaining Winget Version Info

A couple of weeks ago, a new version of Winget popped up on Github. Pretty much since then, I’ve been slowly but surely making sure all 11 of my Windows PCs are running this latest and greatest version (e.g. 1.4.10173). For me that naturally raised the question: How does one go about obtaining Winget version info? That led me back into the MS Learn documentation, about which I’ll now report.

Obtaining Winget Version Info Is Dead Easy

Turns out that winget is just another package, like all the others that the tool can download, install, upgrade, delete and otherwise manage. Thus a simple and basic winget command told me what I wanted to know:

winget –info winget

The lead-in graphic for this story shows this command and its resulting output. Note the first line after the command reads:

Windows Package Manager v1.4.10173

That matches the “Latest” version number at Github, so it’s the most current version around AFAIK (not counting previews). And indeed, I’m pleased to report that using standard winget upgrade commands has ensured that winget is current on all my PCs.

More than One Path to Enlightenment

I also noticed that winget syntax errors will report the version running before conveying its error message info. Thus, omitting the dashes before “info” in the preceding command will also tell you its version number (after which a pageful of syntax guidance follows). I guess you could deliberately mistype a command to produce the version number. But heck, I’d rather do it the right way if I can remember how.

One More Thing: Winget -v

Turns out that Winget -v (or -version) will produce just the info needed in compact readable form. Thanks to Demetrius Nelson (@DenelonMs) for pointing this out to me on Twitter! Why didn’t I think of that… Here ’tis:

Obtaining Winget Version Info.-v option

Hmmm. It doesn’t get any easier than this.
Moral: RTFM (with more care)!

Facebooklinkedin
Facebooklinkedin

Winget Install Technology Hiccup

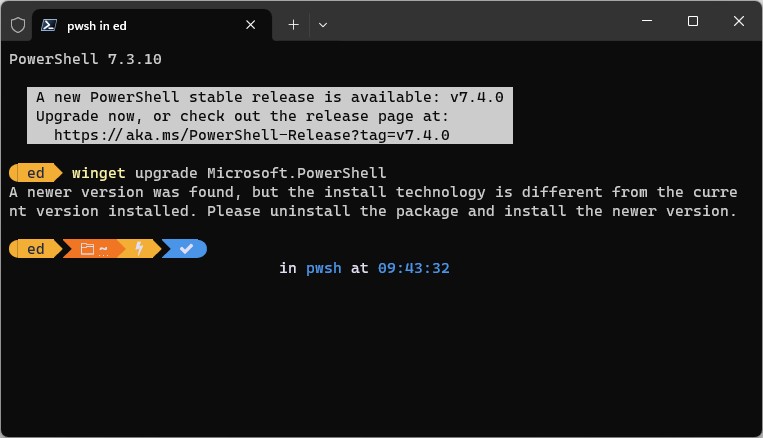
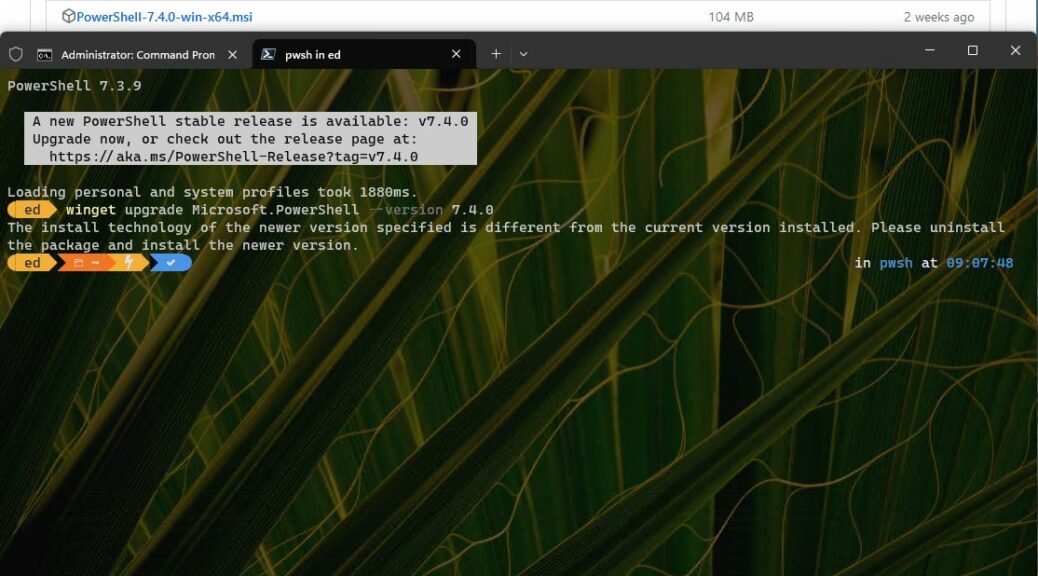
When I ran Winget to check for updates on the Lenovo P16 Workstation yesterday, something interesting happened. As you can see in the lead-in graphic, Winget found 2 packages in need of update. But it installed only one of them upon command. I discovered why when I attempted to force install the missing item. Indeed it produced what I’m calling a Winget install technology hiccup. Let me explain…

Overcoming the Winget Install Technology Hiccup Is Easy

The error message that resulted when I tried to force install RingCentral told me everything I needed to know. It reads:

A newer version was found, but the install technology is different from the current version installed. Please uninstall the package and install the newer version.

So that’s exactly what I did in the next two commands shown–namely:

winget uninstall ringcentral

winget install ringcentral

Luckily for me, the simple name “ringcentral” is sufficient to identify the unique and actual package name (“RingCentral.RingCentral”). Otherwise, I’d have been compelled to use that full, complete nomenclature to pull off the remove/replace maneuver that saw the hiccup overcome. That happens when multiple packages share common nomenclature, and a unique string for the desired package must be fully specified.

In this case, everything was easy-peasey. Just the way I like it: hiccup fixed!

Facebooklinkedin
Facebooklinkedin

Windows 11 Power Options Oddity

OK, here’s one for the “Stranger Things” file. I was checking Power Options on a test laptop yesterday. In fact, it’s one of a pair of nearly identical machines: both are Lenovo ThinkPad X380 Yogas that differ only in SSD brand and OS variant (this one runs Beta Channel, the other one Dev). Yet this machine will show only two power plans under Power Options (see lead-in graphic). The other one shows all default items just as it should, and then some (see below) .

Windows 11 Power Options Oddity.devchannelx380

The Dev Channel X380 lets me view or hide additional plans; the Beta Channel X380 does not. What gives?
[Click image for full-sized view.]

Working Around Windows 11 Power Options Oddity

To attempt to fix the issue, I worked my way through the various — and terrific — Power Options tutorials over at ElevenForum.com. These include the following items:

Of those items, the first put the X380 in a state where I could restore missing power plans. The GUIDs for other plans remained available, but I couldn’t get the utility to offer an “Unhide” option so it would only show two Power Plans at any given moment. That said, having made other Power Plans accessible that workaround proved good enough for me.

Even the Master Remains Baffled

I exchanged a series of private messages with Shawn Brink, fellow WIMVP and a primary operator and tutorial writer at Eleven Forum on this mystery. We ended up concluding that a Lenovo OEM power management driver might be impacting the built-in Power Options control panel widget. I found and installed a new (Nov 29, 2022) Lenovo Power Management Driver for Windows 11.

At first, it made no difference in Power Options behavior. Following a reboot, though, while I still could not unhide other power plans in the initial Power Options pane shown as the lead-in graphic, when I click “Create a power plan,” it now shows all three default items correctly — namely Balanced, Power Saver and High Performance.

Windows 11 Power Options Oddity.partial fix

Here’s progress, of a sort. All the defaults show up when creating a custom plan. [Click image for full-sized view.]

I still have to work around the lack of an unhide capability to access invisible power plans using PowerShell. But at least I can now access and use all  such power plans. This time, close enough is also good enough. Sigh. And that’s how things sometimes go, here in Windows-World.

Note Added January 23

I built an ISO to match the currently running beta image (22623.1180) from UUPDump.net. Then, I performed an in-place repair upgrade. I’d hoped this would fix the Power Options oddities. No dice: apparently, this is among the few problems that a prair install won’t fix. Sigh again.

Facebooklinkedin
Facebooklinkedin

Windows Will Gain Added AI-Based Capabilities

Interesting news from Microsoft at CES recently. This comes thanks to a “guest slot” from Panos Panay in tandem with AMD’s CEO Dr. Lisa Su. It seems that Windows will gain added AI-based capabilities, courtesy of increasing proliferation of AI engines in hardware. (Case in point: cutting-edge AMD Ryzen chips working with added, Azure-based AI engines in the cloud). The initial impact will be to improve user interaction via language models, eyeball tracking, and more.

Here’s what Panay actually said, as quoted at Neowin:

AI is going to reinvent how you do everything on Windows, quite literally. Like these large generative models, think language models, code gen models, image models; these models are so powerful, so delightful, so useful, personal. But they are also very compute intensive, and so we haven’t been able to do this before. We have never seen these intense workloads at this scale before, and they’re right here. It’s gonna need an operating system that blurs the line between cloud and edge, and that’s what we are doing right now.

What Windows Will Gain Added AI-Based Capabilities Means…

This is happening as Microsoft continues doubling down on AI investments and technologies. Its support for the Open AI initiative is ongoing. It announced an Azure Open AI Service on January 17, along with a ChatGPT API for developers (source: Thurrott.com). The joint appearance with AMD at CES underscores the importance of integrating local hardware support and AI workloads in the cloud. Reading between the lines,  that’s how Windows 12 ups the ante for what an OS can be and do for users.

At the same time, this draws another “dividing line” for PC hardware. Indeed, it may very well limit (or restrict) who can use (or make the most of) upcoming Windows 12 capabilities. MS drew a “security line” for hardware capable of upgrading to 11. This may also draw an “AI line” for 12. That should be interesting to watch, and follow as things play out over the next couple of years.

Wishing Upon an AI Star

While MS is building out this AI-based and -integrated future, I’d like to ask them to think about building lots of AI user agents (if they’re not already so engaged). What does this mean?

As users interact with the OS, especially in the context of PowerShell (and related platforms, such as MS Power Apps) I’d like to see MS apply AI technologies to assist and automatically automate use of those tools. This could really help to boost productivity, and guide users and admins to desired results more quickly and easily.

Likewise, MS apps could (and probably should) gain AI user agents to observe how users put their capabilities to work. They can also support simple, basic automation, and provide input and insight on how to use such apps more efficiently and effectively as well.

I see great things coming from AI right now. I see even better things coming from AI in the future, especially as local PCs gain enhanced abilities to handle and coordinate AI workloads in edge computing fashion. This could provide the impetus to move users away from Windows 10 to more modern versions, even if another hardware upgrade is required — but only if the gains provided offset the costs and learning curves involved. Fingers crossed!

I was around for for one “AI wave” in the 1980s that involved Xerox Dolphin machines with LISP processing. I watched two other such waves roll out in the 90s and 00s for various niche markets and applications. Today, it seems like this wave is a tsunami that could change everything. Hopefully, in a good way. We’ll see…

Facebooklinkedin
Facebooklinkedin

Windows 10 OCD Update Stymied

OK then: this morning I decided to check updates on my Windows 10 production desktop. Despite my December 19 contrary prediction, I found over 10 items that needed updates. But I saw my tendency to Windows 10 OCD update stymied by prior experience. Let me explain, first and foremost, that this means I updated what was either necessary or easy. I left the other stuff alone. Deets follow.

How Was Windows 10 OCD Update Stymied?

The list of items in need of update fell into two broad categories:

1. Items with automatic, built-in or easy update capabilities. These included: SUMO, Notepad++ and VS BuildTools (winget handled these automatically). Others included: Audacity, CPU-Z, GPU-Z, Intel ProSet and Zoom (these either include built-in updates, offer direct update links, or are easy to find online — e.g. ProSet).

2. Items I’ve learned not to mess with unnecessarily. These appear in the lead-in graphic above. SUMo likes to point me at versions of ASRock utilities (e.g. APP Shop) that don’t work with my 2016 vintage motherboard. Nitro Pro gets updated all the time, but the maker sends update notifications only when relevant security fixes are added. That’s not the case for going from version 13.67.0.45 to 12.709.2.40.

This gives me a nice delineation between what I can or must update, and what I can safely skip. Should some security issue pop up for Asrock App Shop, I’ll simply uninstall it: I don’t use it much anyway. And if a security fix comes along for Nitro Pro, the maker will notify me to upgrade and send a link.

Case Closed? OCD No More…

I wish I could claim that will never happen to me again. I have fallen prey to “It must be perfect” in the past. It could happen again in the future. I am hopeful that I can now tell the difference between what’s good enough and the perfect. I guess we’ll just have to wait and see.

Facebooklinkedin
Facebooklinkedin

Fixing WADK Upgrade Error 2008

Sometimes, strange things happen when using Winget (the built-in package manager in PowerShell). This morning, I got hit with an error when attempting to upgrade the Windows Assessment and Deployment Kit (aka WADK). This meant fixing WADK upgrade error 2008. Fortunately, I found a helpful GitHub post that explained how to overcome this issue.

Note: the lead-in graphic shows Winget commands to compare local ADK versions (in the list and show sub-commands) to the most current known ADK package (in the search sub-command).

Steps Toward Fixing WADK Upgrade Error 2008

Turns out the tried-and-true technique for fixing the upgrade error works here, too. First: uninstall the current version. Then, download and re-install that version (see this MS Learn article for that link). After that, all should work as it’s supposed to.

What’s interesting is the size and complexity of this environment. The adksetup.exe file is under 2MB in size, but it’s just a bootstrap loader. It brings in and sets up nearly 2GB of tools and supporting infrastructure. It also takes a while (about 5 minutes going and coming) to remove, then replace, that environment.

Once I worked through the maneuver, WADK no longer showed up in Winget. Nor did error 2008 recur, obviously.

When In Doubt, Remove/Replace Works Well

I’ve learned that when Winget gets wonky, there may be reasons connected to the runtime infrastructure at work in your Windows image. Often, the easiest way to clean that up is to remove the troubled package, reboot, then reinstall. This has bailed me out of difficulties on several occasions. That includes this morning’s encounter with the WADK.

If it works for me, it could work for you, too. As long as you have a fresh backup and can easily restore same, why not? I was covered today by my scheduled 9AM image, so I gave it a shot. It worked!

Going On (Brief) Hiatus

Let me take this opportunity to wish one and all the best possible end-of-year holiday. I’ll be silent here until Monday, December 26, as I take a break to spend time with family and friends. For those who celebrate the holiday: Merry Christmas! Otherwise, enjoy the break.

Facebooklinkedin
Facebooklinkedin

Windows 10 Phone Link Eliminated

Dang! After messing about with PowerShell unsuccessfully, I turned to long-time fave 3rd-party tool Revo Uninstaller Free. Seems that Windows 10 doesn’t allow the Phone Link app to be uninstalled anymore. Sadly, the Uninstall option is greyed out in Settings. Likewise, I couldn’t get PowerShell Get-AppxPackage | Remove-AppxPackage to work, either. But if you turn to Revo Uninstaller, it delivers the goods: Windows 10 Phone Link eliminated.

Why I Want Windows 10 Phone Link Eliminated

Two reasons:

1. Phone Link only works with Android phones and I have iOS. Don’t use it, ever.
2. Update failed, then app “stopped working, around recent Store revisions.

If I can’t use an app AND it causes errors, I don’t need it. Thus, I want it gone!

Look at the lead-in graphic. I’ve put a red box around the listing item for the Phone Link app on my Windows 10 production desktop. Right-click on that item, and the first menu option is “Uninstall.” Pick that. Revo asks you to confirm that choice, as follows:

Windows 10 Phone Link Eliminated.confirm

Alas, PS does NOT show the command details it uses to pull this off. Sigh.

Revo Unsintaller works some PowerShell magic around the following text I copied:

Deployment operation progress: Microsoft.YourPhone_1.22092.211.0_x64__8wekyb3d8bbwe

After removing the app, I used the Revo Uninstaller Scan functions to remove all leftovers from the Registry. It no longer shows up on my Windows 10 PCs — all both of them. I will be on the lookout for reappearances after CUs and feature upgrades, based on what I read online about how Phone Link keeps showing back up.

When it comes to “Windows pest removal” sometimes, repeated treatments may be required. LOL!

Facebooklinkedin
Facebooklinkedin

Repair Upgrades PowerShell

Here’s something I didn’t know before. Or at least, I never tried it. Just recently (November 8) MS released a new 7.3.0 version of PowerShell to GitHub. I’ve been upgrading my various systems since, slowly but surely. This morning I learned that opting for Repair upgrades PowerShell. Let me show you what that means.

Showing How Repair Upgrades PowerShell

On some PCs, winget upgrade may not show the new PowerShell as an option. (I’ll use my Lenovo Yoga 7i as an illustration because it manifests such behavior.) You can see it’s running version 7.2.7 and that PowerShell does not show up in the output from winget upgrade below:


If that’s the case, here are the steps to using repair to upgrade PowerShell on such PCs:

1. CTRL-Click on the link that reads https://aka.ms/powershell. This opens the MS PowerShell Documentation page.
2. Click on the “Download PowerShell” button at the upper right. This takes you to the GitHub Latest release page for PowerShell (7.3.0, as I write this, but updated as new versions emerge). Then close all open PowerShell sessions.
3. Scroll down to assets and download the installer file for your PC (for most readers the 64-bit MSI is the right choice: PowerShell-7.3.0-win-x64.msi)
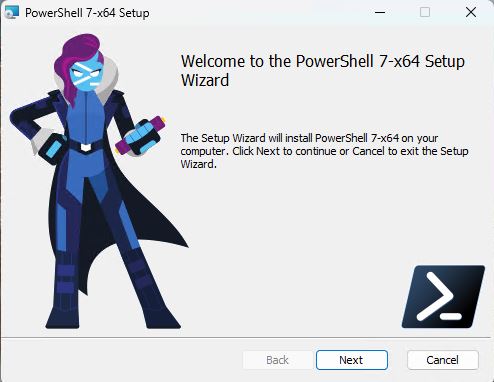
4. Run the microsoft self-installing (MSI) file to start PowerShell installation. Step through all the installer prompts. If the Repair option comes up, select it (shown in the lead-in graphic for this story). It will run and “fix” the current installation.

At the end of this process, you’ll have a working upgrade to version 7.3.0. Cheers!

What About Winget Upgrade Microsoft.Powershell?

Gosh! That works too but finishes strange. Let me show you, in the following screencap (click on image to view full-sized):

The output doesn’t actually confirm a successful install of PowerShell 3.7.0. It shows a progress bar, and a status of “Starting package install…” Then it transitions to a command prompt. In the background, the new version is installed and running. But because you’ve got a 7.2.7 window open, you don’t see the 7.3.0 label until you close the old window and open a new one.

It’s always something, right?

Facebooklinkedin
Facebooklinkedin

Further Kindle Update Follies

Yesterday I worked through my blog post from earlier in the week on yet another PC. As it happens, the initial step — using winget to uninstall the outdated Kindle version — was highly fortuitous. Even though the subsequent winget install Amazon.Kindle brought in the wrong version (because of the package definition), removing the old version is a good way to start the upgrade process. In my further Kindle Update follies follow-up, not uninstalling left the old version behind alongside the new. Wait! It gets even more interesting…

What Happened with Further Kindle Update Follies?

When I found I had two side-by-side versions, I ran Revo Uninstall to try to take out the old one. That left me with no Kindle at all (even though I didn’t do the post uninstall cleanup that Revo does itself). So, I got to install the correct version again. That worked!

Here’s my new recipe for manual Kindle updates.

  1. Grab the latest version from the Kindle download page.
  2. Run winget uninstall Amazon.Kindle in an admin PowerShell (or Windows Terminal) session
  3. Run the downloaded Kindle installer (as I write this, that filename is KindleForPC-installer-1.39.65323.exe, but that will change)

One more thing: before you follow this recipe, try opening the Kindle app. Sometimes — and I stress this word, “sometimes” — it will actually update itself as part of its launch process. Because I haven’t been able to figure out why it works sometimes and not others, the recipe serves as a follow-up should it not auto-update itself.

This is kind of whacko. I repeat an earlier plea to the Amazon developers: please add an update function to the Kindle for PC software. Or, have the installer clean up the old version after it brings in the new one. It’s just too tricky to find and manage updates for ordinary users right now. IMO, that definitely needs fixing …

Note Added November 7

I’ve been working through updates on a bunch of PCs today. Many (most) have needed a Kindle update. I can now conclusively confirm that my foregoing recipe works to update Kindle without apparent issues. Consider it a validation, of sorts…

Facebooklinkedin
Facebooklinkedin