Category Archives: EdFiles

{WED} Updating Realtek UAD Audio Drivers

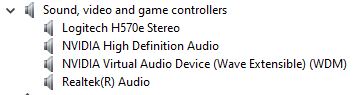
I’ve learned the hard way that working with Realtek Universal Audio Driver (UAD) drivers can be interesting. I’ve accidentally switched back from the “Realtek(R) Audio” drivers shown in first screencap for this story to the Realtek HD Audio drivers more than once. But alas, only the “Realtek (R) Audio” drivers work with the Realtek Audio Console UWP app (see next image following). That’s why I wrote today’s post on the topic of updating Realtek UAD Audio Drivers. There are several steps involved, and a couple of (usually reliable) sources to which I turn for driver downloads. Read on for those details please!

Updating Realtek UAD Audio Drivers.realtek-audio

The name of the driver says nothing about UAD. You must simply recognize that the name “Realtek (R) Audio” signifies that a UAD driver is present and running.

Updating Realtek UAD Audio Drivers.console

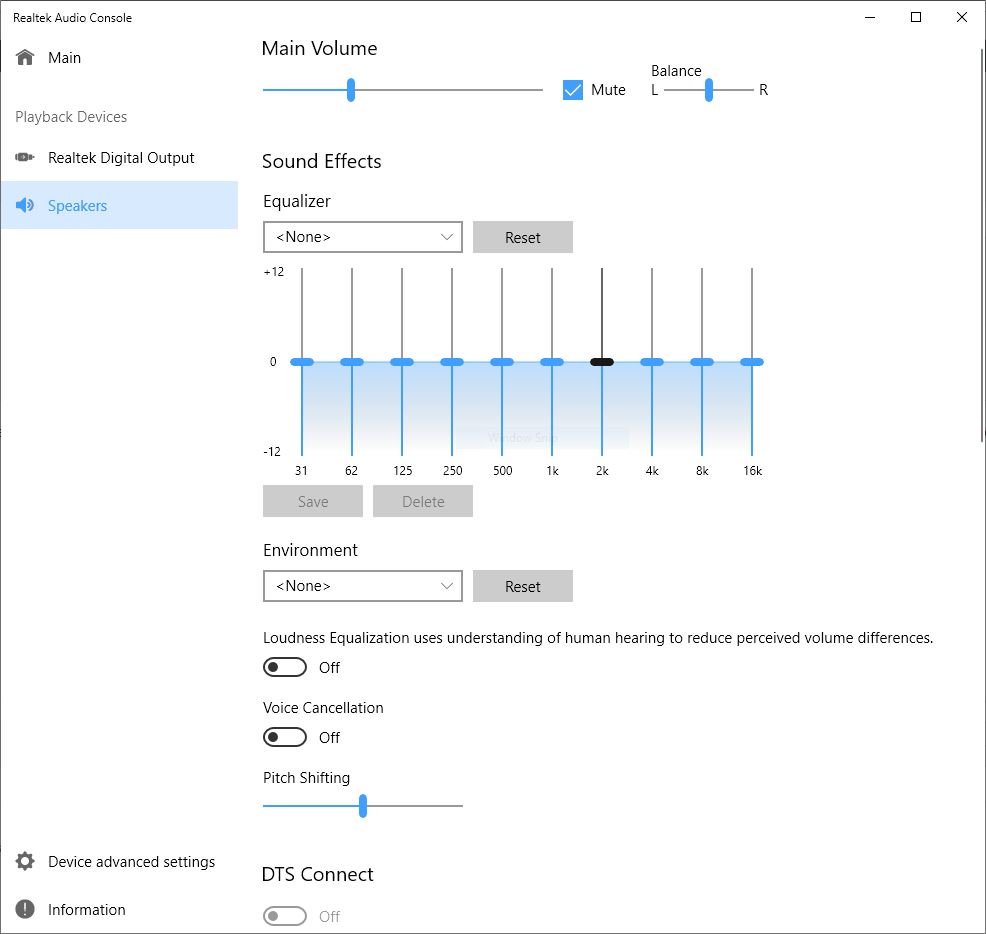
Simply put, one MUST install the UAD (Realtek(R)) driver to use this UWP app.
[Click image for full-sized view.]

Updating Realtek UAD Audio Drivers 1: The UAD Driver Itself

I use the excellent French Station-Drivers website to grab my UAD drivers. There, Realtek Audio gets its own landing page. It’s still a bit of a slog to get to the right driver from there. I’ll explain this as a sequence of steps for my particular motherboard, which comes from Asrock:

1. Click on Realtek High Definition Audio (HDA/UAD)

2. Click on Drivers (UAD).

3. Click on the name of your motherboard (or system) maker. (In my case, that’s Asrock.)

4. Examine the listings to find the highest-numbered drivers version (at bottom of list; in my case, that’s 8890.1).

5. Click on that version link, then click “Download” on the resulting web page.

This will grab a ZIP file that you can use to unpack and install the driver. Personally, I prefer to right-click the driver inside Device Manager, and point the “Update driver” option at the folder location where I unzipped the download file contents. Why? Because the Realtek installer requires not one, but two (2!), reboots to do its thing. I can use my right-click technique to update the driver without rebooting at all. Do what you like best on your PC(s), though.

Updating Realtek UAD Drivers 2: The Software Components

If you open the category in Device Manager named Software Components, you should see something like the next screencap, which shows three (3) additional Realtek software components. You can update the first two of these three items. I grab them from DriverHub, by searching for them by name. That is, I search on “Realtek Audio Effects Component” and “Realtek Audio Universal Service” and download the corresponding ZIP files. Right-clicking those drivers in Device Manager, to point the driver update function at the contents of those ZIP files works fine to update them, too.

Updating Realtek UAD Audio Drivers.sw-comp

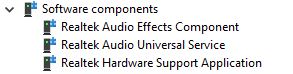
Only the first two of these three drivers get updates, for whatever reason. Thus, that’s all you need look for.

I do this once every six months or so, unless I see a news or other online info item (perhaps at TenForums, which I visit more or less daily) to tell me an update is available sooner. And that’s how I keep my Realtek UAD audio driver and supporting items up-to-date!

Facebooklinkedin
Facebooklinkedin

{WED} Older Lenovos Need Utility Clean-up

Poking around on my two old Lenovo laptops today, I noticed several of their vendor-supplied utilities are passe. Indeed, now that Lenovo offers its Vantage UWP caretaker app, many older ThinkVantage tools are obsolete. That’s why I assert that older Lenovos need utility clean-up. Lenovo itself will happily let you download and install Vantage on any of its PCs. But it doesn’t automatically remove the older stuff when you do. In fact, if you check information pages at Lenovo (URLs below) for the following items, you’ll see what I mean:

+ (HT501246) Lenovo Quick Optimizer

+ (PD022501) Lenovo Solution Center

+ (DS105970) Lenovo System Interface Foundation

+ (DS012808) Lenovo System Update

+ Thinkpad Settings Dependency

+ ThinkVantage Fingerprint Software*

Note: all of the preceding items, except for the last one, can be safely uninstalled. Happily, the Lenovo Vantage UWP app supersedes all of them (except for the Fingerprint software, which must be at version 6.0 or higher for Windows 10 users). Likewise, do NOT uninstall Lenovo Service Bridge: it remains necessary to report your Lenovo PC’s serial and model number info back to the Lenovo servers.

Older Lenovos Need Utility Clean-up.SolutionCenter

The old-fangled Solution Center and its various brethren are all now longer under developer support. Most of them can go.
[Click image for full-sized view.]

Why Do Older Lenovos Need Utility Clean-up?

Good question! Apparently, Lenovo left it to device owners to root out these older items (except for the Fingerprint Software, which you must keep if you have an older fingerprint reader and want to keep using it). Methinks they should’ve offered a clean-up utility. Better yet, the Lenovo Vantage installer should look for these passe items and offer to uninstall them as part of its install process. I’ll be communicating this back to Lenovo, in hope that they might listen to — and possibly even heed — this plea. We’ll see.

What About Newer Lenovos? Do They Need Clean-up, too?

I checked my newer Lenovos, of which I have four: two 2018-vintage X380 Yogas, 1 2018 vintage X1 Extreme, and 1 2019 vintage X390 Yoga. All had the older System Update utility installed, except for the 2019 X390 Yoga. Consequently, I did a bit of clean-up on those newer laptops, too. All’s well now, though.


Facebooklinkedin
Facebooklinkedin

{WED} Some Errors Need Fixing; Others Are Hiccups

From time to time I check in the Reliability Monitor on my Windows 10 PCs. It gives me an excellent sense of PC health, and points me at causes when errors occur. Take my compact road laptop as an example: it’s a 2018 Lenovo X380 Yoga with an i7-8650U CPU, 16 GB RAM, and a 1 TB NVMe SSD. An entirely capable, reasonably fast, and incredibly stable machine. I was surprised recently, in fact, to see a driver error show up on that machine. As you can see in the screencap that follows, the faulting item is the igfxEM Module. That is the name that Intel gives to the software that drives the Intel UHD Graphics 620 built into the CPU chip itself. Upon seeing this error, I was reminded that some errors need fixing; others are hiccups. I soon learned that this one was an apparent hiccup.

Some Errors Need Fixing; Others Are Hiccups.devmgr

When some that starts with “igfx” pops up, I know it refers to “Intel graphics,” that being the company’s standard abbreviation.
[Click image for full-sized view.]

Deciding on Some Errors Need Fixing; Others Are Hiccups

Windows update didn’t think I needed a new Intel graphics driver. Nor did the new UWP app named Intel Driver & Support Assistant. Ditto for the Lenovo Vantage UWP app, which does a pretty good job of keeping up with drivers, too. Thus, there’s no new driver to replace the offending item.

But because it happened exactly once and hasn’t recurred in the past two weeks, I’m convinced this particular error represents a hiccup rather than an ongoing problem in need of fixing. So I’ve concluded that there’s nothing further to do here — except, as always, to keep an occasional eye on Reliability Monitor. It’ll let me know if and when the situation changes.

Some Errors Need Fixing; Others Are Hiccups.intel-d&sa

Intel’s new Driver & Support Assistant works inside a web browser and seems faster and more capable than it’s application predecessor.

SideNote: Running Reliability Monitor

Once upon a time, I could type “reli” into the search box in the Start menu, and the Reliability Monitor would run. No more, not since 1809 or thereabouts. Now, I type “perfmon /rel” into the search box instead. That still works. Or, if you prefer, try “reliability” spelled all the way out. That should produce the “View reliability history” control panel item. The long way around is to click Control Panel → Security & Maintenance → Maintenance → View reliability history. I wish my old method still worked: typing four chars beats typing 12. But that’s the way things go sometimes, here in Windows-World!

Facebooklinkedin
Facebooklinkedin

{WED} Future Win10 Driver Updates All Optional

Here’s an interesting tidbit from the MS Hardware Dev Center, posted February 18. It comes from Senior Program Manager Kevin Tremblay who focuses on Windows OneCore (OS kernel, methinks) and “device enablement” (LinkedIn Profile). Going forward, device driver updates for Windows 10 will always show up in Windows Update as “Optional updates.” Because future Win10 updates all optional now, that means users must initiate such updates manually. In fact, working through the process means:

1. Clicking Optional Updates

2. Checking boxes next to one or more available device driver updates

3. Clicking a “Download and install” button on the Optional updates page to initiate (and approve) those activities.

Here’s what a sample Drive updates window looks like, showing the checkboxes and the “Download and install” button. I’ve already made use of this feature myself on Fast Ring Insider Preview test machines, and can confirm it works as it’s supposed to from personal experience.

Future Win10 Driver Updates All Optional.example

Going forward, Win10 users will have to acquiese and participate actively, before WU will install device drivers on their PCs.
[Click image for full-sized view.]

If Future Win10 Driver Updates All Optional, Then What?

Previous Win10 feature updates have come in for qvetching, criticism, and occasional cries of anguish because of updates installed automatically. They could show up, without prior warning for users. This denies them the opportunity to refuse, or to take preventive measures (a backup image to restore should something go sideways, for example). As far as device drivers go, this is now off the table. Good on Microsoft, for making this change. Because drivers are a perennial and predictable source for post-update instability, this new approach provides a way to avoid trouble, rather than having to clean up a post-update mess. But wait? Isn’t this the way things worked in Windows 7 and 8.x versions. What was once old, is now new again, it seems. A welcome bit of news nevertheless!

Facebooklinkedin
Facebooklinkedin

{WED} Temperamental Dual mSATA SSD Cleaned Up

A few years back, I found myself with some extra mSATA Samsung EVO 250 SSDs on my hands. I purchased two Syba 2.5″ SATA 6G/USB 3.0 to Dual mSATA RAID (SD-ADA40107) adapter cards. I paid about $40 each (they cost $26 now). One of them has been terribly temperamental. Over time its plugged-in SSDs become unreadable. Seems like setting the card down on a conducting surface causes the drives to go bye-bye.  (I don’t have it in a case, as I undoubtedly should.) This happened before on my Surface Pro 3, which sits on a set of (metal) baker’s racks. And today, when I tried to back up my Lenovo X380 Yoga Fast Ring test machine, its drives were once again MIA. Thus, I found myself with a temperamental Dual mSATA SSD cleaned up. Good thing I only keep throwaway data and backups on those drives. Fortunately, I didn’t lose anything I couldn’t recover from.

Temperamental Dual mSATA SSD Cleaned Up.device

I’m guessing that the SSD devices somehow conduct to the rails on the case, and cause the drives to short out if grounded. Sigh.

How Temperamental Dual mSATA SSD Cleaned Up Happened

When I tried to access the devices I got a warning message that they were inaccessible. (I have them set up as JBOD, not RAID, so they show up as Drives E: and F:.) Having seen this before, I attempted repairs using MiniTool Partition Wizard 11. Alas, it couldn’t find anything to recover. So I went into DISKPART and ran a CLEAN operation on each of those drives. Then, I reformatted them as MBR devices using NTFS. They definitely ran faster after the clean-up: Macrium Reflect reports read speeds of 3.6 Gbps and write speeds of 2.6 Gbps for the most recent (and only) backup on the device now. (Of course, this is an artefact of the compression the program uses when accessing the drive: actual throughput isn’t really that fast, either coming or going.)

The funny thing is, I’ve got another one of those cards plugged into a drive caddy where it’s safe from accidental grounding. I’ve never had a problem with that one. So maybe — just maybe — it’s time for me to buy a 2.5″ case (which form factor the card matches exactly). Then, I can  take care of the problem once and for all. But at least I got a refresher on DISKPART out of the deal, and the backups are now running lickety-split. (Elapsed time for the last one was 05:30 for a total of 28 GB of disk space consumed.) That’s the way things go here in Windows-World sometimes, where even backups need occasional backups. Would that I could so easily cure my tendency toward operator error!

Facebooklinkedin
Facebooklinkedin

PCs Now Eight Ninths Patched for Spectre Meltdown

OK, my long and sometimes odd adventures with Spectre and Meltdown patches are finally concluded. Eight of the nine systems here at Chez Tittel are now patched. That’s as far as I think I’ll ever get because my wife’s PC is built around a Jetway NF9G-QM77 mini-ITX motherboard. Its most current BIOS update is September 2017 from a company for which no word on Spectre/Meltdown updates is available. Thus, for my PCs now eight ninths patched for Spectre Meltdown is as far as I’ll get. It’s been a wild ride. I’d like to document it just a tad to explain what others should be going through, too. Or what they should expect to go through soon.

PCs Now Eight Ninths Patched for Spectre Meltdown

Steve Gibson’s Inspectre utility finally gives the T520 and its Sandy Bridge CPU a clean (but slow) bill of health.

Getting to PCs Now Seven Eighths Patched for Spectre Meltdown

It all started as we got back from our end-of-year skiing/snowboarding holiday just after New Year’s. Word on these vulnerabilities emerged as soon as January 2. But I didn’t find out until I returned to my desk on January 5. After driving back from the northeastern part of Colorado, I wasn’t ready to deal with a major security flaw. But there it was, and we all had to deal with it. It soon became apparent that Meltdown and Spectre Variant 1 could be handled via OS-level patching (all complete now, thank goodness). However, Spectre v2 required a firmware patch. Or, as it turned out, a series of firmware patches. That’s because the first set for Haswell and Broadwell patches caused as many problems as they were supposed to solve.

The Timeline from Discovery to (Mostly) Mitigated

Here’s a rough timeline for how things unfolded for my PCs, as far as those firmware updates went:

January 2018
Surface Pro 3 gets a firmware patch 2nd week (1 of 8)
Dell Venue Pro 11 gets a firmware patch late 2nd week (2 of 8)
On 1/15 Intel advises against applying firmware patches
February 2018
Not much happens with firmware patches
March 2018
Microsoft issues firmware patch for Skylake, Coffee Lake, Kaby Lake 3/8 (3 of 8)
Dell XPS27 (Haswell) gets a firmware patch 2nd week (4 of 8)
Asrock issues firmware updates for Haswell, Skylake, Coffee Lake, Kaby Lake 3/15 (5&6)
Lenovo issues firmware updates for Haswell, Ivy Bridge and Sandy Bridge  3/15 (7&8)

Hiccups and Lessons Learned

I have an issue with the Dell Venue Pro following its first semi-successful BIOS/UEFI update. It closed the Spectre v2 vulnerability but left the machine unable to reboot normally.  I must pop the battery out and remove the power cord before the unit will boot after a shutdown or restart. Thus, I can’t apply the latest update to the UEFI. Among other things, it is supposed to address that very problem. I’m going to have to find and run a flash utility that works from an alternate boot.

That’s what I did with the two Lenovo laptops. Their Lenovo Windows Flash utility works only in Windows XP, Vista, 7 and 8. But I’m running Win10  on those machines. Fortunately, Lenovo also makes the update available in ISO form. It boots to alternate (optical) media and flashes the BIOS from DOS. Even though the Windows utility crashed my Win10 laptops, I eventually booted into DOS to flash them anyway. Along the way, I had to remember to reset boot to support both Legacy and UEFI modes. That’s because DOS is so old, it boots only in legacy mode. On the T520 that was how the machine was set; the X220 Tablet was “UEFI only.” I couldn’t boot to the optical disk until I made that change. Sigh.

One of the Asrock motherboards (Z170 Extreme 7+) delivered the update in a Windows-based flash executable. It was easy to apply. The other, a Z97 Killer Fatal1ty, required using the Instant Flash tool within UEFI. I had to format a USB flash drive to FAT32, unpack the ZIP file to that device, then run the tool from UEFI to apply that update. Took a while, but worked just fine.

No Hiccups Are Nice, Too!

Except for the issue with the Dell Venue Pro and the second UEFI/BIOS update, the Dells and the Surface were by far the easiest to deal with. The Dell Support utility checked for the updates, grabbed them as they became available, and applied them with zero muss and fuss. Ditto for the Surface Pro 3

All in all, while it took longer than I think any of us expected it to, the overall process wasn’t too horrible. Let’s hope this kind of thing doesn’t become too routine, either!


Facebooklinkedin
Facebooklinkedin

Bypass Adblock Detection Gains Importance

Ok, then. I patrol a large number of websites daily looking for blog fodder and article topics. Many of those sites are ad-financed. Of those, some won’t show themselves in browsers with adblockers turned on. They use a technology called “Adblock Detection” to determine when browsers are blocking ads. If an adblocker is detected they take “corrective measures” to induce visitors to turn ads back on. Of course, I — and many other users — would rather not do this. Thus, we seek out countermeasures. In this case, that means figuring out how to bypass or circumvent adblock detection. And of course, that’s why I entitled this post bypass Adbock Detection gains importance.

Why and How Bypass Adblock Detection Gains Importance

If you visit WindowsCentral.com in a browser with an adblocker turned on you’ll see a message like this, instead of the website’s actual content.

Admiral’s adblock detector keeps adding annoying wrinkles.
[Click image to see full-sized view]

In the past week or so, Admiral has added a new wrinkle to its adblock detector. Previously, one could simply click the “Close” item on the adblock detection notice. Then, it would go away and leave you alone. Now, you can do this and browse for up to 30 seconds (or until you transition to another page on the site). When the timer goes off, or when you open a new page on the same site, you’re presented with the same display. After three or four repetitions, this becomes intolerable. I’d more or less decided to avoid those sites until I realized the dictum in my next heading must hold in this situation, too.

Where’s There’s a Will, There’s a Workaround

Once you learn the terminology — that is, adblock detection and the need for a bypass — there is no shortage of information and advice on how to get around this despicable (but all-too-understandable) behavior. My favorite nostrum for this problem comes from TechJunkie.com (itself, ironically enough, an ad-financed website). I like their solution because it involves very little effort on my part. It does, however, require using Firefox to make this as simple as possible. One need only click File → New Private Window inside Firefox, then surf to the site of one’s choosing from inside that window. The same Admiral window pops up once, but stays quiet when closed after that. Works like a charm.

Other adblock detection bypass techniques get more interesting. You can use Google cache to interact with a snapshot of the site instead of a live, interactive version. You can use the Wayback Machine in similar fashion, and interact with a different snapshot. There are also scripts from Greasemonkey or Tampermonkey to kill the scripts that invoke the site’s adblock detection and response behaviors. Guiding Tech also suggests disabling JavaScript for offending sites. For me, all of these involve too much poking around in the browser GUI. I’m best-served by a hands-off technique myself, so I’m using Firefox for those sites going forward — at least for now, until the adblock detectors add another wrinkle. Then, I’ll find another workaround or countermeasure, as the game of cops and robbers goes on!

Facebooklinkedin
Facebooklinkedin

Oh my! AOMEI OneKey Recovery Gets Interesting

I’ve been working with and learning about recovery partitions on Windows boot/system disks lately. My explorations led me to a decent but flawed tool that does some nice things for Windows OS recovery. It’s called AOMEI OneKey Recovery, and it’s available in both free and commercial versions. In theory, installing this program is easy. You must make space on your system/boot drive. Then, AOMEI OneKey Recovery adds partitions to that disk for boot-up and repair. As a bonus, its recovery partition incorporates a backup of your Windows OS partition. But in practice, AOMEI OneKey Recovery gets interesting. It’s particularly so when it comes to sizing the disk space that the program needs for its partitions. Here’s what the nominal 256 GB SSD drive on my Dell Venue Pro 11 7130 looked like when the program finished its work:

AOMEI OneKey Recovery Gets Interesting

Alas, considerable trial and error was required to properly size the F: partition I had to give AOMEI OneKey Recovery to work with.

Lack of Sizing Data Means AOMEI OneKey Recovery Gets Interesting Indeed!

To begin with, the program provides no guidance on how to size the partition from which it will create its partitions. These are labeled AOMEI and AOMEI Recovery Partition in the preceding screen capture from the Disk Management utility. I started small (at around 2 GB), and went through too many muffed attempts last night. I got increasingly vexed as I kept upping the size of the F: partition that OneKey Recovery used for the AOMEI partitions shown. For each try, I had to use MiniTool Partition Wizard to reduce the size of the C: partition. Then I used that space to expand the F: partition. Things didn’t work until the F: partition hit 44 GB in size. Finally, it created the disk layout depicted in the preceding graphic.

The problem was, resizing the C: partition requires a reboot to do its thing. For each attempt, I used MiniTool Partition Wizard to shrink the C: partition. Then I could grow the F: partition by the same amount. Each iteration took 3-4 minutes to complete because of the time involved in shifting partition boundaries and waiting for the reboot to complete. By the time I’d done this five times I was ready to spit nails. Surely AOMEI could expend the programming effort necessary to analyze the files on the C: partition and estimate the partition size needed to accommodate them? I would have been much happier with my experience in using the software if I didn’t have to keep repeating my attempts to set up those pesky partitions.

It’s Not All Tar and Feathers, However…

To give credit where it’s due, AOMEI OneKey Recovery was reasonably well-behaved aside from the lack or partition sizing information or guidance. It added itself nicely to my Boot Configuration Database (BCD data) on the Dell Venue Pro 11. Better yet, it didn’t mess with the Macrium Recovery Partition already installed on that drive. In testing of its onekey functionality, it worked quite nicely. The program offered to restore my backed-up runtime environment to the C: partition without a hitch. It took about 10 minutes to create the two partitions shown. Thus, I’m guessing it would take about the same amount of time to restore the contents of its Recovery Partition to C:, should that become necessary. I’ll try it out this weekend, when I have some spare time to devote to that task. I’ll follow up with an update then.

On balance I think this is a good tool for a free program. But because it does require resizing of the C: partition to create the space needed for its partitions, a commercial partition manager is needed to put it to work. Not coincidentally AOMEI makes one of those, too. But I prefer MiniTool Partition Wizard, mostly because I already know and understand how to use that program.

Facebooklinkedin
Facebooklinkedin

Impatience Imperils Progress on 15014 Upgrade

As I was finishing up my day in the office yesterday I made a last pass through TenForums.com. I noticed there that Insider Preview Build 15014 was out. But, alas, I failed to read the covering blog post. Had I done so, I could’ve saved myself some wasted time and effort. Turn out that the progress bar for downloading the latest Upgrade is broken. So when I started updating and didn’t see any progress on my desktop test machine, I immediately presumed “Another issue with WU.” This led to evasive action that ultimately forced me to restore a backup and then reapply the upgrade (successfully) later on. And that’s how I found myself able to observe that impatience imperils progress on 15014 upgrade maneuvers, as noted in this blog post’s title.

You could understand this self-inflicted problem as an “RTFM error,” if you like. But it actually helped me in a couple of interesting and unexpected ways. For one thing, I found myself dealing with the dreaded “black screen of death” on Windows 10. It’s something I’ve read about a lot, but haven’t troubleshot too often. First, I tried to see if the OS was available enough in the background without a working display to launch Task Manager. That meant entering Ctrl-Alt-Esc at the keyboard, then striking Alt-F to open the File Menu. An “R” launches the Run box, which one can use for a variety of tasks. I tried re-launching Windows Explorer, then a shutdown command. Nothing doing. My machine was pretty hosed, it seemed.

Impatience Imperils Progress on 15014 Upgrade

Eventually I did reach my ultimate goal: getting 15014 installed.

Getting Past the Won’t Boot Hurdle

Next, I turned to my old reliable backup program, Macrium Reflect Free. It thoughtfully installs its console as a boot option on the Windows OS boot screen, so I happily fired it off. Inside the Macrium-based Recovery Environment it provides, I found my way to an image of the wonky disk I’d made on January 13. It took just a few mouse clicks to get the restore operation going, and about 10 minutes to complete the job. After that, the machine booted immediately so I could start all over again.

This time, armed with the right information, I let Windows Update chug away to do its thing. This process took around 25 minutes to complete, but the upgrade was entirely successful. Here’s what I learned from this experience:

  • Reading the release notes for a new Insider Build is highly advisable if not downright mandatory
  • Once you’ve started an upgrade, give it plenty of time to run to completion
  • Always keep a current backup available when performing major system changes (like an OS upgrade)
  • If an upgrade fails, be ready to restore that backup and start over, or try again

I did fine on the second two items in the list (I’d learned them the hard way a long time ago). But I’ll have to do better on the first two going forward so I don’t get caught unaware. That’s modern life in Insider Preview land! I don’t want to have to rewrite “Impatience Imperils Progress on 15014 Upgrade” for some other build number, too.


Facebooklinkedin
Facebooklinkedin

Interesting USB Access Issue on Fujitsu Q704 Worked Around

I’m still breaking in — or rather, getting to know in depth — my latest Windows 8.1 tablet. Somewhat annoyingly, the Fujitsu Q704 stops “seeing” a USB flash drive (UFD for short)  plugged into the keyboard dock once the machine has been idle for half an hour or longer. Continue reading Interesting USB Access Issue on Fujitsu Q704 Worked Around

Facebooklinkedin
Facebooklinkedin