Category Archives: Cool Tools

ASUS Snapdragon Shows Odd Boot Anomaly

Here is a puzzle that took me longer than I care to admit to fully unpack. I built a recovery USB — clean DISM export, proper bootloader, everything by the book — set it first in the UEFI boot order, and rebooted an ASUS A14 Zenbook expecting to land in a familiar Windows Recovery Environment. Instead, I got the ASUS recovery stub. Every single time. I moved the USB higher in the boot order. I tried the firmware boot menu. I watched the machine apparently select the USB and then, silently and without apology, drop me into ASUS’s own mini-recovery UI anyway. The drive was not defective. The boot order was correct. The machine just did not care. This is my reason for saying: ASUS Snapdragon shows odd boot anomaly.

Getting Past ASUS Snapdragon Shows Odd Boot Anomaly

What I kept landing in was not Microsoft’s WinRE. It was ASUS’s recovery stub from firmware. It’s a minimal launcher, typically just a few hundred megabytes, that presents three or four tiles: Reset this PC, ASUS Recovery, and Advanced options. It looks vaguely like WinRE. It shares some ancestry with winre.wim. But it is ASUS’s gatekeeper, not Microsoft’s recovery environment, and it exists specifically to intercept the boot process before you can get anywhere else.

Here is the mechanism. ASUS, like most Tier-1 OEMs, configures its UEFI firmware with a hardcoded recovery boot path that fires during the BDS (Boot Device Selection) phase. It hits before the standard UEFI boot manager even looks at the user’s boot order. The firmware scans the internal NVMe for a partition stamped with a specific GPT partition type GUID — not the ordinary Microsoft Basic Data GUID, but a dedicated Recovery GUID or a custom OEM namespace. When it finds that partition, it hands control to the stub immediately. Your carefully ordered boot menu is consulted afterward, if at all. The USB was never really in the running.

Secure Boot adds a second layer of obstruction. Let’s say your hand-built USB carries an unsigned or self-signed bootloader (common with DISM-assembled media not signed against Microsoft’s KEK). Then,  the firmware rejects it silently and falls through to the next trusted entry in its internal list. That entry is the ASUS stub. So even when the BDS phase does get as far as examining external media, an unsigned USB is invisible. The machine looks like it’s ignoring you. It is, technically, but for a specific cryptographic reason (yes, really).

The WIM Recompression Tax

Once you understand why your DIY USB is being locked out, it helps to understand what the OEM actually ships in its place. It also explains why making a genuine ASUS recovery drive takes the better part of an hour. It starts with WIM compression. Microsoft’s stock winre.wim uses LZX compression and typically lands somewhere between 500 MB and 1 GB on disk. Manageable. Sensible. But ASUS’s customised image, once you add the recovery launcher, platform drivers, UI payloads, and potentially a full factory image, can balloon to several gigabytes of uncompressed data before anyone has touched the compression knob.

When you kick off the “Create ASUS Recovery Drive” process in MyASUS, what actually happens under the hood is a DISM /Export-Image /Compress:max operation (or its functional equivalent)  applied to an enormous source WIM. Maximum LZX compression, and on newer builds you may even see solid-block LZMS compression, which squeezes harder but runs even slower.

Here’s the critical detail: WIM compression in DISM is largely single-threaded. It reads every file, applies the compression algorithm, writes the output, and verifies integrity as it goes, all on one logical core (yes, really). On an otherwise fast NVMe-equipped laptop, that process still takes 40 to 55 minutes, not because the machine is slow, but because the algorithm is doing an enormous amount of intense, serialised work. The hardware isn’t at fault; the workload is.

Getting to USB-Based (Alternate) Boot

Here’s where the rubber meets the road. Getting external media to boot on an ASUS machine requires working around the firmware, not just the boot order. There are two reliable paths. First: disable Secure Boot in UEFI setup (DEL at POST, not F8 — more on that distinction in a moment). With Secure Boot off, unsigned bootloaders no longer get silently rejected. Second: on older platforms with CSM support, enabling CSM forces a legacy BIOS boot path that bypasses the UEFI BDS handoff to the stub.

The Bottom Line: Build Custom Recovery Media

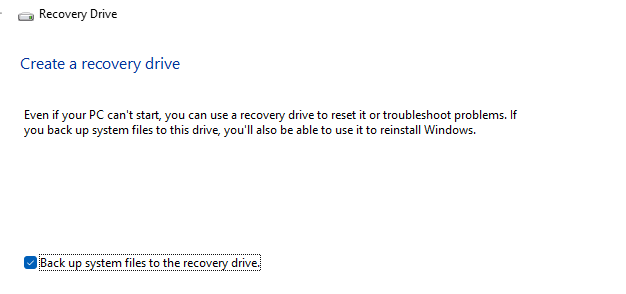
Whether you use the MS supplied “Create a recovery drive” facility, or turn to the MyASUS toolbox to do likewise, the best way to protect an ASUS Zenbook A14 is to build recovery media from that PC. As I learned through a series of failed recovery attempts with other, supposedly generic, all-purpose recovery media, that stuff doesn’t fly inside the Zenbook’s firmware envelope.

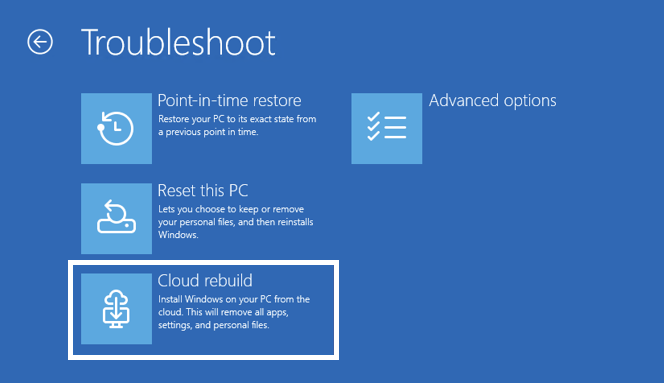
Learn from my mistake, and follow this advice as soon as  you can. Otherwise, you too, will fumble around until you find the MyASUS in WinRE tool that does cloud-based image reconstruction instead. If all you want is WinRE running a command prompt, that’s not a good alternative. Do it now: don’t delay!

The Secure Boot Perspective (2 Days Later)

I just ran the Garlin scripts on the recently rebuilt ASUS Zenbook A14. Looks like one benefit of a constantly updated cloud-based restore is the ability to slipstream new stuff in (or replace older, outdated images with newer, current ones). The concluding status report from  that check script is pretty telling:Shoot! They’ve even revoked the CA-2011 certificate. Good stuff!!!

Facebooklinkedin
Facebooklinkedin

MS Readies Copilot Key Remap

How often do I use Copilot? Multiple times a day, sometimes for hours at a go. How often do I use the Copilot key on a Copilot+ PC to access same? NEVER (I tried it out on an early laptop, saw it worked, and never used it again). I’m pretty sure most other users work the same way. Thus it came as no surprise and something of a relief to read news that MS Readies Copilot key remap in some upcoming Windows 11 update.

Why MS Readies Copilot Key Remap

This plan surfaced in a recently published Microsoft Support Note entitled ” Understand updates to the Copilot key on Windows devices,” Copilot finds no publication date for this item, but guesstimates it appeared on May 18  (yesterday, as I write this post).

Here’s how that note starts out:

Starting in 2024, hardware manufactures released new Windows 11 devices that include a dedicated Copilot key that provides quick access to Copilot experiences in Windows. This Copilot key sometimes replaces the Right Ctrl key or Context Menu key on select devices.

Customers who rely on the Right Ctrl key or Context menu key for keyboard shortcuts or assistive technologies (such as screen readers) experienced some challenges to their workflows when using these devices.

The important info comes next, and explains how things will work once this update appears:

A Windows 11 update will ship later this year that will add a setting option to let you remap the Copilot key to act as the Context menu key or Right Ctrl key. When available, you can find this setting in: Settings > Bluetooth & devices > Keyboard

What Does Copilot Key Remap Mean?

It’s an implicit ACK from MS that some (or many) people don’t use the key. Better, however, it’s a means for those who need the key that used to sit where the Copilot key now rests will get an official way to restore it (or rather, its functions as the Right CTRL or Context menu key) on their keyboards. Good enough for me!

When will this appear? MS isn’t saying yet. But they wouldn’t dangle it out there if they weren’t already working on it. My best guess is months, not longer. I’ll keep an eye on things and let you know when more news is available.

And here’s a concluding irony: I’m current working on a Logitech  Wave Keys keyboard on the Flo6 desktop. No Copilot key here, and I don’t miss it at all, not even one little bit.

Facebooklinkedin
Facebooklinkedin

Intel DSA Remains Driver Install Clickmeister

I just realized that DSA was MIA on my ThinkPad X12 Gen 1 Detachable Tablet. So I installed it, then ran it. It found 3 drivers in need of updates on that device: Wi-Fi, Bluetooth, and (Xe) Graphics. In updating them, I observed that the  Intel Driver and Support Assistant (Intel DSA) remains driver install clickmeister supreme. Let me explain…

Why say: Intel DSA Remains Driver Install Clickmeister?

It’s long been my observation that using DSA requires lots of mouse clicks. This time around, installing the three drivers shown in the lead-in screencap required at least 24 mouse clicks. For the record, those drivers were (numbers at right count clicks for each one):

  • Wireless Bluetooth Drivers (9)
  • 11th-14th Gen Processor Graphics (10)
  • Wi-Fi Drivers (5)

This time around it actually took me 4 additional mouse clicks to get from item 2 to item 3, because I was installing the GPU driver for the first time. Thus, I had to reboot my system, because DSA got “stuck” on “installing” for item 2, and wouldn’t advance to item 3. Sigh. I didn’t count those “extra” clicks in my reported total.

Achieving Intel Driver Update Silence

Believe it or not, that’s the title of a blog I posted on April 27, 2023. That was another time when the sheer number of clicks involved in running DSA hit me hard. It remains noticeable. Today, it struck me as excessive. So I’m formulating this plea to the Intel DSA developers:

Please add a silent mode switch to DSA. Let users tell the tool to run the installs without requiring minutes of babysitting to get through routine maintenance.

I wonder if anybody is listening. Then, I wonder if they’ll respond. Here in Windows-World the silence can sometimes be deafening. Let’s see what happens, shall we?


Facebooklinkedin
Facebooklinkedin

Revo Roots Out Relics

I’ve been meaning to do this for a while. But this morning, I found the fabled “round tuit” for an app clean-up on Flo6 using Revo Uninstaller. Using that tool, I reduced my count of installed apps from 95 to 83, eliminating an even dozen items. When I claim that “Revo roots out relics,” I’m claiming that the program helps stamp out no-longer-needed (or relevant) apps quickly and easily. Let me offer some details, and an explanation…

How Revo Roots Out Relics…

The intro screencap shows a partial list of all apps installed on Flo6. When I started this clean-up adventure, I was mostly beset with two sets of relics:

  • Leftovers from the ASRock B550 Extreme4 motherboard, which I replaced with an MSI MAG Tomahawk B500 MAX in January (3/12)
  • Leftovers from the Creative Sound Blaster AE-7 I installed earlier this month, but couldn’t get to working (5/12)

The other items were a hodge-podge of odds’n’ends including:

  • AIDA64, yet another system information tool that I don’t even remember installing, and never use
  • Angry IP Scanner: an alternative to Advanced IP Scanner that I tried a few times, before switching back to Advanced…
  • CPU-ID: I don’t need the plain-vanilla one any more, because MSI provides a customized version for the MSI MAG Tomahawk
  • CrystalDiskMark 8.4.0 still installed on Flo6, even though I’m running version 9.0.2. Removed it.

That’s it. Subsequent disk cleanup on Flo6 recovered 6 GB of disk space, too.

App Cleanups Should Happen Periodically

I consider this sort of review and removal part of a good Windows PC hygiene regime. Today was my day to clean up old apps. I’m glad I did. I’ll probably do it again at summer’s end, as I tend to pick up detritus like this over time. Here in Windows-World, if you don’t need it, or can’t use it, why keep it? Out it goes!

Facebooklinkedin
Facebooklinkedin

Timing WinGet’s Update Pipeline

OK then, I just read at WinAero that a new PowerToys v0.99.0 is out. Checking via WinGet upgrade in PowerShell it’s not yet in the pipeline. Nevertheless, the app itself is happy to grab said update from its GitHub repository, as you can see in the lead-in graphic. I’m now conducting an experiment. I’ll be checking hourly as I work at my desk, to see when that new PowerToys version comes into WinGet’s ken. Should be interesting…

What’s Involved in Timing WinGet’s Update Pipeline?

Behind the scenes, lots of things must happen before WinGet catches up, and offers the PowerToys update:
1. MS publishes the new release on GitHub (that’s done)
2. A Pull Request (PR) is sent to winget-pkgs with info about the new version, URLs, hash values, and so forth (usually automated)
3. Pull Request validation runs: automated checks verify installer hashes, check URL resolution, and validate manifest schema
4. Pull request merges into the WinGet source: a maintainer approves the package and merges it into the public database
5. WinGet CDN propagates: the updated database index appears via the winget source in related commands (show, install, uninstall, etc.)

How Long Does It Take?

Because PowerToys comes from Microsoft, its timeline is about as short as such things get. Turnaround normally takes no less than 12 hours, nor more than 48 depending on timing. If a weekend gets in the way the delay can stretch out. Ditto if issues with the manifest show themselves, or if the software being packaged shows a bug. Thus, for example, PowerToys v.0.99 has a Command Palette crash bug, and may be slowed to accommodate suitable hotfix.

We’ll see how this one goes. There’s already a new V0.99.1 version on GitHub (which includes that very hotfix). It’s in the WinGet pipeline now: let’s see how long it takes to get through, shall we?

Note Added 1:05 Later…It’s HERE!

The original post went up at 1:05PM local time. It’s now 2:10PM and a check on the P16 Gen 1 Mobile Workstation produces the following WinGet output: It’s here…

Notice that version 0.99.1 is on offer. That means the PowerToys team got its hotfixes into the package before sending it off to WinGet. Good job, @ClintRutkas and team. I am impressed.

And, now that I’m running it on the suitably-configured X380 Yoga, I see that the PowerToys upgrade also flashes an icon. Impressed again:

Facebooklinkedin
Facebooklinkedin

Testing Catches Copilot Errors

I’m happy to admit that Copilot makes many of my Windows adventures easier to undertake. It certainly helps a great deal with PowerShell scripting stuff. But just this morning I was reminded that it’s always smart to question — and verify — everything Copilot tells me. In testing a USB4 NVMe enclosure just now, I asked it which of the ThinkPad X12 Detachable Gen 1 left-side USB-C ports is faster, remembering that one is 10Gbps (UASP) and the other 40Gbps (TB4). It replies “the lower port,” so I run CrystalDiskMark on both to check its answer. Once again, I confirm that testing catches Copilot errors. Let me explain.

How Testing Catches Copilot Errors

Simply put, checking what Copilot tells you will either confirm that it’s correct, or show that it’s wrong. As you can see in the lead-in graphic, which places the upper USB-C port left, and the lower one at right, large reads are MUCH faster on the left. That means the upper port MUST be the TB4 one because UASP/10Gbps can’t deliver more than 1,000 – 1,200 MB/s for either reading or writing.

When I showed Copilot the CDM results, it responded as follows:

I had it backwards — apologies for the bad call. The source I pulled from apparently described the ports in board-schematic order rather than physical top-to-bottom position as you see them on the tablet. Your bench test is the definitive answer.

And if you’re seeing typical UASP numbers (~1,000 MB/s sequential) from the lower port right now, that confirms it’s the USB 3.2 Gen 2 controller — exactly what you’d expect at 10 Gbps with protocol overhead.

At least, it doesn’t fight with me when I knock it over the head with contrary results. And when it writes scripts, the PowerShell mostly either works or it doesn’t. In the latter case, Copilot may fumble around for a while but it eventually gets things right.

Trust, But Verify

It’s not unreasonable to believe much, or perhaps even most, of what Copilot tells you. But if you don’t check its work, you’re setting yourself up for trouble. It’s good at finding stuff and presenting theories and explanations. It’s by no means infallible, as I have just shown. Take that into account, when you start leaning on it for help…

Facebooklinkedin
Facebooklinkedin

Checking Boot/Recovery Media CA-2023 Status

Here’s an interesting consequence of the switchover in the Secure Boot chain of trust from CA-2011 to CA-2023. Once that occurs, you can’t boot from install, repair and recovery media that doesn’t support CA-2023. The PC firmware will reject it as “non-compliant.” What that means is with the revocation of CA-2011 upcoming in June, it’s time to start checking boot/recovery media CA-2023 status. When you can, it’s also time to replace older non-compliant media with newer, compliant versions.

I had Copilot write me a PowerShell Script that did 3 key things:
1. It checked to make sure drive G: (default letter for my UFDs) was present and accounted for
2. It showed me the top-level directory so I could see what I was dealing with (handy to distinguish installers, repair tools, etc.)
3. If it found EFI files, it reported Yes/No on their CA-2023 compliance.

After Checking Boot/Recovery Media CA-2023 Status, Then…?

The TL;DR answer to this question is: replace it if needed, keep it otherwise. I also used this opportunity to label my UFDs so I would know what I had in the future. I found all kinds of interesting stuff, including:

  • An MSI flash drive for my “new” MAG Tomahawk B550 mobo, a UEFI updater for v 2.90 on the ASRock B550 Extreme4+
  • Multiple Macrium Reflect and Hasleo Backup Suite rescue UFDs
  • A copy of the Windows DaRT (Diagostics and Recovery Toolset)
  • Multiple Windows Installer UFDs, mostly via MCT, some from UUPDump

Here’s the interesting thing: NONE of these items is CA-2023 compliant. Copilot says, in fact, that MS has not yet released an installer or repair ISO that includes the CA-2023 boot files in the EFI partition (see lead-in graphic bottom portion). I’d planned to update my dozen or so bootable UFDs today if I could. Looks like I’ll be waiting a while…

Key Takeaway

If you revoke CA-2011 support on any or all of your Windows PCs, you put yourself in the position of having to go into UEFI and turn off Secure Boot sometimes. When might that be? Whenever you want or need to use media to boot that PC for repair, recovery or installation. Good to know! That’s not the kind of thing I’d like sprung on me as a total surprise. Bet you feel the same way, too…

Facebooklinkedin
Facebooklinkedin

Flo6 Gets Unghosted, Loses 183 Drivers

When I switched my production PC, Flo6, from the ASRock to the MSI motherboard on March 21, I left a large crew of ghosts behind. In this case, a ghost is a no-longer-used driver that remains in the driver store even though it’s out of service and irrelevant to the new installation. Thankfully, Copilot helped me remember and find Uwe Sieber’s outstanding Device Cleanup Tool. It specializes in identifying and removing such ghosts. After using the tool, Flo6 gets unghosted, loses 183 drivers (!), and gets considerably slimmed down.

How Flo6 Gets Unghosted, Loses 183 Drivers

At first I tried a tool named GhostBuster. It showed me I had 399 drivers installed on Flo6, of which up to 193 could be removed. But I couldn’t actually make it remove anything. So I asked Copilot for a different option, among which I recognized Uwe Sieber’s aforementioned tool. It worked, too!

Sieber’s Device Cleanup Tool shows ONLY drivers that may be removed. So I removed all of them. Of the 194 in that collection, 11 came back after a reboot (you can see them in the lead-in screencap). That’s how I got to the 183 number for the count of drivers removed from Flo6 overall. I used PowerShell to calculate before and after sizes for the DriverStore. It started out at 10.63 GB, and dropped to 7.87 GB after cleanup. I like that!

One of the consequences of moving from one mobo to another without a clean install is that this kind of cleanup is needed. One of the advantages of that swap is that I didn’t have to clean install the OS. What can I say? I was in a hurry! Here in Windows-World, these are the trade-offs and the consequences we must learn to accept.

Facebooklinkedin
Facebooklinkedin

WinGet Iconification Is Ongoing

Yesterday, I had the good fortune to spend an hour on the phone with WinGet team lead Demitrius Nelon. He gave me a “slice of life” view into the many and varied kinds of chicken-and-egg problems his team deals with daily. He also helped me improve my understanding of where and how icons come from inside a sixel-enabled terminal session, including those that WinGet shows. And indeed, WinGet iconification is ongoing and spreading, as I saw this morning when I ran a general upgrade command on the recently clean-installed (and properly enabled) ThinkPad X12 Gen 1 tablet.

Why Say: WinGet Iconification Is Ongoing

Take a look at the output for a winget upgrade –all …  command from the lead-in graphic. Note the first actual upgrade (for OneDrive) shows an icon in that output stream. This is the first visible evidence I’ve seen running WinGet that the tool is including icons outside of the list –details commands. Very interesting!

Doc Info on list –details

Here’s a big snippet from the release notes for WinGet production version v.1.28.190:

New Feature: ‘list –details’

The new feature enables a new option for the list command, --details. When supplied, the output is no longer a table view of the results but is instead a series of show like outputs drawing data from the installed item.

An example output for a single installed package is:

> wingetdev list Microsoft.VisualStudio.2022.Enterprise --details
Visual Studio Enterprise 2022 [Microsoft.VisualStudio.2022.Enterprise]
Version: 17.14.21 (November 2025)
Publisher: Microsoft Corporation
Local Identifier: ARP\Machine\X86\875fed29
Product Code: 875fed29
Installer Category: exe
Installed Scope: Machine
Installed Location: C:\Program Files\Microsoft Visual Studio\2022\Enterprise
Available Upgrades:
  winget [17.14.23]

If sixels are enabled and supported by the terminal, an icon for the installed package will be shown.

I’m glad to see and understand that the stuff I had to figure out more or less on my own through trial and error is now going explicitly into the public record. For the details on how to enable sixel output in your WinTerm sessions, see last Friday’s how-to blog post Light Up WinGet Icons.

Where to from Here?

I expect to see icons popping up all over WinGet in the coming months. I also expect to see more icons popping up in output streams, as the plumbing falls into place. Right now, only about 20% of WinGet’s packages show icons. But that number’s going to jump for sure. Stay tuned, and I’ll tell you all about it.


Facebooklinkedin
Facebooklinkedin

How-To: Light Up Winget Icons

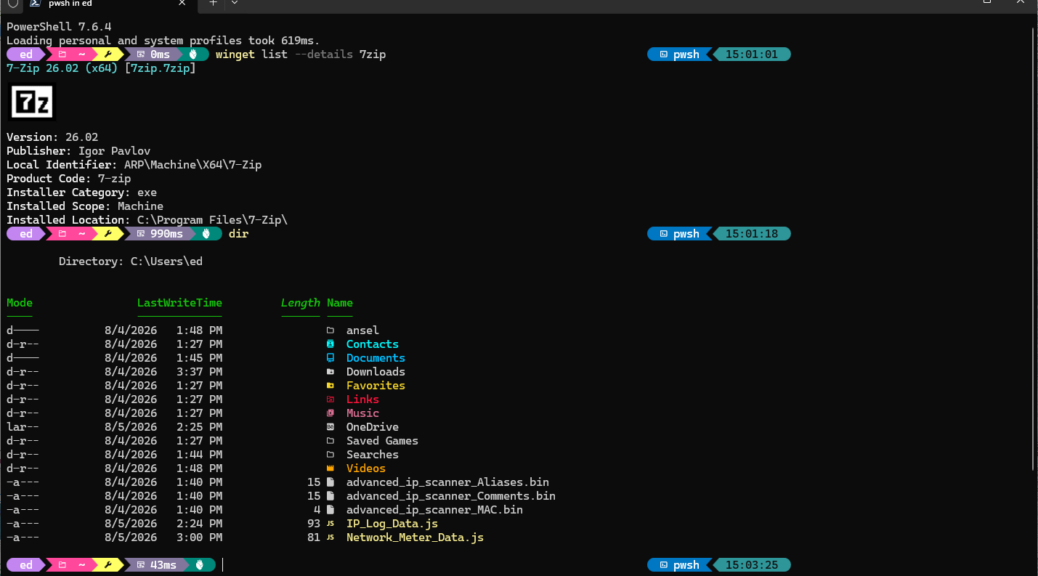
Thanks to numerous requests, I’m providing step-by-step instrux in this unusual second blog post for today. It’s based on something that made me unreasonably happy earlier this week. That is:  WinGet can now display colorful package icons right inside Windows Terminal, rendered via sixel graphics. It’s a small visual upgrade that makes winget list –details output dramatically more readable. You get actual application icons inline with package data instead of a wall of monochrome text. But getting there requires a few specific steps. Here’s the complete recipe so you, too, can light up WinGet icons.

Why Must You Light Up WinGet Icons?

The current production version of WinGet is v1.28.220 as I write this post. The latest Preview version is v1.29.70-preview. Production is still catching up, so preview is a must for the moment. I imagine, though, that this will change with the next production version update. As with all moving targets, this one keeps changing along with everything else!

Step 1 — Get a Preview Version of Winget

Sixel icon support requires WinGet version 1.29.50-preview or later. The current stable release doesn’t include it. Check your version with winget -v. If you’re behind, try this first:

winget upgrade Microsoft.AppInstaller –source winget

If that doesn’t pick up the preview build, head to the microsoft/winget-cli releases page on GitHub, download the latest .msixbundle. If a double-click won’t install it, you can install it manually with Add-AppxPackage. Fair warning: on some machines the Microsoft Store installer handles dependencies automatically. On others, you’ll need to sideload VCLibs and Microsoft.UI.Xaml packages yourself.

Step 2 — Enable Sixels in Winget’s Settings (Not Terminal’s!)

This is the gotcha, and it got me for a short while. I confess: I mixed it up myself. The sixel toggle goes in WinGet‘s own settings file, NOT in Windows Terminal’s settings.json. Run winget settings to open the file. Add or merge a visual block so it looks like this:

{
“$schema”: “https://aka.ms/winget-settings.schema.json”,
“visual”: {
“enableSixels”: true,
“progressBar”: “rainbow”
}
}

The enableSixels: true setting tells WinGet to emit sixel graphics in its output. The progressBar key is optional —”rainbow“, “accent”, and “retro” work well (“sixel” works, but is hard to see). Any of these gives you graphical progress bars during installs, as a nice bonus.

Step 3 — Restart Terminal and Run It

Kill Terminal completely — not just close a tab. Right-click the taskbar icon and close the window, or kill the wt process outright. Relaunch. Then run:

winget list –details

Icons should appear for Win32 packages (exe/msi installers). MSIX packages won’t show icons — that’s a known limitation of the current pipeline, not a configuration error on your part. You can filter to a single package to test things quickly (I chose 7Zip, as it’s at the top of my ASCII sort order):

winget list –details 7zip

What to Expect

Not every package gets an icon. In my testing across two ThinkPads, icon coverage ranged from 26% to 31% of total installed packages. The dividing line is 100% correlated with installer category: Win32 packages (exe/msi) get icons, MSIX packages don’t. That’s an architectural gap Microsoft hasn’t bridged yet.

But what works, works beautifully. The icons are crisp, properly sized, and render instantly. It turns a dull text dump into something you can actually scan visually — which matters when you’re staring at 150+ installed packages trying to figure out what needs updating. Once you’ve got it set up, you won’t want to go back to the plain-text version. Cheers!

Facebooklinkedin
Facebooklinkedin