Yesterday, I blogged about a real, but apparently small, performance boost for ReFS volumes vis-a-vis NTFS ones. While I was undertaking that testing, I switched a USB4 NVMe from NTFS to ReFS to keep everything else the same. I’m pretty sure that’s the best way to isolate file system differences because port, cable, enclosure and drive all remained the same. Along the way, I found myself uncovering “Create Dev Drive” gotcha. Let me explain.
Uncovering Create Dev Drive Gotcha:
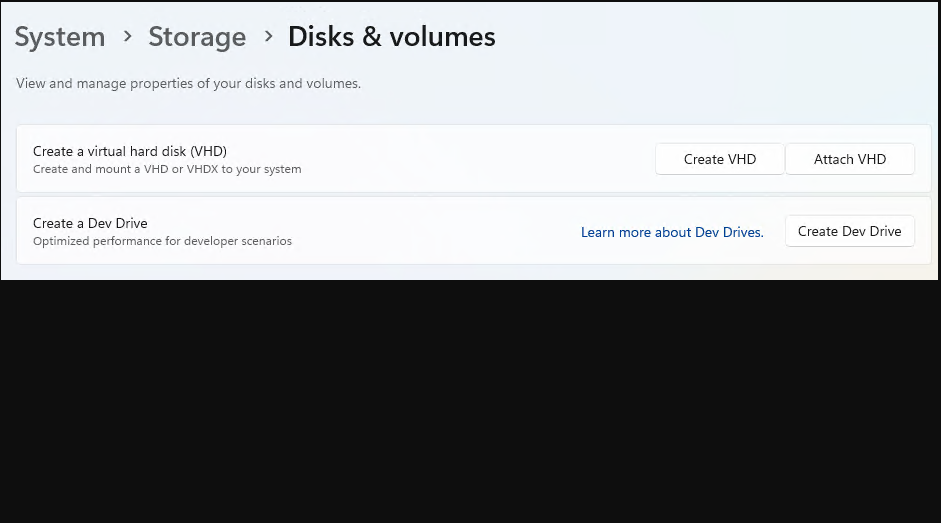
Two Create Dev Drive Buttons
If you attach an unallocated drive to a Windows PC, then navigate to System > Storage > Disks & Volumes, you’ll not only see the “Create Dev Drive button” at the top of that UI pane as shown in the lead-in graphic. Should you scroll down to said unallocated drive, you can evoke a different Create Dev Drive button by clicking on the down-caret for “Create volume” like so:
 Here’s the gotcha: if you use the upper Create Dev Drive button, everything works as it should. But if you use the lower one, the create operation fails every time, and reports it fails because the drive is read-only. Here’s what the Settings UI looks like after that error:
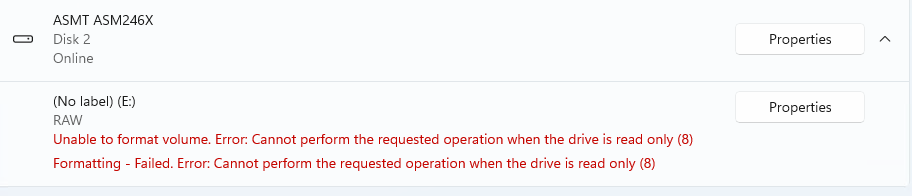 Something odd and interesting apparently happens when you use this button instead. I’m reporting this to Feedback Hub. Here’s that link, if you’d care to upvote: Create a dev drive button doesn’t work.
Clean-Up and Fix
Once you do this to yourself, you need to clean things up before you can set things up correctly using (only) the upper “Create Dev Drive” button. You must open Disk Management and delete the RAW volume you’ll now see there (right-click, and select Delete Volume… from the pop-up menu). Then you can return to Settings > System > Storage >Disks & volumes and do it right this time. Enjoy!

One more thing: the Dev Home app is a great place to get started when creating an ReFS volume. It does the Settings navigation for you and drops you right where you want to be. Just remember: it only works when you select the upper, general “Create Dev Drive” button, NOT the lower, device-specific “Create Dev Drive” button. I have no idea why this is so, but that’s the way it seems to work at present. Mysteries like these are what keep me forever fascinated with the wrinkles in Windows-World.