Category Archives: Windows 11

Build 25300 Restores Taskbar Clock Seconds

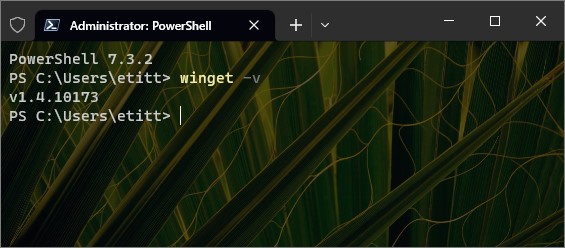
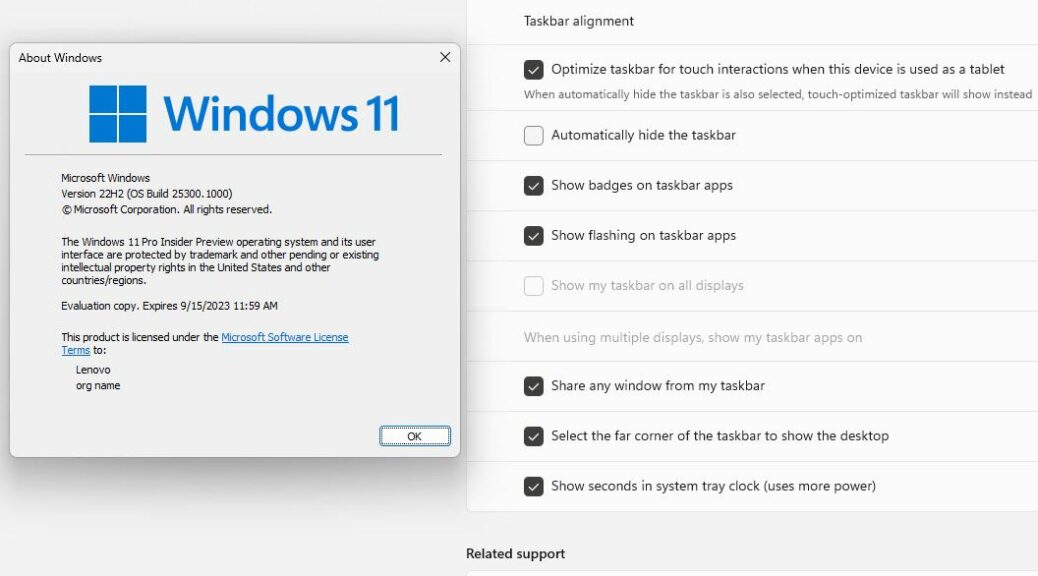
OK, then, they’ve been gone for some time now. But Dev Channel Build 25300 restores Taskbar Clock seconds to its display capabilities. The lead-in graphic shows that Settings checkbox, next to Winver for the build.

Note: we’ve not had access to seconds readouts in the Windows 11 taskbar clock since Day 1 of the release. It popped in — and then out again — in a recent Insider Preview. And right now, it’s only available in the Dev Channel release fork. Just sayin…

Find this by clicking through Settings → Personalization → Taskbar. Then, open the Taskbar behaviors pane. That’s where you’ll find the checkbox labeled: “Show seconds in system tray clock…” Notice that it comes with this caveat: “(uses more power).” MS has long put this theory forward (it recommended against turning on the second hand in Vista-era clock gadgets for the same reason) but doesn’t really present actual data to report how much more power is used — or battery life lost — as a consequence of turning this on. Sigh.

If Build 25300 Restores Taskbar Clock Seconds, Then…

I can only interpret the MS caveat as a warn-off of sorts. I guess we should be grateful they’ve deigned to restore this capability to those bold (or stupid) enough to use it. Count me among that number, and decide for yourself its potential significance. Here’s what it looks it, after you turn seconds back on:

Build 25300 Restores Taskbar Clock Seconds.clock-showing

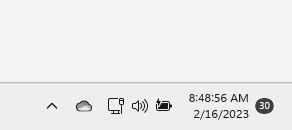
Even at the cost of a bit of power, glad to get those seconds back!

Small though this change may be, I am glad to have the choice as to whether or not I get seconds with my time readout on Windows 11. It’s been that way in Windows as far back as I recall. And now, it’s back again.

Sometimes, those little things do make a difference. I count this as a minor victory for the small people, here in Windows-World.

Facebooklinkedin
Facebooklinkedin

Figuring Out Intel Arc Iris Xe Drivers

For a long, long time Intel has made newer drivers available for its various integrated graphics circuitry. I’m talking older stuff like its UHD graphics, as well as newer Arc and Iris Xe graphics. Until last year, laptop operators were warned off these drivers because they could overwrite OEM extensions and customizations. I’ve been installing and figuring out Intel Arc Iris Xe drivers lately because that warn-off has been modified.

Here’s an “exception” of sorts that now appears in the Intel Driver & Support Assistant‘s cover language for the Intel Arc & Iris Xe Windows Drivers:

If you have a 6th Generation Intel® processor or higher, your computer manufacturer’s customizations will remain intact after upgrading to this graphics driver. To identify your Intel® Processor generation, see How to Find the Generation of Intel® Core™ Processors.

For the record, my test PC is a Lenovo ThinkPad X12 Hybrid Tablet. It runs an 11th Gen Intel CPU (i7-1180G7), with onboard Irix Xe graphics.

What Figuring Out Intel Arc Iris Xe Drivers Buys

Much of the Arc and Iris capability in the Intel ARC Control app is oriented to games, especially its “Studio” functions, designed to let an ARC device broadcast, capture, share highlights, or set up and use a virtual camera, all within the game-play context. Because I’m not a gamer (and have no actual ARC GPUs only on-CPU graphics subsystems) this doesn’t really signify much for me. I did, however, learn that ARC was looking out of the camera on the back of my X12 Hybrid at my desktop cubbyholes. I promptly turned that off.

What I’m concerned about is usability, stability, and everyday performance. By this I mean that the new driver doesn’t impact usability or stability. I also mean that it has no negative impact on performance, either.

The Verdict So Far

In working with my test system locally and remotely, I’ve noticed nothing different or unusual about the graphics driver. Usability, stability and performance all seem the same.

Reliability Monitor tells a different story, though. Over the past 6 days, it shows 3 APPCRASH events all aimed at “ArcControlAssist.exe.” Each seems to fall around when I open or update the ARC Control Assist app.

Thankfully, the everyday behavior of the system remains rock solid. I’m guessing there may be some teething pains involved here. I’ll say that the new drivers are worth testing, but don’t seem entirely ready for production at this time. At this point, I’m more inclined to blame flaky software (the Intel ARC Control Center app itself) rather than a flaky driver (no other behavior to indicate problems). I’ll keep an eye on this stuff, and let you know how it plays out. Stay tuned!


Facebooklinkedin
Facebooklinkedin

Win10 Enterprise Image Repair Mismatch

I’m flummoxed. As part of my production PC repairs the other day, I ran an in-place upgrade install. It didn’t fix my problem, but it ran to reportedly successful completion. Here’s the thing: I used a Windows 10 Pro image for build 19045.2546 (from UUPdump.net) to make those repairs. I’m surprised it worked!

Why Say: Win10 Enterprise Image Repair Mismatch?

As you can see in the lead-in Winver graphic, this PC is clearly running Windows 10 Enterprise (2nd text block). Yet the filename and download info at UUP Dump clearly identifies the Windows version as Pro:

19045.2546.230118-0641.22H2_RELEASE_SVC_PROD3_CLIENTPRO_OEMRET_X64FRE_EN-US.ISO

Targeting install.wim from the Sources directory, DISM unambiguously identifies the Windows version as Windows 10 Pro.

Yep: it definitely says the image is Windows 10 Pro.

IDKYCDT

IDKYCDT = “I didn’t know you could do that.” But apparently, you can. Indeed the MS Answers advice on this technique says only that one must

download the latest .ISO file available for Windows 11 or Windows 10.

It says nothing about version. Likewise, the TenForums tutorial on this topic simply says

  • If you have a 32-bit Windows 10, then you must use a 32-bit ISO or USB.
  • If you have a 64-bit Windows 10, then you must use a 64-bit ISO or USB.

Again, there’s nothing here about version, simply that a valid ISO is required. I don’t where I got the idea that the version and kind of ISO used for repair had to match the repair target. But it does NOT have to match. I got explicit evidence to the contrary earlier this week with my own eyeballs, on this very PC.

Thus, I learned something useful and can pass it on to you, dear reader. Any valid Windows 10 ISO works for Windows 10; ditto for Windows 11. Cool!

This is actually pretty handy because you can use UUPdump.net to cobble together an image for the current build number for Windows (10 or 11) including all recent updates and CUs. Then, when you repair the image it should work for Home, Pro, Education and Enterprise even if you — as I did — download the Pro-only ISO. No further updates will be required, when that repair completes.

Facebooklinkedin
Facebooklinkedin

Why Give PowerToys Admin Access?

I found myself looking at a suggestion from PowerToys on a test PC yesterday. It popped up when I opened Windows Terminal as Administrator, as per usual practice. It warned me that Fancy Zones and other PowerToys tools might not work properly unless I gave PowerToys admin access, too. Hence the question: Why Give PowerToys Admin Access?

Why Give PowerToys Admin Access?
Because other apps use it…

I turned to MS Learn. There I found an item entitled PowerToys running with administrator access. It pretty much explained everything. Here are the salient points from its second heading:

PowerToys only needs elevated administrator permission when interacting with other applications that are running in administrator mode. If those applications are in focus, PowerToys may not function unless it is elevated as well.

These are the two scenarios PowerToys will not work in:

  • Intercepting certain types of keyboard strokes
  • Resizing / moving windows

Seems pretty straightforward to me, and makes perfect sense. Here’s how to get to admin mode in PowerToys from its default “Running as user” mode.

Making the Switch: User to Admin

You must open PowerToys in admin mode to switch to admin mode. If PowerToys is running, right-click its taskbar icon and select exit to terminate its runtime instance. Next, right-click the PowerToys icon in the start menu, and select “Run as administrator.” In Settings, Administrator mode, move the “Always run as administrator” slider from off (as shown in the lead-in graphic) to On. That’s it!

Now, you can run some of your tools and programs in admin mode without warning messages from PowerToys (or concerns that its tools might not work as they’re supposed to). I like it, and I like ready access to simple, intelligible explanations as to why things must change to work properly.

One More Thing: v0.67.1 Is Out

As I write this item, MS has just released PowerToys update to v0.67.1. While you’re poking around inside Settings/General click the “Check for updates” button. If your PC isn’t yet caught up to this latest version, it’ll take care of it for you. Or, try this command

Winget upgrade Microsoft.PowerToys

if you prefer. Cheers!


Facebooklinkedin
Facebooklinkedin

PowerToys Application versus App

I’ll be darned. This has been going on for awhile, but I just recently learned about it. If you look, you too can find a September 18, 2021 Thurrott.com story. It says: PowerToys are now available in the MS Store. I spent some time this weekend switching over from the GitHub version (installs as an application) to the Store version (installs as an app). This led me to considering the differences between PowerToys application versus app.

Switching from the application version to its app counterpart is also neither documented nor obvious. Neither installer knows about the other, so it doesn’t clean up old stuff from “the other fork,” either. Let me explain later on here…

Understanding PowerToys Application versus App

In Windows, Applications live in two primary folder trees. 32-bit applications (of which there are fewer and fewer, now that Windows 10 is mostly 64-bit, and Windows 11 completely 64-bit) live in:

C:\Program Files (x86)

Their 64-bit counterparts, alternatives, or replacements live in:

C:/Program Files

Apps live in their own corner of the preceding folder tree — namely:

C:/Program Files/WindowsApps

Distinguishing Application from App

The only way you can tell if you’re running an application or app version of PowerToys is by where it lives in your Windows installation. If it shows up in Programs and Features, it’s an applicatioon. If it shows up under Installed Apps in Settings, it’s an app. Otherwise, they look — and behave — identically.

You can see the Settings-based App info to the left, and the Programs and Features-based Application into at the right, in the lead-in screencap above. Same name, same size, same version, same date.

So why go with the app version rather than the application one? Two primary reasons I can think of:

1. Apps get updated via the Microsoft Store automatically. You have to use the Update function inside PowerToys Settings/General to update the application version.

2. Apps are supposedly more secure than applications, because they run within a sandboxed environment. FWIW, I haven’t seen or read about that playing into the presence or absence of security exploits.

Making the Application to App Switch

First, visit Programs and Features and uninstall PowerToys there (or use your favorite third-party uninstaller: e.g. Revo Free). Then visit the Microsoft Store, search for PowerToys and install the version that comes up there (v.0.67.0 as I write this). Done!

If you try to install the app without removing the application, you’ll end up running both side-by-side. It’s much easier to follow an “out with the old (install), in with the new (install)” approach. How do I know this? I went the other way at first and had to clean up the resulting overlap. Save yourself that trouble, please!

Facebooklinkedin
Facebooklinkedin

PowerToys v0.67.0 Gets Quick Launch

Here’s a nice little tweak for a great set of useful tools. That’s right, the venerable PowerToys v0.67.0 gets Quick Launch in that release. You can see what you get by default on the left of the lead-in graphic. At right, you can see what comes up under the “More” selection scrolled to the top.

What Makes PowerToys v0.67.0 Gets Quick Launch News?

You’ve always been able to launch individual PowerToys using key combinations, once those tools are enabled. You can find those various key combinations (aka “shortcuts”) in the PowerToys documentation files (right-click PowerToys, choose Documentation from the resulting pop-up menu).

What’s new here is that you need now simply left-click PowerToys and the Quick Launch menus shown above become available. This is a great boon to me, because it means I don’t have to learn or remember the various keyboard shortcuts anymore. It takes fewer clicks and key presses, too. Always good! Be sure to check this out for yourself after you update to v0.67.0.

Installing PowerToys…

If you don’t have them already, you don’t need to grab PowerToys from GitHub unless you want to. GitHub does, however, remain the only source for the Preview version of PowerToys. Instead, you can grab the stable version of PowerToys from the MS Store. That’s what I did on the test machine where I captured the screencap(s) above. I couldn’t believe this PC didn’t already have it installed, but it gave me a terrific opportunity to take the MS Store install path. Works like a charm!

Facebooklinkedin
Facebooklinkedin

Frustrating Firefox x86 Follies

Oh boy! I just shot myself rather nicely in the foot but managed to call back the bullet. Let me explain, in the context of unfolding and frustrating Firefox x86 follies here at Chez Tittel. The lead-in graphic for this story shows two entries for Firefox as you can see in the red outline box. Therein hangs this particular tale…

Fixing Frustrating Firefox x86 Follies

I noticed this earlier this week when, after updating Firefox x64 on my production PC, I noticed a second copy still running the previous version. WTF? Using SUMO to show me the containing folders for each instance I saw what was up. One 64-bit copy is running in the Program Files folder tree. More interestingly, a second 64-bit copy is running in the Program Files (x86) folder tree. WTF again?

Nothing loath, I went into Explorer and deleted the Mozilla Firefox folder from the (x86) folder tree. This is the shooting myself in the foot part. Turns out that particular instance has all of my favorites, stored passwords, and yada yada yada. The true x64 instance is a “clean install” — but not in a good way. Sigh.

I called the bullet back by opening the Recycle Bin and restoring the entire, just-deleted Mozilla Firefox folder. I see that I can export all my stuff from one instance and then import it into the other. As soon as I have time to figure all that stuff out I can grab my “vital stats” from the x86 instance and make ready to transfer it into the x64 instance. Then, I should be able to safely delete the x86 instance without losing my valuable accreted data. Sigh again.

This Raises an Interesting Question…

What I really want to know is: how did an x64 instance of Firefox wind up in the x86 folder? I’m pretty sure that’s another self-inflicted wound. When I updated the trailing second instance earlier this week, whaddya bet it was a now-obsolete 32-bit instance for which only a 64-bit instance can serve as an update? Sigh one more time, and wonder why Firefox let me do this to myself. Go figure!

Alas, that’s the way things go for me sometimes in Windows-World. I’m just glad I was able to figure out and recover from my own foible without losing too much time or wasting too much effort.

Facebooklinkedin
Facebooklinkedin

Updating WingetUI Brings Follow-On

I have to laugh. When I wrote yesterday about Winget moving up to version 1.4, I should’ve known it would carry items in its wake. Hence my update to the GUI front-end for Winget this morning — namely, the Github project known as WingetUI. I might have guessed, but did not, that updating WingetUI brings follow-on packages in its wake.

Instead I simply fired off the update process for WingetUI this morning, and moved onto another open window. I was happily surfing some traffic at ElevenForum.com when outta nowhere an install window for the Microsoft Visual C++ 2015-2022 Redistributable popped up on my screen. You can see the trace it left behind in “Programs and Features” (dated 1/31/2023) in the screencap above.

If Updating WingetUI Brings Follow-On, Then What?

I guess it makes sense that if Winget is updated, WingetUI should follow suit. I’m not sure if the new C++ Redistributable is a natural consequence of the update, or just a coincidence. But gosh! I’m of the opinion that if one program needs to install other stuff so it can work, it should at least notify you beforehand. Or even, ask permission.

But what do I know? Thus, I was a bit taken aback when the install window for the C++ Redistributable popped up today. It seemed kind of random and unexpected to me. Maybe it’s my fault for covering up the WingetUI install window with something else. Maybe it’s just one of those things that sometimes happens when you update software here in Windows-World. You tell me!

Facebooklinkedin
Facebooklinkedin

Obtaining Winget Version Info

A couple of weeks ago, a new version of Winget popped up on Github. Pretty much since then, I’ve been slowly but surely making sure all 11 of my Windows PCs are running this latest and greatest version (e.g. 1.4.10173). For me that naturally raised the question: How does one go about obtaining Winget version info? That led me back into the MS Learn documentation, about which I’ll now report.

Obtaining Winget Version Info Is Dead Easy

Turns out that winget is just another package, like all the others that the tool can download, install, upgrade, delete and otherwise manage. Thus a simple and basic winget command told me what I wanted to know:

winget –info winget

The lead-in graphic for this story shows this command and its resulting output. Note the first line after the command reads:

Windows Package Manager v1.4.10173

That matches the “Latest” version number at Github, so it’s the most current version around AFAIK (not counting previews). And indeed, I’m pleased to report that using standard winget upgrade commands has ensured that winget is current on all my PCs.

More than One Path to Enlightenment

I also noticed that winget syntax errors will report the version running before conveying its error message info. Thus, omitting the dashes before “info” in the preceding command will also tell you its version number (after which a pageful of syntax guidance follows). I guess you could deliberately mistype a command to produce the version number. But heck, I’d rather do it the right way if I can remember how.

One More Thing: Winget -v

Turns out that Winget -v (or -version) will produce just the info needed in compact readable form. Thanks to Demetrius Nelson (@DenelonMs) for pointing this out to me on Twitter! Why didn’t I think of that… Here ’tis:

Obtaining Winget Version Info.-v option

Hmmm. It doesn’t get any easier than this.
Moral: RTFM (with more care)!

Facebooklinkedin
Facebooklinkedin

Obvious Fix Addresses 0xC1900101 Install Error

I run two Dev Channel test PCs. Yesterday, the Lenovo ThinkPad X12 Hybrid failed to upgrade to Build 25284. And it threw a familiar error code — one I’d just written about on ElevenForum just two days ago. Fortunately, the obvious fix addresses 0xC1900101 install error, as I will explain. But gosh! What a coincidence to have dispensed advice about this error only to experience it myself shortly afterward.

What Obvious Fix Addresses 0xC1900101 Install Error?

First let me share the text from my ElevenForum post (from which a screencap appears above):

Check out this MS Learn article: it asserts that an incompatible driver is present when this error code presents: https://learn.microsoft.com/en-us/troubleshoot/windows-client/deployment/windows-10-upgrade-resolution-procedures

So what I did next was to review all of the device drivers on the problem PC, and to upgrade those that weren’t current. To that end, I used a 3rd-party tool from IObit called Driver Booster (available in both free and for-a-fee versions). It found over 20 drivers in need of updating, and I updated all of them.

Long story short: two reboots later (one from the drivers the program found, another from a Lenovo Vantage update) I retried the 25254 install. And this time it completed successfully, sans the driver-related error. As I poke around online, I also see this is a fairly common install error where the obvious repair strategy is most often effective.

Shoot! It’s nice when things work the way they’re supposed to. Luckily, that does happen here in Windows-World from time to time.

Facebooklinkedin
Facebooklinkedin