Category Archives: Tips, Tricks and Tweaks

Want to know how to make the most out of your Windows 7 system?
Here we share the things we have learned for what to do (and what not to do) to make Windows 7 perform at its best.

Managing Windows 11 Defaults Gets Tricky

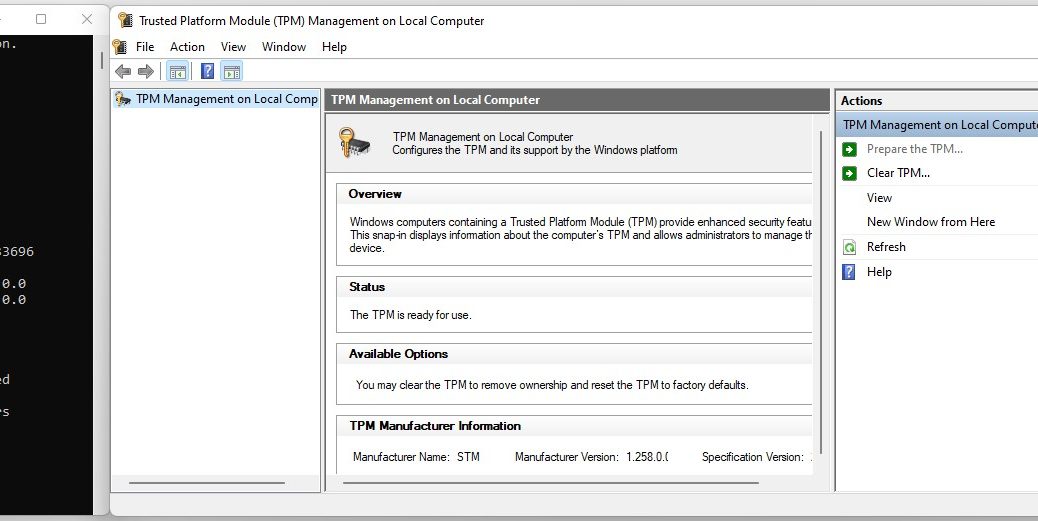
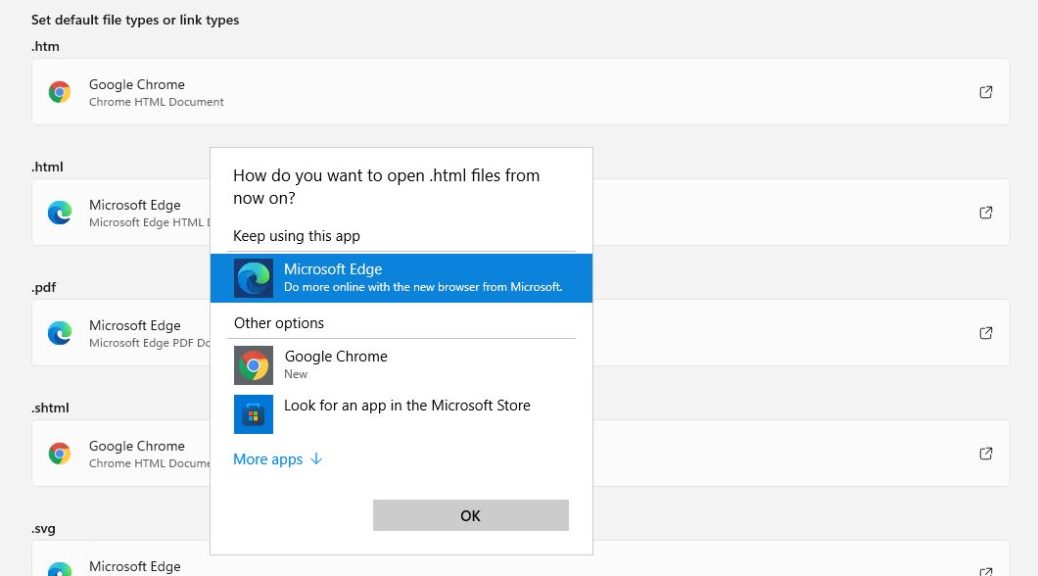
Oho! I just learned something interesting from Martin Brinkmann over at Ghacks.Net. It seems that in Windows 11, MS has re-jiggered the way default application selection works. In Windows 10 one could grab an application and associate it with all typical file or link types in one go. Alas, managing Windows 11 defaults gets tricky, because you must now choose them one at a time.

MS also supplies various defaults by default so to speak, which explains why Microsoft Edge shows up so persistently when opening web-related file types. Thus, for example, I count 22 such entries in Settings → Apps → Default apps → (Browser name here). I chose Google Chrome as my example in the lead-in graphic above. If you really want to make Chrome the overall default, you must jump into each of the 22 associated file or link types and pick Chrome from the pick list for each one.

Why Say: Managing Windows 11 Defaults Gets Tricky?

Maybe I should have said “labor intensive” instead. But “tricky” makes for a more compelling headline, so I’ll admit to taking just a wee bit of artistic license here. Truth is, as long as you know that this is how Windows 11 works, it’s the kind of thing you need to do once for those applications you want to make default when Microsoft supplies something different. This takes time and a little effort, but it’s not the end of the world as we know it by a long shot.

I’m hoping Nir Sofer reads this blog post, though, and whips out a Windows11Default tool to help automate this task. Seems like it should be fairly straightforward for someone with the right understanding of Windows internals to make this happen. I see a fascinating thread on this topic in the Spiceworld Forums that explains that GPOs and an XML file can do the trick. I’ll be noodling around with this for a while and see if I can figure something further out. Hopefully, Windows 11 and 10 work the same way in this regard. Stay tuned, and I’ll find out…

Facebooklinkedin
Facebooklinkedin

Check Windows TPM Status 2 Ways

What with Windows 11 looming ever closer on the horizon, more Windows 10 users will want to check TPM status on their PC. TPM is, of course, the Trusted Platform Module that provides hardware-level credential caching and encryption to protect systems from snooping and takeover. Today, I’ll show you how to check Windows TPM status 2 ways. One way uses a PowerShell cmdlet, the other way runs a Microsoft Management Console snap-in (an .msc file).

How to Check Windows TPM Status 2 Ways

Naturally, both methods require admin privileges. That is, you must run the cmdlet in an Administrative PowerShell session. Alternatively, you must be logged into an administrative-level account to access the proper MMC snap-in.

Way 1: PowerShell

Prosaically enough, the necessary cmdlet is named get-tpm. As its name portends, it provides detailed information about the presence and state of TPM on the target system upon which it is run. Go ahead, take a look:

Check Windows TPM Status 2 Ways.get-tpm

Note all the details about TPM presence and status. Source: my i7-6700 PC, which has no TPM.

Way 2: Run TPM.MSC (MMC Snap-in)

To take this path, simply type tpm.msc into the run command box or the Windows search box. It does not provide as much detail as the PowerShell cmdlet, but it is a little faster and easier to run. That said, here’s what its output looks like:

Check Windows TPM Status 2 Ways.tpm.msc

The TPM plug-in for the MMC just provides basic presence/absence information, though more data appears when a TPM is present (see next screencap below)
[Click image for full-sized view.]

TPM Info from Win11-Ready System

For comparison purposes here’s a side-by-side rendition of the PowerShell cmdlet (left) and MMC snap-in (right) from my 11th generation Lenovo X12 Hybrid Tablet PC. It meets the Windows 11 hardware requirements and tells its story about the TPM capabilities present on that machine. Note: 11th generation Intel CPUs provide TPM 2.0 emulation in firmware, rather than in a separate TPM chip.

Click image for full-sized view.

Facebooklinkedin
Facebooklinkedin

WinKey+P Powers Display Projection

Sometimes, it isn’t until things go terribly wrong that one appreciates the power of simple syntax. Check out this TenForums post, which explores the impact of the WinKey+P gone wrong: Win p key  pressed. Because WinKey+P powers display projection, a user’s nephew’s wrong menu choice made him think he’d lost access to 2 of his 3 displays in a multi-monitor configuration. Not so!

WinKey+P Powers Display Projection — Usually Into a Menu

Normally, when you strike Winkey+P on a Windows 10 or 11 PC, you’ll get a pop-up menu like the one shown in the lead-in graphic. It highlights the current setting — Extend in my case, because I have my desktop extended over a pair of Dell 2717 monitors. Overall, it offers these four settings:

  • PC Screen only: (tantamount to striking WinKey+P once)
  • Duplicate: copies primary monitor to all other monitors (select by striking WinKey+P twice)
  • Extend: extend the desktop across all available monitors (select by pressing WinKey+P three times)
  • Second screen only: use only Display #2 for graphical output (select by pressing WinKey+P four times)

Our hapless user’s nephew struck WinKey+P once, which apparently forced his PC into “PC Screen only” mode. On my PC, however, I got the menu shown above, and was easily able to move among the selections using my mouse.

When Key Combos Go Wrong, Try More!

Interestingly, advice on TenForums about what to do in this situation is spot on. It reads “Did you try pressing ‘WinKey+P’ again? Sometimes a key acts like an ‘on off’ switch.” In this case, our user wanted to press WinKey+P 3 times to get to the extend option through the keyboard. There’s no discussion of using the menu instead, which I find infinitely preferable.

For some odd reason I’m reminded of one of William Blake’s epigrams from his Proverbs of Heaven and Hell:

The fool who persists in his folly soon becomes wise.

This turns out to be good, if oblique, advice when dealing with unwanted WinKey key combinations. As for myself: I’d have looked it up online, and found all the insight I ever could have wanted, and more.

Facebooklinkedin
Facebooklinkedin

Downgrading Dev Channel Is Now Sometimes Possible

Here’s an interesting tidbit from the July 29 version of Microsoft Docs “Deeper look at flighting.” And of course, as the lead sentence reads “Flighting is the process of running Windows Insider Preview Builds on your device.” In an amendment to prior policy, downgrading Dev Channel is now sometimes possible for test PCs or VMs. Let me explain…

What Downgrading Dev Channel Is Now Sometimes Possible Means

The key to switching without requiring a clean re-install (the prior policy in all cases) is that the Dev Channel must have the same or lower Build number than the target channel. That means switching from Dev Channel to another channel requires users “to find your current build number and compare it to the current build number in the channel you wish to switch to.” Build numbers appear in the output from winver.exe, and in Start → Settings → System → About.

I quote the step-by-step process verbatim from the previously linked flighting document:

  1. Open Settings > Windows Update > Windows Insider Program.
  2. Select Choose your Insider settings.
  3. Select the desired channel, either Beta Channel (Recommended), or Release Preview Channel.
  4. The next time you receive an update, it will be for your new channel.

This will make the process of downgrading channels simpler. It also provides an “exit strategy” for Dev Channel PCs. Prior policy insisted that the only escape from Dev Channel could be a clean re-install of some other Windows version. The other channels have always offered the option to drop back to production/RTM versions when they become available. This extends that out to Dev Channel, but requires two steps to get there: first drop back to Beta or Insider Preview, then drop back to production/RTM. Good stuff!

Why Am I Telling You This … Now?

As you look at the WinVer output from Dev Channel (left) and Beta Channel (right) in the lead graphic, right now the Build numbers are the same. That means that you can downgrade Dev Channel PCs as I write this story. Given that MS hasn’t released a Dev Channel build in a while this can’t last forever. If you want to try it out, act fast — or wait for the next synch-up. Your call…

Facebooklinkedin
Facebooklinkedin

Confusing Windows 11 Scissors and Trashcan

Sometimes, I have to laugh at myself. Yesterday, in cleaning out my Downloads folder on a Windows 11 test PC, I noticed that clicking the Scissors icon didn’t delete selected files. Duh! That’s the job of the Trashcan icon, as I figured out a little later using mouseover tactics. By confusing Windows 11 scissors and trashcan icons, I showed myself that minor mistakes can stymie routine file handling tasks. Sigh.

If Confusing Windows 11 Scissors and Trashcan, What Next?

Before I figured out my category/identification error, I found another quick workaround to delete files. By clicking “More options” at the bottom of the first right-click menu, another more familiar menu appears. It’s more or less the Windows 10 menu transplanted into Windows 11, like so:

Confusing Windows 11 Scissors and Trashcan.more-options

A second menu has the familiar text entry to make my choice more obvious: Delete appears three up from the bottom.
[Click image for full-sized view.]

As is nearly always the case in Windows (including 11), there’s more than one way to get things done. When one fails (or operator error leads to unwanted outcomes), another way can lead to success. My next step would be to turn to the command line, had this alternate path not led to the desired results. It’s always good to keep working at things until they get solved. That goes double when my silly mixup led to an initial lack of success.

As I learn new UIs and tools, this kind of thing happens from time to time. Call them Windows follies or funnies if you like. For me, it’s just another day, and another lesson learned, here in Windows-World!

Facebooklinkedin
Facebooklinkedin

WhyNotWin11 Offers PC Health Check Alternative

Some Windows users are purists by deliberate choice. Given the option of a Microsoft and a third-party too, they’ll take the MS route every time. I am no such purist. I appreciate good tools, whether from Microsoft or another (reputable) source. Thus, I’d like to observe that the GitHub project WhyNotWin11 offers PC Health Check Alternative. Indeed MS has temporarily taken down its tool. PC Health Check is available only from 3rd-party sources, such as TechSpot right now. Thus, WhyNotWin11 has the current advantage.

Why Say WhyNot11 Offers PC Health Check Alternative?

Though PC Health Check has been out of circulation for a week or so, WhyNot11 got its most recent update on July 3. Visit its Latest Release page for a download (version number 2.3.0.5 as I write this). You can also update the previous version 2.3.03 by downloading the latest SupportedProcessorsIntel.txt file and copying it over the previous version in the %Appdata%\Local\WhyNotWin11 folder.

Note: on my PC, that’s
C:\Users\\AppData\Local\WhyNotWin11\SupportedProcessorsIntel.txt.

WhyNotWin11 Is More Informative, Too

This story’s lead-in graphic shows the information that the third-party tool displays about target PCs. It provides a complete overview of which requirements are met (green), which aren’t listed as compatible (amber), and which are missing or disabled (red). This is more helpful than the output from PC Health Check. See it output below:

PC Health Check only briefly explains part of what’s at issue, and tersely at that.

While the message above does explain the “the processor isn’t supported,” it also fails to note the absence (as I know it to be on this PC) of a Trusted Platform Module (2.0 or any other version). WhyNotWin11 notifies users about both conditions directly and obviously.

IMO, easy access and operation, and more information about the target PC all make WhyNotWin11 a superior choice over PC Health Check. At least, for the purpose of finding out why a machine will (or won’t) upgrade to Windows 11. PC Health Check does offer other capabilities that users may find helpful, including (questionable) info about backup and synchronization, Windows Update checks, storage capacity consumption and startup time. I’m not arguing against use of the tool, when it returns to circulation. I’m merely suggesting that for the purpose of evaluating PCs for Windows 11 upgrades, WhyNotWin11 does a better job at that specific task.

Facebooklinkedin
Facebooklinkedin

Windows 11 Store Updates via Library

One minor befuddlement about the newly-refreshed update to the Microsoft Store has puzzled me. Since updating to Windows 11, and obtaining the latest Store version, I haven’t been able to find its Update mechanism. This morning, on a whim, I opened the Library left-column menu item. Voila! Now I know one obtains Windows 11 Store updates via Library buttons. You can see the previously-elusive “Get updates” button at the upper left of the lead-in graphic for this very story.

Push the Button, and Windows 11 Store Updates via Library

And indeed, pressing the “Get updates” button from the Library controls behaves pretty much the same way as in Windows 10. The button goes dim, the busy circle icon circulates for a while, and if any updates are pending a list appears and begins to take care of itself.

I wish I could show you a picture of that update process. But only one of my test machines needed an update. It was for the commercial version of Lenovo Vantage (the ThinkPad update utility). Thing is, it flew by so quickly I didn’t have time to grab a screencap. That said, it does show up in Reliability Monitor as an Informational event. So here’s a screencap that shows it installed at 9:02 AM on July 3.

Windows 11 Store Updates via Library.update-relimon

There it is: Non-highlighted (second) item with LenovoSettings in the name string.
[Click image for full-sized view.]

As the old saying goes, I KNEW it had to be in there somewhere. A little poking around and I did eventually find it. My only question now is why did Microsoft decide to call this the “Library?” My guess: because it points to the repository of apps on the host PC where the Microsoft Store is currently running. The Help button is surprisingly mum on Store UI details and related info, so I guess I did what we’re all supposed to do. I figured it out for myself. Maybe you’ll find it helpful, too…

Facebooklinkedin
Facebooklinkedin

Identifying Windows 10 Mystery Startup Items

Here’s something new and helpful about working with Task Manager. Take a look at this story’s lead-in graphic. It shows you can right-click any column header in Task Manager’s Startup tab, to see a pick list of columns (checked items). Add the “Startup type” and “Command line” items, and learn more about the startup entries they describe. In fact, they helped me with identifying Windows 10 mystery startup items on my production PC.

Identifying Windows 10 Mystery Startup Items.program

When a generic “Program” entry showed up in Startup items, adding fields let me see where it was coming from.
[Click item for full-sized view: see top table entry.]

How-to: Identifying Windows 10 Mystery Startup Items

The “Startup type” tells you where the directive comes from. For “Program” it came from the Registry. Better still, Command line data tells you what Startup executes as Windows 10 gets up and running. The particular instruction is malformed and can’t work:

"C:\Program" Files\Teams Installer\Teams.exe --checkinstall --source=default

The closing double quote is misplaced (it should be at the end of the line). Also the directory path referenced in the command does not actually exist on the PC in which this Registry entry resides.

What did I do about this spurious startup item? I cheerfully disabled it. Indeed, that means there’s an orphaned key-value pair in my registry. I can live with that. I do intend to report it via the Feedback Hub, because it definitely includes a syntax error (the misplaced closing double quote). Otherwise, though, it’s no big deal and I’m satisfied to disable it.

[NOTE} Here’s a shout-out to WinHelpOnline, whose story What is “Program” in Task Manager Startup Tab helped me understand my mystery item. It’s worth reading in its entirety for those who want to learn further details about what’s going on, and how to remove related orphaned registry items.

Facebooklinkedin
Facebooklinkedin

WinGet 1.0 Updates Most Win10 Applications

A production version of the Windows Package Manager “WinGet” made its debut on or about May 26.  You can grab it from GitHub as version v1.0.11451. It offers the remarkable ability to update any Windows 10 applications for which update packages are defined. Running the tool as a test of this capability, I was able to update 7 of 9 applications the tool flagged as outdated. The 8th item was Firefox, which didn’t get updated within WinGet, but was easily handle through its own update facility. The 9th item was the UWP app for Zoom, which I quickly updated from within its own GUI as well. Thus I confirmed for myself that WinGet 1.0 updates most Win10 applications, if not all of them.

What Does WinGet 1.0 Updates Most Win10 Applications Mean?

In the past, I’ve turned to 3rd party tools such as SuMO or PatchMyPC to keep my Windows PCs up-to-date. The most usable version of SuMO costs €20 and up. PatchMyPC is free but somewhat limited in the programs it can recognize and update. So far, WinGet finds — and updates — programs that not even SuMO recognizes (e.g. Strawberry Perl and SpaceDesk). And of course, it’s free for the download from Microsoft’s GitHub repository.

If you look at the lead-in graphic for this story, you’ll see the command syntax to ask WinGet to list programs for which it knows upgrades are available. That syntax is simple:

WinGet upgrade

does the trick. If you want to actually run those upgrades, you need only add --all to the preceding command to fire it off (note the double dashes that precede the word all). You can see the tool at work in this oversized screencap:

WinGet 1.0 Updates Most Win10 Applications.upgrade-all

WinGet skipped Firefox and Zoom (a UWP app) and owing to my mistake hung up on updating the final item: spacedesk Windows DRIVER.
[Click image for full-sized view.]

The tool hung while trying to update SpaceDesk. This was probably a self-inflicted wound, though, because an earlier Macrium Reflect update did leave a reboot pending to complete its own installation. I had to kill the PowerShell process tree to terminate that apparently never-ending update, thanks to my oversight.

After Restart, All’s Well That Ends Well

And sure enough, after a restart, another round of WinGet upgrade -all took care of the SpaceDesk item. It ran through to completion (and even reset the graphic driver automatically to “make room” for itself). This capability is worth getting to know. I predict some admins will find it eminently capable of keeping up with (most) upgrades on Windows 10 PCs, especially reference image machines for deployment use. Check it out!

What Did WinGet Miss?

To give the Devil his due, I just ran SuMO to see what WinGet’s update check missed. Here’s a list of what it didn’t find (and for which apps, therefore, update packages are presumably needed):
1. CPU-Z
2. SuMO itself
3. Snagit
It just goes to show that none of these tools is absolutely complete, though some are more complete than others. I still like what WinGet does and how it works just fine!

Facebooklinkedin
Facebooklinkedin

Power Options VM Surprise

It’s been a painful last few days here in Windows World. I’ve been working on a loaner, locked-down machine in connection with a code analysis project. Because that code is protected and valuable intellectual property (IP), I’m able to access its GitHub repository only through a VM running on a hardened and isolated system. Essentially, I have to access the VM through a browser tab set up inside a VPN-accessible secure store. It hasn’t been going too well, either: each time I tried to use the VM and left the machine alone for a while, it would drop its connection. And then, to make things worse, I couldn’t get back in without asking an IT admin to reset the server side of the remote access environment. That’s where  an unwanted and unexepected Power Options VM surprise came into play.

What Is a Power Options VM Surprise?

If you look at the lead-in graphic, you’ll see that one change I make on my Windows PCs post-upgrade or install is to change the sleep interval to “Never.” The default is 30 minutes. Accessing the VM used a commercial VPN into a host server. Then, a remote access client (first RDP, then VNC) connected to the VM itself. For a long time, the firm’s IT guy kept fiddling with RDP settings and such. Eventually he switched to VNC for remote access, thinking it might be an RDP protocol issue at work (or not).

But the disconnect issues kept popping up, where the VM connection would drop when the machine was idle for 30 minutes or more. This finally caused him to investigate the Power Options, where it was immediately obvious the default “sleep after 30 minutes” was the culprit. Resetting the value to my usual preference — that is “Never” — has since fixed things, hopefully for good.

Troubleshooting 101: Don’t Overlook the Obvious

As an outsider with only a regular user account, it wasn’t up to me to mess with default settings on the locked-down machine furnished to me for this project. Ditto for default settings for the VM I was accessing to get into the target code base. But gosh: I have to believe we were looking for complex solutions to a seemingly complex problem. Instead, we should have been looking for simple solutions for a straightforward default settings check.

The moral of this story is not lost on me. I hope it will likewise inspire you to make a checklist when working with VMs, and to put “check default settings” (especially in Power Options) right near the head of that list. Sleep may “knit up the raveled sleeve of care,” as the Immortal Bard put it. But sleep causes all kinds of interesting problems for Windows PC — and now I know, for Windows VMs, too. Funny thing, I’ve learned to make this tweak because I use RDP extensively here at Chez Tittel to get from my production desktop to the 10-plus other PCs usually running around here. I shoulda known…

Facebooklinkedin
Facebooklinkedin