In Windows 11, a restore point provides a snapshot of various essential system files, settings, installed programs, and the registry taken at a specific point in time. Restore points can roll back the OS and associated state info should something go sideways. They don’t replace backups (especially image backups) because they don’t contain personal files and documents, nor do they capture other boot disk partitions for full restoration (e.g. EFI, MSR and recovery partitions, if present). I’ve been thinking on Windows 11 restore points because I don’t use them (I use daily image backups instead) and because they can take up lots of room on disk.
Looking further into Windows 11 Restore Points
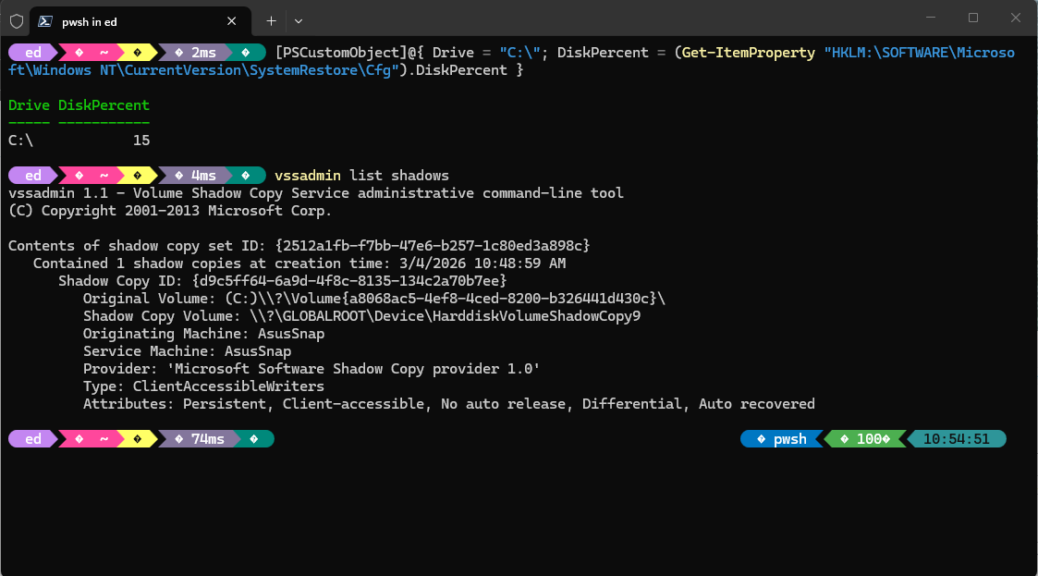
Before I could share my reflections and observations about Windows 11 Restore Points (let’s condense that to W11RPs) I had to find a machine with them turned on to dig into them a bit. Turns out my newest personal acquisition — the very nice ASUS Zenbook A14 I picked up during Black Friday sales last year — still has them turned on. You can see that the C: drive has W11RPs enabled, and the info about a single restore point that I just generated right under neath.
You can find restore points inside the WizTree app pretty easily, if you’ve got any. They appear within the System Volume Information folder, which lives at the root of the boot/system drive (C:\ usually). It’s the big purple rectangle in this snippet from Wiztree, and corresponds to the shadow copy item shown in the lead-in graphic (output from the vssadmin list shadows command, in fact):
 At 2.3 GB in size, one can see why keeping numbers of them around might be something of a storage-sucker. In truth, that’s one big reason I typically don’t keep them around.
Turning W11RPs on and off, and more
The controls for W11RPs live on the Protection tab of the System Properties applet in Control Panel. Settings in Windows 11 kind of interferes with access to this info, so the best way to get there these days is to invoke its executable directly (Into the Windows Run box (Winkey+R), type this string:
C:\Windows\System32\SystemPropertiesProtection.exe
That fires up the item screencapped next, and shows the key controls for W11RPs, to wit:
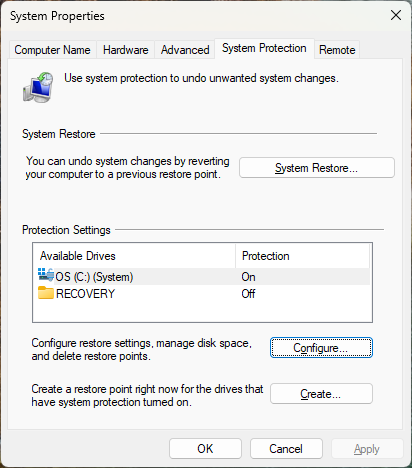 For any drives available on the target system, you select its entry, click the “Configure” button then enable or disable restore points. As you can see about the C:\ drive has W11RPs enabled, and it came that way from the factory.
Problems with W11RPs?
If you read up on informed sentiment about W11RPs (I get my insights from many sources, but find TenForums.com and ElevenForum.com particularly insightful), you’ll learn that they sometimes work, and sometimes don’t. If you use them, you’ll learn that they take a while to load (on the order of 15-20 minutes on most of my PCs). They also tend to happen once a day by scheduled task, and whenever you make system changes or install apps that include built-in RP capture commands.
You can use them if you like. I don’t like, and I don’t use them. Macrium Reflect can restore a full system image on my PCs in the 2-6 minute range, is easier to use, runs from a rescue disk if needed, and has shown itself to be thoroughly reliable and capable. For me that’s the end of the story.
Now, pardon me while I go off to disable W11RPs on the AsusSnap. I seem to have forgotten this little step in my intake process…