One of the quieter but genuinely useful maintenance tasks for any Windows 11 machine is verifying the WinRE recovery partition. When necessary, you can refresh bits and pieces. On my desktop (production) rig Flo6, that job came due recently when I discovered a one-version gap between the OS and the recovery environment. Here’s exactly what I did to perform Flo6 recovery partition cleanup.
Why Do Flo6 Recovery Partition Cleanup?
Flo6 was running Windows 11 25H2 (build 26200.9168). It’s current and fully patched. A quick reagentc /info at an elevated command prompt, however, told a different story about the recovery environment: Windows RE Version 10.0.26100.9168. That’s 24H2 — one full major version behind the OS.
This kind of mismatch is typical after an in-place upgrade. Windows Update doesn’t always push a matching WinRE update alongside the OS upgrade. The recovery environment still works, but keeping it in sync with the running OS is simply good hygiene.
Finding the Right Source Media
Fortunately, I had a Windows 11 25H2 bootable UFD on hand. It is ESD-USB labeled, FAT32 formatted, carries seven editions in a split WIM (install.swm + install2.swm, totaling ~5.6 GB compressed). A quick DISM query confirmed the match:
dism /get-wiminfo /wimfile:G:\sources\install.swm /index:6
Output showed Version: 10.0.26200 / ServicePack Build: 9168 — an exact build-for-build match with Flo6’s OS. The source media was confirmed.
DISM Workflow: Four Clean Steps
Split WIMs add a wrinkle:the/swmfile parameter won’t work with /mount-wim. The workaround is to export first, then mount the resulting single WIM. Here’s the sequence I ran from an elevated command prompt:
Step 1 — Export the Pro edition to a single WIM:
dism /export-image /sourceimagefile:G:\sources\install.swm /swmfile:”G:\sources\install*.swm” /sourceindex:6 /destinationimagefile:C:\temp_pro.wim
Step 2 — Mount read-only to C:\BootMount (a pre-existing empty directory):
dism /mount-wim /wimfile:C:\temp_pro.wim /index:1 /mountdir:C:\BootMount /readonly
Step 3 — Extract winre.wim to a temp location:
copy C:\BootMount\Windows\System32\Recovery\Winre.wim D:\Temp\Winre25H2.wim
Step 4 — Unmount and delete the temp WIM:
dism /unmount-wim /mountdir:C:\BootMount /discard
del C:\temp_pro.wim
Swapping the WinRE Recovery Partition Image
With the new Winre.wim extracted, swapping it into the recovery partition takes just a few commands using reagentc (note: the copy command runs into a second line here, but should be a one-liner when run at the command line):
reagentc /disable

copy /y d:\temp\winre25h2.wim r:\recovery\windowsre\winre.wim

reagentc /enable

reagentc /info
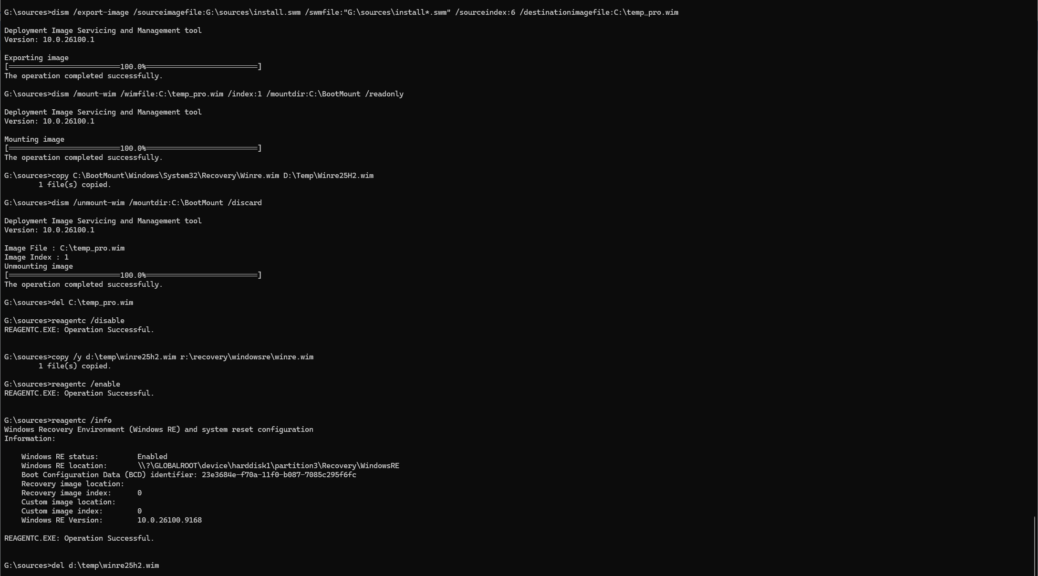
The leading screenshot above shows this exact sequence — disable, copy, enable, and the final /info verification — all completing successfully. Note that R:is the recovery partition, temporarily assigned a drive letter for this operation.
A Nuance Worth Noting
The final reagentc /info reported Windows RE Version: 10.0.26100.9168 , and still shows 24H2. This isn’t a failure. The winre.wim packaged inside a 25H2 OS install image is itself built on the 24H2 WinPE base.
Microsoft maintains WinRE on its own separate servicing track. The embedded winre.wim version doesn’t automatically match the OS build number. The WinRE is fully functional and properly enabled — the version stamp reflects WinPE infrastructure, not a gap in recovery coverage.
Bottom Line
The Flo6 WinRE recovery partition is now refreshed, re-enabled, and confirmed healthy: Status Enabled, location correct, BCD identifier registered, and local reinstall available. Total active time at the command prompt: under ten minutes.
If you haven’t checked your own WinRE status lately, reagentc /info is a fast, zero-risk first step — and now you know exactly what to do if the version number looks off. Here in Windows-World, checking is good, and verifying is better. Today, I’m in a good place. How about you?

