
On Thursday and Friday of last week, I continued to fight with warm boot issues on my primary Flo6 desktop. The ASRock UEFI stubbornly refused to synch up the MS updates for Secure Boot with its own internal, stored values. Net result: I couldn’t restart Flo6. I could only traverse the shutdown/startup cycle through a deep, cold boot that sometimes required a CMOS reset. After lunch Friday, I took the plunge and tore the PC apart to switch out the ASRock B550 Extreme4 for an MSI Mag Tomahawk B550 WiFi Max. To my great relief and delight, that Flo6 mobo switchover succeeds admirably. That said, I started after lunch Friday and finished after 9M Saturday nite. Phew!
Lessons Learned, as Flo6 Mobo Switchover Succeeds
I made a couple of interesting mis-steps along the way that slowed things down, but the overall process was pretty straightforward. The teardown was easy, but it reminded me how much I now depend on reading glasses for close-up work, since last fall’s cataract surgery.
In putting the new build together, I saw that I’d failed to remove the clear plastic sticker on the CPU cooler during the previous build. Have to laugh, but the results are amazing: no sticker plus a fresh coat of thermal paste took CPU temps down from mid-50s to low-60s to a steady 31°C (Source: Speccy; HWiNFO shows various temps ranging from 32 to 42°C). All show serious improvements over the old build!
Putting the old parts onto the MSI Tomahawk board is where things got interesting. That board offers only LEDs for CPU. DRAM. VGA and BOOT. I missed the two-digit POST code display on the ASRock mobo, which was more intelligible and easier to read. My first mis-step was mispositioning the 5800x CPU. I was 180 degrees off on the first try. Easily fixed, but took time.
My second mis-step was to put the GPU in the secondary PCIe slot. For some reason I was scared of the metal clad primary. But the PC wouldn’t POST that way, so eventually got that straightened out (the VGA LED did its job). The third stumbling block wasn’t a mis-step, it was more of a design flaw in the MSI board. It wouldn’t start up with more than 2 of the 4 orignal RAM modules (32 GB each) in place. That was a pure trial-and-error exercise.
All the Stops along the Way…
I also had to flash the UEFI (though they still call it BIOS flashing) before I could get past recognizing the CPU. This works with neither CPU nor GPU installed, from a specially formatted USB 2 flash drive. It’s like magic that the board can DIY this process, but it worked like a champ. From that point on, I moved from one proper set-up step to the next. CPU first, GPU second, and proper RAM configuration last.
Note: getting the RGB connector to seat properly on the mobo pins was the most physically challenging part of the build. Close second was working with RAM modules right up against the massive ThermalWright Assassin CPU cooler. But it all got sorted, by guess and by gosh.
Eventually (around 6:30 PM Saturday), I got the setup to boot and it took me straight into Windows, running the same image I’d been using on the old ASRock mobo. Boy, was I relieved to see that happen. And now, for some clean-up notes and good news. Read on…
Booting into Windows, and Beyond…
Once I got into Windows, I had to adjust for the mobo change. To activate Windows 11 Pro, I had to re-enter the same MAK it had already been running on (who knew?). To switchover from the old ASRock to the new MSI drivers, the system loaded an MSI Center app. It cheerfully offered to load “all” necessary drivers, but gave me control over which ones I chose. Needless to say, I skipped the fluff and stuck to device drivers and useful utilities only.
Then I ran Settings > Windows Update, which caught up other key drivers. A fresh run of the Logi app brought back my wireless mouse (I’d been forced to plug in a wired mouse during set-up because I mistakenly grabbed an MS wireless mouse instead of the Logi model, LOL).
Checking Secure Boot and CA-2023
The following image triumphantly confirms that with the current UEFI and recent MS updates in place, Secure Boot and certificates took care of themselves. I didn’t have to do anything!!!
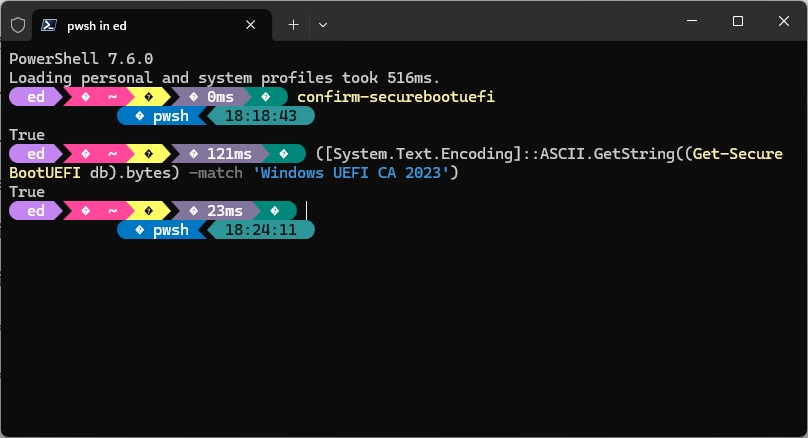 The first PowerShell (PS) command [confirm-SecureBootUEFI] shows it’s in place and working. The second PS command tells me that CA-2023 is in place and in use. That was really the whole reason for the mobo switch, so I’m tickled to death it worked like it was supposed. Added bonus: I can restart, shutdown, and even use “shift+(Settings > Power Button > Restart) to get into the Windows Recovery (WinRE) environment. In short, Windows boot now works just like it should, and Secure Boot is properly doing its thing.
It was a long time coming, and cost me US$150 for the MSI mobo. But God: it was worth it. Case finally, finally closed. I’m thrilled!!!