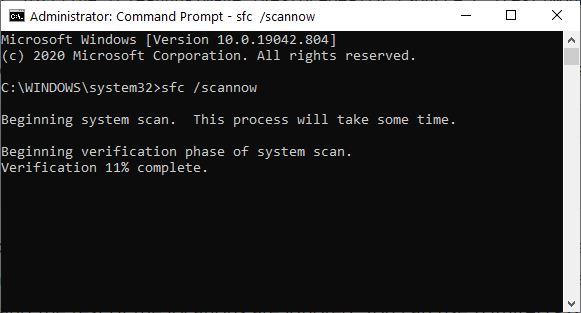
Category Archives: Win7View

Notes on Windows 7, Win7 compatible software and hardware, reviews, tips and more.

{WED} KB4554364 Illustrates MS Catalog Update Install

One week ago today (March 30), MS released an optional update KB4554364 through the Microsoft Update Catalog. This update is discretionary (though it will probably get rolled up into the next Update Tuesday on April 14). The update was released specifically to address reported issues with certain VPNs and with Internet connectivity problems for certain applications. If one has no such problems, it’s not necessary to install KB4554364. I just went ahead and did it anyway on one of my PCs. Why? Because the process of installing KB455364 illustrates MS Catalog Update install actions and behavior. That’s the subject for today’s blog post, in fact.

To begin the process, one must download the update from the MS Update Catalog. The entry for the 64-bit 1909 version of this item provides the lead-in illustration for this story. If you click the download link at the far right, you’ll be prompted to confirm that download in a pop-up window. Note: this download is named windows10.0-kb4554364-x64_0037f0861430f0d9a5cea807b46735c697a82d0c.msu. The file extension at the end of the file name — .msu — indicates it will call the Windows Update Standalone Installer to install itself. Careful inspection of the filename shows it identifies numerous aspects of the update involved:

  • windows10.0 identifies the operating system target as Windows 10
  • kb4554364 identifies the governing knowledge base article that describes this particular update
  • x64 identifies that the update is for 64-bit OSes
  • the long string of digits is a globally unique identifier (GUID) for this particular self-installing update file
  • the .msu file extension, as already mentioned, indicates that this file calls on the Windows Update Standalone Installer to apply the update(s) it contains. Some updates come in the form of cabinet (.cab) files. I’ll explain how to install those in the concluding section of this blog post

Step 2: KB4554364 Illustrates MS Catalog Update Install with Installer Start-up

To launch the self-installing update file, double-click it in File Explorer, or right-click and select “Open” from the pop-up menu. This launches the Windows Update Standalone Installer, depicted in the following screencap:

When the Windows Update Standalone Installer starts up, it asks you to confirm installation of the targeted update (KB4554364, in this case). Click “Yes” to fire off the update process.

Step 3: KB4554364 Illustrates MS Catalog Update Install with Update Installation

First, a status window appears that indicates the Windows Update Standalone Installer has begun its work. As you can see it report that is is “Initializing installation…”

Once the intialization phase is complete, the Standalone Installer reports that it is installing the specified update (KB4554364)

This takes some time to complete, but eventually you’ll see a report that the update installation has completed

At this point, the update won’t take effect until the host PC is restarted. Thus, you have the option of forcing an immediate restart (click the “Restart now” button). OTOH, if you have unsaved or unfinished work on that system, or aren’t yet ready to restart, click the “Close” button and keep on computing. You can manually restart later at a more convenient time, or the PC will automatically restart when the next eligible restart time window comes around.

Installing Cabinet Files from the Windows Update Catalog

You can use the DISM command to install .cab files downloaded from the catalog. I find it easiest to shift right-click the download entry in File Explorer, then use the “Copy as path” option from the pop-up menu. As an example, I just did so with the .cab file named "C:\ProgramData\Package Cache\{CE83D0BD-418A-F3D1-D6CE-687E96D1EBD0}v10.1.17763.132\Installers\ff8dd5a961e46b5d05906ac4b7a5ba37.cab" purely for illustration. The proper DISM syntax is:

dism /online /add-package /packagepath:path-spec

Thus, for the preceding path specification, this becomes:

dism /online /add-package /packagepath:C:\ProgramData\Package Cache\{CE83D0BD-418A-F3D1-D6CE-687E96D1EBD0}v10.1.17763.132\Installers\ff8dd5a961e46b5d05906ac4b7a5ba37.cab

If the path specification includes any spaces, leave the quotation marks around that string. Otherwise, as you see above, it’s OK to remove them. This will apply an update-package in .cab format to your current, running Windows image.

Cheers!

Facebooklinkedin
Facebooklinkedin

{WED} Watch SSD TRIM Work Using Optimize-Volume PowerShell Cmdlet

I can’t help it. I *LOVE* this kind of stuff. I just learned that with the right syntax, you can watch SSD TRIM work using Optimize-Volume PowerShell cmdlet. The TRIM operation on an SSD erases data blocks that are no longer in use. Then, it returns them to the pool of available blocks for re-use.

According to SearchStorage.TechTarget “The use of TRIM can improve the performance of wriitng data to SSDs and contribute to longer SSD life.” I just counted. Of the 10 drives I have installed on my production PC, 4 of them contain SSDs. That said, one of them uses a dual RAID controller for 2xSamsung EVO 250 SSDs. I just learned it doesn’t support the TRIM operation (which is good to know, all by itself). All three of the others TRIM works just fine. (These are: my boot drive, my work data drive F: OCZ3-120 and my scratch drive G: ScratchSSD.) When I tried to TRIM the L: DualSam2 drive, here’s what the cmdlet told me:

Watch SSD TRIM Work Using Optimize-Volume PowerShell Cmdlet.notrim

Because the L: drive uses a Syba Dual mSATA to SATA RAID controller, it doesn’t support the TRIM operation. Sigh.
[Click image for full-sized view.]

How-to: Watch SSD TRIM Work Using Optimize-Volume PowerShell Cmdlet

The syntax for the cmdlet is pretty straightforward, but the good stuff appears in the output it produces in verbose mode. I’ll show an illustration first, then spell that syntax out in detail.

Watch SSD TRIM Work Using Optimize-Volume PowerShell Cmdlet.ReTrim

Unless you enable verbose mode, Optimize-Volume runs silently. The space trimmed value is usually within 1-2 GB of the free space value.
[Click image for full-sized view.]

The command syntax is
Optimize-Volume -DriveLetter X -ReTrim -Verbose

Substitute the actual drive letter you wish to optimize for the italic X in the syntax example, as I did for drive F in the preceding screencapture (e.g.Optimize-Volume -DriveLetter F -ReTrim -Verbose). It will also do a nice little progress bar animation while the operation is underway, too.

How-to: Use the -Analyze option to See if a Drive Needs Optimization

One more thing. If you replace the -ReTrim option with the -Analyze option for the Optimize-Volume cmdlet, you’ll get another set of verbose output that shows analysis activity and then reports on what it finds. Here’s what this command said for my unTRIMmable L: DualSam2 drive, just for grins:

Watch SSD TRIM Work Using Optimize-Volume PowerShell Cmdlet.Analyze

Unless you enable verbose mode, Optimize-Volume runs silently. The space trimmed value is usually within 1-2 GB of the free space value.
[Click image for full-sized view.]

The regularly scheduled drive optimization task occurs on Windows 10 machines weekly, so I didn’t expect to see anything out of the ordinary. That said, this is one of those cases where it’s more fun to watch the tool work than it is to know it’s working silently in the background. Enjoy!

Here’s a link to the MS DOCs documentation for the Optimize-Volume cmdlet. It has more info, examples, and covers other cmdlet capabilities I didn’t mention here.

Facebooklinkedin
Facebooklinkedin

{WED} Check Out MS News Bar Beta

MS has released a new news app through the Microsoft Store. Those interested in a new look for the MS newsfeed will want to check out MS News Bar Beta release. It strikes me as an improvement over the default MSN news pages that come up in Edge. There’s also considerably more control over how (and where) this News Bar appears on your desktop, too. And it can be dismissed instantly with a click on its minimization control when you want to get it out of the way. My opinion: the News Bar is worth downloading and playing around with. It’s a useful tool during this current news-hungry pandemic WFH situation we now live in. Here’s a look at its Appearance pane, from the app’s Settings controls:

Check Out MS News Bar Beta.appearance

The News Bar’s Settings are simple and straightforward. Took me a couple of minutes to work through them, and decide what I liked.
[Click image for full-sized view.]

Download from Store to Check Out MS News Bar Beta

The app is readily available as a free download from the Microsoft Store. Or visit the Store, and search on “News Bar Beta.” It will pop right up. The download is just over 75 MB in size, and takes only a short while to download and install. As the preceding screen cap illlustrates, its controls are both simple and intuitive. After messing about a little while, I chose to position the News Bar at the top of my Primary (#1) Display in Image format. Here’s what a snippet of that looks like, from the left-hand-side of the screen. (It’s about 1/3 of the total display width, but I didn’t want to shrink the thumbnails down TOO much for reproduction here):

---------    ---------    ---------    ---------
| TN 1 |    | TN 2 |    | TN 3 |    | TN 4 | . . .
---------    ---------    ---------    ---------

You can switch between text and images views for newsfeed stories to see a representative photo (image) or a brief description (text).
[Click image for full-sized view.]

[Note added March 15, 2024] Upon receipt of a demand letter from a Canadian firm named PicRights International for US$1,334 for use of two of the five images previously shown above, I replaced those purely illustrative and news reporting images with boxes showing symbolic thumbnails, e.g. TN1, TN2, and so forth. That’s all I meant to convey anyway. IMO such inclusion falls squarely under “fair use” doctrine because I was reporting and showing something about a new Microsoft app by way of explaining what it was and what it showed.

[Note:] Thanks to Nayan at WinCentral for bringing this new (beta) app to my attention in his post “Microsoft bringing ‘Windows News Bar’ to Windows 10 as the on-desktop news source.”

Facebooklinkedin
Facebooklinkedin

{WED} Winkey R Directly Accesses Settings Pages Using URIs

Here’s another item under the “I didn’t know you could that in Windows 10” heading. This time, it’s a series of shortcut commands to access the vast majority of panes within the Settings UWP app. That’s right: if you open the Run Box, Winkey R directly accesses settings pages using URIs. Thus, for example simply typing ms-settings: in the run box opens the home page for the settings app. Things in this realm are a little tricky though, because not all of these strings are predictable. Thus, for example ms-settings:network launches the Network & Internet home pane. But neither ms-settings:system nor ms-settings:devices gets you past the home page for Windows Settings. This is more of a recipe or incantation, then, than it is a predictable use of obvious strings. What’s a power user or admin to do?

Winkey R Directly Accesses Settings Pages Using URIs.nodevices

Looks like a reasonable guess, but doesn’t work as you expect (you get the Home page shown at the top of this story, instead of the Devices pane).

Details for Winkey R Directly Accesses Settings Pages Using URIs

There’s a “magic reference” available in Microsoft DOCs that provides the necessary collection of usable strings. They’re organized by category, alphabetized (Accounts, Apps, Cortana, Devices, and so forth). Find them in a subsection of a document entitled Launching, resuming and background tasks named Launch the Windows Settings app. I forbear from reproducing the full list of entries you can find in this document, because there are over 200 strings that start with ms-settings: that you can use in the Run box to produce any of a plethora of Settings panes and pages.

Instead, I suggest you bookmark the link to the Launch the Windows Settings app page, and spend some time getting to know its contents. There’s a lot of useful stuff in there, so your investment of time and in play/experimentation should be amply rewarded. Good stuff, in fact!

[Note:] Once again, thanks to Sergey Tkachenko for posting an item on this topic at WinAero.com. It’s entitled MS-Settings Page List of URI Shortcuts in Windows 10. Most of it recites the strings that work in the Winkey-R/Run box environment. As you chew it over, I hope you’ll see why I pointed to the master reference at MS DOCs instead. Sigh.

Facebooklinkedin
Facebooklinkedin

Identify Active Win10 Network Adapter

I’m a big fan of the long-deprecated Windows Gadgets, which date back to the Vista era. Thanks to excellent work from Helmut Buhler (@8GadgetPack on Twitter) you can download his 8GadgetPack quickly and easily. This morning, however, I noticed that the Network Meter gadget was not reporting on network activity. Closer inspection showed two different network adapters queued up: one for outbound traffic, one for inbound. I knew this had to be wrong, because I’ve got an RJ-45 cable plugged into only one of the two GbE interfaces on my production PC. “But which one is active?” I asked myself. And that’s how I needed to identify active Win10 network adapter on my PC, to put the gadget back to work. Here’s what I saw in Network Monitor, to begin with:

Identify Active Win10 Network Adapter.netmon-nada

With no traces to indicate network activity, despite an assigned IP address, I knew Network Meter was checking the wrong NIC.

Which Tools Identify Active Win10 Network Adapter?

Turns out you have a lot of choices to identify the active network adapter on a Windows 10 PC. I found 4 methods very quickly, and all agreed that the Intel I211 adapter was handling my active Ethernet connection. Here’s a snippet of what I saw in Settings → Network & Internet → View your network properties. Or, you can right-click the network icon in the notification bar, and select Open Network & Internet settings as an alternate entry point.

Identify Active Win10 Network Adapter.settings

Alas, one must scan to the bottom of this verbose collection of info to see “Connected to Internet,” which is what I was looking for.

This showed me that of the two NICs present on this motherboard — an Intel I211 GbE and an Intel I219V — the I211 was the active interface. But plenty of other method presented to me to provide this information, including:
1. NirSoft’s AdapterWatch tool, which presents the data in a horizontal table, and makes status obvious with an Operational Status value of “Operational” for the I211 and “Non Operational” for the I219V (not to mention the presence of IPv4 addresses for the active one, and none for the other).
2. The PowerShell cmdlet get-NetAdapter showed me everything I needed to know in compact, easy-to-read form.
3. Gabe Topala’s SIW Home (a subscription favorite for which I’ve been paying $49 a year for 10 instances for over a decade now) shows the I211 as “Connected” and the I219V as “Disconnected.”

Of these other methods, I’ll probably use the PowerShell get-NetAdapter method going forward should I find myself in this boat again. I can launch PS7 using the Winkey-X key sequence, and type the cmdlet name lickety-split. Here’s what it shows me:

Identify Active Win10 Network Adapter.ps7-getnetadap

Quick to run, easy to read, immediate access to the relevant status (“Up”). Works for me!
[Click image for full-sized view.]

Acting on the Information in Network Monitor

With the information that the I211 was connected to the Internet, I jumped into the Network Monitor’s controls and made sure it was selected under the “For Speed” and “For Internal IP Address” fields. I also turned off auto-detect and selected “Wired Network” as my Network Type. Immediately afterward, the gadget started working again, like so:

Identify Active Win10 Network Adapter.netmon-working

OK then: that’s what I’m after. Active download (yellow) and upload (green) traces on the timeline, and count values below.

Fixed!

Facebooklinkedin
Facebooklinkedin

When Driver MIA After Upgrade Try Pick from a list…

My Lenovo X380 Yoga constantly presents me with the same problem after each Feature Upgrade. And because that PC is hooked into the Fast ring for Insider Previews, that means it happens once every week or two. Instead of a working Synaptics WBDI-SGX fingerprint reader. I get a yellow exclamation point in Device Manager for that item. Further detail indicates it was unable to load the device driver properly. After long and repeated experience with this error, I’ve learned that the following “click sequence” will set things right. First, I right-click into Update drivers → Browse my computer for drivers → Let me pick from a list of available drivers… Only one driver shows up as a result, and it’s the very one I need. That why I say when driver MIA after upgrade try Pick from a list… Here’s what that looks like:
When Driver MIA After Upgrade Try 'Pick from a list...'

Click the desired entry to highlight, then click Next to install that driver. When there’s only one entry, there’s only one possible item to choose, too.
[Click image for full-sized view.]

If When Driver MIA After Upgrade Try Pick from a list… Doesn’t work

Of course, it’s not always this easy to fix an MIA driver following a feature upgrade. That’s why it’s a good idea to use DISM to export your current (presumably working) set of Windows 10 drivers before a major upgrade. My good friend and Win10.Guru partner Kari the Finn explains all this in a TenForums tutorial. It’s entitled DISM — Add or Remove Drivers on an Offline Image, and addresses the important stuff in Step Two: Get drivers: Export. That might do the trick, as long as you (or Windows) can recognize the right sub-folder to search for the good stuff.

On a Lenovo laptop, you can also grab drivers from their Support pages . Shoot! Their Vantage app may be able to find and install the missing item for you, using its System Update function. Or you can search for the driver manually. This takes me to a Fingerprint reader page, where I see the Synaptics WBDI device that I need.

When Driver MIA After Upgrade Try 'Pick from a list...'

If all else fails, I can always grab the driver from the Lenovo download pages.
[Click image for full-sized view.]

Facebooklinkedin
Facebooklinkedin

{WED} Windows 10 Power Options Include NVMe Idle Timeout

Here’s another factoid that falls under the heading of “I didn’t know Windows 10 could do that.” In this case, the particular widget in question is Power Options (Control Panel). The right PowerShell command or its equivalent Registry tweak makes an NVMe item appear. Actually, this item occurs under the Hard Disk entry. Its full name is Primary NVMe Idle Timeout (see below). In fact, it defines an idle timeout value for an NVMe SSD in the boot/system role.  Hence my post title: Windows 10 Power Options Include NVMe Idle Timeout. Here’s how it looks:

Windows 10 Power Options Include NVMe Idle Timeout.nvme-info

Until you enable this attribute (PowerShell) or set the right RegKey value, you won’t see this in Power Options.

In case you didn’t already know, NVMe stands for Non-Volatile Memory Express. Usually, it’s a kind of flash memory that might be a solid state disk (SSD), a PCIe add-in card, an M.2 card, or something similar. NMVe is incredibly popular because it’s fast and increasingly affordable. Nearly all of my newer systems boot from an NVMe drive. Lots of vendors make NVMe drives. Right now, my systems include such drives from Samsung, LiteOn and Toshiba.

Make Windows 10 Power Options Include NVMe Idle Timeout

In fact, to see this entry in Power Options, you must reverse Windows 10’s default setting. Thus, the operative part of the command string reads -ATTRIB-HIDE. The minus sign does the magic that makes the entry appear. You can cut and paste the whole string (shown below)  into PowerShell. For illlustration, it’s also shown in the screencap that follows the command-line text input.

powercfg -attributes SUB_DISK D639518A-E56D-4345-8AF2-B9F32FB26109 -ATTRIB_HIDE

Windows 10 Power Options Include NVMe Idle Timeout.ps

Entering the command gives zero feedback, but the change shows up immediately in Power Options.
[Click image for full-sized view.]

 The following command string makes this NVMe entry invisible in Power Options:

powercfg -attributes SUB_DISK D639518A-E56D-4345-8AF2-B9F32FB26109 +ATTRIB_HIDE

Of course, the only difference is the plus sign in the final command element. The preceding value is a GUID for this particular Power Options setting.

Do It in the Registry, If You Prefer

The name of the corresponding registry key is, in fact, the afore-cited GUID. The highlighted Attributes value controls if the NVMe item is visible in Power Options. Here again, a value of 0 makes the option visible; 1 makes it disappear. String alert! The fully-qualified registry key name is:

HKLM\SYSTEM\CurrentControlSet\Control\Power\PowerSettings\0012ee47-9041-4b5d-9b77-535fba8b1442\d639518a-e56d-4345-8af2-b9f32fb26109

Just for the record, HKLM is a common abbreviation for HKEY_LOCAL_MACHINE. For better visualization, here’s a screencap of all that good stuff:

Windows 10 Power Options Include NVMe Idle Timeout.regedit

The complete registry location occurs just below the command menu line, and includes two (2) GUIDs in its path.
[Click image for full-sized view.]

Once again, a value of zero (0) for Attributes means the NVME timeout item shows up in Power Options. A value of one (1) means it’s hidden.

Does NVMe Idle Timeout Really Matter?

Looking at the default value (200 ms), I’m inclined to think not. That’s so fast that altering the value won’t affect the PC much (or at all). But it’s always interesting to learn something new about Windows 10. There’s a lot more going on in general, and in Power Options, than one might think. And who knows? Someday, this tidbit may come in handy.

[Note] Thanks, Sergey Tkachenko/WinAero.com for covering this topic. He posted on this topic sometime in the last 24 hours. (Alas, his posts aren’t dated.) Check it out: it’s entitled Add Primary NVME Idle Timeout to Power Options in Windows 10. Bolshaya spaciba, Sergey!

Facebooklinkedin
Facebooklinkedin

{WED} Diagnosing Dead Windows 10 USB Flash Drives

I’ve probably owned 100+ USB Flash Drives (UFDs) over the years. In that entire time, I’ve had exactly three of them fail. My most recent failure occurred on Monday (March 16). This happened as I tried to build a 1909 bootable installer using the Media Creation Tool. The OS  downloaded successfully. But before the UFD finished building, MCT errored out (“There was a problem running this tool” as shown below). After a second failed try, I found myself diagnosing dead Windows 10 USB flash drives. This time around, the death was irreversible and indisputable. I’ll explain what I found so others can benefit from this experience.

Diagnosing Dead Windows 10 USB Flash Drives.wct-error

The error message doesn’t identify media as the problem explicitly, but it clearly identifies a problem and it fails to complete.
[Click image for full-sized view.]

Error Message Helps Diagnosing Dead Windows 10 USB Flash Drives

The error code is 0x80042405, so I turned to the Microsoft Error Lookup Tool for more information. The following PowerShell session screencap shows what it told me, which was both interesting and mysterious.

Diagnosing Dead Windows 10 USB Flash Drives.melt-output

Error message lookup reports a problem with the target disk, with key term “unsupported configuration.”
[Click image for full-sized view.]

I got my next real clue when I tried to find the UFD in Disk Management. It failed to finish loading until I removed the UFD. Obviously, it was having issues recognizing the drive. Then I loaded up MiniTool Partition Wizard (MTPW) and got the following information: “Bad disk.”

Diagnosing Dead Windows 10 USB Flash Drives.bad-ufd

MiniTool Partition Wizard calls out the UFD’s condition as a “bad disk.” That can’t be good!
[Click image for full-sized view.]

None of MTPW’s built-in facilitiees — partition recovery and data recovery, to be more specific — could find any files on the device. There was no path to recovery or reformatting at all. As a last ditch effort, I tried HDD Guru’s HDD LLF Lower Level Format tool (aka HDDLLF.4.40.exe). It couldn’t do anything with the UFD, either. To me that proves conclusively that this UFD is dead, dead, dead. End of story, except to observe that I paid less than US$10 for this 16GB Mushkin ATOM device, so it’s a tolerable loss. Next!

Facebooklinkedin
Facebooklinkedin

{WED} Microsoft Technet Gallery Retires June 2020

Here’s an interesting news item. On March 9, Robert Outlaw, Lead Program Manager, Docs.Developer Experience posted the immanent retirement of the Microsoft Technet Gallery. This is a long-time “public space” in the Microsoft DOCs web pages. Here, Microsoft MVPs, developers and community members have made a collection of over 25,000 PowerShell scripts for all and sundry server and desktop management tasks. But according to Mr. Outlaw, the Microsoft Technet Gallery retires June 2020. As the snippet at the head of this story says, the exact date for retirement is still TBD.

Technet Gallery Retires June 2020
Technet Gallery retirement post header info

[Click here for full-sized view.]

If Microsoft Technet Gallery Retires June 2020, Then What?

Having just delved into a Wayback Machine site snapshot from March 16, 2020, I see that the site is HEAVILY archived there. In fact, I couldn’t find a single page that wasn’t already present in that online archive. Interestingly, getting to the leaf (script) level in the Technet Gallery is like time travel. That’s because you’ll go back to the latest update to the script page itself when you navigate that far in the gallery. Thus, for an AD script named List all groups or users in an OU, I found myself back to October 2015.Under Networking, a NAT Detection script links to a September 2015 page.

I could go on and on, but I’m sure you get the idea. It is: while you may not be able to access the Technet Gallery pages live through Microsoft Docs come June 2020, that’s not really a problem. You’ll still be able to get to the archive through the Wayback machine. As far as I can tell, what’s available there is a full, faithful and complete copy of the whole shebang. Simply change your favorite for this valuable scripting resource to the last, best and final Wayback Machine snapshot taken just before MS pulls the plug. That way, you’ll retain access to its contents. When MS announces that date, I’ll provide a link to that ultimate snapshot as an addendum to this blog post.

Stay tuned!

[Note:] Here’s a shout out to Martin Brinkmann at ghacks.net. His story Microsoft announces retirement of the TechNet Gallery (and all its scripts) clued me into this upcoming retirement. Thanks, Martin: immer nochmals “Vielen Dank!”

Facebooklinkedin
Facebooklinkedin

{WED} Freezing Visual Basic Signals Impending EOL

Surprise! An interesting item showed up on the Microsoft Devblogs on March 11 (Wednesday). Innocuously enough, it’s entitled “Visual Basic support planned for .NET 5.0.” To begin, the story explains that Visual Basic will get a bunch of capabilities to support .NET 5/.NET Core. Next, it proffers a list of new application types, and benefits of long-term stability. Then comes an interesting paragraph. Its import is that MS freezing Visual Basic signals impending EOL (End-of-life) for this language. Here’s what I’m talking about. (I added the bold emphasis):

Going forward, we do not plan to evolve Visual Basic as a language. This supports language stability and maintains compatibility between the .NET Core and .NET Framework versions of Visual Basic. Future features of .NET Core that require language changes may not be supported in Visual Basic. Due to differences in the platform, there will be some differences between Visual Basic on .NET Framework and .NET Core.

Freezing Visual Basic Signals Impending EOL.oldlogo

Here’s what the Visual Basic (aka VB) logo looked like back in the day. Microsoft Basic first appeared as Altair Basic in 1975!
[Click image for full-sized view.]

What Freezing Visual Basic Signals Impending EOL Really Means

Once upon a time, Bill Gates dropped out of Harvard to jump into computing. He and a Seattle friend, Paul Allen, founded Microsoft on April 4, 1975. Their very first product was a BASIC interpreter for Altair 8800 microcomputer. Later its name became Microsoft Basic. Later still, that changed to Visual Basic. And now, the end of its continued growth and support is in sight.

Gosh! Talk about the end of an era. In fact, it’s more like the the end of one universe, and the beginning of another. Honestly, I see it as a telling sign — amidst a raft of other, similar but lesser signs. Thus, there’s no doubt that Microsoft has reinvented itself completely. Azure and the cloud really do rule this roost, and that’s where Microsoft now lives. The rest of us are just catching up.

Personally, my first encounter with Basic came as a CompSci grad student at UT Austin in 1979. Many years later, I helped teach 5th and 6th graders Microsoft Small Basic at Cactus Ranch Elementary. This happened in 2015 and 2016 through their programming club. (In fact, my son was a participant, and I wanted to help out.) To me, it’s ironic that the URL for Small Basic is https://smallbasic-publicwebsite.azurewebsites.net/. The new already encapsulates the old. Soon, the new will leave the old behind completely. All I can say is: Wow!

Facebooklinkedin
Facebooklinkedin