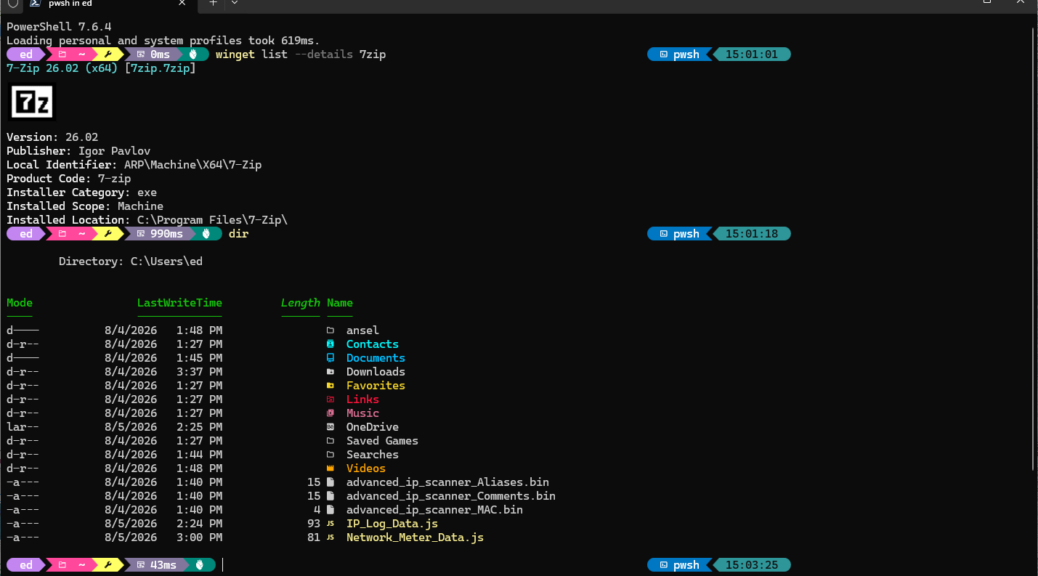
Having just restored the ThinkStation P3 Ultra Gen 2 to a clean, plain-vanilla Windows 11 image, I’m now tweaking things to make them comfortable and right. One of my primary targets for improvement is the command line. In turn, that has me spiffing up P3 Ultra WinTerm to get things the way I like them.
What Spiffing Up P3 Ultra WinTerm Entails
What follows is the four-layer stack I put together on the P3 Ultra to make Windows Terminal customization actually mean something. You can see the results in the lead-in screenshot above: a segmented Oh My Posh prompt, a rendered 7-Zip application icon courtesy of winget sixels, and a gloriously color-coded directory listing from Terminal-Icons. Here’s how it all fits together.
WinTerm Customization: Font Foundation
The very first thing I do after any clean Windows install — before the wallpaper, before the taskbar tweaks, before I remember I’m supposed to be “keeping it minimal” — is set up a proper terminal environment. On the P3 Ultra running 25H2, that meant opening Windows Terminal and immediately confronting the default Cascadia Mono font, which is fine in the way that a gas-station sandwich is fine. It works. You’re not going to brag about it.
The secret to this entire Windows Terminal customization stack is that absolutely everything else — the Oh My Posh prompt glyphs, the Terminal-Icons file badges, the whole visual language — depends entirely on a Nerd Font being the active terminal font. Without one, every single glyph-based feature renders with less pizazz. You get a terminal that looks like it’s having a small crisis. Not the aesthetic I’m going for.
My pick is CaskaydiaCove Nerd Font Mono v3.4.0 — the Nerd Fonts project’s officially patched version of Microsoft’s own Cascadia Code. That lineage matters. indeed, it looks completely native in Windows Terminal because it essentially is Cascadia Code, just supercharged with 10,000+ additional Nerd Font glyphs packed into the private-use Unicode ranges.
I installed it per-user to %LOCALAPPDATA%\Microsoft\Windows\Fonts, then promoted it system-wide since the P3 Ultra session was already running elevated. One JSON edit in Windows Terminal settings (hit Ctrl+Shift+, to open the file directly), setting “face”: “CaskaydiaCove Nerd Font Mono” inside profiles.defaults.font, and that foundation is laid.
OMP Puts Prompts Right
Oh My Posh (OMP) is the tool that turns my drab PS C:\Users\ed> prompt into a segmented, information-dense status bar that actually tells me things I want to know. In my current setup — visible in the screenshot — the left side shows my username (ed), the current directory, a key glyph, the terminal icon, and the last command’s execution time. The right side displays the shell name (pwsh) and a live clock. It looks and feels sharp. Frankly, it’s the main reason I get excited about a new terminal setup.
Speaking of execution time: the screenshot shows a 0ms result for a quick winget list –details 7zip run, which is gratifying. Less gratifying but no unexpected is the 990ms that appears on the subsequent dir command. That’s Terminal-Icons loading its full icon map on first call, not OMP behaving badly. Well. Mostly not OMP behaving badly. The 990ms is the price of a pretty terminal, and I have decided it is worth it in the same way I decided heated seats were worth it when I bought my last car. Once you have the temperature drops below freezing, the idea of going without feels almost uncivilized.
OMP installs cleanly via winget with winget install JanDeDobbeleer.OhMyPosh. Then, getting it running in PowerShell 7.6.4 (the version running on the P3 Ultra, as you can see in the startup banner in the screenshot) takes exactly one line added to your $PROFILE. That’s an oh-my-posh init pwsh call pointing at your chosen theme JSON. That’s it. Minimal friction, maximum visual payoff.
Winget Icons: Sixel Graphics Come to Life
Here’s the one that still makes me do a small double-take every time I see it: that 7-Zip logo in the terminal is not ASCII art. It is not a colored block approximation. It is the actual, rendered 7-Zip application icon, displayed as a real bitmap inside the terminal window, courtesy of sixel graphics support added to winget in Preview build 1.29.50 and later.
| Important: Two Different Settings Files
Enabling sixels requires editing winget’s own settings file — opened with winget settings — not Windows Terminal’s settings.json. These are two entirely separate JSON files. Editing the wrong one produces a very confusing non-result, and I say that with the authority of someone who absolutely did exactly that on the first attempt. |
Once you’re in the right file, the change is simple: add “visual”: { “enableSixels”: true } to the JSON, do a full restart of Windows Terminal (not just a new tab — a full close and reopen), and then run –winget list -details [packagename] to see the icon appear. Coverage is currently somewhere around 25–30% of installed packages — Win32 (exe/msi) apps show icons reliably. MSIX packages mostly don’t yet. But seeing 7-Zip’s logo materialize in a terminal window never quite gets old.
Terminal-Icons: Color-Coded Dir Listings
The final piece of the stack is Terminal-Icons. This PowerShell module by Brandon Olin transforms your Get-ChildItem output from a monochrome wall of filenames into a color-coded, glyph-annotated directory listing .. Bonus: it’s easier to scan at speed. Folders get folder glyphs in teal. JavaScript files get the JS badge in orange. Binaries, config files, images, and scripts each get their own visual treatment, all driven by the Nerd Font glyph library that CaskaydiaCove Nerd Font Mono v3.4.0 provides.
Installation requires a single PowerShell line: Install-Module -Name Terminal-Icons -Repository PSGallery -Force. Permanent activation requires adding Import-Module Terminal-Icons to your $PROFILE. After that, dir, ls, and Get-ChildItem all pick up the icons and colors automatically — no further configuration needed. It simply works, which in my experience is not always a given with PowerShell modules.
OK, I’m Happy Now…
Installing this stack — CaskaydiaCove Nerd Font Mono, Oh My Posh, winget sixels, and Terminal-Icons — took me about 10 minutes. The result is exactly what you see in that lead-in screenshot: a terminal that looks like it means business, with a prompt that tells me what I need to know, icons that let me spot my packages and files at a glance, and one very satisfying 7-Zip logo that I have already shown to more colleagues than strictly necessary. It is, as I said to myself at the time, a very spiffed-up terminal. Round Rock, TX never looked so good from a command line. Here in Windows-World, I count that as an accomplishment, of sorts…

